Pinterest is a great way to share your website’s content and attract more visitors. In our experience, you can unlock even more benefits by verifying your website on Pinterest.
When you verify your website, Pinterest knows it is really you. This gives you access to special tools like website analytics so you can see what is popular. You will also be able to run ads and access detailed information about how people interact with your content.
This article will show you how to easily verify your WordPress website on Pinterest.
Why Should You Verify Your WordPress Site on Pinterest?
Pinterest is one of the most popular social media platforms for sharing photos, videos, and other visual content. It allows you to create an account and manage your images like Instagram or Flickr.
It also allows other users to collect website links and other visual content by creating boards.
If you are running a photography website or any other type of blog with images and videos, then Pinterest can be an important source of traffic.
Verifying your website on Pinterest will help you learn more about your visitors using Pinterest Analytics. You will also be able to participate in their ad program and plan a strategy to grow your Pinterest traffic.
That being said, let’s take a look at how to easily verify your WordPress blog on Pinterest.
How to Verify Your WordPress Site on Pinterest
Before we start, you will need to upgrade your Pinterest profile to a business account. This will allow you to use all their Pro tools like analytics, ads program, and more. The Pinterest business account is free and easy to set up.
Then, let’s get started.
Video Tutorial
If you’d prefer written instructions, just keep reading.
Step 1: Upgrade Your Pinterest Account to Business
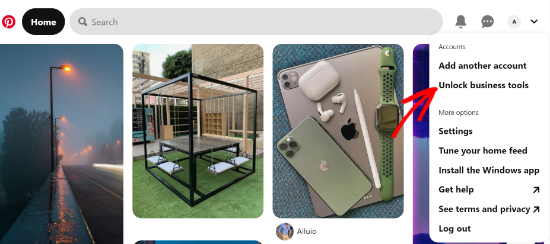
First, you need to log in to your Pinterest account and click on the down arrow in the top right corner of your screen. Next, click on the ‘Unlock business tools’ option.
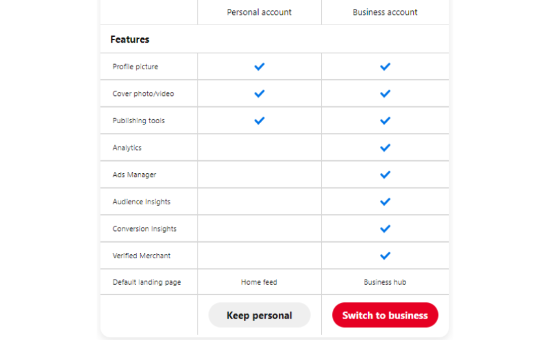
On the next screen, you will see a list of features the business account will offer.
To upgrade your personal account and use these features, click the ‘Switch to business’ button.
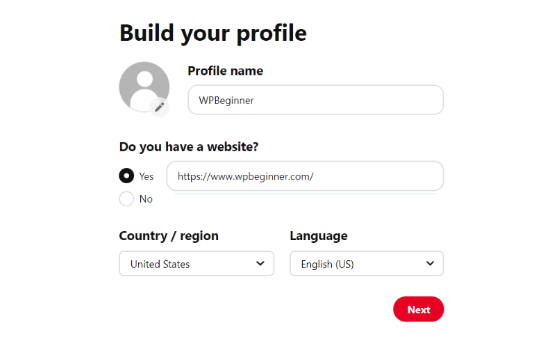
After that, enter your business account details like a profile name, website URL, country, and language.
Once you have entered all these details, click the ‘Next’ button.
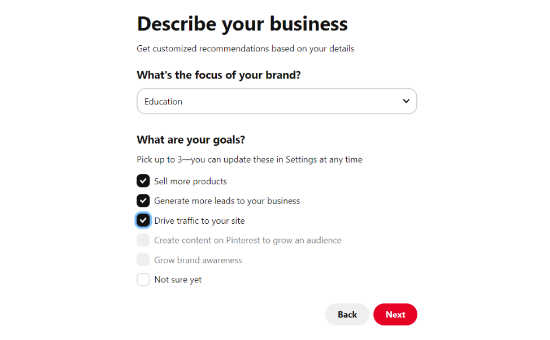
Pinterest will now ask you to describe your business. You can select an industry from the dropdown menu and pick 3 goals from the given options.
After that, click the ‘Next’ button.
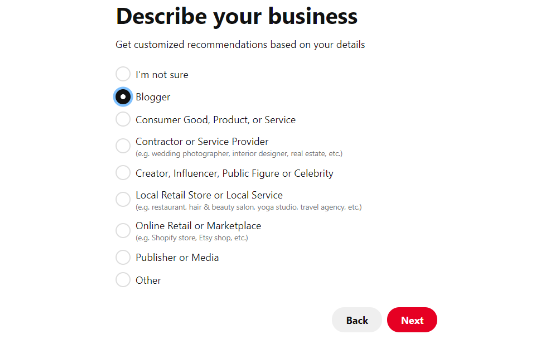
On the next screen, you will be asked to select an option to get customized recommendations.
Once you have done this, make sure you click the ‘Next’ button.
Now, you will be asked to select an option if you are interested in advertising on Pinterest and then click the ‘Next’ button.
For this tutorial, you can select the ‘No, I am not planning to advertise’ option.

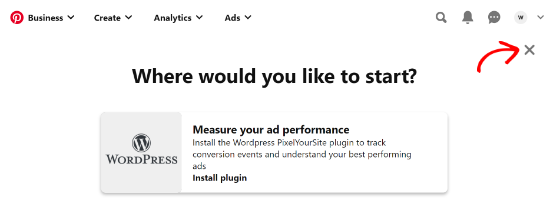
Next, Pinterest will show you different options to get started with your business account.
You can click the ‘cross’ icon in the top right corner to skip this part.
Step 2: Claim Your Website on Pinterest
The next step is to claim your website on Pinterest.
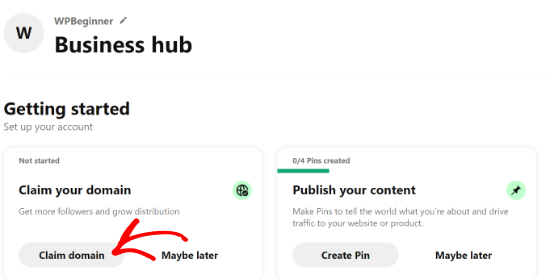
To do that, you can click on the ‘Claim domain’ button from your Pinterest Business hub page, and it will directly take you to the claim settings page.
Another way to claim your website is by clicking on the down arrow in the top right corner and selecting the ‘Settings’ option. Then, head over to the ‘Claim’ section in the left menu.
To get the credit for your content on Pinterest, click the ‘Claim’ button for Websites.
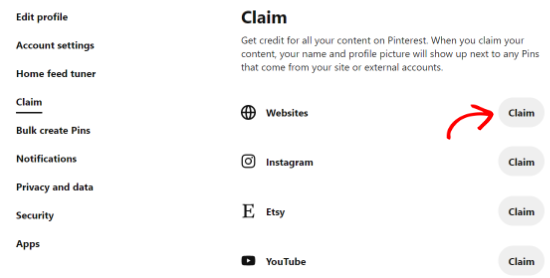
Once you click the button, a popup window will appear with three options to claim your WordPress website.
We are choosing the ‘Add HTML tag’ option because it is the easiest.
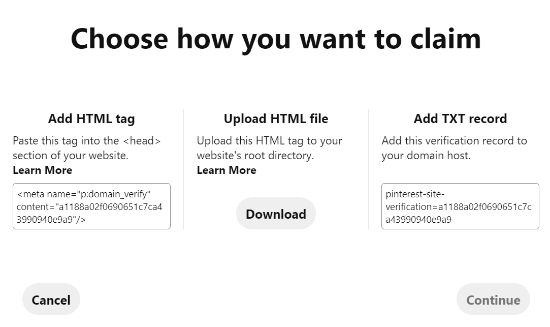
However, if you prefer, you can choose the other option where you download the HTML file and upload it to your website’s root directory using an FTP client or your WordPress hosting file manager.
You can also add a verification TXT record to your domain settings using your domain registrar.
Step 3: Add HTML Tag to Your WordPress Website
There are multiple ways to add an HTML tag to your website’s header, but we will only cover the two easiest methods.
Add Pinterest HTML Tag With an SEO Plugin
First, you can use the All in One SEO (AIOSEO) WordPress plugin and enter the HTML tag to your website. For more details, follow our guide on how to install a WordPress plugin.
AIOSEO is the best SEO plugin for WordPress and makes it very easy to optimize your site for search engines without hiring an expert.
While we recommend the Pro version, you can also use the free version of AIOSEO to add Pinterest verification.
To add the HTML tag, go to All in One SEO » General Settings and then click the ‘Webmaster Tools’ tab from the top menu.
After that, click the ‘Pinterest Site Verification’ block.
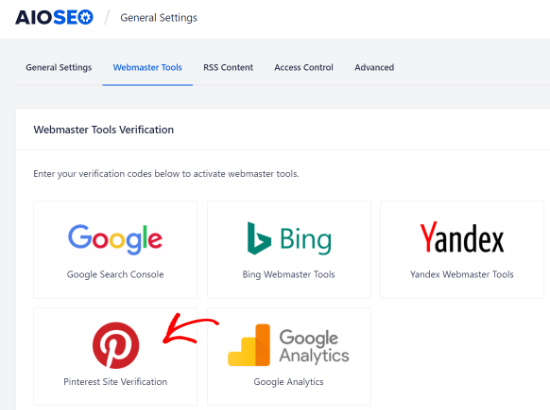
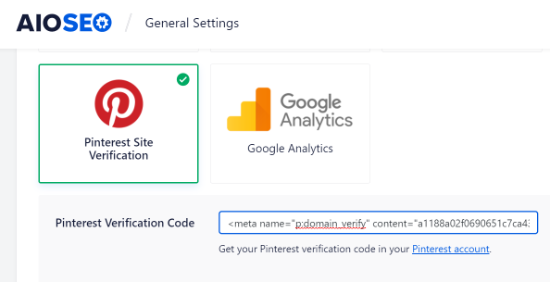
Now, enter the HTML tag you copied in the previous step in the Pinterest Site Verification field.
Then, you need to click the ‘Save Changes’ button.
Add Pinterest HTML Tag With a Code Snippets Plugin
Apart from using AIOSEO, another way of adding the HTML tag is by installing and activating the WPCode plugin.
Upon activation, you need to visit the Code Snippets » Header & Footer page in your WordPress dashboard. In the ‘Header’ section, you need to paste the HTML tag. Then, click on the ‘Save Changes’ button.
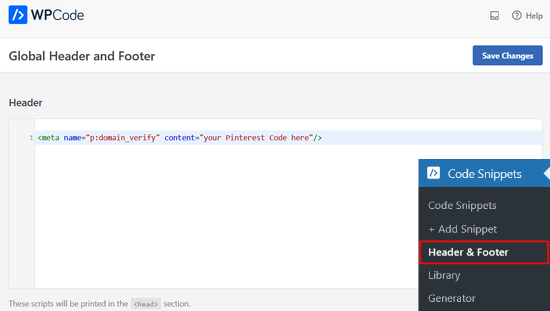
Once the HTML code is added to your website’s header section, you need to go back to the Pinterest screen and click on the ‘Continue’ button in the popup.
It will now ask you to enter the URL of your website and then click the ‘Verify’ button.
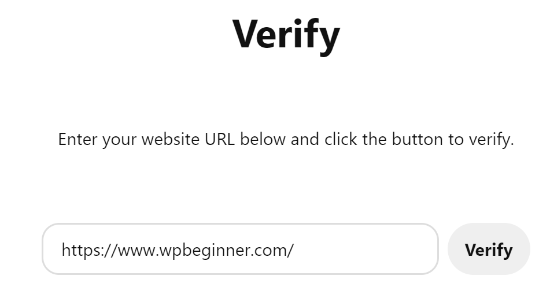
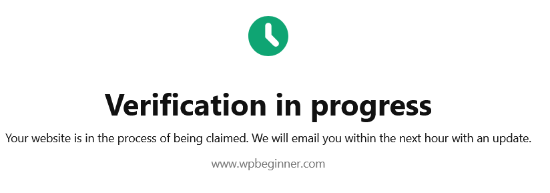
Once you do that, you will see a message saying, ‘Verification in progress.’
Normally, the process takes 24 hours, and you get an email about your website’s verification.
That is it! You have now successfully verified your WordPress website on Pinterest.
Tip: If Pinterest fails to verify after you have added the verification code, then it means you need to clear your WordPress cache.
Expert Guides on Using Pinterest in WordPress
We hope this article helped you learn how to verify your WordPress site on Pinterest. You may also want to see some other guides related to using Pinterest in WordPress:
- How to Show Your Latest Pinterest Pins in WordPress Sidebar Widgets
- How to Hide Pinterest Images in Your WordPress Blog Posts
- How to Add Pinterest “Pin It” Button in your WordPress Blog
- The Complete Social Media Cheat Sheet for WordPress (Updated)
- Best Social Media Plugins for WordPress
- How to Supercharge Pinterest Traffic to Your Blog
If you liked this article, then please subscribe to our YouTube Channel for WordPress video tutorials. You can also find us on Twitter and Facebook.


Dennis Muthomi
The AIOSEO method works great! Quick tip from my experience: make a simple checklist for WordPress sites. The most important thing? Always clear the cache after adding the verification code.
I can’t tell you how many times clients called about failed verifications. A quick cache clear fixed it right away! While the guide mentions a 24-hour verification window (which is true), I’ve seen it work much faster with a cleared cache.
Marian
I did as the article mentioned, and it has not worked. Not even after I cleared my cache.
WPBeginner Support
It would depend on the specific issue you are running into, is it not verifying or are you seeing a different error?
Admin
aga
Thank you so much!! I’ve been trying to do it for weeks and you made it so simple!
WPBeginner Support
Glad our guide could help
Admin
Iruoma
Hey,
Thanks for this info!
I used the AIOSEO and tried going back to my interest to confirm and it says no relevant meta tag was found. Do I have to wait some more to allow for verification?
Thank you.
WPBeginner Support
You would want to check that you’ve cleared any caching on your site as that is the most common reason for that message after adding the verification to your site.
Admin
Kelly Grace
I have Wordfence on my WP.org website and it gives me a warning when I try to add the HTML tag I copied from Pinterest. Is it safe to ignore that and proceed?
Taufiq Azad Siam
Can you please tell me why should I verify my WordPress website on Pinterest?
Please don’t get me wrong. I am a huge fan of this website. I just want to know the benefits.
WPBeginner Support
We would recommend taking a look at the beginning of our article where we cover what is gained from verifying your site
Admin
Eddie Morgan
Can I uninstall AIOSEO verifying pininterest
WPBeginner Support
Once the site is verified you can remove it from your site but AIOSEO is used for much more than only verifying your site on Pinterest.
Admin
Eddie Morgan
Thank you so much, I followed the steps and got the notification verification in progress. How will I know when the website has been successfully claimed? Is it the email they will send? or what changes will I see on Pinterest to know its been successfully claimed.
WPBeginner Support
It is normally an email, as we say in the article above
Salma
Hello!
Thank you for such helpful guides. Your guides are very thorough and helped me through a lot of complications I didn’t think I’d run through while making a blog. So, I just thought I’d thank you for putting in so much work.
WPBeginner Support
Glad our guides have been helpful
Admin
Laura
this was SO helpful. thank you for posting!!
WPBeginner Support
Glad our guide was helpful
Admin
Nesha
This video was so helpful thank you. I have been trying to do this in multiple ways for a while now and never succeeding. Working with your video I managed it in less than 5 minutes. Thank you for sharing!!
WPBeginner Support
Glad our guide was helpful
Admin
Chay
This was a lifesaver!!!! I’ve have been struggling with claiming my website foreverrr. Yoast really is the easiest way and I already had it. Thanks
WPBeginner Support
Glad our guide was helpful
Admin
Miles
I’m great at adventures, not so great at websites… You rock thank you would have never gotten this alone
WPBeginner Support
Glad our guide was helpful
Admin
Ashish Kumar Banchhor
Thankyou dear,
I was looking for this. thanks a lot
WPBeginner Support
Glad our guide was helpful
Admin
John
I was going to add your plugin but it’s saying it’s untested with my version of Wordpress 5.5.1. (which is saying I’m running the latest version).
WPBeginner Support
For that warning, you would want to take a look at our article below:
https://www.wpbeginner.com/opinion/should-you-install-plugins-not-tested-with-your-wordpress-version/
The plugin should still be working and we’ll look into updating the tested number
Admin
John
Great thanks so much, appreciate your response. Thanks for all your guidance and content, it’s been so helpful as I continue to learn Wordpress.
Bryce
Thanks !!
I have tried to do that many times but never succeeded.
WPBeginner Support
You’re welcome, glad our guide can help change that
Admin
Tasia
Your site is super helpful. I’ve come across it many times for answers to questions I’ve googled. Great work!
WPBeginner Support
Thank you, glad our content is helpful
Admin
Lydia
I have been trying to figure this out for a week! I should have come to WPBeginners in the first place, duh. The way you showed it in connection with Yoast was so easy, thanks.
WPBeginner Support
Glad our guide could make it easier for you
Admin
ajumohit
tq for the guidance. my website claimed within 15 minutes
WPBeginner Support
Glad our guide was helpful
Admin
Sanaz
I keep getting “Authorization Failed” after entering my website URL, does anyone know why this is happening?
WPBeginner Support
It would depend on where you are getting the error but the most likely reason would be if you hadn’t cleared all your caching we would recommend doing that to ensure Pinterest can see the tag properly
Admin
Marlene
I have claimed my website already and I accidentally deleted my header and footer plugin and now I’ve lost my meta tag for my claimed Pinterest account. I’m using SEO Yeost now. How do I find that meta tag again so I can input that into my SEO Pinterest section?
WPBeginner Support
Unless you edit the website claim on Pinterest, your site will remain claimed without you needing to include the tag
Admin
Lynn
I have followed the instructions but it never claims my website and after a couple of days I try again! Could there be another reason?
WPBeginner Support
You would want to ensure you’ve cleared all of your caching and that you don’t have a coming soon page up preventing Pinterest from seeing your code.
Admin
Emma
I came across this article when needing more information on getting my Pinterest business account up and running, this was really helpful and easy to follow, thank you very much.
I will be bookmarking your website to return to in the near future as I continue my learning
WPBeginner Support
Glad our article was helpful
Admin
Lungi
Thanks you, this was super easy to follow!
WPBeginner Support
You’re welcome, glad our guide was helpful
Admin