Before we started translating WPBeginner into other languages, we noticed that we were missing out on new visitors and customers by only offering content in English.
I’ve also helped store owners localize their WooCommerce stores, and I’ve learned that offering translated content is a common roadblock for many people trying to grow their international customer base.
What most store owners don’t realize is that translating a WooCommerce store doesn’t have to be complicated or expensive.
Through years of testing different solutions, I’ve identified two reliable methods that work for businesses of all sizes.
In this guide, I’ll walk you through both approaches to translating your WooCommerce store.
Why Bother Translating Your WooCommerce Store?
Ever landed on a website in a language you don’t speak? It’s frustrating, right?
Now imagine that happening to someone trying to shop on your WooCommerce store. If your site is only in English, you could be missing out on a huge chunk of potential customers just because they can’t understand what you are selling.
When your store speaks your customers’ language, a few awesome things happen:
- 🛍️ Customers can understand your product info, which helps them decide to buy faster.
- 🤝 It builds trust. People feel more confident when they read in their native language.
- 💡 It creates a smoother, more enjoyable shopping experience.
- 🚚 It’s super helpful if you ship internationally and your customers speak other languages.
- 💸 It leads to more sales (because more people can actually buy).
- 🌍 It opens your store up to new audiences across countries and regions.
- 💾 It’s a must-have if you’re selling digital products that work in multiple languages.
And here’s the good news: translating your WooCommerce store doesn’t have to be hard. You don’t need to know multiple languages or hire a pro.
The easiest way is to use a WordPress multilingual plugin.
Having said that, I am going to share two different WordPress plugins that can do the job well. You can use the quick links below to jump straight to the method you want to use:
Method 1: Use TranslatePress to Translate Your WooCommerce Store
If you are looking for the easiest way to translate your WooCommerce store right on the front end, then TranslatePress is a great choice.
You can simply browse your site, click on the text you want to translate, and type in the translated version. No digging through settings or backend menus, as it all happens in a visual editor. This makes it perfect for beginners who want a simple, no-code solution.
First, you need to install and activate the TranslatePress plugin. For more details, see our step-by-step guide on how to install a WordPress plugin.
Note📓: You can use the free version of TranslatePress to translate your site into another language. However, for unlimited languages, you need the Pro plan.
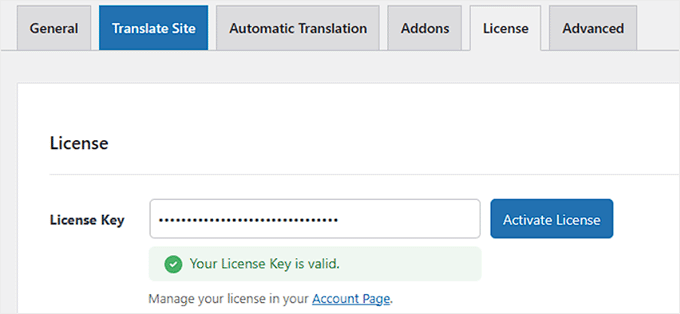
Upon activation, visit the Settings » TranslatePress » License page from the WordPress dashboard and enter your license key.
You can find this information in your account on the TranslatePress website.
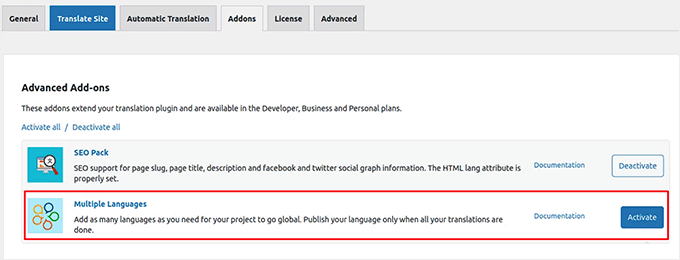
Then, head over to the ‘Addons’ tab and activate the ‘Multiple Languages’ addon.
Keep in mind that this feature is only available in the Pro version.
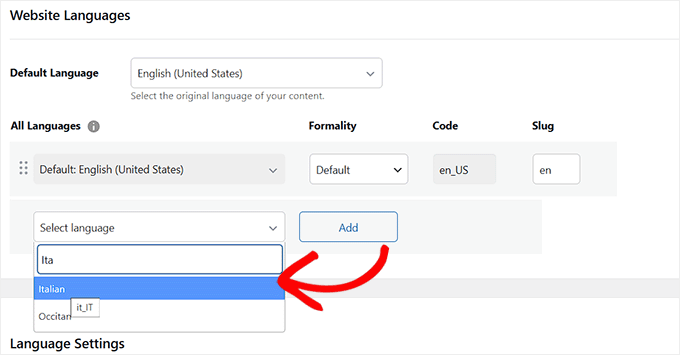
Next, click on the ‘General’ tab. Here, you need to check that your default language is set correctly. You also have to choose the additional language(s) for your online store.
To do this, select your preferred language from the dropdown under the ‘All Languages’ section, and click the ‘Add’ button next to it.
Go ahead and repeat this process for all the languages you want to use for your store.
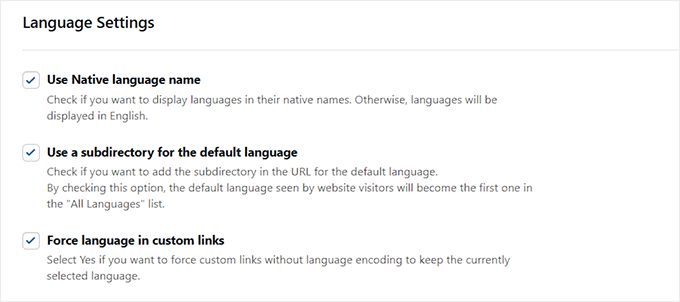
After that, scroll down to the ‘Language Settings’ section. You can now check the ‘Use Native language name’ option so that visitors will see language names like Español instead of Spanish, or Français instead of French.
If you leave it unchecked, the language names will appear in their English versions, like “Spanish”, “French”, “German”, and so on.
Next, check the ‘Use a subdirectory for the default language’ box if you want the default language to get its own subdirectory in the URL, like yourstore.com/en/.
Finally, check the ‘Force language in custom links’ option to keep your visitors in the right language when they click on custom links, like buttons, banners, or menu items.
Once that’s done, go to the ‘Language Switcher’ section.
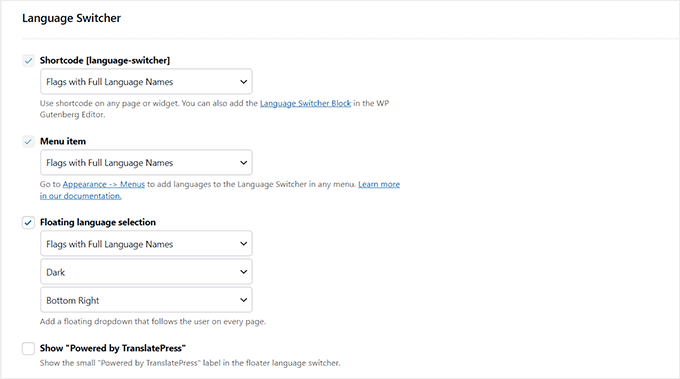
This is where you can customize how the language options appear on your site. You can choose the style and position of the switcher, and even adjust the design to match your site’s look.
By default, the switcher will show up on your store’s front page. But if you’d rather place it somewhere specific, like a dedicated page or the footer, you can use the shortcode provided in this section.
Next, click the ‘Save Changes’ button to store your settings.
Now that you have configured basic plugin settings, let’s start translating your WooCommerce store.
You can do this by clicking the ‘Translate Site’ tab in the WordPress admin bar.
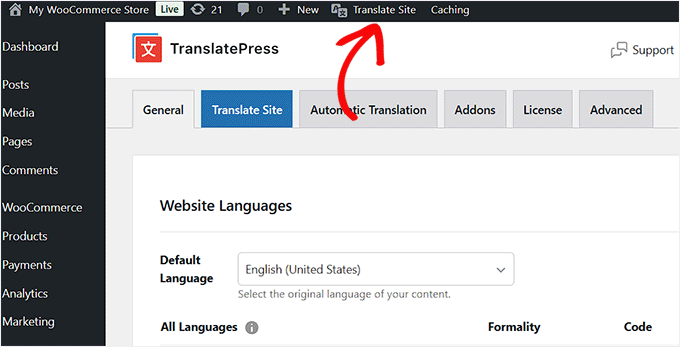
This will open the front-end translation editor, where you will see your website on the right and the translation tools on the left.
You can visit any page on your site and hover your mouse over the text you want to translate. When you do that, a blue pencil icon will appear. Simply click it to start editing.
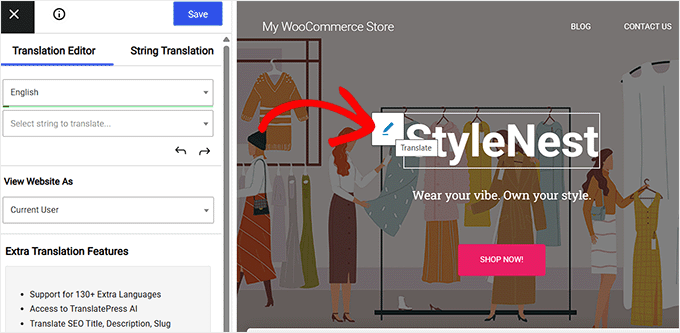
Then, type your translation into the panel on the left. You can repeat this for any text and for all the languages you’ve added to your site.
Once you’ve finished, don’t forget to click the ‘Save’ button at the top of the screen.
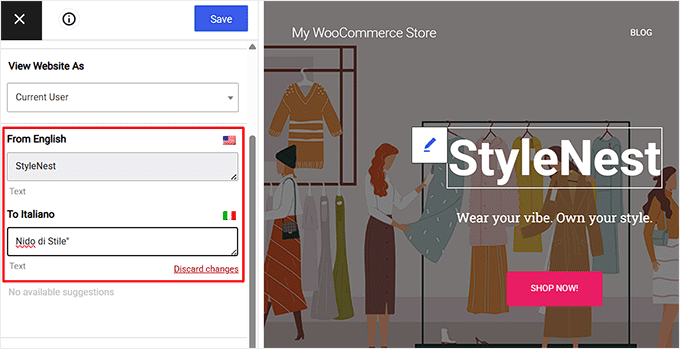
After that, go ahead and visit your online store to see the translated text. Then, simply click on the language switcher and select your desired language.
You will now see your WooCommerce store in a different language.

Note📓: Keep in mind that any text that’s created by WordPress and plugins you use should be automatically translated.
For more help using the plugin, check out our article on translating your WordPress site with TranslatePress.
Automatically Translate Your WooCommerce Store Using TranslatePress
You can automatically translate your website using TranslatePress AI. Once enabled, it translates your entire website content into the selected languages.
Simply visit the Settings » TranslatePress » Automatic Translation page and toggle on the ‘Enable Automatic Translation’ switch.
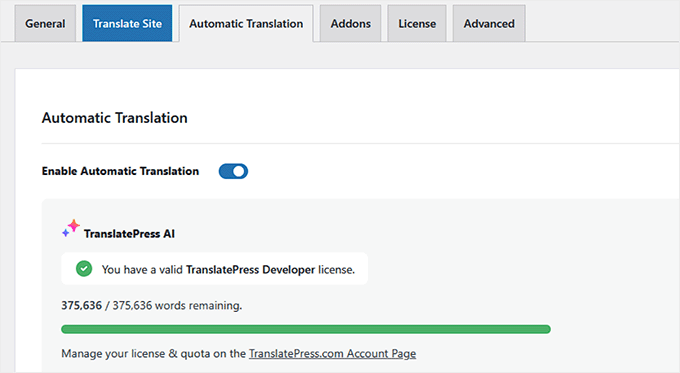
Once you do that, the AI will translate the site in just a few minutes. However, this feature is only available in the Pro plan.
If you are using the free version, then you can enable automatic translation with Google Translate.
Just choose this option from the ‘Alternative Engines’ dropdown and add your Google Translate API key.

If you don’t want to know how to do that, then click the link under the API field to find out the process.
Once you do that, Google Translate will automatically translate the online store for you.
Method 2: Use WPML to Translate Your WooCommerce Store
WPML is a more advanced translation plugin that’s built for larger multilingual setups and complex WooCommerce stores. If you need more control, multiple languages, and deeper translation features, then it’s a solid pick.
It has a user-friendly interface that makes it easy to connect your site with professional third-party translation services.
Plus, the plugin supports 65 languages, and you can also add your own language variants, such as Mexican Spanish or Canadian French.
For more information, see our complete WPML review.
First, you need to visit the WPML website and sign up for an account. Keep in mind that you will need to purchase the Multilingual CMS plan to translate WooCommerce.
Next, you need to install and activate the OTGS Installer plugin. For more details, see our step-by-step guide on how to install a WordPress plugin.
Upon activation, a ‘Commercial’ tab will be added to the ‘Add Plugins’ page. Here, you need to enter your WPML Site Key and click the ‘Register’ button.
This information can be found on your WPML account page.
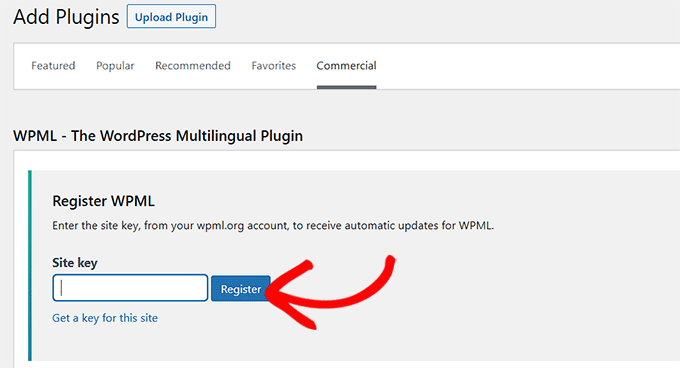
Once you’ve done that, the WPML plugin and a list of its extensions will appear on the screen. From this list, check the boxes for the following settings:
- WPML Multilingual CMS
- String Translation
- WooCommerce Multilingual & Multicurrency
- Media Translation
After selecting these options, click the ‘Download’ button to download and install the necessary extensions for your store.
This will ensure that your WooCommerce store supports multilingual content, multiple currencies, and media translation. Keep in mind that you will also need to activate these tools from your ‘Plugins’ page.

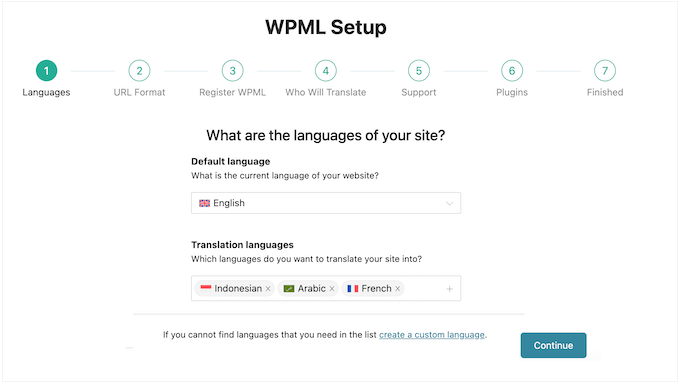
Upon activation, a setup wizard will open up on your screen, where the plugin will show your store’s default language that it has automatically detected.
However, you can switch that language to another if you want. Next, select other languages you want to use on your online store and click the ‘Continue’ button.
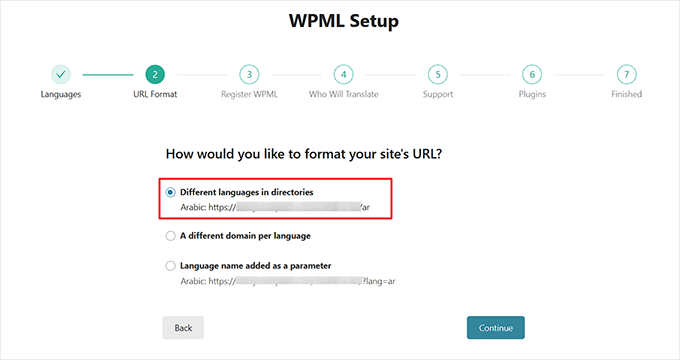
After that, choose the URL format for different languages.
For instance, you can select a directory structure, set up separate domains or subdomains for each language, or add language as a parameter.
I recommend the first option since it is more SEO-friendly.
Go ahead and click the ‘Continue’ button once you are done.
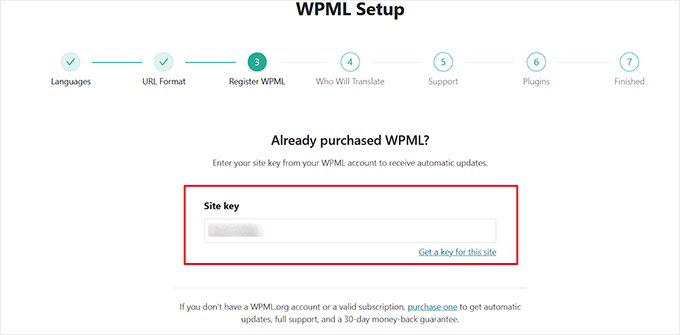
In the next step, the plugin will ask you to enter ‘Site key’ again, which is essentially the license key.
You can find this information on your account on the WPML website.
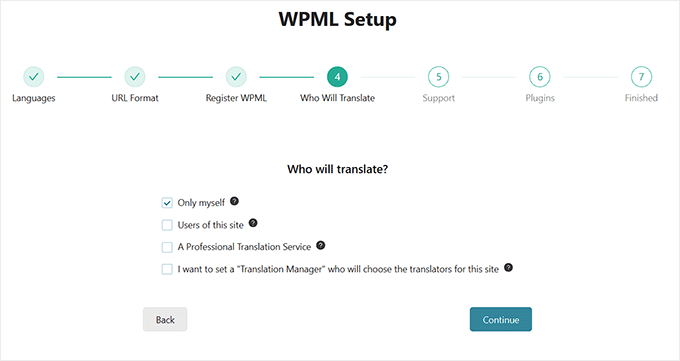
After that, the plugin will ask you who will be translating the content on your store.
You can add translations yourself, allow users to translate, choose a professional translation service, or add a translation manager who will choose translators for your site.
Keep in mind that you can always change how you manage translations on your website.
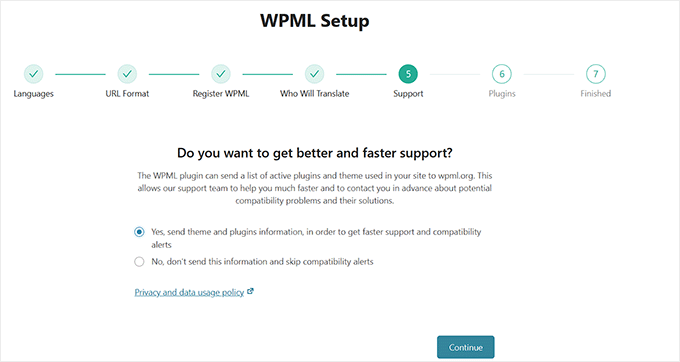
Now, when you click the ‘Continue’ button, the plugin will give you the option to share a list of your active plugins and theme with the WPML support team.
This will help them provide better support because they will already know what plugins and themes you are using.
Simply make a choice and move to the next step.
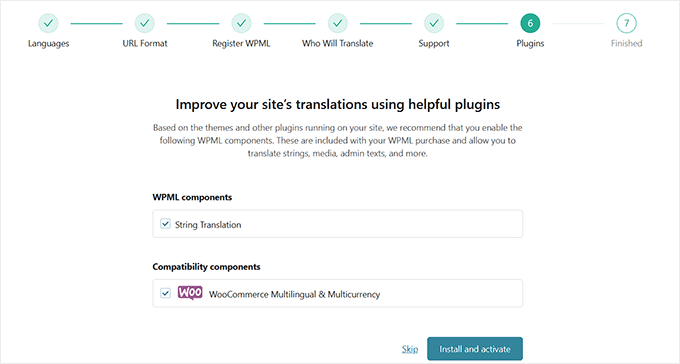
WPML will then suggest some built-in and third-party translation tools that can help smooth the translation process.
You can click on the ‘Skip’ link for now and install those plugins later if needed.
You have now successfully set up WPML to create and manage your multilingual website. However, your online store won’t be fully translated just yet.
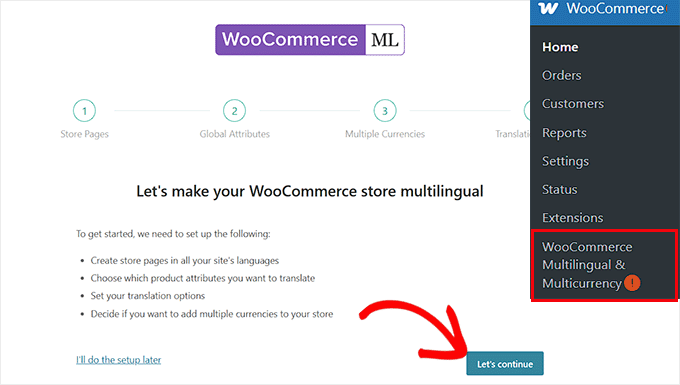
To make WPML work with your WooCommerce store, you’ll need to configure the WooCommerce Multilingual & Multicurrency addon that you installed earlier alongside WPML.
This extension connects WPML to your products, shopping cart, checkout, and other store pages, so everything runs smoothly in multiple languages and currencies.
To get started, head to the WooCommerce » WooCommerce Multilingual & Multicurrency page. This will open another setup wizard where you have to click the ‘Let’s continue’ button.
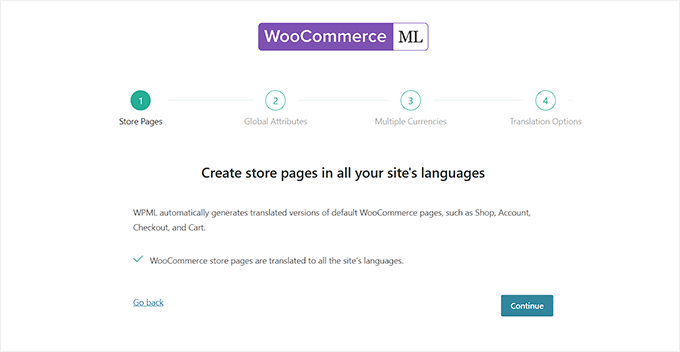
WPML will now ask permission to automatically generate translated versions of default WooCommerce pages, such as Shop, Account, Checkout, and Cart.
Go ahead and click the ‘Continue’ button.
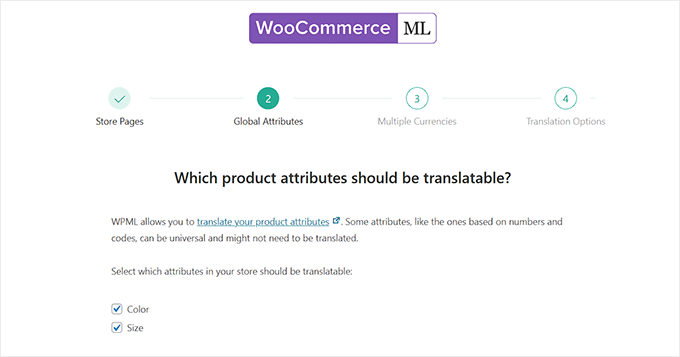
Now, you have to choose which product attributes (like Color or Size) should be translated for your multilingual store.
Attributes with universal values (such as numbers or codes) may not need translation, but options like color names or sizes in different languages often do.
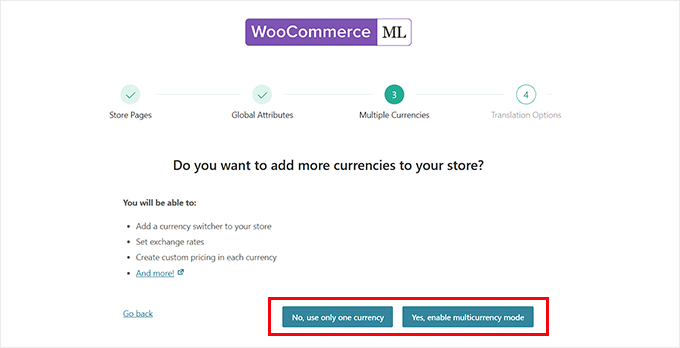
After that, you will be asked whether you want to enable multiple currencies on your site.
If you prefer to keep things simple and only show the default currency for each language, then choose ‘No, use only one currency.’ For example, if your site is available in French, all users who view it in French will still see prices in Dollars.
This is because the currency won’t change based on language or location.
On the other hand, if you want to offer a more localized shopping experience with different currencies based on the visitor’s country or language, then choose ‘Yes, enable multiple currency mode.’
After that, let’s click the ‘Continue’ button for the next step.
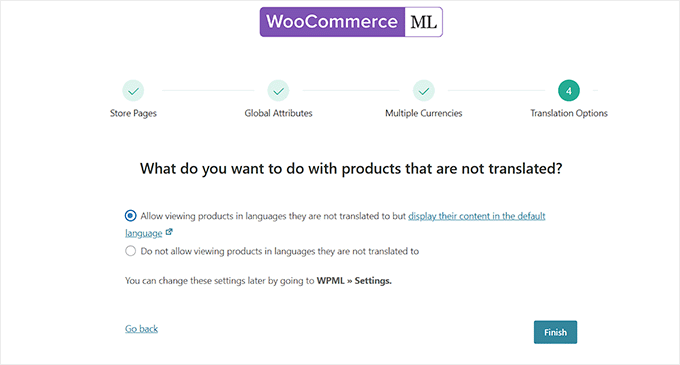
Next, you’ll be asked to choose what happens when a product hasn’t been translated into any language yet.
If you want visitors to still see those products, even if they are not available in their selected language, you can choose the first option.
For example, if your default language is English and a product hasn’t been translated into French, users browsing your site in French will still see the product, but the title and description will appear in English.
Alternatively, you can choose to hide untranslated products completely. This means that if a product isn’t available in a visitor’s selected language, it simply won’t show up at all.
This option helps create a fully localized experience but might limit product visibility, especially if you haven’t finished translating everything yet.
Simply choose an option and click the ‘Finish’ button.
You will now be taken to the ‘Translation Dashboard’ where you have to expand the ‘Products’ tab.
Note: To translate store pages, such as checkout or cart, you will need to expand the ‘Pages’ tab.
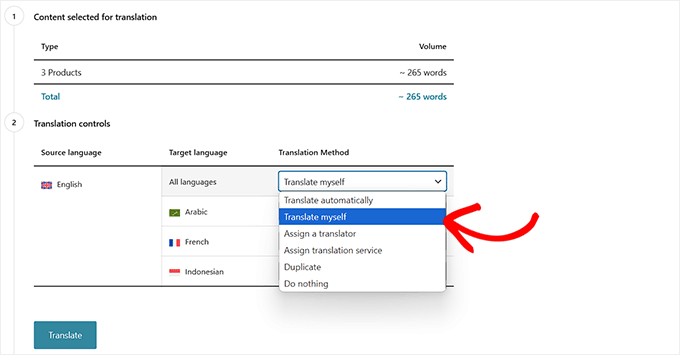
Then, check all the products that you want to translate and click the ‘Translate your content’ button.

Once you do that, you will be asked to choose a translation method. You can opt for the ‘Translate Myself’ option if you want to do this manually.
Go ahead and click the ‘Translate’ button.
Now, go to the WPML » Translations page from the WordPress admin sidebar.
Here, click the ‘Translate’ button next to the product page of your choice.
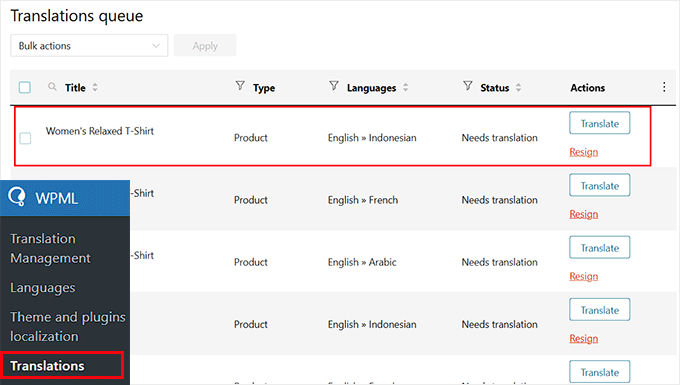
WPML will launch its Translation Editor, where you’ll see the translated versions of your product pages. On the right side, you’ll find the translated content, while the original content remains on the left.
Note: By default, automatic translation is enabled in WPML, which is why the translated content appears instantly in the editor.
Before deciding whether to use this feature for your entire store, I recommend checking out the next section, where I explain how automatic translation works and how credits are used.
If you prefer to translate the content manually, simply click the ‘Undo Translation’ button.
This will remove the machine-generated translation so you can enter your own version instead.

After that, you can start adding your translation strings next to each sentence.
Make sure to thoroughly review these translations to ensure they are accurate. Once you’re satisfied, simply click the ‘Complete Translation’ button.

Now repeat this process for all the pages and products in your WooCommerce store to ensure your entire site is translated and ready for your multilingual customers.
You can also use the plugin to translate categories, templates, posts, and tags. For step-by-step instructions, see our tutorial on how to create a multilingual WordPress site with WPML.
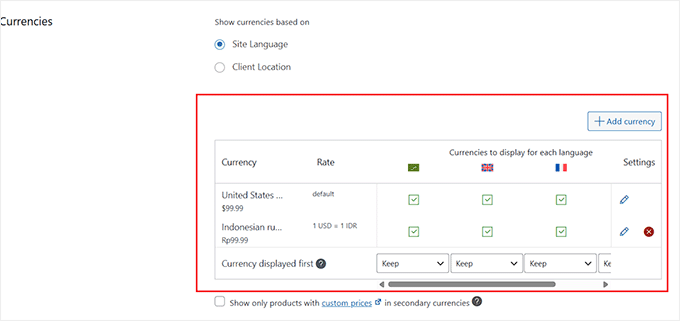
After that, visit the WooCommerce » WooCommerce Multilingual & Multicurrency » Multicurrency page from the admin sidebar.
Here, go to the ‘Currencies’ section and select ‘Site Language’ as the option for how currencies are displayed. Then, click ‘Add Currency’ to add the appropriate currencies for each language you’ve translated your site into.
For example, you might add Euros for French, USD for English, and CAD for Canadian French.
Once you’ve added all the currencies, click the ‘Save Changes’ button.
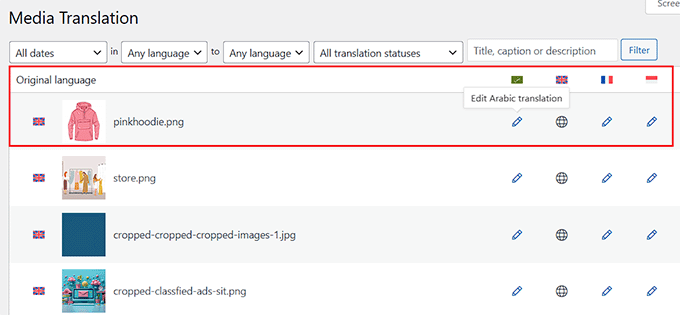
Then, go to the WPML » Media Translation page from your WordPress admin.
Note: This feature won’t be available unless you’ve installed the Media Translation addon.
This extension lets you add translated versions of your image titles for each language in your WooCommerce store.
Simply click the pencil icon next to the image under the language you want to translate it into.
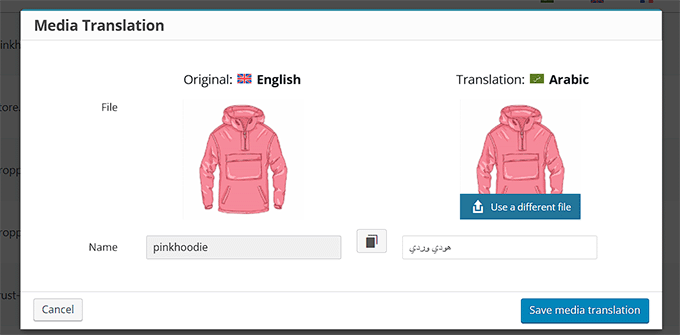
This will open a popup, where you need to type the translated name of the image. You could also select a different image to use for the translated version.
When you are done, just click the ‘Save media translation’ button
Once you do that, visit your website and scroll to the bottom.
Here, you will see a list of all the languages that customers can translate your website into.
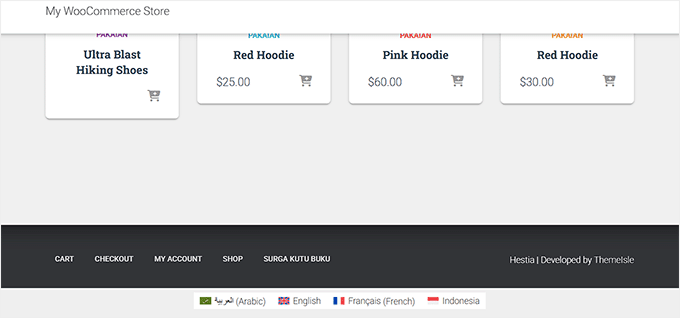
Simply select a language, and your WooCommerce store will now be shown in a different language.
Here is a preview of what that can look like:
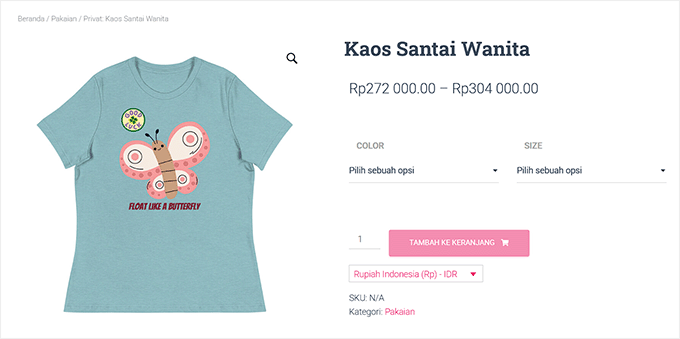
Automatically Translating Your WooCommerce Store Using WPML
If manually translating every product and page on your WooCommerce store sounds overwhelming, there’s a better option.
WPML has a built-in automatic translation feature that takes care of it for you. You don’t need to know multiple languages or hire a translator. Just let the plugin do the work.
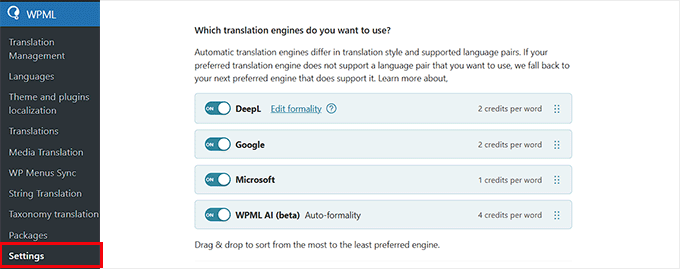
Behind the scenes, WPML uses powerful machine translation engines like WPML AI, DeepL, Google Translate, and Microsoft Translator. These services are known for providing accurate results for common languages, so your store can look natural in multiple languages.
Simply visit the WPML » Settings page and choose the translation service you like.
However, you must know that automatic translation in WPML works on a credit-based system. Each word or short phrase that gets translated uses a small number of credits.
This means:
- You’ll receive a certain number of free credits each month, based on your plan.
- If you need more, you can buy extra credits directly from WPML as needed.
- You’re in full control—translate as much or as little as you want.
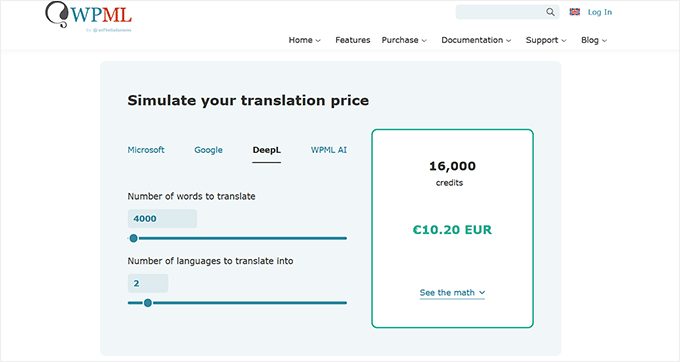
Plus, here’s the cool part: This feature is enabled by default inside WPML’s Translation Editor.
That means when you open a product, post, or page to translate, WPML will automatically generate the translation for you using your available credits.
Unless you click the ‘Undo translation’ button, what you are seeing is machine-translated content—instantly added without lifting a finger.
You can also see at the top how many credits are being used for each page.

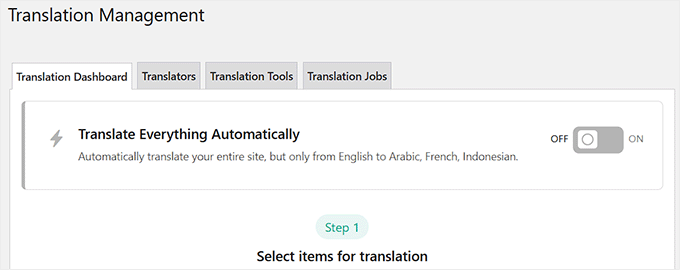
You can also take this a step further by heading over to the WPML » Translation Management page and simply turning on the ‘Translate Everything Automatically’ option.
When this is enabled, WPML will go through your entire WooCommerce store and automatically translate all your content using your available credits—no manual work required.
Bonus Guides to Help You Manage a Multilingual Store
Running a multilingual WooCommerce store involves more than just translating product pages. From handling SEO in different languages to managing currency and regional settings, there are a few extra steps that can make a big difference.
To help you out, I’ve put together some additional guides and resources:
- How to Add Multilingual Search in WordPress (Easy Ways)
- How to Use English WordPress Admin on a Multilingual Site
- Beginner’s Guide to Creating a Multilingual Sitemap in WordPress
- How to Easily Create a Multilingual WordPress Site
- How to Create Multilingual Forms in WordPress
- WordPress International SEO Tips – How to Get More Global Visitors
- How to Find and Translate a Translation Ready WordPress Theme
I hope this article helped you learn how to translate your WooCommerce store. You might also like to see our list of the must-have WooCommerce plugins and our tutorial on how to add country restrictions for WooCommerce products.
If you liked this article, then please subscribe to our YouTube Channel for WordPress video tutorials. You can also find us on Twitter and Facebook.


Dennis Muthomi
please help me here, I have a question: is there a way to automatically detect a visitor’s location and prompt them to switch to their local language version of the site?
like if someone from Spain lands on my woocommerce store that is in english, could it popup and say “Want to view this in Spanish instead?” and then reload everything in español if they click yes? I know Shopify does something like that which is really useful.It would just make for an even smoother multilingual experience, especially for shops doing a lot of international sales.
do either TranslatePress or WPML have that kind of geo-location language switching built-in? or maybe there’s another plugin that could work alongside them to add that functionality?
WPBeginner Support
While not through geolocation, both plugins have tools for detecting the language a browser is in to translate the content. If you would prefer a geolocation popup specifically then we would recommend our guide below!
https://www.wpbeginner.com/wp-tutorials/how-to-create-a-wordpress-popup-based-on-location/
Admin
Jiří Vaněk
I use the PolyLang plugin for translation, and there’s an option to set the language version of the website based on the user’s browser language. So, if the user’s browser is in Spanish and I have a Spanish version of the site in PolyLang, it will automatically display that version. I use this on my blog, which has multiple languages, and it works very well.