We’ve helped lots of entrepreneurs start their own online boutique shops, and we’ve noticed that most struggle with the same challenges. They feel overwhelmed by technical details, worry about choosing the wrong platform, or don’t know how to attract customers.
The good news? Starting an online boutique is much easier today than it used to be!
In this complete guide, we’re sharing everything we’ve learned from years of helping store owners succeed online. We’ll walk you through the exact steps to launch your boutique shop – from choosing the right platform to setting up your store and driving your first sales.
Whether you’re starting from scratch or looking to grow your existing boutique, you’ll find actionable steps to help your store thrive.

What Do You Need to Start an Online Boutique Shop?
Starting your very own online boutique might seem like a big undertaking, but trust us, it’s a lot simpler than you probably imagine! To get your online shop up and running, here’s what you’ll need:
- A domain name: This is your website’s address on the internet (think of it like your shop’s name).
- A web hosting account: This is where all the files for your website will live online (like renting space for your shop).
- Your undivided attention for 30 minutes.
Yes, you read that right.
You can actually build a fully functional online boutique shop from the ground up in under 30 minutes, and you don’t need to be a tech whiz to do it.
We’re going to walk you through absolutely everything you need to know, step-by-step. Just follow along with our checklist, and you’ll be well on your way to launching a successful online boutique that brings in sales.
We will cover:
- Choosing the Best Online Boutique Shop Platform
- 2. Setting Up Your Online Boutique Shop
- Set Up WordPress and WooCommerce on Your Website
- Add Products to Your Online Boutique Shop
- Change or Customize Your WordPress Theme
- Add Plugins to Extend Your Online Shop and Drive Sales
- Learn More About WordPress to Grow Your Store
💡 Looking to create a stunning website without the hassle? Our WordPress Website Design Services are here to help!
We’ll work with you to build a website that not only looks amazing but also works perfectly for your business. Whether you need a sleek online store, a personal blog, or a professional site, we’ve got the tools and expertise to make it happen.
You focus on your business, and we’ll take care of the design. Schedule a free call with your WordPress experts today!
Now, here’s our step-by-step guide to starting an online boutique platform.
1. Choosing the Best Online Boutique Shop Platform
The biggest mistake that new store owners make is choosing the wrong eCommerce platform for their online shop. This could be a costly mistake. Not only will you have to re-do all the work, but you could also lose money.
Thankfully, you’re here, so we can help you avoid making that mistake.
When it comes to eCommerce platforms for boutique shops, we recommend only two platforms: Shopify or WooCommerce (built on WordPress).
Shopify is an all-in-one solution that’s quick to get started with. However, the cost can be a significant downside, starting at $29 per month and going all the way up to $299 per month for more features – and that doesn’t even include extra costs for third-party apps.
Plus, you’re pretty much locked into using their payment system, or they’ll charge you extra transaction fees. That’s a lot for small business owners to spend.
This is why most boutique owners choose WordPress + WooCommerce. It’s budget-friendly, has all the features you’ll likely need, it’s super flexible, and you can get it set up in less than 30 minutes.
WooCommerce also happens to be the most popular eCommerce platform in the world.
If you want to dig deeper into the differences, then check out our side-by-side comparison of Shopify vs WooCommerce.
In this tutorial, we’ll walk you through how to start an online boutique shop using WooCommerce.
2. Setting Up Your Online Boutique Shop
To start an online shop, you must have a domain name, web hosting, and an SSL certificate.
A domain name is your website’s address on the internet. This is what users type in their browsers to reach your website, for example, google.com or wpbeginner.com.
Web hosting is where your website files live on the internet; you can think of it as your website’s house on the internet. And do note that every website on the internet needs web hosting.
Last but not least, you need an SSL certificate. This adds a special security layer to your website, so you can accept credit cards and other personal information.
Normally, if bought separately, a domain name costs around $14.99/year, web hosting costs around $8.99/month, and an SSL certificate costs around $69.99/year.
That’s a lot of startup costs.
Thankfully, Bluehost, an official WordPress and WooCommerce-recommended hosting provider, has agreed to offer our users a free domain name, SSL certificate, and a discount on web hosting.
Basically, you can get started for as low as $1.99 / month.
This will help you keep the costs of building a WordPress site to an absolute minimum.
However, Bluehost also has a dedicated WooCommerce hosting plan that comes with over $1,000 worth of premium WordPress and WooCommerce extensions, which is totally worth it.
This costs $24.95 per month, but it includes security & backup features and premium WooCommerce extensions like subscriptions, bookings, etc.
Note: At WPBeginner, we believe in transparency. If you sign up with Bluehost using our referral link, we will earn a small commission at no extra cost to you (in fact, you will save money and get a free domain).
We would get this commission for recommending just about any WordPress hosting company, but we only recommend products that we believe will add value to our readers.
If you’re looking for a Bluehost alternative, then we recommend trying out SiteGround WooCommerce hosting. It’s another officially recommended WordPress hosting provider.
With that in mind, let’s go ahead and get your store domain name, web hosting, and SSL certificate.
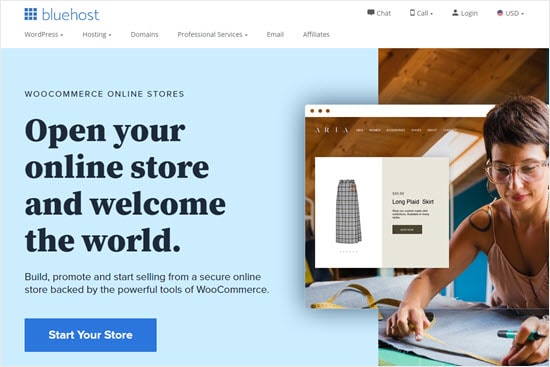
You need to start by opening up the Bluehost WooCommerce website in a new window and clicking the ‘Start Your Store’ button.
Next, you’ll be asked to choose a hosting plan. Their online store plan, which costs $6.99 per month, comes with over $1,000 worth of premium WordPress and WooCommerce extensions.
It’s a great deal because the WooCommerce subscription and bookings extension alone cost more than Bluehost’s annual subscription.
Note: If you’re looking for the $1.99 per month plan, then you’ll want to click this link.
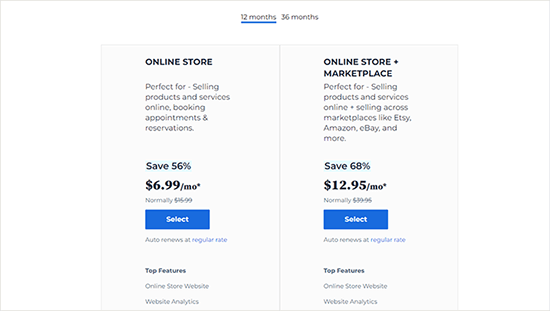
You’ll then need to click the ‘Select’ button below a plan to continue.
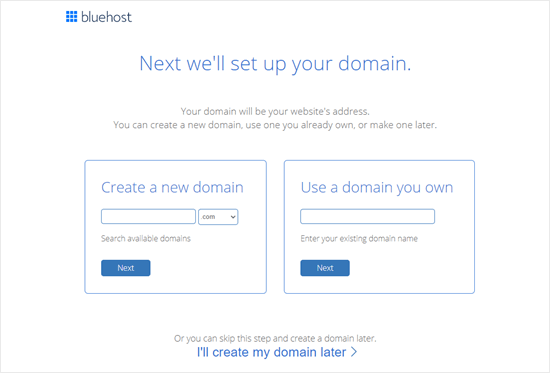
Next, you’ll be prompted to enter or choose a domain name. Remember, you get a free domain name with Bluehost.
If you need help picking a domain name for your store, you can use our free business name generator tool.
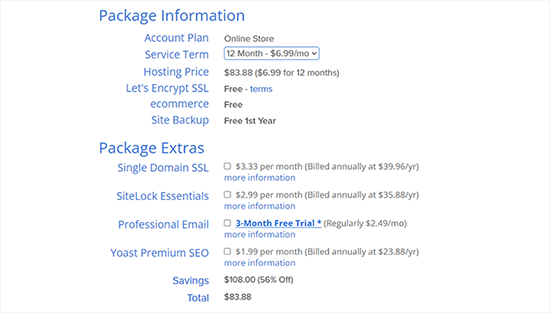
On the next screen, you must enter your account details, such as your name and address.
Below this, you need to confirm the package you’ve chosen is correct.
Expert Tip: You get the biggest savings by signing up for a 36-month plan.
You can uncheck the ‘Package Extras’ because you don’t need them right now. You can always add them later if you like, and later in the article, we’ll show you how to get some of the similar features for free.
After you enter your payment details and purchase your hosting, Bluehost will email you your account details.
You can now proceed to log in to your Bluehost account and continue setting up WordPress and WooCommerce.
3. Setting Up WooCommerce
The good part about the Bluehost WooCommerce plan is that it comes with an automated wizard that guides you through the entire setup.
First, it will ask how much help you need to build your site. Simply click the ‘No Help Needed’ button, as you have this tutorial to help you.
On the next screen, you can select ‘Online Store’ for your website type and simply continue following the website creation wizard.
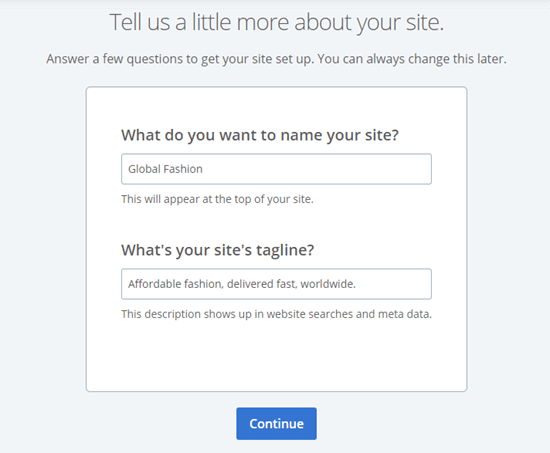
At the final step, Bluehost will ask you to enter a name and a tagline for your website. You can change this later, so don’t worry if you haven’t decided yet.
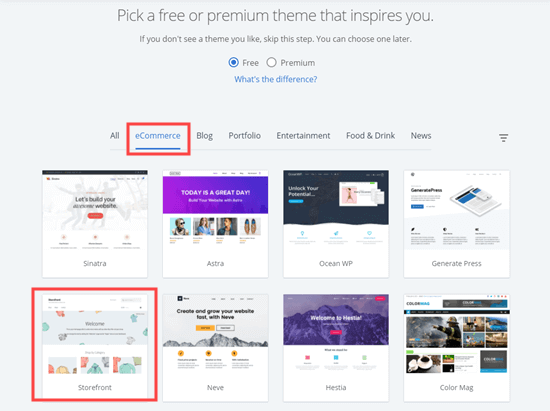
Bluehost will now offer you some WordPress themes to choose from. If you are unsure, then you can start with the Storefront theme.
You can change the WordPress theme later on.
After this, Bluehost will install both WordPress and WooCommerce for you.
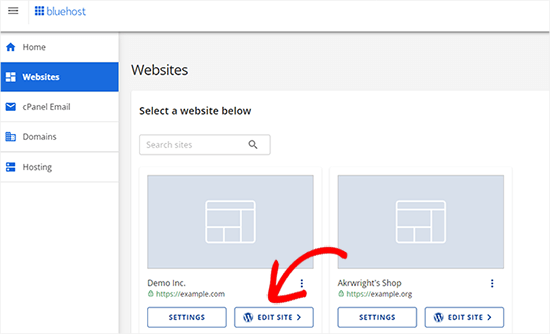
Once the screen refreshes, you’ll see your Bluehost dashboard. You can log in to WordPress by clicking on ‘Edit Site.’
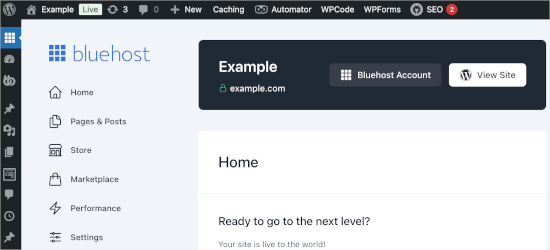
Your WordPress site will open in a new window.
Then, you will see your WordPress admin area.
Bluehost gives you a free SSL Certificate.
This certificate is pre-installed for your domain. However, you might need to configure your WordPress site so that it loads using HTTPS instead of HTTP.
So, let’s navigate to Settings » General and change your ‘WordPress Address (URL)’ and ‘Site Address (URL)’ to use https.
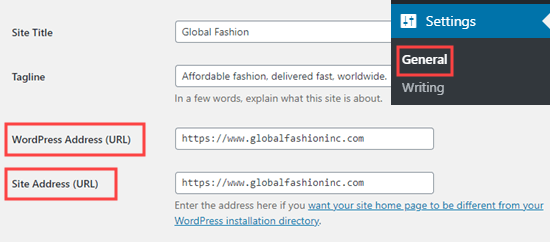
Don’t forget to scroll down to the bottom of the page and click the ‘Save Changes’ button to store your changes.
Now, you can go ahead and set up your online store.
Simply click on the WooCommerce link on the left-hand side of your screen, then follow the WooCommerce setup wizard to set up your online store with your address, industry, product types, and business details.
After completing the setup wizard, you need to add payment methods to accept online payments on your boutique shop.
WooCommerce integrates with a number of popular payment gateways. The most popular are PayPal and Stripe (credit cards).
To connect WooCommerce to a payment gateway, you’ll want to go to WooCommerce » Settings and switch to the ‘Payments’ tab.
Here, you simply need to click the toggle in the ‘Enabled’ column for the payment method you want to use. We’re going to use ‘PayPal Standard’ for our online store.
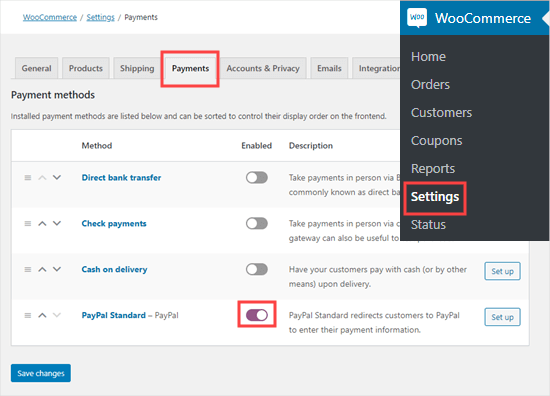
After switching on a payment method, go ahead and click the ‘Set Up’ button to the right of it.
For the ‘PayPal Standard’ method, this will then take you to a page where you need to enter your PayPal email address.
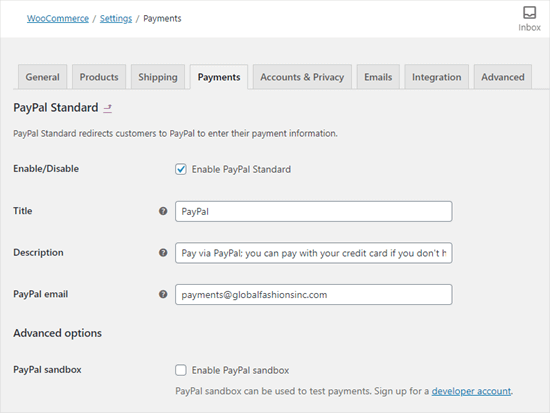
Once you’re done with the configuration, don’t forget to scroll down and click the ‘Save Changes’ button at the bottom of the screen.
You can switch to the Payments tab again and add other payment methods like Stripe.
Instead of setting up WooCommerce’s default Stripe addon, we recommend using the free Stripe Payment Gateway for WooCommerce plugin. It comes with extra features and an easy setup wizard.
Expert Tip: We recommend switching on check payments and/or cash on delivery while setting up your online store. This makes it easy to create test orders without spending any money.
4. Add Products to Your Online Boutique Shop
Now that you’ve set up payment methods, it’s time to add products to your online store. If you haven’t done any product sourcing yet, check out our comprehensive guide on choosing the best products to sell online.
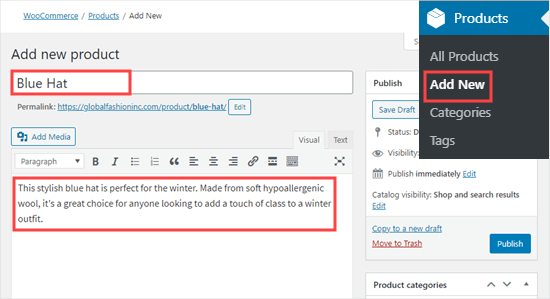
To add a product, let’s head over to Products » Add New from your WordPress admin area.
First, you need to enter a product title and provide a detailed description. This not only helps to drive sales by giving potential customers the details they need, but it also helps your product page rank high on search engines.
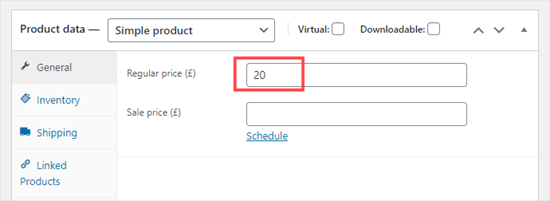
Next, you can scroll down to the ‘Product Data’ section below the description box. Here, you need to decide on your pricing and enter the ‘Regular Price’ of your product.
If it’s on sale, then you can set a ‘Sale Price’ too.
Under the ‘Product Data’ box, you can optionally enter a short description of your product. This appears in areas where the long description will not fit.
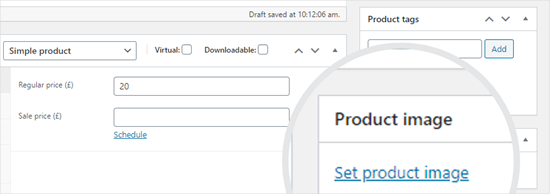
Next, let’s click on the ‘Set Product Image’ link on the right-hand side of the screen to upload product images.
Expert Tip: We highly recommend that you optimize your images for the web to ensure that your website is always blazing fast.
Above the product photo upload area, you can also set your product categories and tags. We recommend giving your product at least one category.
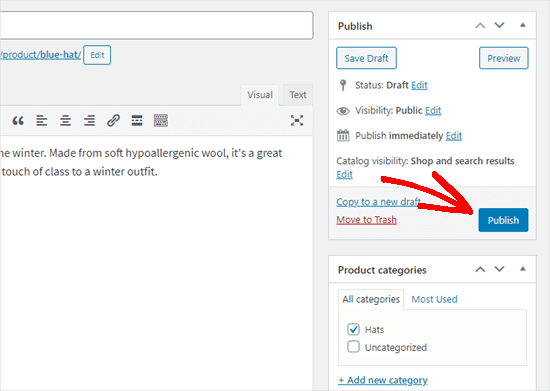
Once you’ve entered all the details for your product, simply click on the ‘Publish’ button to put it live on your website.
From here, you can repeat the same process to add more products if needed.
Once you’ve added your products, you can visit your site to see them listed on your Shop page.

5. Change or Customize Your WordPress Theme
Themes control the design template of your website. There are thousands of free and paid WordPress themes that you can choose from, and most of them are compatible with WooCommerce.
However, just like not every outfit is perfect for every occasion, not every theme is ideal for showcasing your beautiful boutique items.
Bluehost may install the ‘Storefront’ theme by default, or you may be using another default theme right now.
The great thing is, you can easily change your website’s design by installing a different WordPress theme. Not sure where to start? We’ve put together a curated list of the very best WooCommerce WordPress themes specifically designed for online stores like yours.
Once you’ve found a theme that catches your eye, you’ll need to download and install it. If you need a little help with this, check out our beginner-friendly guide on how to install a WordPress theme.
Most WordPress themes are highly customizable. For instance, you can change fonts, colors, header styles, backgrounds, and more to match your brand.
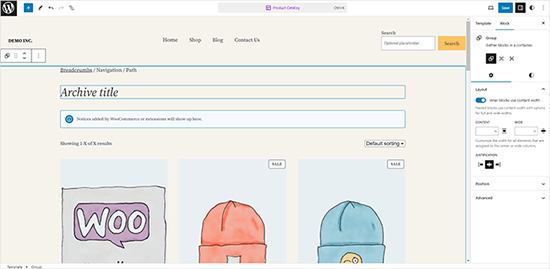
If you are using a block theme, then you can go to Appearance » Editor to customize your theme.
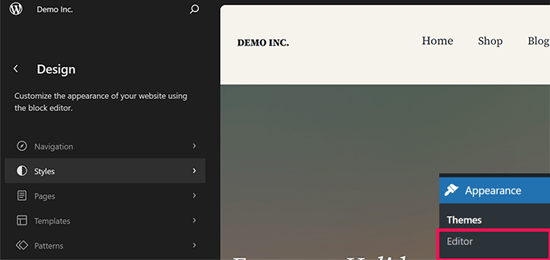
It works like the default WordPress editor, using blocks to add or remove items from your website layout.
You can choose any page or template to edit. You can also just point and click on items in the preview panel to edit them.
On the other hand, if you are using a classic WordPress theme, then you can customize it using ‘Theme Customizer’ instead.
Simply go to the Appearance » Customize page to launch the theme customizer. You’ll then see a live preview of your site with customization options in the left column.
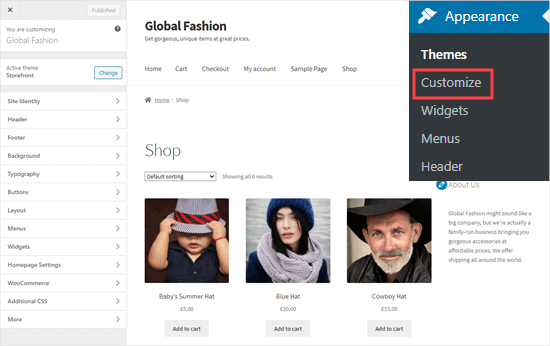
The tabs down the left-hand side let you change various aspects of your site. The WooCommerce options let you control how your store displays.
For instance, you can go to WooCommerce » Product Catalog to change how your Shop page looks. Here, we’ve set our shop page to have four images per row instead of 3 per row.
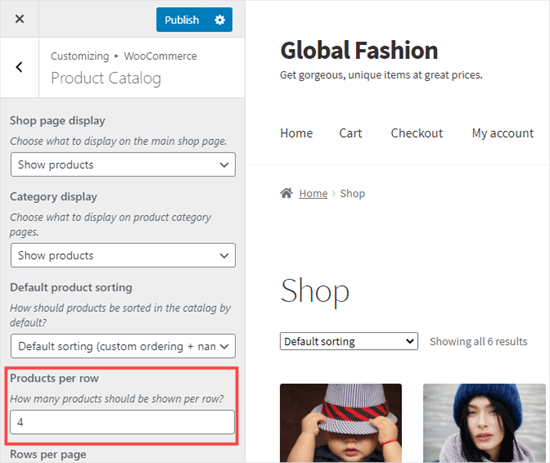
As soon as you make a change, you will see a live preview of your customization. Make sure you check that you are happy with all your pages, including functional ones such as the cart and checkout pages.
Once you’ve finished making changes using the theme customizer, you just need to click the Publish button on the top left. This saves your changes and makes them live on your website.
Pro Tip: If you want to further customize your WooCommerce store, you can use one of the drag & drop page builders, or use a styling plugin like CSS Hero to create custom styles without any code.
6. Add Plugins to Extend Your Online Shop and Drive Sales
Plugins are like apps for your WordPress site. They allow you to add new features to your online store. Some WordPress plugins are essential that all WooCommerce stores may need, and some you can choose to add specific features.
The best part about WordPress is that there are over 59,000 plugins that you can use to add new features to your site without hiring a developer.
You can follow our step-by-step guide on how to install a WordPress plugin to install any of the plugins below.
Here are our recommendations for some of the most essential plugins for your online shop:
- MonsterInsights – Leading WordPress analytics plugin that helps you track visitor stats (free version available).
- WPForms – #1 form builder for WordPress, trusted by 6 million websites. You can use it to build contact forms, surveys, polls, etc. (free version available).
- AIOSEO – Leading WordPress SEO plugin that will help your store rank higher in Google and other search engines (free version available).
- SeedProd – The #1 drag-and-drop page builder that lets you easily create custom WooCommerce checkout pages, cart pages, product grids, and more.
- Duplicator – Leading WordPress backup plugin that will help you make automated backups in case of an emergency (free version available).
- OptinMonster – The best conversion optimization toolkit that will help you get more subscribers and sales (free version available).
- Sucuri – Offers a free website malware scanner plugin for WordPress.
- WP Mail SMTP – Helps improve the email deliverability of your website, so customers get their receipt, login information, etc. (free version available).
- FunnelKit Automations – Allows you to customize WooCommerce emails and set up automated follow-up emails and workflows to boost sales.
Aside from these, we have our complete list of the best WooCommerce plugins that you may want to check out for additional features.
Here are some of our other recommended WooCommerce plugins and tools that can help you make more sales.
If you’re looking for a clever way to boost sales and get more customers buying from your online boutique, then offering smart coupons is a fantastic strategy.
Instead of simply giving your customers a discount on everything in their WooCommerce cart, you can use smart coupons to create all kinds of different campaigns and promotions. For example, you might create ‘buy one get one’ (BOGO) coupons to really boost sales of a specific item (such as winter coats at the start of summer.)
We recommend using Advanced Coupons to create all kinds of smart WooCommerce coupons including BOGO deals, percentage discounts, free gift coupons, and much more. It gives you a ton of flexibility to create really effective promotions for your boutique.
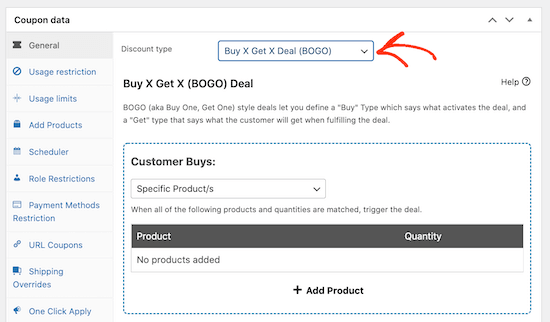
Want to see all the amazing things this plugin can do for your boutique? We put it through its paces and wrote up a complete Advanced Coupons review. It’s packed with information to help you decide if it’s the right tool to supercharge your sales.

Let’s face it, people love to be in the know and no one wants to miss out on something special. That’s where FOMO (Fear of Missing Out) comes in, and it can be a game-changer for your online boutique.
When used strategically, FOMO can create a sense of urgency, get shoppers more engaged with your site, and ultimately lead to more sales. A fantastic way to tap into this on your boutique website is by using TrustPulse.
This powerful social proof plugin shows real-time actions visitors are taking on your website including recent purchases. We use TrustPulse to show purchases on our partner websites such as OptinMonster, and the results have been amazing!
In fact, we’ve written a detailed TrustPulse review based on our experiences with the plugin, which can help you decide whether it’s right for your online boutique.
If you do decide to go ahead with TrustPulse, then you can see our step-by-step guide on how to leverage FOMO and increase conversions. It’s got everything you need to get started and turn those browsers into buyers.
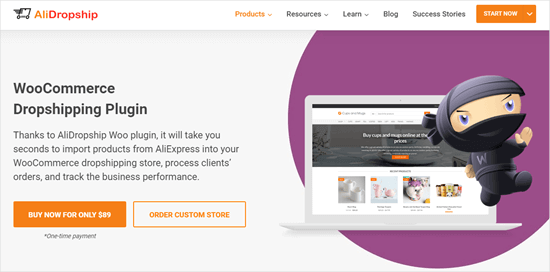
If you love the idea of having an online boutique but don’t want to deal with the headaches of storing products and shipping them yourself, then you should definitely check out AliDropship. It’s the best dropshipping plugin for WordPress that allows you to import products directly from AliExpress into your WooCommerce store.
It’s a fantastic way to get started selling online with less upfront investment and less day-to-day management.
Alternative: Another popular online shopping business model is to create an Amazon affiliate store. This allows you to promote third-party products in your boutique store and send them to customers for a commission.
You can check out our guide to building an Amazon affiliate store using WordPress.
Today’s shoppers expect quick answers to their questions, and any hesitation about their purchase can easily lead to a lost sale for your boutique. At WPBeginner, we offer professional services including emergency assistance for hacked sites, so I know how important fast customer support is.
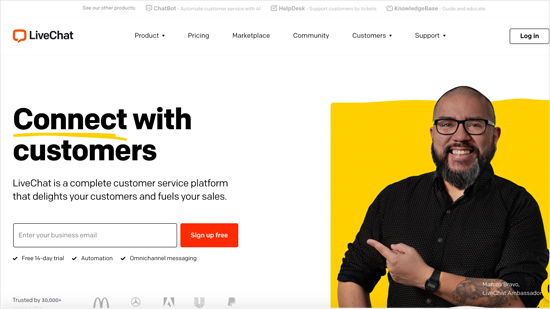
Want to add live chat to your boutique site? In our opinion, LiveChat is one of the best live chat software in the market. It lets you answer visitors and customers from your laptop, tablet, and mobile devices. You can add your team members to speed up replies.
We actually use LiveChat on our WPBeginner Pro Services website, so we can respond to visitors and potential customers immediately. We’ve even written a full LiveChat review based on our own experiences, so you can see if it’s the right fit for your boutique.
The same company also has another great tool called ChatBot, which helps you build smart workflows to automatically answer customer questions and boost sales. Once again, we’ve put this plugin to the test and created an in-depth ChatBot review, so you can learn more about how it could work for your online boutique.

Think of an email list as a special collection of names and email addresses of people who have said, “Yes, I want to hear from you!” They’ve given you permission to send them updates and promotions about your amazing boutique.
You can build this valuable list using email marketing software and then easily send an email blast to everyone on your list with updates about your latest blog posts, new arrivals in your online store, or any other exciting news about your business.
There are hundreds of email marketing services out there, but we recommend Constant Contact for your boutique website. It makes it super easy to connect with your customers via email, so you can keep them in the loop about new products, special deals, and encourage them to come back and shop again.
Constant Contact is packed with powerful features to help you do this effectively, including automated follow-up emails, tools to test different email approaches, seamless integration with WooCommerce, and the ability to send personalized emails automatically.
To learn more, check out our detailed Constant Contact review.
Alternative: If you’re looking for a Constant Contact alternative, then we recommend Drip for Pro users and Sendinblue as a generally good alternative.
7. Learn More About WordPress to Grow Your Store
WPBeginner is the largest free WordPress resource site for beginners. Our main goal is to provide helpful and easy-to-follow WordPress tutorials for small business owners, bloggers, and non-techy WordPress site creators. You can find out more about us here.
To learn more about WordPress, we recommend starting with the:
- WPBeginner Dictionary – The best place to look up WordPress terms. We explain everything in a beginner-friendly way.
- WPBeginner Videos – New to WordPress? Watch our videos to master WordPress.
- WPBeginner Blog – The central place for all our WordPress tutorials.
We also have a guide to show users how to make the most out of WPBeginner’s free resources.
Many of our users type their questions in Google and just add ‘wpbeginner’ at the end of it. This shows them the most helpful answer to their question.
For further help and support, we recommend joining our free Facebook group WPBeginner Engage. It has 98,000+ members and focuses on helping beginners and non-tech-savvy users go further with WordPress.
You can also subscribe to the WPBeginner YouTube Channel. We regularly share helpful WordPress video tutorials.
FAQs About Creating an Online Boutique Shop
Having helped thousands of people start their online shop, we have answered quite a lot of questions. Below are the answers to the most frequently asked questions about creating an eCommerce website.
Do I need a business plan or business license to sell online?
No. you don’t need a business license to sell online. You can start as a sole proprietorship, which is what most people do.
Once your business starts to take off, you can register an official LLC, corporation, or private limited company based on your country / legal jurisdiction.
Reducing these upfront costs and barriers can let you get started faster.
How do I choose the best products for my online store?
All boutique owners need to think about their target audience because it will have a huge impact on their overall success.
For instance, an online clothing store aimed at 20-somethings might sell geeky t-shirts. An online clothing boutique for retired boomers might focus on practical but stylish leisurewear.
We have a detailed guide on how to choose the best products to sell online.
Also, you can take a play out of the dropshippers’ playbook and expand your product collection using a dropshipping plugin. This lets you sell products without the inventory hassle.
How can I make more sales?
You can make more sales from your eCommerce website by building an email list, growing your social media following, or even partnering with influencers.
You could also use more advanced marketing strategies like retargeting visitors who leave products in their shopping carts.
Like any retailer, you need to pay attention to measuring marketing efforts and tracking what works. Remember, your online business is competing against many other online stores like eBay and wholesalers, so you need to consider how to make your shop stand out.
Do I need to charge sales tax?
You may need to charge sales tax, depending on where you live. You should check your local government’s website for details on this.
There are WooCommerce plugins that can handle sales tax for you.
Can I charge for shipping separately?
Yes, you can absolutely add shipping costs to your WooCommerce checkout. There are plugins that can automatically calculate the shipping rates based on the user’s address.
You can also use the Advanced Coupons plugin that we mentioned above to offer free shipping on orders above a certain $ amount to encourage higher purchases.
Can I sell my products in bulk / wholesale?
Yes, you can absolutely sell your products in bulk at lower prices. While WooCommerce doesn’t have this functionality by default, you can use the Wholesale Suite for WooCommerce plugin to sell your products in bulk.
For example, if you have an online clothing business, you can offer wholesale suppliers a separate login, bulk price discounts, and separate order forms so they can place large orders at once.
How do I get started with my online boutique?
Starting a new business can feel daunting, but you just need to work through our guide step by step.
Begin by thinking about your ideal customer and then registering a domain name and hosting account.
We strongly recommend using Bluehost’s WooCommerce hosting to keep your startup costs as low as possible. The setup process is straightforward and won’t take more than 30 minutes.
Plus, WordPress + WooCommerce is the best website builder for your online store.
Start Your Online Boutique Shop Today »
Are there other eCommerce platforms for boutique shops?
Yes, aside from WooCommerce, there are several other eCommerce platforms that you can use, such as Shopify, BigCommerce, Wix, etc.
We have done a detailed comparison of the best eCommerce platforms. However, we always recommend users use WooCommerce because of its flexibility, affordability, and ease of use.
We hope this article helped you learn how to start an online boutique shop that drives sales. You might also like our articles on how to grow your online business and how to track WooCommerce conversions to make more sales.
If you liked this article, then please subscribe to our YouTube Channel for WordPress video tutorials. You can also find us on Twitter and Facebook.


Abdullah Al Imran
Hi, This is a nice tutorial for creating a shop website. thanks for sharing such nice things.
WPBeginner Support
Glad our guide was helpful
Admin