Speed is crucial for the success of an eCommerce site. It not only improves customer experience, but it directly impacts conversions and sales.
At WPBeginner, we’ve helped countless online businesses achieve significant growth by optimizing their websites for lightning-fast performance.
This comprehensive guide draws on our extensive experience to show you how to easily speed up your eCommerce store to improve performance and conversions.
Why Speed Matters for Your eCommerce Store
Speed is extremely important when it comes to user experience. No one likes a slow website, a slow computer, or a slow app.
But for online stores, a slow website can actually cost you business.
For instance, a study found that a single-second delay in page load time results in a 7% loss in conversions, 11% fewer page views, and a 16% decrease in customer satisfaction.
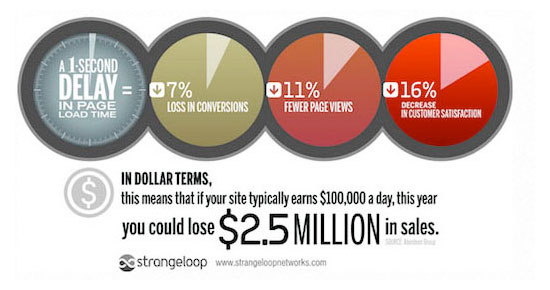
In simpler words, slow websites can lead to lower eCommerce sales.
Now, apart from user experience and sales, eCommerce site speed also affects your SEO rankings. Search engines like Google consider speed as an important user experience indicator and ranking factor.
In fact, Google’s page experience search update is solely focused on user experience metrics like bounce rate and website speed. A faster eCommerce website will help you bring more free traffic from search engines.
That being said, let’s take a look at how to easily bump up your eCommerce store speed and performance.
Here is a quick overview of the topics we will cover in this guide:
- Choose a Better eCommerce Hosting Provider
- Install a WordPress Caching Plugin
- Use the Latest PHP Version
- 4. Use the Latest Version of WordPress & WooCommerce
- Optimize Product Images for Performance
- Use a DNS Level Website Firewall
- Choose a Better WordPress Theme
- Use Better WordPress Plugins
- Reduce External HTTP Requests
- Reduce Database Requests
- Optimize WordPress Database
- Use Staging Sites to Track Performance Issues
- Offload eCommerce Emails
- Use Better Conversion Rate Optimization Tools
Video Tutorial
If you prefer written instructions, then just keep reading.
1. Choose a Better eCommerce Hosting Provider
All eCommerce performance optimization you make to your website will have little impact if you don’t have a good eCommerce hosting provider.
Not all WordPress hosting companies are the same. For better performance, you need to choose an eCommerce hosting provider that does the following:
- Provides a stable and up-to-date platform to host your eCommerce store.
- Is optimized for WordPress, WooCommerce, or any other eCommerce plugin that you may want to use.
- Their servers are optimized for speed and performance. This means built-in caching, security, and other features to improve performance.
We recommend using SiteGround. This is where we host WPBeginner, and they are one of the officially recommended WordPress hosting providers.
SiteGround servers run on the Google Cloud Platform, which is known for high performance. They have built-in caching and even have their own optimization plugin that automatically implements many of the performance tips that we will recommend later in this article.
If you are looking for alternatives, then you can check out our list of the best WooCommerce hosting providers.
After setting up your eCommerce store on a good hosting service, you can implement the following optimization tips to boost performance.
2. Install a WordPress Caching Plugin
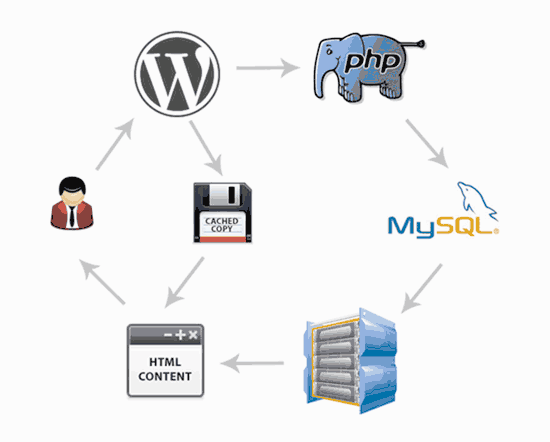
WooCommerce is a dynamic eCommerce platform. This means all your product data is stored in a database, and product pages are generated when a user visits your website.
To do this, WordPress needs to run the same process each time. If more people visit your eCommerce store at the same time, then it will slow down and may even crash.
A caching plugin helps you fix that issue.
Instead of generating pages each time, a caching plugin shows the user a cached version of the HTML page. This frees up your server resources and allows it to run more efficiently, which improves website loading time.
There are some great WordPress caching plugins available. We recommend using WP Rocket. It is the best WordPress caching plugin on the market, with the most beginner-friendly settings.
Unlike other WordPress caching solutions, we appreciate that WP Rocket doesn’t wait for users to visit a page to generate a cached version. Instead, it automatically prepares a cache of your website and keeps it up to date.
With the right WP Rocket settings, you can easily get near-perfect scores in speed test tools like Pingdom, GTMetrix, Google Pagespeed Insights, and more.
For details and instructions, see our article on how to install and set up WP Rocket in WordPress.
Top WordPress hosting companies, like SiteGround and Bluehost, offer their own caching solutions, too.
SiteGround SG Optimizer
SiteGround allows you to easily turn on caching in your eCommerce store by using their SG Optimizer plugin.
This all-in-one performance tool includes caching, performance tweaks, WebP image conversion in WordPress, database optimization, CSS minification, GZIP compression, and more.
Simply install and activate the SG Optimizer plugin in WordPress. For more details, see our step-by-step guide on how to install a WordPress plugin.
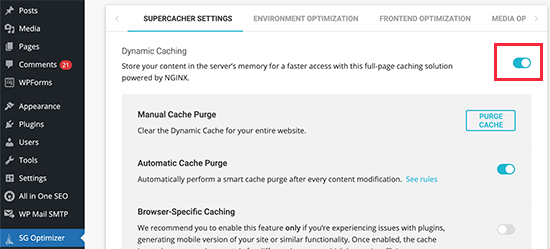
Upon activation, click on the SG Optimizer menu in your WordPress admin sidebar to access plugin settings. From here, you need to turn on the Dynamic Caching option.
Turn on Caching on Bluehost
Similarly, Bluehost also allows you to use its built-in caching system for optimizing WooCommerce.
Simply log in to your Bluehost dashboard and go to the Websites page. If you have multiple sites, then select your site and then switch to the ‘Speed’ tab.
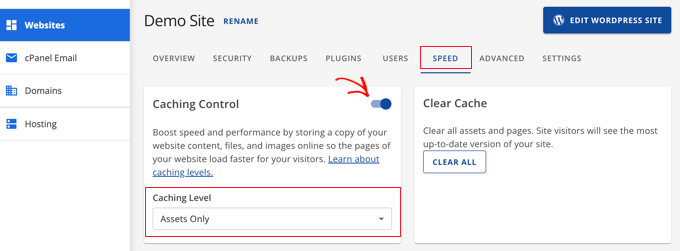
From here, you need to turn on caching control using the toggle. You can also choose from three different caching levels. Bluehost recommends the ‘Assets Only’ level for eCommerce sites.
3. Use the Latest PHP Version
WordPress and WooCommerce are both mainly written in the PHP programming language.
With each new version, PHP improves in performance and becomes faster. It also fixes bugs and patches security issues that may compromise your website’s stability and speed.
This is why you should always use the latest PHP version.
You can find out your eCommerce store’s PHP version by visiting Tools » Site Health in your WordPress dashboard and switching to the ‘Info’ tab.
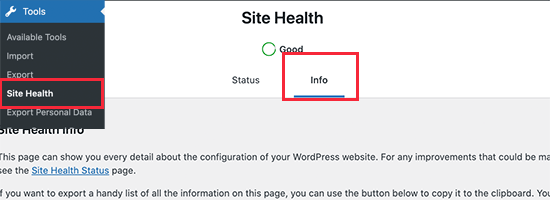
From here, you need to click on the ‘Server’ section to expand it.
You will be able to see the PHP version used by your server.
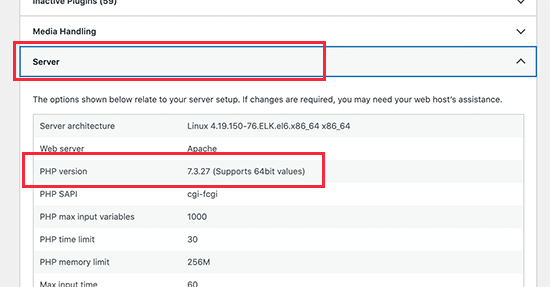
If your website is running on a PHP version lower than 8.0, then you should reach out to your hosting provider and ask them to update it for you.
For more details, see our article on how PHP updates impact your website.
Note: Some managed WordPress hosting companies like SiteGround have built their own Ultrafast PHP to improve overall server response time. Others are using PHP FastCGI to help customers improve eCommerce speed.
4. Use the Latest Version of WordPress & WooCommerce
WordPress and WooCommerce developers spend a significant amount of time improving performance during each development cycle. This makes both apps run more efficiently and use fewer server-side resources.
Each new version also fixes bugs and strengthens security, which is crucial for an eCommerce business.
As the store owner, it is your responsibility to make sure that you are using the latest version of WordPress, WooCommerce, other plugins, and your WordPress theme.
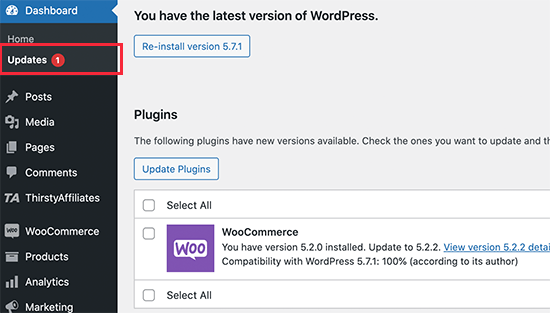
Simply go to the Dashboard » Updates page to install all available updates.
Related: See our guide on the pros and cons of using WordPress for eCommerce.
5. Optimize Product Images for Performance
Product images are one of the most visually important things for an online store. Better product images keep potential customers engaged and can help boost sales conversion.
This is why it’s important to add high-quality product images. However, you need to make sure that large image file sizes are properly optimized.
There are two ways to optimize product images for the web without losing quality.
First, you can optimize each product image on your computer before uploading it to your website. This requires image editing software like Adobe Photoshop, Affinity, or GIMP.
Most of them have the option to export an image for the web. You can also adjust the quality of the image before saving it for upload.
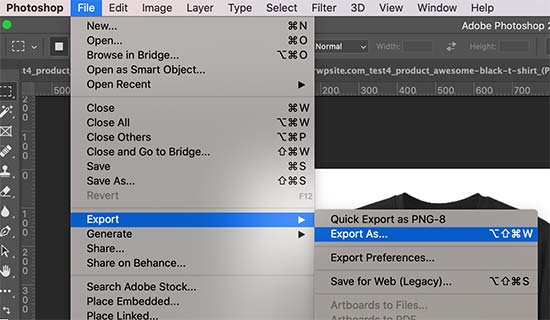
Alternatively, you can use an image compression plugin for WordPress. These plugins automatically optimize your product image size for better site performance.
Aside from image compression, the image file type you choose can also help. For example, we find that JPEG is a better format for images that have a lot of colors, whereas PNG images are better for transparent images.
6. Use a DNS Level Website Firewall
Brute force and DDoS attacks are common internet nuisances. Basically, hackers try to overload your server to break in, steal data, or install malware.
Most hosting companies have basic safeguards that protect your websites from such attacks. However, one downside of these attacks is that they make your website load extremely slowly.
This is where you need a Website Application Firewall (WAF).
Now, common WordPress firewall plugins run on your own web server. This makes them a little less efficient, as they cannot block suspicious attacks until they reach your server.
On the other hand, a DNS-level firewall is able to filter your website traffic on the cloud and block suspicious attacks even before they reach your website.
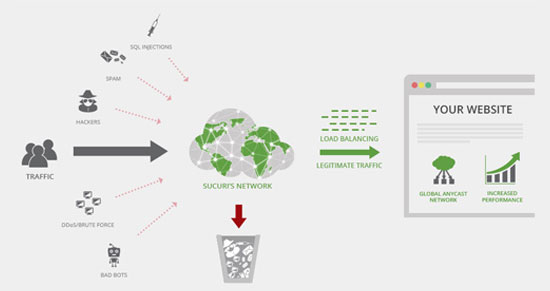
We recommend using Sucuri. It is the best WordPress firewall plugin with a comprehensive security suite.
Sucuri also comes with a powerful CDN (content delivery network). A CDN serves your website’s static content (images, stylesheets, JavaScript) from a global network of servers. This further reduces your server load and improves overall site load time.
If you are looking for a free option, then Cloudflare free CDN gives you basic level DNS firewall protection. We are currently using it on WPBeginner.
7. Choose a Better WordPress Theme

WordPress themes control the appearance of your eCommerce store. However, not all of them are optimized for performance and often add too much clutter, which makes your website slower.
When choosing a WordPress theme for an eCommerce store, you need to find the balance between functionality and speed. Theme features like sliders, carousels, web fonts, and icon fonts can slow down your website.
We recommend going for a simple theme and then using plugins to add the features you need. This gives you better control over both the performance and appearance of your online store.
WordPress themes by StudioPress, Elegant Themes, and Astra are all optimized for performance. For more individual theme recommendations, see our expert picks for the best WooCommerce themes for WordPress.
8. Use Better WordPress Plugins
One of the most often asked questions by WordPress beginners is how many plugins they can use in their store without affecting performance.
The answer is as many as you like. We have 62 plugins installed on WPBeginner and our site still loads in less than half a second.
The total number of plugins does not affect the performance of your online store. It’s the quality of the code that does.
A single poorly-coded WordPress plugin may load too many scripts or stylesheets that could affect page load speed.
On the other hand, a well-coded plugin would use standard best practices to minimize the performance impact. We recommend testing your plugins for performance impact before and after installing them.
We also maintain a list of the must-have WooCommerce plugins, where we have hand-picked essential WooCommerce plugins used by most online stores.
For example, the SeedProd drag-and-drop landing page builder helps you build blazing-fast eCommerce landing pages without writing any code.
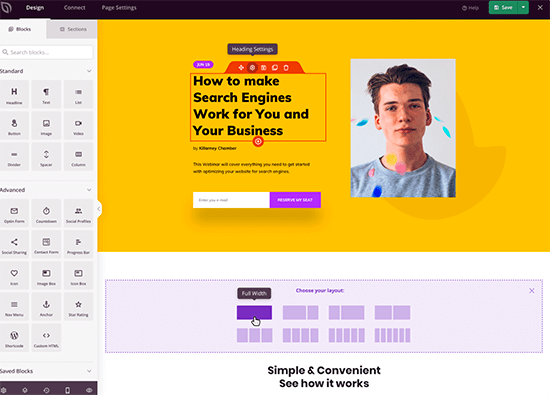
For more on this topic, see our guide on how to choose the best WordPress plugins. It has a step-by-step process on how to evaluate WordPress plugins and pick the right one for your online store.
9. Reduce External HTTP Requests
A typical eCommerce page contains several components. For instance, it has images, CSS and JavaScript files, video embeds, and more.
Each component is separately loaded by users’ browsers by making an HTTP request to your server. More HTTP requests mean longer page load times.
Your server may also be fetching things from third-party tools and services like Google Analytics, social media retargeting, and other services. These are called external HTTP requests. These can take even longer to finish on a typical web page load.
It is ok to have these scripts on your WordPress website, but if they are affecting your website’s performance, then you need to consider reducing them.
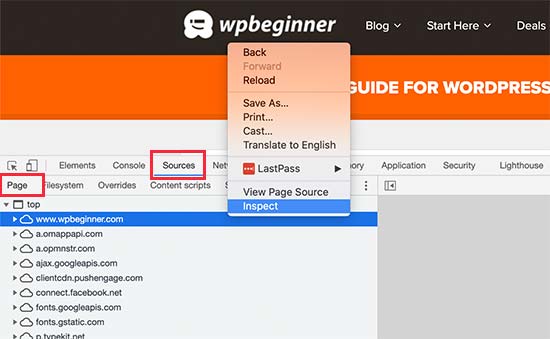
You can view external HTTP requests by visiting your website and opening the Inspect tool in your browser. From here, switch to the Sources » Page tab to view all external HTTP requests.
10. Reduce Database Requests
WordPress and WooCommerce use a database to store a lot of content and settings. Your WordPress theme and plugins also make database queries fetch and display that information on the screen.
Database queries are extremely fast, and your website can run hundreds of those in mere milliseconds. However, if your website is handling a traffic spike, then these queries can slow down your page load time.
You can check the database calls by using a plugin like Query Monitor in WordPress. Upon activation, the plugin will add the query monitor menu to your WordPress admin bar.
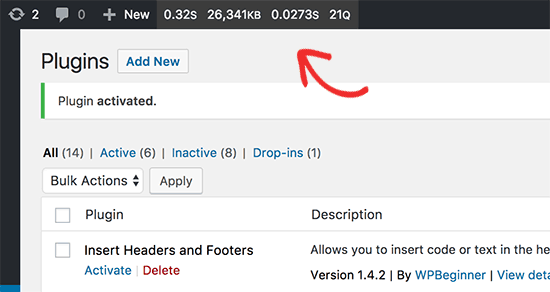
However, minimizing these requests may not be possible for beginner-level users. For instance, you may need to modify your WordPress theme to reduce database calls.
If you are comfortable editing your WordPress theme files or debugging code, then you can look for database calls that can be avoided.
Other users can try finding a better WordPress theme and alternate plugins to reduce database calls if needed.
11. Optimize WordPress Database
Over a period of time, your WordPress database may get bloated with information that you may not need anymore.
This clutter can potentially slow down database queries, backup processes, and overall WordPress performance. From time to time, it’s important to optimize your WordPress database to declutter unnecessary information.
Simply install and activate the WP Sweep plugin. Upon activation, simply go to Tools » Sweep to clean up your WordPress database.
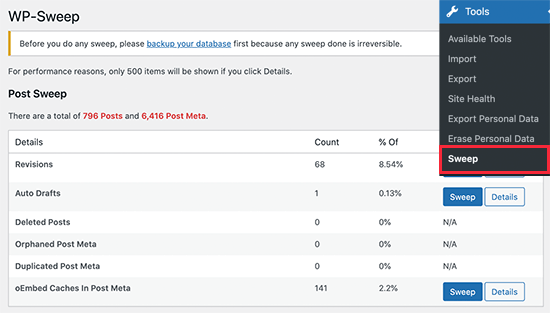
For more on this topic, see our article on how to optimize the WordPress database for speed and performance.
12. Use Staging Sites to Track Performance Issues
Making changes to a live eCommerce store can cause issues. For instance, a customer may lose their order, or your site may go down during a sale event.
A staging site helps you easily try out performance optimization tips, new plugins, or a theme without affecting your live store.
Basically, a staging site is a clone of your live website that is used for testing changes before making them live.
Many popular WordPress hosting companies offer a 1-click staging site setup. Once set up, you can try your changes and track your page load speed and performance.
Once you are ready to implement those changes, you can simply deploy the staging site to the live version.
For step-by-step instructions, see our tutorial on how to create a staging site for WordPress.
13. Offload eCommerce Emails

Emails play a very important role in an eCommerce store. They are used to deliver order confirmations, invoices, password reset emails, sales and marketing messages, and more.
However, many beginners don’t realize this and use their hosting provider’s limited email functionality for eCommerce emails.
Most hosting companies don’t support the default WordPress mail function. Some even disable it to prevent spam and abuse.
This is why you need to use a dedicated SMTP email service provider along with the WP Mail SMTP plugin. These companies specialize in sending mass emails and ensuring higher deliverability, which means your emails don’t end up in the spam folder.
We recommend using SendLayer, as they are one of the best SMTP service providers for transactional emails.
SendLayer is easy to set up and works with WooCommerce and all top WordPress contact form plugins. Plus, they offer a 30-day free trial with up to 50,000 emails.
If you want to look at others, then you can check out SMTP.com, Brevo (Formerly Sendinblue), or Mailgun.
14. Use Better Conversion Rate Optimization Tools
When it comes to eCommerce websites, conversion rate optimization (CRO) is important for increasing sales.
A typical online store has many dynamic elements to increase conversions, such as a free shipping bar on the homepage, a Black Friday sale countdown timer in the website header, an exit-intent popup on checkout pages, or even spin-a-wheel gamification on the mobile site to reduce cart abandonment.
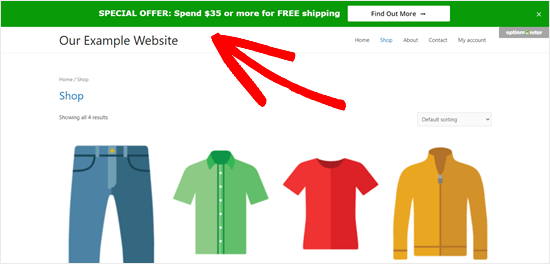
Often, store owners and retailers use a combination of tools and plugins to add these dynamic elements. The challenge is that not all of them are properly optimized for speed.
This is why it’s important to choose conversion optimization tools that offer a suite of features in one platform, so you’re not loading multiple external scripts.
Below is a list of popular conversion optimization tools that we use on our eCommerce websites:
- OptinMonster – The most powerful conversion optimization toolkit that lets you create personalized popups, gamification campaigns, floating bars, and more.
- LiveChat.com – The best live chat software. They also offer ChatBot automation software as well that works for both WooCommerce and Shopify.
- TrustPulse – The best social proof software in the market that’s optimized for speed. You can use it to show real-time user activity without slowing down your site.
When it comes to analytics and A/B testing tools, we recommend only using what’s absolutely needed.
For example, if you are launching a new landing page or website design, then it’s important to run heatmap analytics. However, after a short period of analysis, we recommend disabling heatmaps so it doesn’t slow down your website speed.
Similarly, for A/B testing tools, you don’t need to run those scripts on every page of your website. You can selectively load A/B testing scripts on specific pages, and when you’re done with the test, don’t forget to remove the script.
We hope this article helped you speed up your eCommerce website. You may also want to see our WordPress security handbook or our complete WordPress eCommerce setup guide.
If you liked this article, then please subscribe to our YouTube Channel for WordPress video tutorials. You can also find us on Twitter and Facebook.


Jiří Vaněk
Website speed is an eternal topic, and almost everyone using WordPress and WooCommerce deals with it. No one wants a slow website. Thank you for this tutorial. I went through all your points step by step and applied what I was missing. What helped me the most was CDN and WP Rocket for caching. I noticed a significant increase in speed there. WP Rocket took care of local page speed, and CDN ensured faster delivery worldwide. For me, these are two key points that can dramatically increase speed. Thanks to the tutorial, I also checked my MySQL and PHP versions and asked my web hosting provider to upgrade to the latest versions.
kzain
Have you noticed a particular method from this article that had the most impact on your site’s performance?
I’m curious if using a CDN or another approach made a bigger difference in your site’s speed.
WPBeginner Support
A CDN will normally help sites the most if the distance from where the site is hosted to the visitor. Otherwise, it depends on how the site is set up for which step would work the best.
Admin
Jiří Vaněk
It’s important to check almost everything mentioned in the tutorial. From my experience, the four things that helped the most with increasing speed are as follows. A quality cache plugin, which had a rapid impact on speed—I use WP Rocket. CDN, which started delivering content faster to users from foreign countries (I use CloudFlare’s CDN). Upgrading the PHP version to the current 8.3, as well as upgrading the MySQL server version. The current PHP seems to work more optimally and much faster. The same goes for MySQL. So for me, these four things are key, but of course, that doesn’t mean the other aspects aren’t important.