Setting up Google Ads conversion tracking can help you uncover insights about your ad campaign’s performance. You will be able to find out which campaign is performing the best, how users interact with your ads, and how you can improve conversions.
However, many website owners don’t know how to link Google Ads with their WordPress site. They can feel overwhelmed by the idea of setting it up, even though it is actually easier than they might think.
At WPBeginner, we run multiple paid campaigns, and we use MonsterInsights to set up Google Ads tracking.
And in this article, we will show you how to properly set up eCommerce Google Ads conversion tracking in WordPress. This is the exact same method that we use on our own websites.
Why Set Up Google Ads Conversion Tracking in WordPress?
If you are running Google Ads for your WordPress blog, eCommerce store, or membership site, then it is important to know how the ads are performing. You can’t improve what you can’t measure.
Tracking Google Ads conversions helps you see how much revenue you have earned from users who clicked on your ad campaigns. It also helps you see which paid keywords and ad groups drive the most conversions. This way, you can optimize your campaigns and budget for more profitable search terms.
Besides that, Google Ads conversion tracking also uncovers how users behave on your WordPress site after clicking an ad.
For instance, you might see a lot of users arrive on a landing page but abandon it after adding products to the cart.
You can use this information to improve the checkout process, offer discounts and incentives as users are about to leave your site, and provide an overall better user experience.
That said, let’s see how you can add Google Ads tracking in WordPress.
Adding Google Ads to Your WordPress Website
The easiest way to connect Google Ads with WordPress is by using MonsterInsights. It is the best analytics plugin for WordPress that helps you set up Google Analytics without adding code.

At WPBeginner and our other brands, we also use MonsterInsights to connect Google Analytics and Google Ads. Plus, it helps us set up advanced tracking in WordPress. To learn more, see our detailed MonsterInsights review.
MonsterInsights offers a PPC Tracking addon that lets you set up comprehensive conversion tracking without touching a single line of code or hiring a developer.
Note: We will use the MonsterInsights Pro license for this tutorial because it includes the PPC Tracking addon. There is also a MonsterInsights Lite version you can use for free to set up Google Analytics.
First, you’ll need to install and activate the MonsterInsights plugin. If you need help, then please see our guide on how to install a WordPress plugin.
Upon activation, you will be redirected to the welcome screen in your WordPress dashboard. Go ahead and click the ‘Launch the Wizard’ button.

Next, you can follow the onscreen instructions to connect Google Analytics to your site. For more details, you can see our guide on how to install Google Analytics in WordPress.
Once you’ve connected Google Analytics with WordPress, the next step is to install the PPC Tracking addon.
Simply go to Insights » Addons from your WordPress dashboard and navigate to the ‘PPC Tracking’ addon.
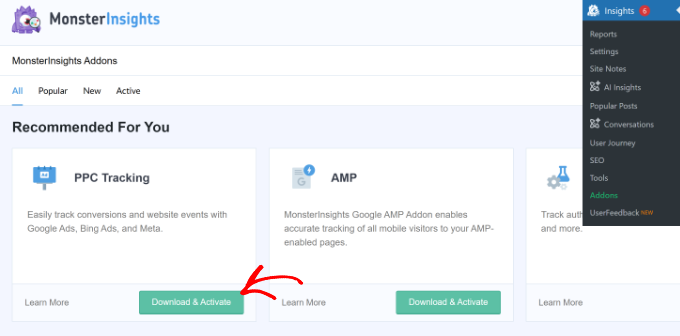
Go ahead and click the ‘Download & Activate’ button. The addon will now automatically install and activate on your site.
Creating a Conversion Action in Google Ads
Next, you’ll need to create a conversion action in Google Ads.
First, you can visit the Google Ads website and log in to your account.
After that, go ahead and click the ‘+’ symbol in the left column.
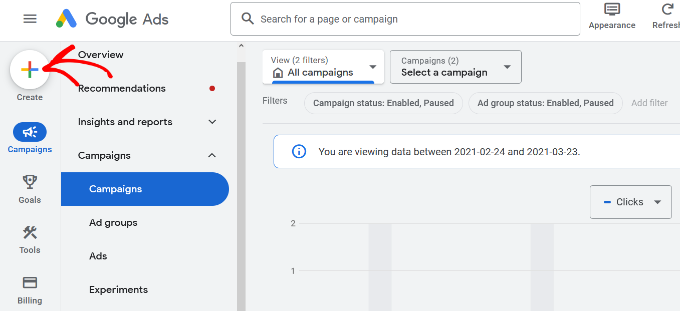
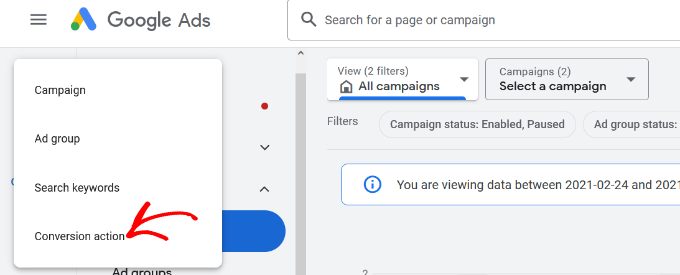
Next, you’ll have different options to create.
Simply click on the ‘Conversion action’ option.
Next, Google Ads will ask you to select the type of conversions you want to track. It will show you 4 options: a website, app, phone call, or import.
For this tutorial, we will choose the ‘Website’ option for tracking ad conversions.

After that, you’ll need to enter the website URL where you’d like to measure conversions.
Once that’s done, simply click the ‘Scan’ button.

Google Ads will now show 2 options to create conversion actions, including an automatic and manual method.
In the automatic method, you’ll need to select the conversion goal, choose a match type, and enter the URL. This way is suitable if you know which events to count as conversions.
However, we recommend selecting the manual method as it gives you more control. Simply scroll down and click the ‘+ Add a conversion action manually’ option.
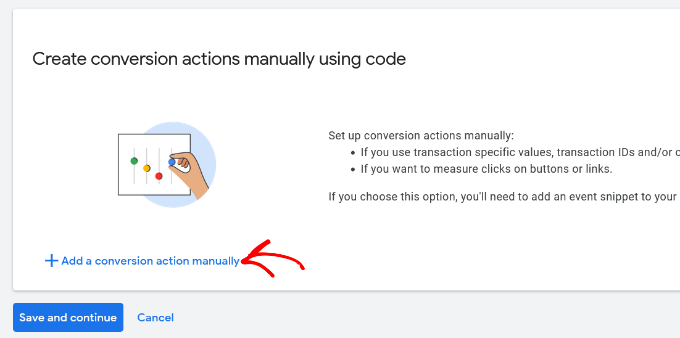
Next, you’ll need to enter the Conversion action details.
First, you can select the ‘Goal and action optimization’ for your conversion. This is the action you’d like to track.
For example, when a user subscribes to your newsletter, makes a purchase, adds a product to a cart, submits a contact form, and more.
For the sake of this tutorial, we will select ‘Subscribe’ as the goal. After that, you can enter the Conversion name.

You can now scroll down and select a Value for your conversion. Google Ads lets you choose the same value for each conversion, assign different values for conversions, or don’t use a value for conversion action.
For this tutorial, we will select the ‘Use the same for each conversion’ option, select the currency, and enter a value.

Besides that, you can also choose how many conversions to count per click.
If you are tracking email newsletter signups, then we recommend selecting the ‘One’ option. This way, each subscriber is counted once. However, you can use the ‘Every’ option in an eCommerce store and count each purchase as a conversion.
After selecting these options, simply click the ‘Done’ button at the bottom.

You can now see your conversion action under the ‘Create conversion actions manually using code’ section.
Go ahead and click the ‘Save and continue’ button to get instructions for adding the tracking tags for conversion action to your site.

On the next screen, you’ll see 3 options to add the conversion action to your site. Simply select the ‘Use Google Tag Manager’ option.
You should see the Conversion ID and Conversion Label. Go ahead and copy these to a notepad file or keep the browser window/tab open.

To finish the setup process, you’ll need to head to your WordPress website dashboard and view the MonsterInsights settings.
You can do this by going to Insights » Settings and clicking on the ‘Conversions’ tab.
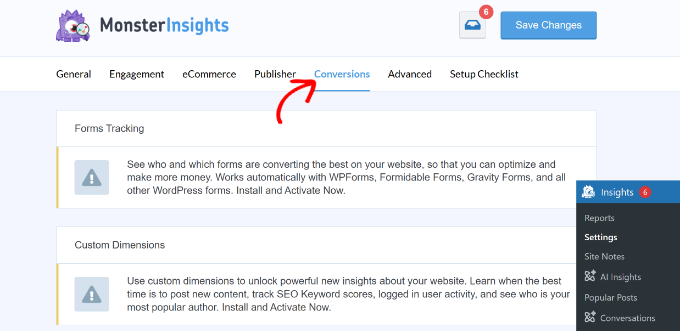
After that, you can scroll down to the ‘PPC Ads Pixel Tracking’ section.
Go ahead and enter the Conversion ID. Make sure you follow the format, which will look like this: AW-123456789.
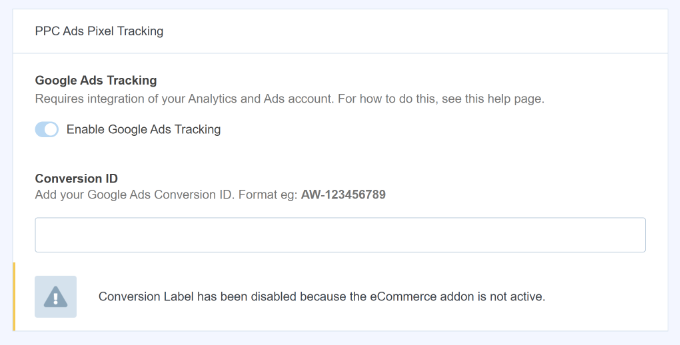
If you are tracking Google Ads on Easy Digital Downloads, WooCommerce, or MemberPress, then you’ll need to enable the eCommerce addon enter the Conversion Label in the respective field. For more details, please see our guide on how to set up eCommerce tracking in WordPress.
That’s it. You’ve successfully set up Google Ads conversion tracking on your WordPress website.
View Google Ads Conversion Tracking Data in Google Analytics
You can take it a step further and connect Google Ads with Google Analytics to get more insights about how people use your website after clicking on an ad.
For instance, you can see the number of visitors from paid search and find out which pages they view after landing on your site. You can also use different filters and create custom reports in Google Analytics.
Let’s see how you can link your Google Ads account with Google Analytics.
First, you’ll need to log in to your account and then go to the ‘Admin’ settings.
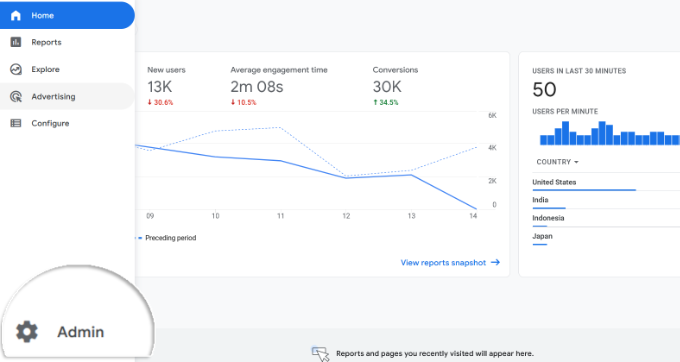
After that, you can click the ‘Google Ads links’ option.
It is located in the ‘Product links’ section.
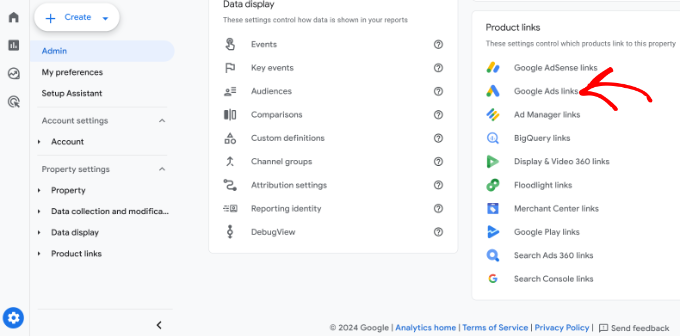
A new window will now slide in from the right.
Go ahead and click the ‘Link’ button in the top right corner.

Next, you will see different options for Link setup.
First, you can click the ‘Choose Google Ads accounts’ option.

On the next screen, you’ll need to select the Google Ads account you wish to connect.
Once that’s done, simply click the ‘Confirm’ button at the top.

You will now see the Google Ads account that you want to link.
Go ahead and click the ‘Next’ button.

In the next step, Google Analytics will give you options to enable personalized advertising and auto-tagging.
You can use the default settings and click the ‘Next’ button.

After that, you’ll see a summary of your Link setup settings.
If everything checks out, then go ahead and click the ‘Submit’ button.

You should now see a ‘Link Created’ notification in front of your Google Ads account. This means that you’ve successfully connected Google Ads with Google Analytics.
Do note that it can take up to 24 hours for your Google Ads data to appear in Analytics reports.

Next, you can view the Google Ads conversion tracking report in Google Analytics 4.
First, you can head to Acquisition » Traffic acquisition from the menu on your left and scroll down to see how many visitors came from the Paid Search channel.

After that, you can go to Acquisition » Overview under the Life cycle section and view the Session Google Ads campaign report. This will show which campaign got the most traffic.
You can also click the ‘View Google Ads campaigns’ option at the bottom to view more details.
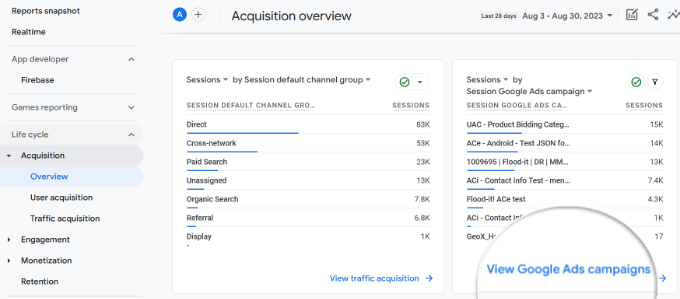
For each campaign, you can see the total number of users, sessions, number of Google Ads clicks, cost per click (CPC), conversions, and more.
Using the information from this report, you can see which campaigns perform the best.

More Options for Google Ads Conversion Tracking in WordPress
When it comes to setting up any conversion tracking, the most important thing you want to make sure is that the setup is done properly.
This is why we use and recommend MonsterInsights because it does everything for you behind the scenes without touching any code.
However, if you prefer to add code directly to your WordPress site, then you can do that as well by using the free WPCode plugin. This will help future-proof your customizations.
You can follow our tutorial on adding custom code in WordPress for more details.
There’s also a premium version of WPCode that lets you easily add eCommerce tracking pixels for Google Ads and other popular platforms like Facebook, Pinterest, and TikTok.
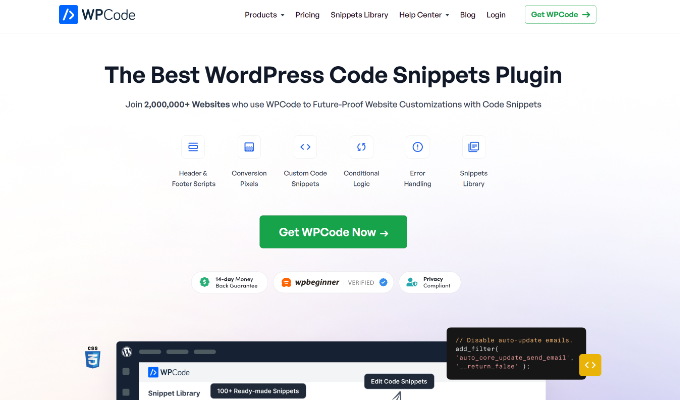
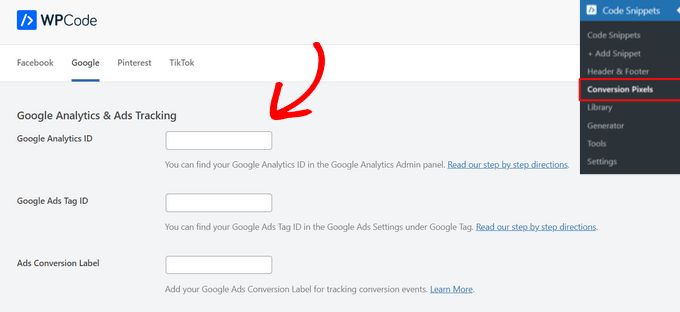
With WPCode’s Conversion Pixels addon, you can track events like view item, add to cart, begin checkout, purchase, and more.
Simply copy and paste your Google Analytics ID, Google Ads Tag ID, and Ads Conversion Label into the corresponding fields, and you are ready to track conversions for your Google Ads.
We hope this article helped you learn how to set up Google Ads conversion tracking in WordPress. You may also want to see our guide on how to set up WordPress form tracking in Google Analytics and our expert pick of the best WooCommerce reporting and analytics plugins.
If you liked this article, then please subscribe to our YouTube Channel for WordPress video tutorials. You can also find us on Twitter and Facebook.


Jiří Vaněk
Google Analytics is a great tool, but it wasn’t until I started using Monster Insights that it became something readable and understandable for me. I also have ads on my website, but I never really tracked them. I relied on Google’s tool to see the number of clicks and the resulting earnings. Setting up tracking would have been difficult for me, but with this guide and the Monster Insights plugin, the setup was a breeze, even for me. Thanks to this, I can now track ad conversions through Monster Insights directly on my website.
WPBeginner Support
Glad to hear the plugin is helpful
Admin