Many store owners ask how we manage our sales campaigns so efficiently on WPBeginner.
The secret isn’t just in scheduling coupons—it’s also in how you promote them. We use OptinMonster to create popups, slide-ins, and header banners that make our offers hard to miss.
What many store owners overlook is that combining scheduled coupons with the right promotion tools can make a big difference in results. After years of running successful campaigns, we’ve refined a system that works consistently well.
In this guide, we’ll show you our proven approach to scheduling and promoting WooCommerce coupons.
💡Quick Answer: How to Schedule Coupons in WooCommerce
The most effective way to schedule coupons in WooCommerce is by using a plugin like Advanced Coupons. This tool adds start and end date fields to the coupon settings, allowing you to automate your sales campaigns.
Why Create Scheduled Coupons in WooCommerce?
Scheduling coupons in your online store lets you automate your promotions, which can help you save time and prevent costly mistakes.
Instead of manually activating or deactivating coupons, you can set start and end dates so your discounts run automatically, even when you’re busy.
This approach helps you avoid two common problems: missing out on sales because a coupon wasn’t activated, or losing profit because a coupon stayed live longer than planned.
It’s also a great way to plan ahead for seasonal campaigns like Black Friday, Christmas, or Valentine’s Day, so your offers go live right on time.
Beyond major holidays, scheduled coupons can help boost sales during slow periods.
For instance, if your data shows that Tuesday afternoons are quiet, you can create a “Treat Yourself Tuesday” flash sale and schedule it to run only for those few hours.
Automating coupon timing not only reduces manual work but also helps keep your marketing consistent and predictable.
With that in mind, let’s walk you through how to easily schedule coupons in WooCommerce.
Here’s a quick overview of the steps we’ll cover:
- Setting Up a Scheduled Coupon in WooCommerce
- Promoting Your Scheduled Coupons in WooCommerce
- Bonus Tip: Creating One-Time Personalized Coupon Codes
- Frequently Asked Questions About Scheduling Coupons
Let’s get started!
Setting Up a Scheduled Coupon in WooCommerce
The easiest way to schedule coupons is by using Advanced Coupons.
It’s the best WooCommerce coupon code plugin that allows you to create all kinds of deals, coupons, offers, loyalty programs, and more.
However, keep in mind that scheduling is a premium feature in Advanced Coupons.
To get started, you will need to install both the free base plugin and the paid premium Advanced Coupons plugin. For detailed instructions, you can see our guide on how to install a WordPress plugin.
After you activate the premium plugin, a new ‘Coupons’ menu item will appear in your WordPress admin area. Now, go ahead and navigate to the Coupons » License page.
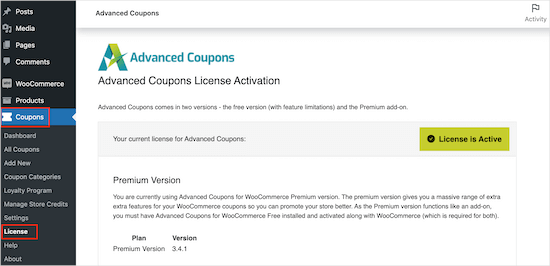
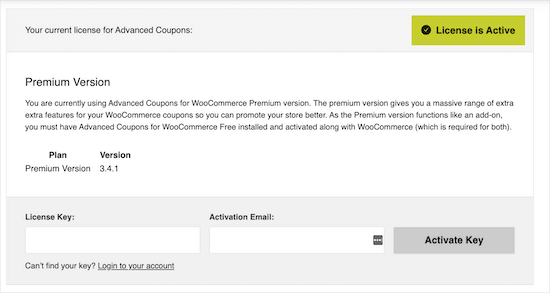
Then, you can enter your license key into the ‘License Key’ field. You can find this key in your account on the Advanced Coupons website.
You’ll also need to enter your ‘Activation Email,’ which is the email address you used to purchase Advanced Coupons. After that, just click on ‘Activate Key.’
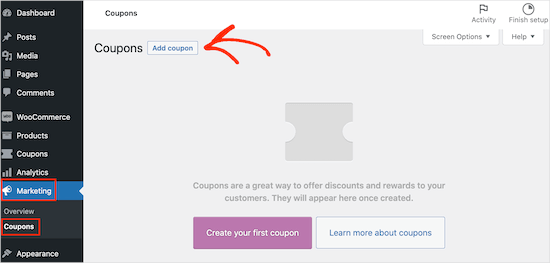
To schedule a coupon in WooCommerce, you need to visit the Marketing » Coupons page in the WordPress admin area.
Here, go ahead and click on the ‘Add coupon’ button.
On the next screen, you can type in a title for your coupon.
This will become the actual coupon that customers will type in, so it’s a good idea to use something that’s easy for shoppers to remember and type. It can also reflect the offer you are creating, such as ‘BlackFriday20%’ or ‘SummerSale.’
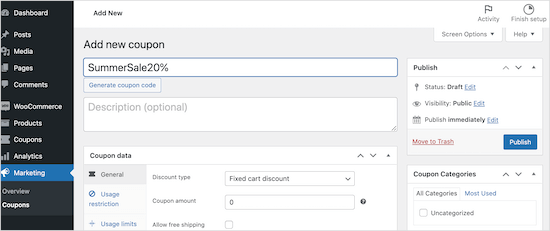
Another option is to click the ‘Generate coupon code’ button, which generates a random string of letters and numbers. However, this can make the coupon complicated and difficult to remember, so we don’t recommend it.
Advanced Coupons can create all kinds of coupons, including free gift coupons, shipping discount coupons, and more.
For this guide, we will create a percentage discount by scrolling to the ‘Coupon data’ section. Here, open the ‘Discount type’ dropdown and click on ‘Percentage discount.’
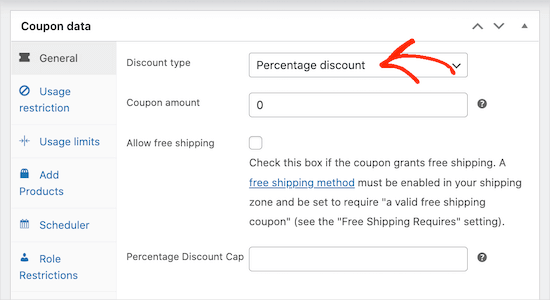
With that done, type the percentage discount you want to use into the ‘Coupon amount’ field. For example, you can type in ’10’ to create a 10% discount coupon.
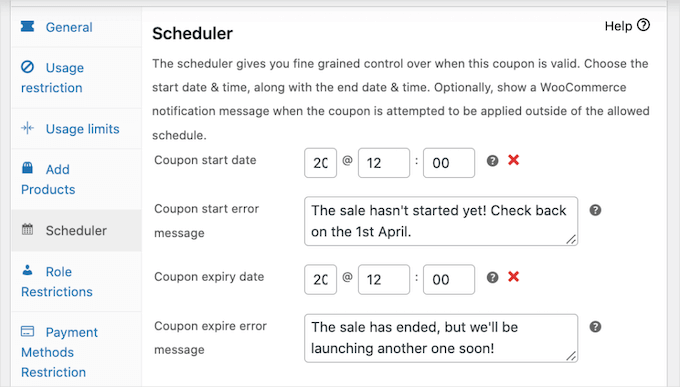
After that, you can click on the ‘Scheduler’ tab and then check the ‘Date Range Schedules’ box.
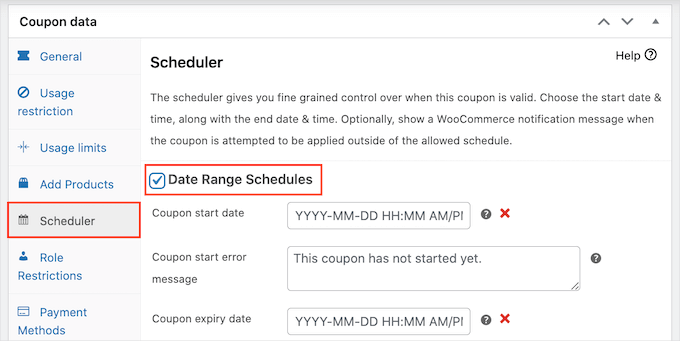
In ‘Coupon start date,’ go ahead and type in the date and time when the coupon should go live. Then, use the ‘Coupon expiry date’ to specify the date and time when customers can no longer use the coupon.
Pro Tip: Your coupon will become active at the very beginning of your start date (00:00:00). It remains valid for the whole duration of the end date and expires at the very end of that day (23:59:59).
This all works based on the timezone you have configured in your main WordPress settings.
Before you publish, it is vital to double-check that your WordPress timezone is set correctly. Your coupons will start and end based on this setting.
You can verify this by going to Settings » General in your dashboard. An incorrect timezone can cause your sale to launch or finish at the wrong time for your customers.
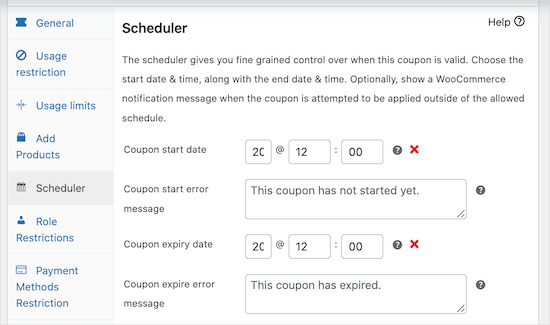
By default, Advanced Coupons will show an error message if the coupon has expired or the sale hasn’t started yet.
You can change these 2 error messages by typing some new text into the ‘Coupon start error message’ and ‘Coupon expire error message’ boxes.
Once you are done, go ahead and publish the coupon.
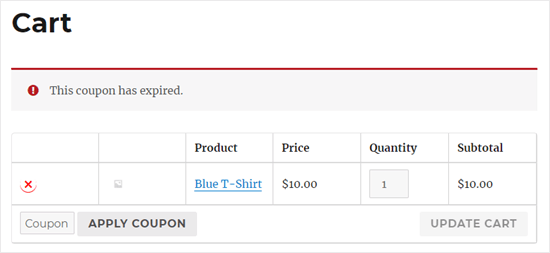
Now, if a customer tries to use the coupon before the scheduled start date, they’ll see an error message on the WooCommerce cart page.
As well as saving time, planning your coupons in advance makes it easier to promote your upcoming deals.
For example, you might use your email marketing service to send a bulk email to all your affiliates, letting them know about the upcoming promotion and coupon code. These partners can then share the code with their audience, so you’ll get visitors and sales as soon as the deal goes live.
With the Advanced Coupons WooCommerce plugin, you can schedule as many coupons as you want simply by following the process described above.
You can save even more time by sending these scheduled coupons to customers automatically using a plugin like FunnelKit.
For details, you can see our guide on how to send automated coupons in WordPress.
Promoting Your Scheduled Coupons in WooCommerce
Once you’ve scheduled your coupons, they will only work if you have customers visit your site. That’s why you will want to promote your sale as much as you can before and during the sale.
Many successful online marketplaces promote their sales using messages that appear automatically to visitors at just the right time. This is often called ‘dynamic content,’ and it’s a great way to grab a shopper’s attention.
Common examples include floating header bars, popups that appear when a user is about to leave your site, and small slide-in message boxes.
You can automate all this dynamic content using OptinMonster, the best conversion optimization tool for creating popups, banners, and other onsite campaigns.
We use OptinMonster because its advanced scheduling and display rules allow us to automate our promotional campaigns to run alongside our scheduled coupons. It comes with countdown timers, coupon code popups, and other tools that help promote sales.
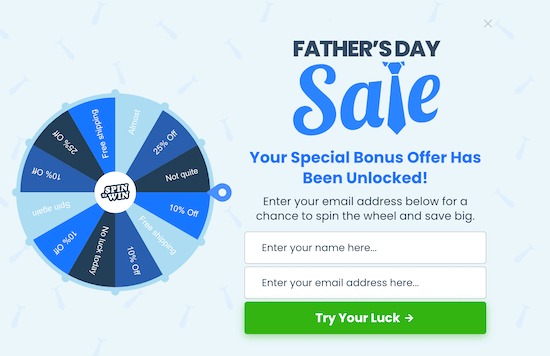
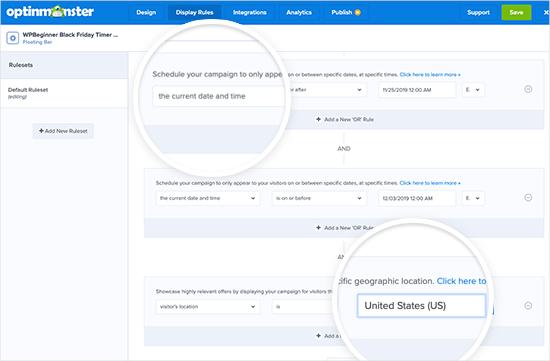
You can use OptinMonster’s powerful display rules to schedule each campaign in advance and save yourself even more time.
You can even use these display rules to personalize each campaign based on the shopper’s location.
For example, you can automatically schedule a Christmas buy one get one free offer for the US and schedule a Diwali sale in India.
It’s also a good idea to monitor how visitors are using your coupon codes to see what’s working and what isn’t. You can then use this insight to fine-tune all your future coupon codes and marketing to get even better results.
For more details, you can see our guide on how to set up WooCommerce conversion tracking.
Bonus Tip: Creating One-Time Personalized Coupon Codes
Coupons are great for driving sales, but some customers may use multi-use coupons repeatedly without ever paying the full price. That’s why it’s a good idea to place limits on who can use a coupon and how many times they can use it.
One effective way to manage this is by creating one-time personalized coupon codes.
This ensures that each customer gets a unique offer, reducing the risk of coupon abuse. It also helps target specific customers, increasing the likelihood of repeat purchases and boosting customer satisfaction.
For more details, you can check out our guide on how to create one-time, personalized coupon codes in WooCommerce.
Frequently Asked Questions About Scheduling Coupons
Here are some questions that our readers frequently ask about scheduling coupons in WooCommerce:
What is the best plugin for scheduling coupons in WooCommerce?
The easiest and most powerful tool is Advanced Coupons. It lets you set start and end dates and create many other types of deals like BOGO offers, shipping discounts, and more.
How can I prevent customers from abusing coupon codes?
You can set usage restrictions within WooCommerce itself, such as limiting uses per customer. For even better control, Advanced Coupons allows you to create unique, one-time personalized codes to prevent coupon abuse.
How do scheduled coupons handle different time zones?
Scheduled coupons use the time zone you have configured in your WordPress general settings. The coupon will activate at 12:00:00 on the start date and expire at 23:59:59 the day before the end date, according to that time zone.
Can I automatically apply a coupon to a customer’s cart?
Yes, the Advanced Coupons plugin lets you create URL coupons. When a customer clicks this special link, the discount is automatically applied to their cart, making the process much easier for them.
We hope this article helped you learn how to create a scheduled coupon in WooCommerce so you can automate your sales. You can also go through our actionable tips on the best ways to increase WooCommerce sales and our picks of the best WooCommerce plugins for your store.
If you liked this article, then please subscribe to our YouTube Channel for WordPress video tutorials. You can also find us on Twitter and Facebook.


Mustafa
can it be possible , the expiration date would be different for every user . i mean date starts from when the user gets sign in and coupon expires on the 10th day from he/she got signed in .so for every user , expiration date would be different. i searched alot but couldn’t find the answer.
WPBeginner Support
You would want to reach out to the plugin’s support to see if that is in their advanced scheduling or a planned future feature.
Admin