Wix is holding your website back. You need more features, but adding them is getting expensive. It’s time to move to WordPress.
Moving away from Wix isn’t easy. They don’t want you to leave, which can make moving your site seem really hard.
But we’ve figured it out. We’ve helped thousands of people switch, and we know exactly how to move from Wix to WordPress without losing your existing content.
This guide will show you how to move your Wix site to WordPress. We’ll help you set up your hosting, move your blog posts and pages, and point your old Wix site to your new WordPress one.
After reviewing various ways to move from Wix to WordPress, we believe the easiest method is to import your blog posts via RSS.
In this step-by-step guide, we will walk you through the process of transferring your Wix website to WordPress. Depending on how many pages you have on your Wix site, the migration can take up to an hour.
Here are the steps to migrate from Wix to WordPress:
- Step 1: Sign Up for WordPress Web Hosting
- Step 2: Set Up Your New WordPress Site
- Step 3: Customize Your Site's Design
- Step 4: Import Your Wix Blog Posts to WordPress
- Step 5: Import Your Wix Pages to WordPress
- Step 6: Create Your Main Navigational Menu
- Step 7: Redirect Wix to WordPress
- Step 8: Add Essential WordPress Plugins
Ready to switch from Wix to WordPress? Let’s get started.
Step 1: Sign Up for WordPress Web Hosting
To start a WordPress blog, the first thing you’ll need is a web hosting account for your website.
Web hosting is your website’s home on the internet. This is where all of your files and data are stored.
You will also need a domain name (such as www.yoursite.com). This is your website’s address on the internet.
When you use Wix, they host your website for you, which is also the reason why it’s quite limited. On the other hand, WordPress is free software, so you’ll need a place to install it. That’s why you need to purchase web hosting and a domain name.
We highly recommend that you use Bluehost because they are an official WordPress.org recommended hosting provider.
They have agreed to give WPBeginner readers a free domain and up to a 83% discount on web hosting when using our special Bluehost coupon code.
That means that you can get started for only $1.99 per month!
If you want to look at more options, then we have a list of the best WordPress hosting providers that you can choose from.
Some other companies that we recommend are SiteGround and HostGator.
In this tutorial, we will use Bluehost for screenshots and examples. Once you click on the Bluehost link from above, go ahead and click the ‘Get Started Now’ button.

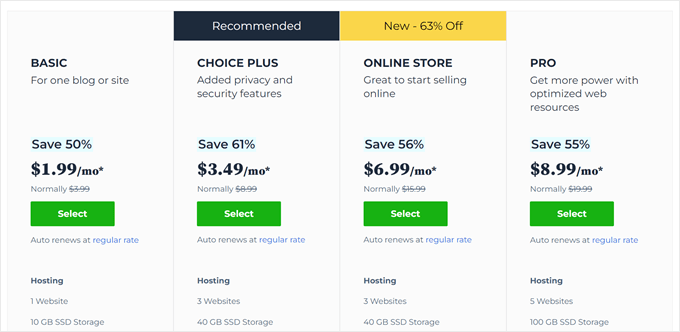
Next, you will have to choose a Bluehost plan.
You can feel free to pick any plan that best suits your needs. Many users go with Choice Plus. You can always upgrade to a higher plan in the future if needed.
Once you’ve made your choice, click ‘Select.’
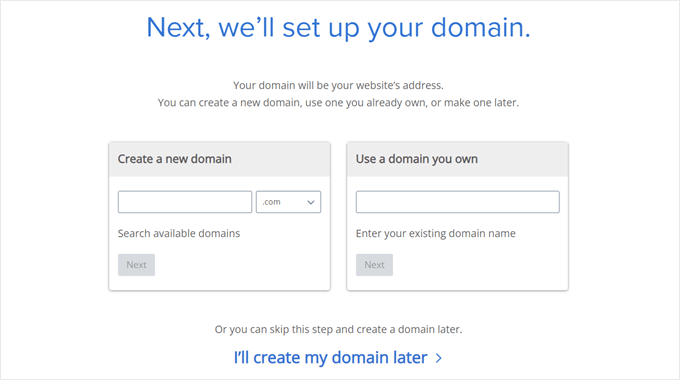
On the next screen, you will have to choose a new domain name or connect your existing domain name from Wix to WordPress.
If you don’t want to deal with this step now, you can click the ‘I’ll create my domain later’ button.
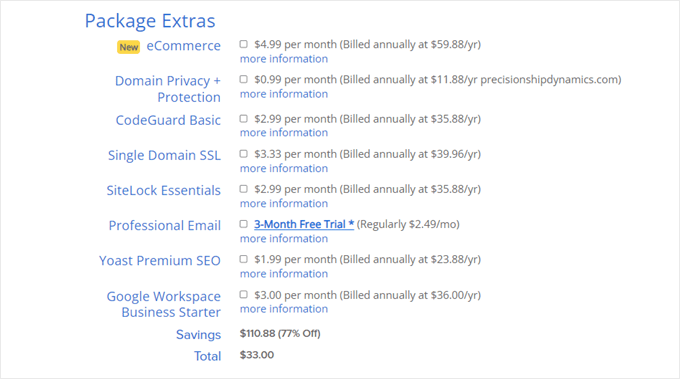
Now, you will see some package extras to add to your hosting account.
These are all optional, and you can uncheck them all for now.
Once done, you will then complete the payment. After that, Bluehost will email you instructions to log in to the hosting dashboard.
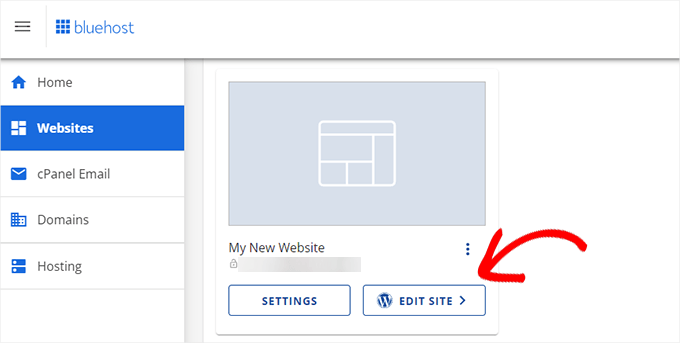
After logging in to Bluehost, you can navigate to the ‘Websites’ tab in the dashboard. You will then see that Bluehost has installed your new WordPress site for you.
Go ahead and click ‘Edit Site’ to open your WordPress admin area.
Step 2: Set Up Your New WordPress Site
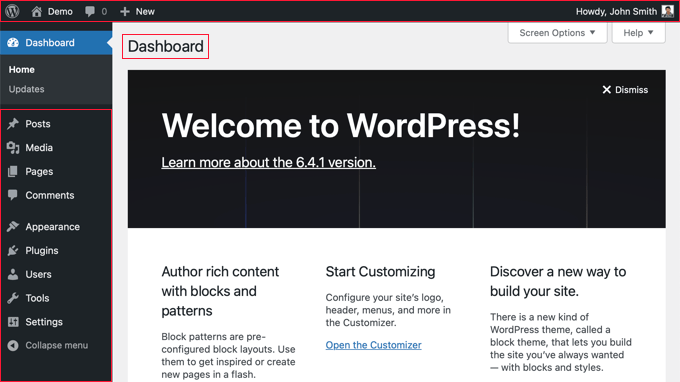
Upon login, you will see your WordPress admin dashboard:
Once you log in to the WordPress admin area, it’s a good idea to set your WordPress permalinks.
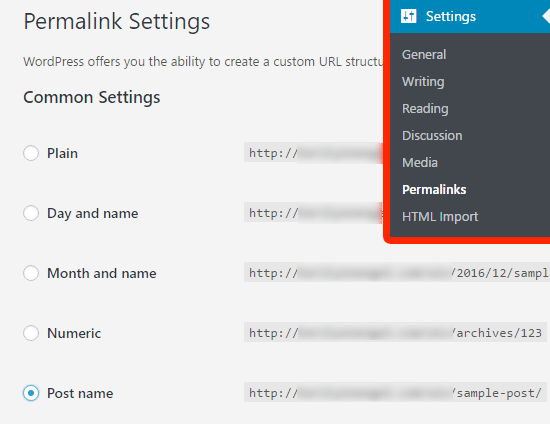
Your permalink settings will determine the address of each blog post. For example, instead of publishing a blog post to:
www.yourblog.com/2017/10/blog-post-title
You can publish it to:
www.yourblog.com/blog-post-title.
You can change your permalink settings by navigating to Settings » Permalinks in your WordPress dashboard. Once you have selected the structure you want, click on the ‘Save Changes’ button at the bottom.
For more details about permalinks, you can check out our post on SEO-friendly URL structures in WordPress.
Step 3: Customize Your Site’s Design
Next, you should customize the appearance of your website. It’s easy to do that using WordPress themes.
WordPress themes are similar to Wix templates as they control the appearance and display of your WordPress website.
There are thousands of free and paid WordPress themes available for you to use. Some themes are very basic and minimalist, while others will add a lot of new features to your site.

As a WordPress beginner, you may want to start with a simple theme that’s easy to use. We have a list of recommended simple WordPress themes you can take a look at to get started.
Once you have found a theme you like, you can install it by following our guide on how to install a WordPress theme.
Remember, you can easily change your theme in the future, so you don’t need to spend too much time on this step.
You can even use the default WordPress theme and start with the migration process because the most important part is moving all of your content from Wix to WordPress.
Step 4: Import Your Wix Blog Posts to WordPress
In this step, we will transfer your Wix blog posts over to your new WordPress site.
Wix is a closed platform, and they don’t provide an easy way for users to migrate their content away from Wix.
But we can still automate the process by importing your Wix RSS feed, instead of recreating each blog post manually.
To get started, you’ll need to download your Wix RSS file.
You can locate the file by adding /feed.xml or /blog-feed.xml to your Wix website URL.
If you don’t have a custom domain with Wix, then you can find your RSS feed at username.wixsite.com/blogname/feed.xml or username.wixsite.com/blogname/blog-feed.xml, where “username” is your Wix username and “blogname” is the name of your blog.
If you have a custom domain such as www.yourwixblog.com, then you can find your RSS feed at www.yourwixblog.com/feed.xml or www.yourwixblog.com/blog-feed.xml.
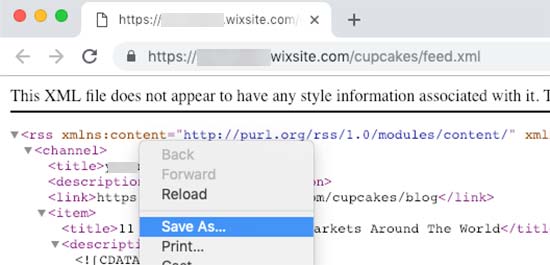
After navigating to the proper URL, you should see a page full of code.
Go ahead and right-click anywhere on the page and click ‘Save As’ to save the file on your computer.
Now that you have your RSS file, you can log in to your WordPress dashboard and click on Tools » Import.
Next, click the ‘Install Now’ link under the RSS heading.
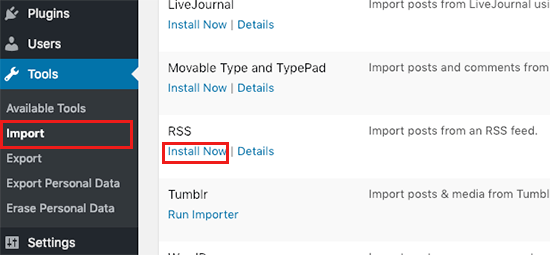
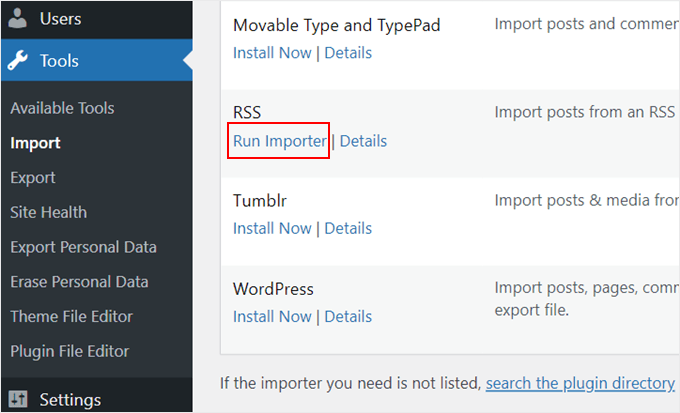
After a few seconds, you’ll see a link at the top of the page to ‘Run Importer.’
Go ahead and click the link.
Next, you need to click the ‘Choose File’ button and select the feed.xml file that is saved to your computer.
Once selected, you can click the ‘Upload file and import’ button.

If you have a lot of blog posts to import, then it can take several minutes to import them all.
When it’s done, you’ll see a confirmation message.

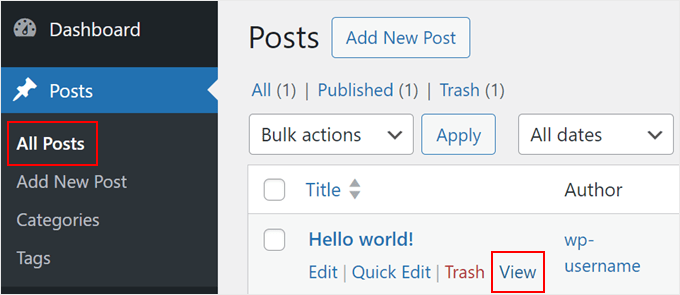
To check on your blog posts and make sure they were exported from Wix correctly, you can navigate to Posts » All Posts and click ‘View’ underneath each post.
Like so:
At this point, the content of your blog posts has been transferred, but there’s one problem: any images in your post are still hosted with Wix.
Luckily, there’s an easy way to fix this and move your images over to WordPress.
All you need to do is install and activate the Auto Upload Images plugin.
Plugins are like apps for WordPress that allow you to add new features. We have a step-by-step guide on how to install a WordPress plugin.
After installing and activating the plugin, you’ll need to re-save each post that contains images, and the plugin will import images inside it.
It would be time-consuming to edit each post one by one, but we have a handy trick that you can use to quickly re-save all WordPress posts at once.
Simply go to the Posts » All Posts page and then click on the ‘Screen Options‘ button at the top.
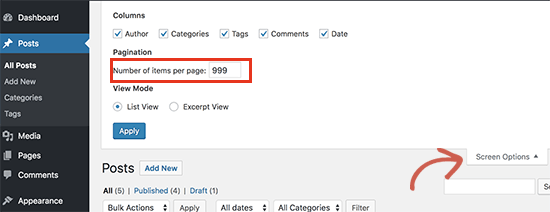
You need to increase the number to 999 in the ‘Number of items per page field’ field and click on the ‘Apply’ button.
WordPress will reload the page, and this time it will show 999 posts at a time.
Next, you need to select all your posts and then select ‘Edit’ under the bulk actions menu.
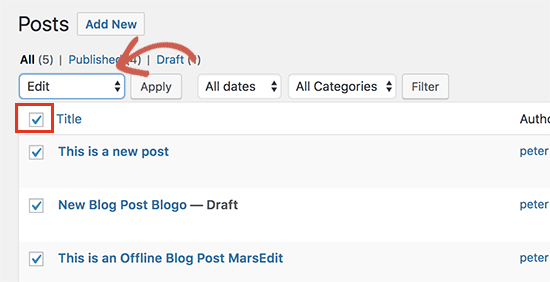
After that, you need to click the ‘Apply’ button.
WordPress will show you a quick edit box with all selected posts.
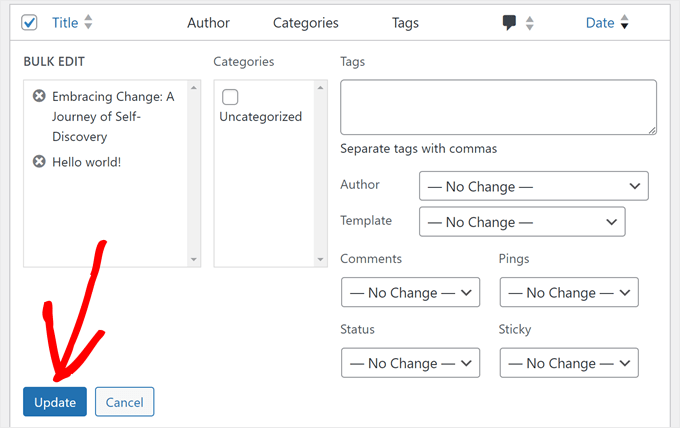
You just need to click on the ‘Update’ button, and WordPress will update all your posts.
See our guide on importing external images in WordPress for more detailed instructions.
Step 5: Import Your Wix Pages to WordPress
After you have imported your blog post, next we will need to transfer your Wix pages over to your WordPress site.
Wix doesn’t provide any automated way to do this, so we will have to recreate each page in WordPress one by one.
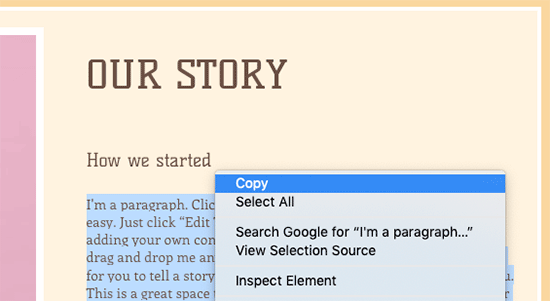
First, you can navigate to the Wix page you want to transfer to WordPress. Highlight all the content (except for the page title). Then you can right-click and click on ‘Copy.’
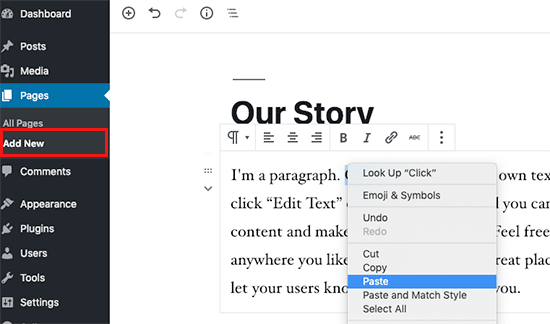
After that, you need to log in to your WordPress dashboard and navigate to Pages » Add New to recreate the page.
At the top of the page, you can type in the page title. Then you can right-click and and click on ‘Paste’ to recreate the content.
For help styling your pages, you can check out our article on adding new posts or pages in WordPress.
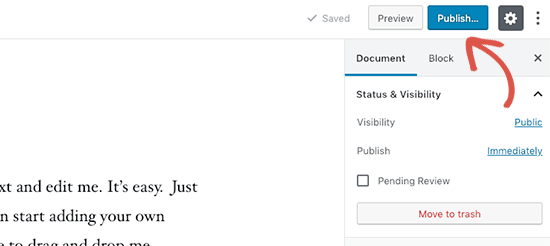
When you have finished styling your page, you can click the ‘Publish’ button to publish your page on your new WordPress site.
While you can follow the above method for all text-based pages, it won’t work for certain pages like your contact page. You’ll need to install a contact form plugin like WPForms to create it.
We have a step-by-step guide on how to create a simple contact form if you want hands-on instructions.
Now that you’ve converted all your content, it’s a good idea to carefully preview your posts and pages to make sure everything is working right and looks the way it’s supposed to.
Step 6: Create Your Main Navigational Menu
Next, you’ll want to make sure your visitors can easily navigate through your new website using your primary menu.
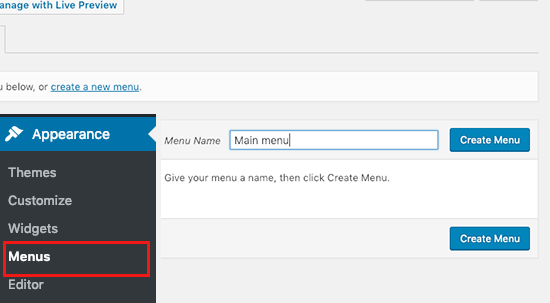
You can create a navigational menu by going to Appearance » Menus. Type in a name for your menu, and click one of the ‘Create Menu’ buttons.
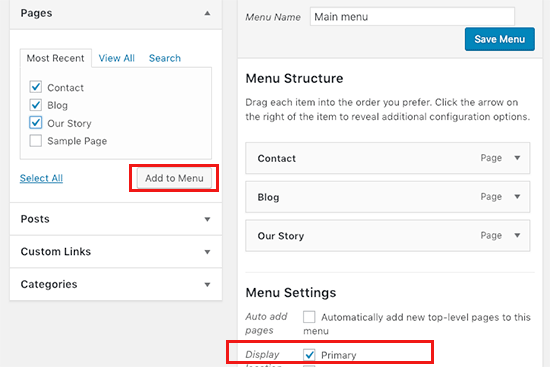
Next, you can select whichever pages you want to add to your main menu and click the ‘Add to Menu’ button. When you’ve added all the pages you want, select the menu position.
Finally, click the blue ‘Save Menu’ button on the right.
Now your menu has been created and is live on your website. For more details on creating menus, you can read our guide on how to add a custom navigation menu in WordPress.
Step 7: Redirect Wix to WordPress
Your new WordPress site is complete, and you are ready to let your readers know about your move.
It’s important to not only announce your move to your readers but to set up proper redirection.
You want all visitors to your old site to land on exactly the same page on the new site. This will also let search engines know that your old site has moved to a new location.
Note: You can only redirect users to your new WordPress site if you have a custom domain on Wix.
Unfortunately, if you were using a wixsite subdomain, then you cannot redirect users to your WordPress site. We recommend linking your new website on your old Wix site homepage to redirect users to WordPress.
First, you need to open a plain text editor like Notepad and paste this code:
var hashesarr = {
"#!about-us/c1it7":'/about/',
"#!contact/ce54":'/contact/',
"#!random-article/c1mz":'/random-article/'
 };

for (var hash in hashesarr) {
    var patt = new RegExp(hash);
    if (window.location.hash.match(patt) !== null) {
        window.location.href = hashesarr[hash];
    }
}
In this code we have added three example URLs in the following format:
"#!about-us/c1it7":'/about/',
The first part of the line looks for a string in the URL. This will be the URL your Wix users will be coming from. The second part in the line is the WordPress slug for the same page.
Unfortunately, you will have to manually add each URL in this format. Once you are finished, you need to save this file as redirects.js.
Next, you need to upload this file to your WordPress theme’s /js/ directory using an FTP client. You can read our article on how to upload files using FTP for step-by-step instructions.
If your theme does not have a /js/ directory, then you need to create one.
Now you need to edit your theme’s functions.php file or use the WPCode plugin (recommended) and add this code at the bottom of the file:
function wpb_wixjs () {
wp_enqueue_script( 'wixredirect', get_stylesheet_directory_uri() . '/js/redirects.js', array(), '1.0.0', true);
}
add_action('wp_enqueue_scripts', 'wpb_wixjs');
Don’t forget to save your changes.
That’s all, you can now try visiting a URL from your old Wix site to see the redirect in action.
Note: These redirects will not redirect search engines and are not very SEO-friendly. We recommend installing an SEO plugin like All in One SEO to get your search engine rankings back up and build your authority.
Lastly, don’t forget to inform your readers of your new address. You can do this by announcing your move on social media, writing a blog post about it, and sending out a notice to your email newsletter.
Step 8: Add Essential WordPress Plugins
WordPress plugins allow you to add more features to your site. Plugins work like Wix apps. There are hundreds of plugins available, free and paid. You can check out our archive of articles about the best WordPress plugins if you are not sure where to start.
We also have a list of the must-have WordPress plugins for all websites.
If you’re looking for a Wix-style drag-and-drop page builder, then we recommend using one of the best drag-and-drop WordPress page builder plugins like SeedProd.

It lets you fully customize your website design without any code. That’s it!
I Have Moved from Wix to WordPress, What Now?
Congratulations on successfully migrating your site from Wix to WordPress! You’ve taken a big step towards having more control and flexibility over your website.
But the journey doesn’t end here. To ensure your new WordPress site is fully optimized and running smoothly, consider exploring these resources:
- Ultimate WordPress Migration Guide for Beginners (Step by Step) – Even though you’ve completed your migration, this guide offers valuable insights into post-migration checks and optimizations you might want to perform.
- The Ultimate WordPress SEO Migration Checklist – Ensure your site’s SEO doesn’t take a hit after the migration. This checklist helps you maintain and improve your search engine rankings on your new WordPress platform.
- WPBeginner’s Beginner’s Guide – This comprehensive collection of articles covers everything you need to know as a WordPress beginner. From basic setup to advanced customizations, this resource will help you make the most of your new WordPress site.
Alternative: Professional WordPress Migration with Seahawk Media
If the DIY approach seems daunting, consider Seahawk Media‘s professional WordPress migration service.
They specialize in seamlessly moving websites from various platforms to WordPress, including Wix, Shopify, Squarespace, and more.
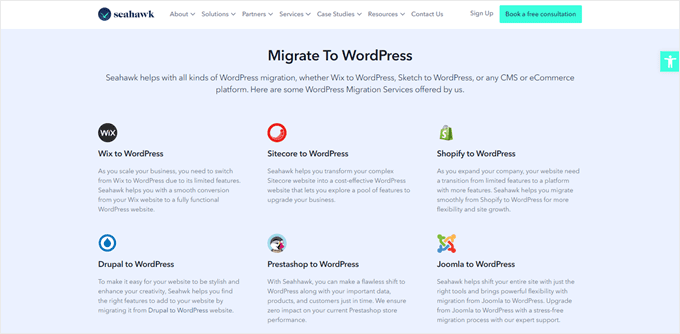
Seahawk Media’s expert team prioritizes data security and privacy throughout the process. Their step-by-step approach preserves your content, design, and functionality while upgrading you to the flexibility and power of WordPress.
For a stress-free transition to WordPress, book a free consultation with Seahawk Media and let the experts handle your website migration.
We hope this tutorial helped you switch from Wix to WordPress without hassle. You may also want to check out our list of the best WordPress migration plugins and our guide on how to move from Weebly to WordPress.
If you liked this article, then please subscribe to our YouTube Channel for WordPress video tutorials. You can also find us on Twitter and Facebook.


Justin
You can locate the file by adding /feed.xml or /blog-feed.xml to your Wix website URL.
I don’t believe this works anymore since /feed.xml brings up the wix page doesn’t exist page and /blog-feed.xml brings up the last couple of weeks of posts in plain text with images just like it would appear in an RSS reader, no code.
WPBeginner Support
Thank you for letting us know, we will be sure to look into this!
Admin
Mrteesurez
This guide is indepth, I first used Wix when I was started then, it is nothing more than Wordpress.com, even the latter seems better than the earlier.
So sad that there is not automatic migration of page and one need to create the page one by one.
That’s why it is better to choose a right platform from the beginning.
Concerning the redirect, is the code modify htaccess or how is the code works to plant the redirect when Wix domain DNS is not accessible ?
WPBeginner Support
The code is for when users are redirected to your WordPress site via your domain pointing to your WordPress site, this is not a redirect on Wix itself.
Admin
Moinuddin Waheed
Back in the days wix used to be a go to place for newbies who wanted to write blog posts without any coding knowledge . it has easy to use interface and beginner friendly but if you want to scale to make a big in the blogging then that has many limitations for you. WordPress blogs are the best to scale and make tangible income and grow exponentially in your blogging journey.
thank you wpbeginner for making transition from wix to WordPress a cakewalk.
WPBeginner Support
You’re welcome
Admin
František Tokarčík
As I can see, in wix RSS there are only 20 latest posts. Is there any way to import more than just 20?
WPBeginner Support
That may be a recent change by Wix, we will look into it and if there are alternatives we would recommend.
Admin
Monique
I currently have my company website, domain and email through Wix/google workspace. If I switch to Word press do I lose my stuff that I currently have? email, domain google workspace? or does it transfer over?
WPBeginner Support
Most if not all hosting providers would allow you to move your email over when transferring to WordPress and as long as it is your domain you should be able to transfer it to any hosting provider. Unless we are misunderstanding, you should also keep your Google Workspace as well.
Admin
Caroline
Hi, I read your blog on migrating a wix-site to wordpress. However it seems to focus on blog-rss feeds. What if I only have a site (no blogs)
WPBeginner Support
Sadly, you would need to follow step 5 for pages on Wix that are not in your RSS feed.
Admin
Tereza
Hi,
I have Wix website with domain and hosting (not via Wix) and need to transfer it to WP. The first step says to sign up for WP hosting – is it possible to use the hosting provider I already use for Wix or need to create new separate hosting for WP? Thank you.
WPBeginner Support
It would depend on your hosting provider, you would want to check with your host to see if they have a staging option that you can use.
Admin
Dominique
I audited a client’s on-page technical SEO (Client uses Wix) and there are a lot of errors that appeared. Should I optimize the website before converting from Wix to WordPress?
Gardrena
Is there away to import WIX products to woocommerce? We have thousands of products that wee need to transfer.
WPBeginner Support
We do not have a recommended method at the moment.
Admin
Mack Bason
Thanks for the great article. If you transfer your blog from Wix to WP – what happens to you view counter/likes counter and all of the comments that were posted?
WPBeginner Support
While your comments should normally stay, any counters would not be transferrable normally.
Admin
Marek
Is there a way to transfer Facebook ‘likes’ from Wix to WordPress?
WPBeginner Support
We do not have a specific recommended method for that at the moment.
Admin
Rajalakshmi
I have registered a domain with wix. I would like to move to bluehost or wordpress. Can I use same domain.
WPBeginner Support
Yes, you can redirect or move your domain to your new host.
Admin
Reese
I have no coding knowledge, how do I set up the 301 redirect? What is notepad??
WPBeginner Support
You would want to read through step 7 again and Notepad is a text editor that comes with Windows by default but you can use other text editors if you wanted.
Admin
Miguel De
Nice article, just quick question, If I am using the same domain in my WP site, do I still need to have redirections?
WPBeginner Support
We would still recommend setting up redirects to prevent any issues.
Admin
Kristen
I’m running in to a problem transferring my blog from Wix to WP. When I get to the step to “Upload file and import” I get an error message saying there’s been a fatal error. What could this mean? Any work around?
WPBeginner Support
It would depend on the specific error, for a starting point you may want to take a look at our article below:
https://www.wpbeginner.com/wp-tutorials/how-to-fix-fatal-error-maximum-execution-time-exceeded-in-wordpress/
Admin
Bhavik
Hello,
Thank you for the step by step process of migration. It really helped me.
The only problem I faced was the blog-feed.xml only gives 20 Posts.
What can we do to get all the published post?
WPBeginner Support
You may need to check with Wix for that issue
Admin