By default, WordPress uses lazy loading to delay media downloads, which improves load times.
At WPBeginner, we use this feature on some of our sites to speed things up. It helps pages load faster by delaying images until they are actually needed.
However, there are plenty of reasons to disable lazy loading, whether it’s to optimize specific elements, troubleshoot issues, ensure plugin compatibility, or prevent a poor user experience.
In this article, we will show you how to easily disable lazy loading in WordPress.
What Is Lazy Loading?
WordPress first introduced lazy loading images in WordPress 5.5. Later, it extended the lazy load feature to iframe embeds (like YouTube videos, Spotify, and other embeds).
This practice helps improve your site’s performance and page speed by quickly loading content in the visible area first.
A faster website is not just good for users, but it can also improve your website rankings because search engines like Google consider speed an important ranking factor.
Apart from images and embeds, you can also easily lazy load comments and Gravatars to further improve page load speed.
You can see the lazy loading functionality in action by right-clicking on an image and selecting the Inspect tool in your browser.
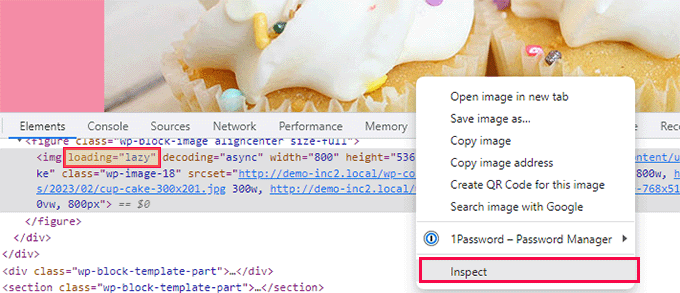
This will split your browser screen and show you the HTML source code. From here, you’ll be able to see the “loading=lazy” attribute added to the image.
Now normally, we don’t recommend disabling lazy load due to its overall benefits for your WordPress website. Turning it off can result in slower website speed, lower conversion rates, and lower SEO rankings.
However, lazy loading can hurt the user experience for some websites.
For instance, if you run a photography website where images are the most significant aspect of your content, then lazy loading them may ruin the user experience for your customers.
In other cases, you might be using a different lazy loading solution and just want to turn off the default WordPress lazy load.
That being said, let’s see how you can easily disable lazy load in WordPress.
For this tutorial, we will show you a code method and a plugin method. You can use the links below to jump to whatever option you prefer:
Method 1: Disable Lazy Load in WordPress Using WPCode (Recommended)
You can disable the lazy load feature in WordPress by adding custom code to your theme’s functions.php file.
However, keep in mind that the smallest error while adding the code can break your website and make it inaccessible.
This is why we recommend using WPCode to add custom code.
It’s the best WordPress custom code snippets plugin on the market. Plus, it makes adding code to your website super easy and safe.
We have thoroughly tested it on our demo website and saw excellent results. To learn more, see our complete WPCode review.
First, you need to install and activate the WPCode plugin. For detailed instructions, see our guide on how to install a WordPress plugin.
🚨 Note: WPCode also has a free version that you can use for this tutorial. However, upgrading to the paid plan will give you access to features like a cloud library of code snippets, conditional logic, and more.
Upon activation, visit the Code Snippets » + Add Snippet page from the WordPress dashboard.
From here, click the ‘Use snippet’ button under the ‘Add Your Custom Code (New Snippet)’ option.

This will direct you to the ‘Create Custom Snippet’ page, where you can start by typing a name for your code snippet.
This can be anything that will help you identify the code snippet and what it does. We called ours ‘Disable Lazy Load.’
Once you’ve given your custom snippet a name, select ‘PHP Snippet’ from the ‘Code Type’ dropdown menu in the right corner of the screen.
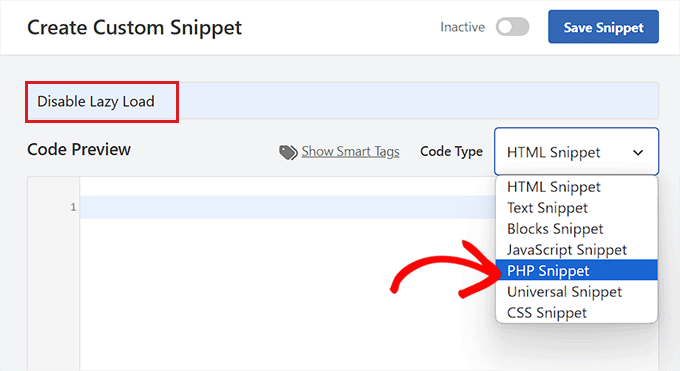
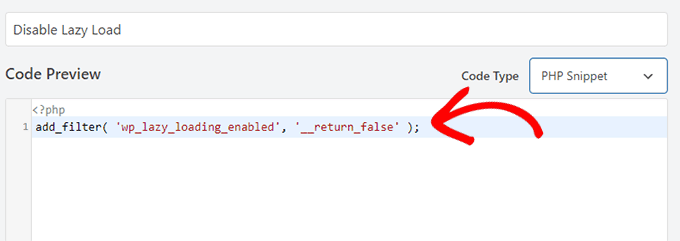
Now, copy and paste the following PHP code in the ‘Code Preview’ box:
add_filter( 'wp_lazy_loading_enabled', '__return_false' );
This is how the code will look after being pasted.
After that, scroll down to the ‘Insertion’ section. Here, simply choose the ‘Auto Insert’ mode.
This will ensure that your custom code is automatically executed everywhere on your WordPress site once you activate the snippet.

Next, scroll back to the top of the page and simply toggle the ‘Inactive’ switch to ‘Active’.
Finally, don’t forget to click the ‘Save Snippet’ button to save and run your code snippet.

Now, lazy loading will be disabled on your WordPress site.
You can test that by right-clicking on an image and selecting ‘Inspect’ from the browser menu.

In the HTML code for the image, the ‘loading=lazy’ attribute will now disappear.
Method 2: Disable Lazy Load in WordPress Using a Plugin
If you don’t want to add code to your site, then you can use a plugin to disable WordPress lazy loading.
The only thing you need to do is install and activate the Disable Lazy Load plugin. For more instructions, check our step-by-step guide on how to install a WordPress plugin.
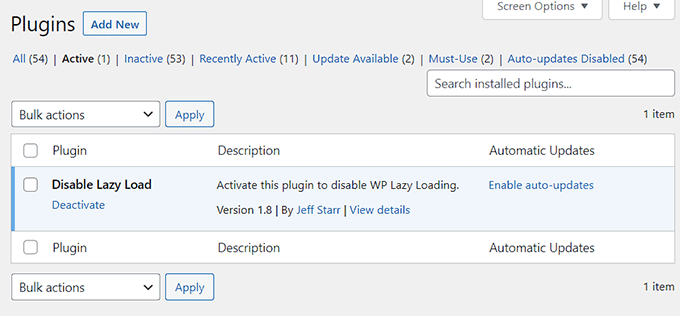
The plugin works out of the box and does not require any configuration. Once activated, it will automatically disable the lazy load feature on your website.
💡 Expert Tip: Want to make your site faster? Our Site Speed Optimization Service helps improve load times, boost SEO, and keep visitors engaged. We can handle the technical side so you can focus on growing your business.
To learn more, see our WPBeginner Pro Services page.
Video Tutorial
If you don’t prefer written instructions, then you can watch our video tutorial:
Bonus: Boost Your Site’s Speed And Performance
Once you have disabled lazy loading, it can affect your website’s speed and performance negatively.
In that case, you can try other tips to boost your site’s performance and decrease page load time. For example, you can optimize the images on your site by compressing them, using JPEG or PNG as file formats, and more.
Additionally, you should always run the latest version of WordPress, use excerpts on the homepage, split comments into pages, and use SEO-optimized themes on your website.
Other than that, you can also use caching plugins like WP Rocket or WP Super Cache to further boost your site speed.
For more tips, you can see our beginner’s guide on how to boost WordPress speed and performance.
We hope this article helped you learn how to properly disable lazy load in WordPress. You may also want to see our beginner’s guide on how to optimize WordPress images for better page load times or see our pick of the best WordPress image compression plugins.
If you liked this article, then please subscribe to our YouTube Channel for WordPress video tutorials. You can also find us on Twitter and Facebook.


Jiří Vaněk
Thank you for the snippet. After PageSpeed Insights started alerting me about lazy load issues and informed me that it was problematic for my website, I tried to disable lazy load in many ways. The website is built on Elementor, and nothing worked correctly. The snippet finally fixed the problem, and now PageSpeed Insights no longer flags this issue. I thought lazy load would be better for performance, but according to the measurements on my website and template, it was not. This snippet saved me.
WPBeginner Support
Glad our snippet was able to help
Admin
Dimitrios Charalampidis
This website’s articles have helped me so much… I just wanted to say: Thank you!
WPBeginner Support
You’re welcome! Glad to hear our guides have been helpful!
Admin
Adrian
What about disable lazy load ONLY on featured image (first image above the fold)? Is there an easy way?
WPBeginner Support
We do not have a recommendation for conditionally disabling it but should that change we will be sure to share!
Admin