Website owners need to prioritize WordPress security to protect their sensitive data and maintain the trust of their users. One very effective way we do this at WPBeginner is by password-protecting our WordPress admin directory.
The wp-admin directory is the control center of your WordPress site. It’s where you manage everything from content to settings, making it a prime target for hackers. Password-protecting your admin files will keep them safe from attack.
This article provides a straightforward guide to easily password-protect your wp-admin directory and strengthen your website’s security.
Why Password Protect Your WordPress Admin Directory?
By password-protecting your WordPress admin directory, you add an extra layer of security to the most important entry point to your WordPress website.
Your WordPress admin dashboard is the central hub of your site. It’s where you’ll publish posts and pages, customize your theme, install WordPress plugins, and more.
Often, when hackers try to get into your website, they’ll do it through the wp-admin screen using a brute force attack.
You can help protect your website against potential attacks by using security measures such as a strong password and limiting login attempts.
To be even more secure, you can also password-protect the wp-admin directory. Then, when someone attempts to access your admin area, they’ll need to enter a username and password before they ever make it to the WordPress login page.
With that said, let’s take a look at how you can password-protect your WordPress admin directory step by step.
The first method is recommended for most users, and you can use the quick links below to jump straight to the method you want to use:
Video Tutorial
If you’d prefer written instructions, then just keep reading.
Method 1: Password-Protect wp-admin Using Directory Privacy (Recommended)
The easiest way to password-protect your WordPress admin directory is by using your WordPress hosting provider’s Directory Privacy app.
First, you need to log in to your hosting account dashboard and click on the ‘Directory Privacy’ option in the Files section of your website’s cPanel dashboard.
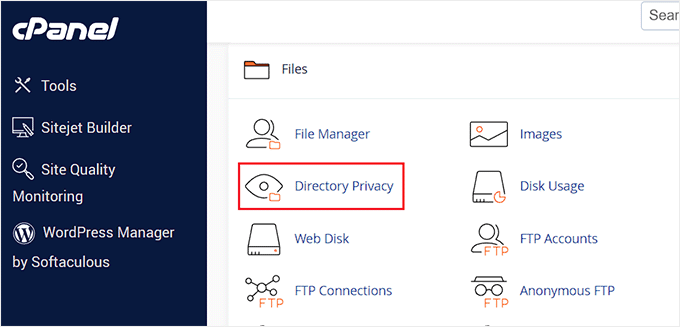
Note: Most web hosts using cPanel, like Bluehost, will have similar steps. However, your dashboard might be slightly different from our screenshots, depending on your hosting provider.
This brings you to a screen that lists all of the different directories on your server. You need to find the folder that contains your website files.
For most website owners, this can be found by clicking on the ‘public_html’ folder.
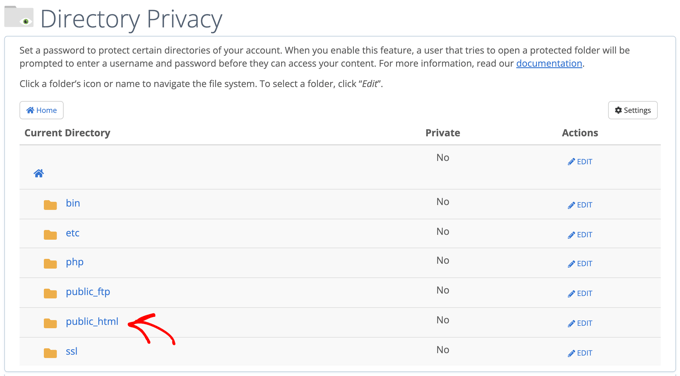
This brings up all of the website files you’ve installed on your server.
Next, you’ll need to click on the folder with your website’s domain name.
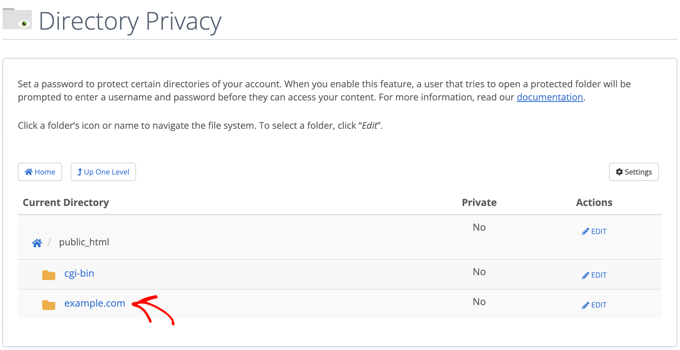
In that folder, you’ll see a wp-admin folder.
Instead of clicking the folder name, you’ll need to click the ‘Edit’ button next to that folder.
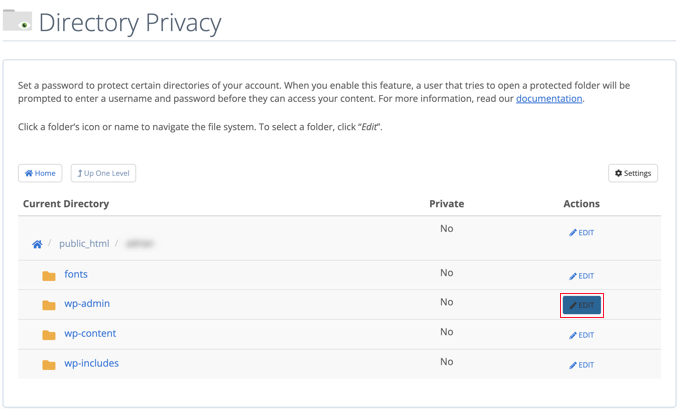
This brings you to a screen where you can turn on password protection.
Simply check the box that says ‘Password protect this directory’. If you like, you can also give your directory a name like ‘Admin Area’ to help you remember.
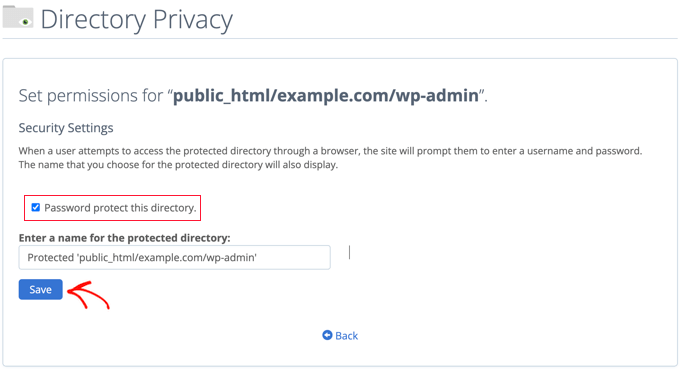
Once you’ve done that, you’ll need to click the ‘Save’ button.
This will take you to a page where the confirmation message will appear.

Now, you’ll need to click the ‘Go Back’ button, and you’ll be taken to a screen where you can create a user that will be able to access this directory.
You will be asked to enter a username and password and then confirm the password. Make sure to note your username and password in a safe place, such as a password manager app.
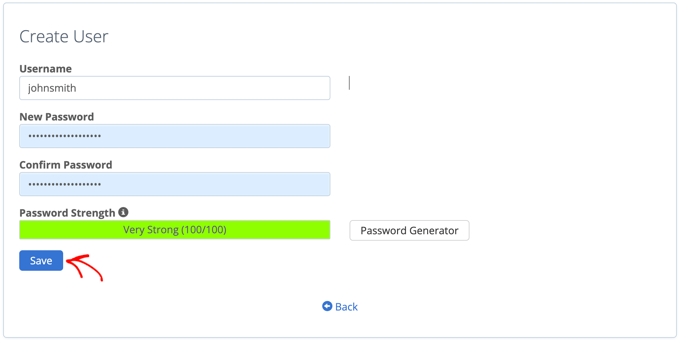
Make sure you click the ‘Save’ button when you’ve done that.
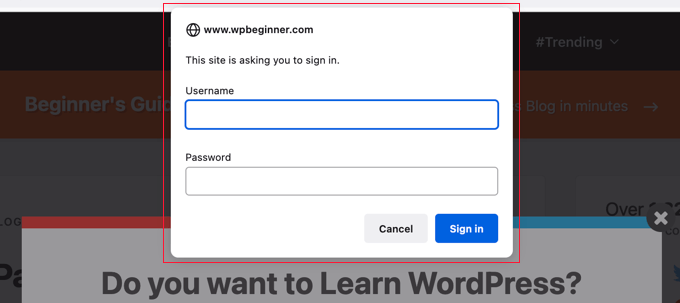
Now, when someone tries to access your wp-admin directory, they will be prompted to enter the username and password you created above.
Method 2: Password-Protect wp-admin Using Code
You can also password-protect your WordPress admin directory manually. To do this, you’ll need to create two files called .htpasswd and .htaccess.
Note: Adding any code to your WordPress site can be dangerous. Even a small mistake can cause major errors on your website. We only recommend this method for advanced users.
Creating the .htaccess File
First, open up your preferred text editor and name the new file .htaccess.
After that, you need to copy the following code snippet and add it to the file:
AuthName "Admins Only"
AuthUserFile /home/user/public_html/example.com/wp-admin/.htpasswd
AuthGroupFile /dev/null
AuthType basic
require user yourusername
Make sure you change the ‘AuthUserFile’ path to the location where you’ll upload the .htpasswd file and change ‘yourusername’ to the username you want to use to log in.
Don’t forget to save the file when you are finished.
Creating the .htpasswd File
Once you’ve done that, you need to create a .htpasswd file.
To do this, open up a text editor and create a file called .htpasswd. This file will list your username along with your password in an encrypted format.
The easiest way to generate the encrypted password is with a htpasswd generator.
Simply enter your username and password, select the encryption format, and click the ‘Create .htpasswd file’ button.
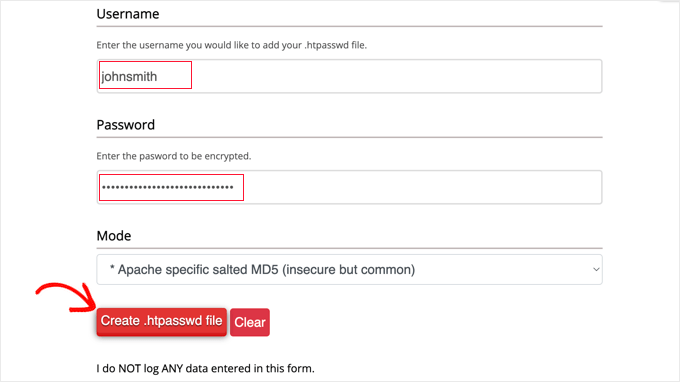
The htpasswd generator will display a line of text that you need to paste into your .htpasswd file. Make sure you save the file once you’ve done that.
Uploading .htaccess and .htpasswd to the wp-admin Directory
The last step is to upload both of the files you created to your website’s wp-admin folder.
You will need to connect to your WordPress hosting account using an FTP client or the online file manager tool provided by your hosting provider. For more details, see our beginner’s guide on how to use FTP to upload files to WordPress.
For this tutorial, we will use FileZilla because it’s free and works on both Mac and Windows.
Once you have connected to your website, you will see the files on your computer in the left window and the files on your website on the right. On the left, you need to navigate to the location where you saved the .htaccess and .htpasswd files.
Then, on the right, you need to go to the wp-admin directory for the website you wish to protect. Most users will need to double-click the public_html folder, then the folder with their domain name, then the wp-admin folder.
Now, you can select the two files on the left and click ‘Upload’ from the right-click menu or simply drag the files onto the left window.
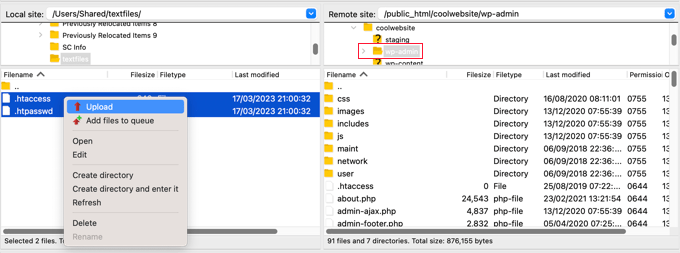
Now, your ‘wp-admin’ directory will be password protected.
Troubleshooting wp-admin Password Protection
Depending on how your server and website are set up, there’s a chance you might run into WordPress errors. These errors can be fixed by carefully adding code to your .htaccess file.
Note: This is the .htaccess file located in your main website folder, not the one you uploaded to the ‘wp-admin’ folder. If you are having trouble finding it, then see our guide on why you can’t find .htaccess and how to locate it.
Fixing the Ajax Not Working Error
One of the most common errors is that Ajax functionality may stop working on the front end of your site. If you have WordPress plugins that require Ajax, such as live Ajax search or Ajax contact forms, then you will notice that these plugins won’t work anymore.
To fix this, simply add the following code to the .htaccess file that’s located in your wp-admin folder:
<Files admin-ajax.php>
    Order allow,deny
    Allow from all
    Satisfy any
</Files>
Fixing the 404 Error and Too Many Redirects Error
Two other errors you might run into are the 404 error and the too many redirects error.
The simplest way to fix them is to open up your main .htaccess file located in your website directory and add the following line of code before the WordPress rules:
ErrorDocument 401 default
Bonus: Best WordPress Guides for wp-admin Security
We hope this article helped you learn how to password-protect your WordPress admin (wp-admin) directory. You may want to see some further guides on making your admin area more secure:
- How to Restrict WordPress Admin Access by IP Address
- Vital Tips to Protect Your WordPress Admin Area (Updated)
- How to Add a Custom Login URL in WordPress (Step by Step)
- How and Why You Should Limit Login Attempts in WordPress
- How to Add Two-Factor Authentication in WordPress (Free Method)
- How to Add Security Questions to the WordPress Login Screen
- How to Force Users to Change Passwords in WordPress – Expire Password
- How to Reset Passwords for All Users in WordPress
If you liked this article, then please subscribe to our YouTube Channel for WordPress video tutorials. You can also find us on Twitter and Facebook.


tom
This might be stupid question but i wonder now – i have the set up above apllied to my website and it works fine but lets assume that a bot will brute force that extra login area and i tried that manually for a while and my server did not block my ip or anything. So tehnically that brute force attack on that area could last ‘forever’ and this in turn might slow down my website somehow, or not? If so it is a shame because i took me a couple hours to set this up and was delighted with that extra layer of protection…
WPBeginner Support
While possible, it takes far fewer resources to load the login for your wp-admin area than your WordPress login page which means it would require much more from a brute force attack to affect your site’s speed.
Admin
Dayo Olobayo
I’m not very technical but I’m glad you included the option for using the Directory Privacy app. That sounds much easier than creating those .htaccess files. Thank you.
Mrteesurez
Thanks. I found it helpful.
I want to ask if the methods are all offering the same level of security, I would prefer and recommend to stick to the first method as it seems easy and straight forward.
Or is there any one that is better than the other ??
WPBeginner Support
These are different methods to achieve the same result so it would depend on your preference for which one you would use.
Admin
Mark
Is there anyway for hackers to gain access to this password and even change it, like in phpMyAdmin ?
WPBeginner Support
They would need access to your hosting provider or site files for this guide.
Admin
Salman
I have changed my login URL using the “WPS Hide Login” plugin. Lets say the previous URL ended in wp-admin/ and the new URL ends in hidden/ now how can I password protect this new URL?
WPBeginner Support
It would depend on what method you are using and how you changed the URL, as long as there is a file/folder in the new location you should be able to select that folder or change the path on line 2 of the htaccess method
Admin
Jiří Vaněk
WPShide doesn’t create a new folder, I use that too. The wp-admin folder is still on the server and functional. So if you use WPSHide, secure the wp-admin folder exactly the same.
Jiří Vaněk
A good practice is also to rename the WordPress administration URL and choose a different administrator username than ‘admin.’ Changing the URL makes it harder for attackers to locate the administration, and not using ‘admin’ as the administrator reduces the risk of a successful brute force attack.
WPBeginner Support
Having a username other than admin is definitely recommended but for changing the wp-admin url is not always recommended as that can cause trouble with some plugins as well as make troubleshooting more difficult.
Admin
Jose
Ajax fix worked fine. Thanks a lot for this.
WPBeginner Support
Glad our article could help
Admin
Umer Yaseen
What if someone accesses our WordPress admin directory by entering mywebsite.com/wp-login.php instead of mywebsite.com/wp-admin. This method only protects wp-admin and not protects wp-login.php. So how it is useful?
WPBeginner Support
This would show the same prompt for users trying to log in using the wp-login.php
Admin
nadia
you are the best. thanks for thousand time like allways.
WPBeginner Support
Glad you’ve found our content helpful
Admin
Lordemmaculate
I want to do this but my server is Nginx not Apache so I can’t use .htaccess
WPBeginner Support
We’ll see if we can add a method for that type of server when we update this article
Admin
Rajah
The first method through cPanel worked like a charm. However, when I logout again from WP and login again it doesn’t ask again for the directory password. Is it meant to ask only once?
WPBeginner Support
Your cookies/cache will remember the login information. Normally the next time you start up your computer it will require you to log in again.
Admin
Webo
Very good, Thank you…
WPBeginner Support
You’re welcome
Admin
Izzy
The “Password Protect Directories” is not on my cPanel under “securitiy”, so I tried the manual way, but it doesn’t seem to work as it doesn’t ask for login when I open wp-admin…
WPBeginner Support
If you reach out to your hosting provider they should be able to assist and take a look if there’s any reason it wouldn’t be working.
Admin
Ahsan Ali
Thanks for your efforts!
I used cpanel method it works fine but the problem is that the password prompt appearing on every page of my website!
What i have to do so that it appear only at wp-admin page?
WPBeginner Support
It sounds like you may have password protected your public_html folder instead of the wp-admin folder. You would want to remove the current protection and attempt to set it up again
Admin