Many WordPress users prefer to work on their websites using a local server on their computer. This allows you to work on your website privately before making changes available online.
Eventually, you’ll need to move it to a live server to make it accessible to online visitors. This transition is crucial to ensure that your website functions properly on the live site.
We’ve worked on many local websites, so we had to learn the easiest way to transfer content to live websites.
In this article, we will provide step-by-step instructions on how to move WordPress from a local server to a live site.
Why Move WordPress From a Local Server to a Live Site?
Building your WordPress blog on a local server is a safe way to test changes on your website without affecting visitors.
When you have finished perfecting your website, the next step is to move from your local server to a live site.
Let’s show you two ways to move your site from a local server to a live site.
The first method uses a WordPress migration plugin and is recommended for beginners.
In the second method, we will show you how to manually move WordPress from a local server to a live site.
You can choose the method that works best for you:
Before You Migrate Your WordPress Site
You need to have a few things in place to migrate WordPress from a local server to a live server.
First, we assume that you have a WordPress site running on a local server (also called localhost) on your computer and that you have full access to it.
Next, you’ll need to have a domain name and web hosting.
We have heard countless stories from beginners who started with poor or free web hosting providers and regretted it. In our experience, choosing the right hosting provider is critical to the success of any website.
To make your decision easier, we recommend using Bluehost. They are an officially recommended WordPress hosting company, and they are giving WPBeginner users an exclusive discount + free domain and SSL.
Basically, you can get started for as little as $1.99 per month.
If you want a great Bluehost alternative, you can look at Hostinger. They are also offering an exclusive discount to WPBeginner users with a free domain name.
If you can afford to pay a little more, then check out SiteGround. They also have a special deal for WPBeginner readers.
If you need help setting up your website, then follow our step-by-step guide on how to make a website.
Finally, you will need an FTP program and know how to use FTP to upload your local server site to the live site.
Ready? Let’s begin migrating your WordPress site.
Video Tutorial
If you’d prefer written instructions, then just keep reading.
Method 1: Transfer WordPress From The Local Server to Live Site Using a Migration Plugin (Recommended)
This method is easier and recommended for beginners. We will be using a WordPress migration plugin to move WordPress from localhost to a live site.
Step 1: Install and Set Up the Duplicator Plugin
First, you need to install and activate the Duplicator plugin on your local site. For more details, see our step-by-step guide on how to install a WordPress plugin.
Pro Tip: There is also a pro version of Duplicator that offers secure backups, cloud storage, easy site restore, and more.
Upon activation, you need to go to the Duplicator » Backups page and click on the ‘Create New’ button.
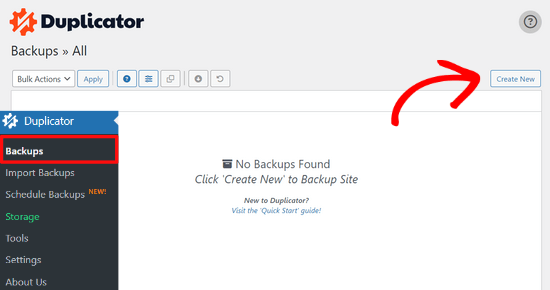
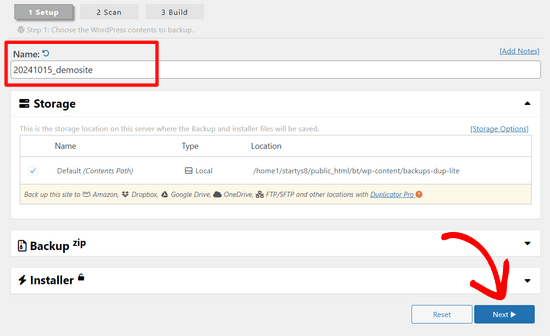
This brings you to a screen where you can give your backup a name.
Then, click the ‘Next’ button.
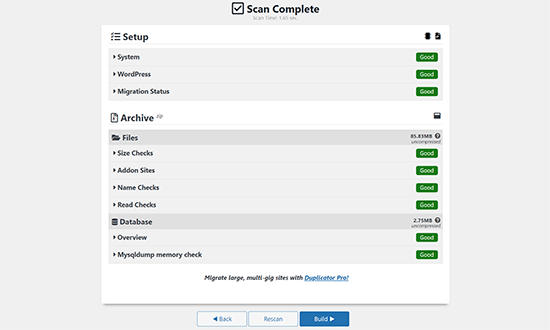
Duplicator will now run some tests to see if everything is in order.
If all items are marked ‘Good,’ then click on the ‘Build’ button.
This process may take a few minutes, depending on the size of your website. You must leave this tab open until it is complete.
Once finished, you’ll see download options for ‘Installer’ and ‘Archive’ packages. You need to click on the ‘Download Both Files’ button to download both files to your computer.
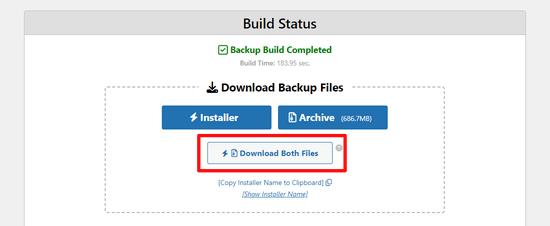
The ‘Archive’ file is a complete copy of your WordPress site. It includes all WordPress core files as well as your images, uploads, themes, plugins, and a backup of your WordPress database.
The ‘Installer’ file is a script that will automate the entire migration process by unpacking the archive file containing your website.
Step 2: Create a Database for Your Live WordPress Website
Before you can run the installer or upload the WordPress website from localhost to your hosting server, you need to create a MySQL database for your new live website.
If you have already created a MySQL database, then you can skip this step.
To create a database, you need to visit your hosting account’s cPanel dashboard. Then, locate the ‘Databases’ section and click on the ‘MySQL Database Wizard’ icon.
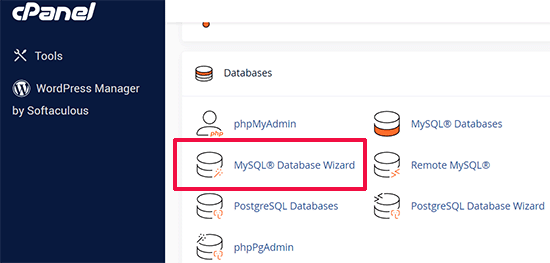
On the next screen, there’s a field to create a new database.
Simply provide a name for your database and click on the ‘Create Database’ button.

cPanel will now create a new database for you.
After that, you need to enter a username and password for your new user and then click the ‘Create User’ button.
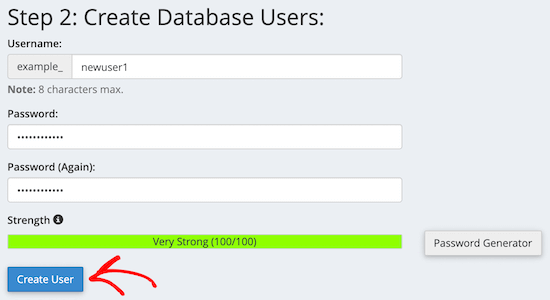
Next, you need to add the user you just created to the database.
First, click the ‘All Privileges’ checkbox.
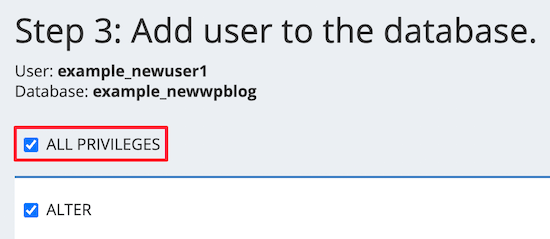
Then, scroll down and click the ‘Make Changes’ button to save your changes.
Your database is now ready to be used with your WordPress site. Make sure to note down the database name, username, and password. You’ll need this information in the next step.
Step 3: Upload Files from the Local Server to the Live WordPress Website
Now, you need to upload the archive and installer files from your local site to your hosting account.
First, connect to your live site using an FTP client. Once connected, make sure that the root directory of your website is completely empty.
Normally, the root directory is the /home/public_html/ folder.
Some WordPress hosting companies automatically install WordPress when you sign up. If you have WordPress files there, then you need to delete them.
After that, you can upload the archive.zip and installer.php files from Duplicator to your empty root directory.

Step 4: Running the Migration Script
After you have uploaded the migration files, you need to visit the following URL in your browser:
http://example.com/installer.php
Don’t forget to replace ‘example.com’ with your own domain name.
This will launch the Duplicator migration wizard.
The installer will run a few tests and will initialize the script.
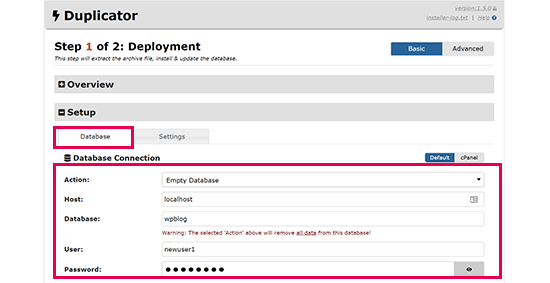
Under the Setup section, you will be asked to enter your MySQL host, database name, username, and password.
Your host will likely be a local host. After that, you will enter the details of the database you created in the earlier step.
Then, click on the ‘Validate’ button to make sure the details you entered are correct.
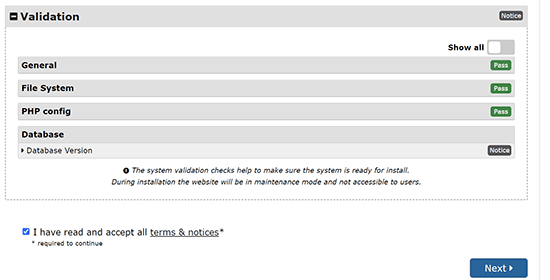
After that, click on the ‘Next’ button to continue.
Duplicator will now import your WordPress database backup from the archive into your new database.
It will also update URLs pointing to the local site and your new live site.
You can now click on the ‘Admin Login’ button to enter the WordPress admin area of your live site.

Once you log in to your live site, Duplicator will automatically clean up the installation files.
That’s all. You have successfully moved WordPress from the local server to your live site.
Method 2: Manually Transfer WordPress From the Local Server to the Live Site
In this method, we will show you how to manually move WordPress from the local server to your live site. It will be useful if the first method doesn’t work or if you prefer to do it manually.
Step 1: Export Local WordPress Database
The first thing you need to do is export your local WordPress database. We will be using phpMyAdmin to do that.
If you are unfamiliar with it, then you might want to take a look at our guide to WordPress database management using phpMyAdmin.
Simply go to http://localhost/phpmyadmin/ and click on your WordPress database. Next, click on the ‘Export’ button from the top menu bar.

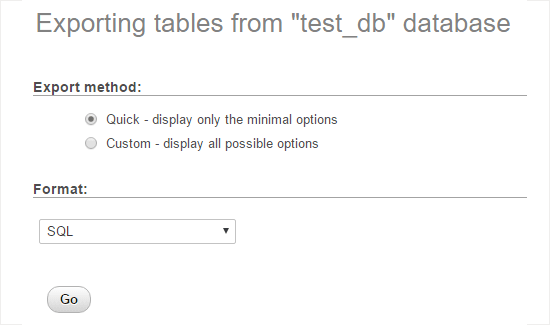
In the ‘Export method:’ option, you can choose ‘Quick’ or ‘Custom.’ Custom will provide you with more options to export your database.
But we recommend choosing ‘Quick’ and then clicking the ‘Go’ button to download your database.
Step 2: Upload WordPress Files to Live Site
Now, we will need to move all your website files to the live site.
To get started, go ahead and open your FTP client and connect to your web hosting account.
Once you are connected to your live site, make sure you upload the files in the right directory. For example, if you want the site to be hosted on ‘yoursite.com,’ then you will want to upload all the files in your public_html directory.
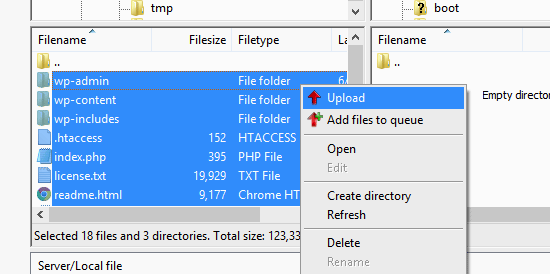
Now select your local WordPress files and upload them to your live server.
Step 3: Create a MySQL Database on Your Live Site
While your FTP client is uploading your WordPress files, you can start importing your database to the live server.
Most WordPress hosting providers offer cPanel to manage your hosting account, so we will show you how to create a database using cPanel.
First, you need to log in to your cPanel dashboard and click on the ‘MySQL Database Wizard’ icon, which can be found in the ‘Databases’ section.

On the next screen, you can create a new database.
You need to provide a name for your database, then click ‘Create Database.’

cPanel will now automatically create a new database for you.
Next, you need to enter a username and password for your new user and then click ‘Create User’.
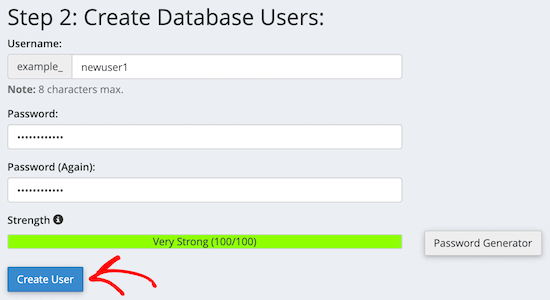
After that, you need to add the user you just created to the database.
First, check the ‘All Privileges’ checkbox.
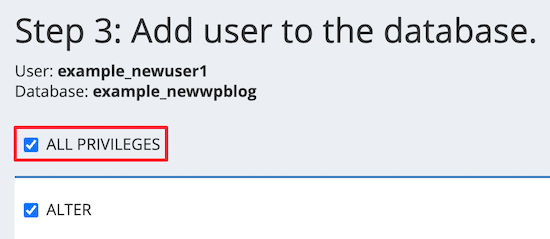
Then, scroll down and click ‘Make Changes’ to save your changes.
You’ve successfully created a new database for your live WordPress site.
Step 4: Import WordPress Database to Live Site
The next step in the process is to import your WordPress database.
Go to your cPanel dashboard, scroll down to the ‘Databases’ section, and click on ‘phpMyAdmin.’
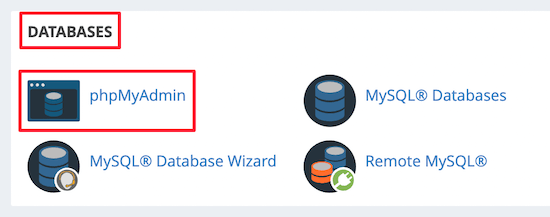
This will take you to phpMyAdmin, where you want to click on the database you just created above. phpMyAdmin will show your new database with no tables.
Next, click on the ‘Import’ tab in the top menu. On the import page, click on the ‘Choose File’ button and then select the database file from the local site you saved in the first step.
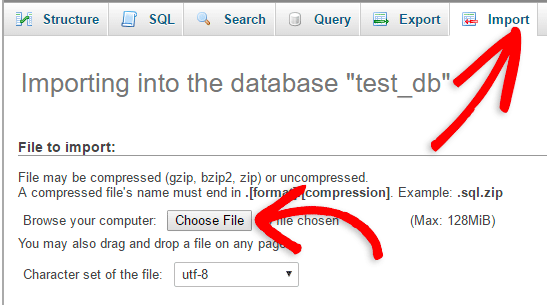
After that, click the ‘Go’ button at the bottom of the page. Your database will automatically be imported to phpMyadmin.
Step 5: Change the Site URL
Now, you need to change the site URL in your database so that it will connect with your live WordPress site.
In phpMyAdmin, look for the wp_options table in your database that you just imported above.
If you changed your database prefix, then instead of wp_options, it might be {new_prefix}_options.
Next, click on the ‘Browse’ button next to wp_options. Or, click the link in the sidebar to open up the page that has a list of fields within the wp_options table.
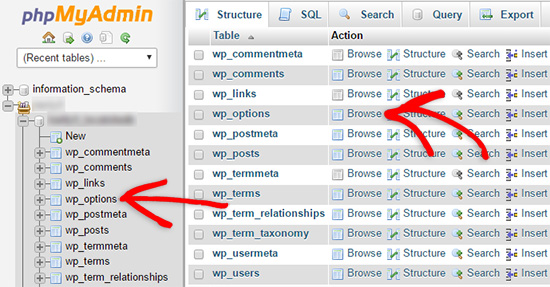
Then, in the options_name column, you need to look for the siteurl option.
Then, click the ‘Edit’ icon.

This brings up a window where you can edit the field.
In the input box option_value, you’ll see the URL of your local install, which will be something like http://localhost/test.
You need to insert your new site URL in this field, for example: https://www.wpbeginner.com.
Then, you can save the field by clicking the ‘Go’ button.
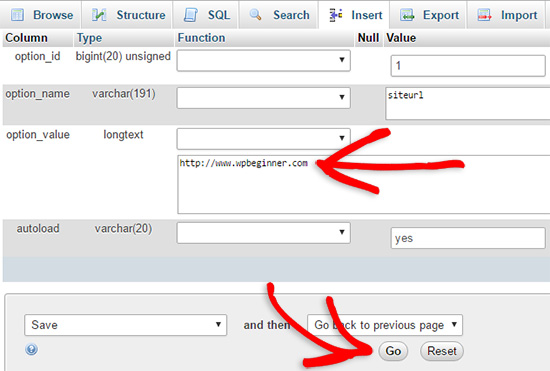
Next, you need to follow the same steps as above for the home option name. The wp_options menu can be a few pages long. Usually, the home option will be on the second page.
Then, update the home URL, so it’s the same as your live site URL.
Step 6: Set Up Your Live Site
Now that you’ve imported the database and uploaded your content, it’s time to configure WordPress.
At this time, your site should be showing an ‘Error establishing a database connection‘ error.
To fix this, connect to your website using an FTP client and open up the wp-config.php file.
You’ll be looking for the following lines of code:
// ** MySQL settings - You can get this info from your web host ** //
/** The name of the database for WordPress */
define( 'DB_NAME', 'database_name_here' );
/** MySQL database username */
define( 'DB_USER', 'username_here' );
/** MySQL database password */
define( 'DB_PASSWORD', 'password_here' );
/** MySQL hostname */
define( 'DB_HOST', 'localhost' );
You will need to provide the database name, username, and password you created earlier.
Next, save the wp-config.php file and upload it back to your WordPress hosting server.
Now, when you visit your website, it should be live.
After that, you need to log in to your WordPress admin panel and go to the Settings » General. Then, without changing anything, scroll to the bottom and click the ‘Save Changes’ button.
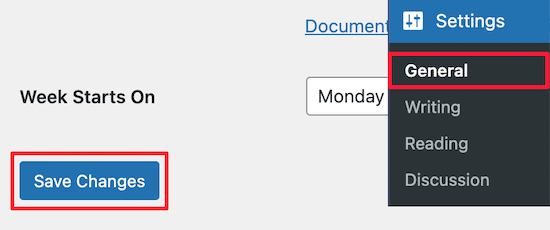
This will make sure that your site URL is corrected anywhere else that it needs to be.
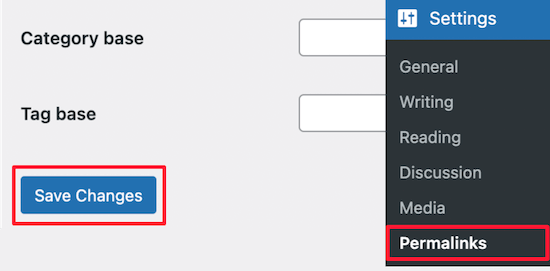
Once you’ve done that, go to Settings » Permalinks, then scroll down and click ‘Save Changes’ to ensure that all post links are working fine.
Step 7: Fix Images and Broken Links by Updating Paths
Whenever you are moving a WordPress site from one domain to another or from a local server to a live site, you’ll face broken links and missing images.
We’ll show you two ways to update URLs. You can pick one that works best for you.
1. Update URLs Using Search & Replace Everything Plugin (Recommended)
The safest way to fix this is by using Search & Replace Everything. It is a powerful WordPress plugin that allows you to easily perform bulk update tasks on your website without writing complex database queries.
First, you need to install and activate the Search & Replace Everything plugin.
After activation, go to Tools » WP Search & Replace page.
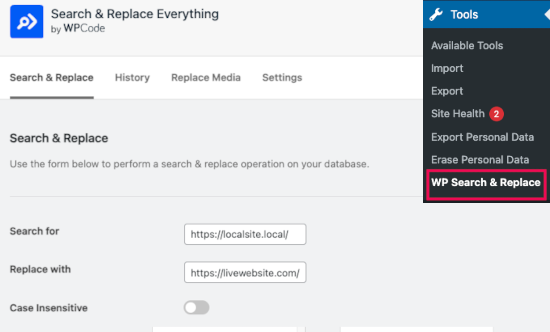
From here, you need to enter your local site URL in the ‘Search for’ field and your live site URL in the ‘Replace with’ field.
Scroll a little and click ‘Select All’ under the tables. This ensures that the plugin will look for the old URL everywhere in the database.
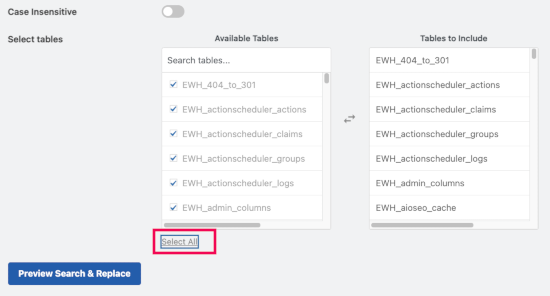
Now click the ‘Preview Search & Replace’ button to continue.
The plugin will search your database for all instances of the old URL and then preview the results.
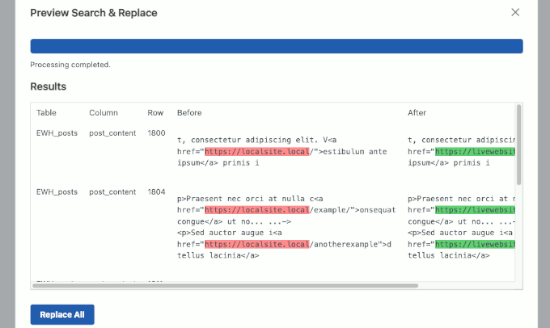
If everything looks good, click ‘Replace All’ to save the changes.
You’ll see a warning about the changes you are making. Click ‘Yes’ to continue.
The plugin will now update the database and replace local URLs with your current website URL.
2. Update URLs Manually (Advanced)
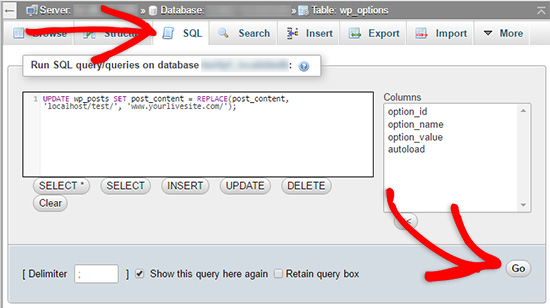
Another way to update the URLs is by using the following SQL query:
UPDATE wp_posts SET post_content = REPLACE(post_content, 'localhost/test/', 'www.yourlivesite.com/');
Simply go to phpMyAdmin, click on your database, and then click on ‘SQL’ from the top menu and add the query above.
Make sure you change it to your local site and live site URLs and click the ‘Go’ button.
That’s it. You have now successfully migrated WordPress from your local server to a live site.
Hopefully, your live website is up and running smoothly. If you notice any errors, you can check out our guide to common WordPress errors for help with troubleshooting.
We hope this article helped you move WordPress from a local server to a live site. You may also want to see our guide on moving a live site to a local server or look at the ultimate website migration checklist for practical WordPress migration steps.
If you liked this article, then please subscribe to our YouTube Channel for WordPress video tutorials. You can also find us on Twitter and Facebook.


Mark
Hi!
I’ve done until step 6 and was able to get the Error Database Connection and I was thrilled! when i changed the parameters the error changed to Error 500. And now I’m stuck.
My local MAMP DB is named “localdatabase” and the new one that I created in the live site have a prefix that I cannot edit so now my new database name in the live site is “web_localdatabase”
Question:
1. Should the my local database name be the same with the one in the live site?
2. If not, is there any other changes I need to do aside from the changes in Step 6?
Thanks!!!!!!!
Cindy
Hi there,
I thought I followed your steps to the letter. I accessed localhost through WAMP. cPanel is through StableHost. FTP using FileZilla. After the migration I looked at my site and saw that half of my most recent post was missing. It had never been published; it was the first post I created in localhost. (I recently moved from wp.com to wp.org. Had less than 20 posts at time of transfer. All of them migrated from localhost to live with no errors.) I had no ‘failed transfers’ during the FTP upload. No errors that I noticed.
After seeing the incomplete blog post, I tried to access localhost to view the original content using WAMP. That project name can no longer be displayed. I cannot access my blog content on localhost using the name I assigned prior to the migration. The folder is still present in www.
I must have done something right since part of a post that was never on my live site did make it there. Can you tell me what happened to my localhost? I don’t have anything in sub folders…it’s all pretty straight forward and I tried to keep it simple.
Troubleshooting:
Ran SQL query per your Step 7, message is: #1146 – Table ‘sxxxxx_wp574.wp_posts’ doesn’t exist. wp_574 is the database name I created in Step 3. Query was localhost name and website domain.
Restarted computer.
WAMP ‘Restart all services’ option.
Right now I’m completely confused! I not only do not know what to do next but am fearful of trying a Google suggestion for fear of really screwing things up. Can you help me? Any insight into the incomplete migration would be good to know too but I’m more freaked out about localhost at the moment. Thanks so much. You’re instructions are very easy to follow and understandable.
Kind Regards, cindy
Lea Jacta Est
Hello!
I have issues updating my links (step 7). It seems to be an URL match problem. Using Velvet Blues, I’m typing my old URL in the required field and I do the same for the new URL but there’s an error message showing every time I try.
Just to check :
– my old URL = my localhost URL which is in the general settings and which shows in the address bar when I go to my homepage
– my new URL : my brand new domain name which ends by .com
… right ?
Does the error comes from somewhere else or am I doing it this wrong ?
Thanks a lot for your help.
Jeff Bradbury
I currently have my live site at. I want to download it to MAMP (Mac) and begin the process of redesigning locally and then I want to put it back fresh.
1) When I’m ready to upload the new site, do I put it over top of the current folder? Do I create a new folder (or subdomain) and stick it in that directory and then move the domain/DNS to the new site?
2) I have a bunch of pretty links on the live site that I wish to download and begin working on … I think i’m correct in thinking that Pretty links just take the form of whatever the domain currently is.
3) Is this the best process if you want to constantly be working locally and updating your site on a daily/weekly basis? This appears to be a great method if you want a One and Done method of updating a site. If there is another way or method of working locally and then uploading the changes …. or even syncing a live/local site, I would love some help and advice. THANK YOU!
WPBeginner Support
1. Depends on what files you have changed and what changes you made that are stored in the database. We assume that you will be working on your theme and would probably make few changes that will be stored in database. In that case, you can just overwrite your theme files and update your database from a backup.
2. If by pretty links you mean the permalink settings, then we think that those will not be affected.
3. If you are planning on continuously working on your site, then this strategy would work but it is not the best solution. You need a solution that allows you to automatically sync your development site to your live site. For example, take a look at our tutorial on how to create a staging environment for your WordPress site. Subscribe to WPBeginner, we will soon cover this topic in an upcoming article with detailed instructions.
Admin
Felipe Stabile
THANK YOU GUYS!
Things went smooth after some problems and thinking, but it was because my host is a little different, and i´ve got problems uploading my files to the FTP using Filezilla. Serious docs got a failure message, but i solve that by doing the following:
If someone here is using smarterasp, you´d be better not using Filezilla, use the integrated (HostingControlPanel/MyWebsites//FileManager).
With your database clean, You have to zip your files from HTDOCS/wordpress, and then upload this zip file.
In the integrated File Manager you have the option for unzip. wait a little bit, until all folders and docs appear.
Then follow the tutorial above and you´ll be ok.
Mohit
Hey wpbeginner,
Thanks a lot for this tutorial. Its the best one I have came across.
Followed this step by step and got the expected results.
Keep up the good work !
Cheers!
Abhay
Many-many thanks bro. it worked very well.
Biniam
Thanks a million!!!
jay capulong
hi all is ok, but the others picture is not showing,
what do you mean localhost/test? (local site)
thanks
M3N
Hi. Thanks for this great tutorial.
One question though…
Following steps you described doesn’t cause problem with serialized data. I saw some tutorials recommended to use a script or other thing to avoid the problem with serialized data when changing file paths manually.
Any idea or suggestion ?
Mark
Hi, I don’t know if anyone suffered from a redirect to their local host when they ran wp-admin. I did but I found a post over at stackoverflow that sorted me out. Basically I had to update the filepaths in the WP-Options table.
Good luck.
MT
Mujtaba Zia
*** This is the best ever tutorial of my life ***
I know about html/css but never worked on wordpress, this tutorial helps me lot and have my site live by following every step and wordings of it. Thank you so so much!
Now very eager to learn more through this website.
Kathy
I’m encountering some serious problems when transferring to live server. Locally I have 2 sites using the same theme. Both running off separate databases and sites, both work perfectly locally. One site is uploaded and running fine and i’m in the process of uploading the second, here’s where it goes wrong. I’ve exported and created the database, working perfectly all images appear correct. I uploaded all the files and amended the config then ran in to problems. I appear to have no content loading and only half a theme along with the incorrect logo of the site. I tried to login in to amend all links but i am returning an ‘internal server error’ the sever encountered internal error or misconfiguration and was unable to complete your request.
I have rolled the site back to it’s previous look but i am at a complete loss as to next steps, can anyone help? I can not understand how we are working perfectly locally and then an epic fail on live.
Kathy
p.s. I have screenshots if that helps.
DaveJorg
Heads up that sometimes after the migration is complete only the home page works.
If this is the case visit Dashboard > settings > pemalinks and click save changes. I believe it updates the mod_rewrite and should fix the issue. It did for me.
RW
Please remove my email from the comments thread. I’ve tried to unsubscribe each time and it’s not working.
Carlo
Thanks for this guide. I’m a more than a beginner in this field. How can I proceed if I have a database already installed on my hosting. Do I have to delete it and make new one, cancel the tables or simply empty them? Thanks in advance for your help
WPBeginner Support
You can create a totally new database.
Admin
Nathan
I moved everything and it went smooth until I tried logging in to WP it keeps saying password incorrect. I even tried changing details in phpMyAdmin. Could the problem be that I ran your query before logging in to WP?
Nathan
I fixed the problem, i just signed in to WP and re-saved permalinks and whole site was update. Thanks for the great tutorial.
Angela
Unfortunately, I wasn’t able to move my site from localhost to online. I got to the login page and it wouldn’t accept my login information. Any idea what the problem could be? I don’t want to give up on it so I may try again.
Omar Zeidan
Hi Angela,
Well, you might forgot to import the DB files to your live server, did you ?
If nothing worked with you then try the following,
Access your DB admin panel, find the wp_users and manually add one there.
Hope this helps.
Pranesh
Excellent guide. Everything went fine. Thanks a lot !!
Ziga
Hello, i followed all steps, and at step #4, i choose .gzip file to import, and got the following error:
#1064 – You have an error in your SQL syntax; check the manual that corresponds to your MySQL server version for the right syntax to use near ‘?’ at line 2
Any help?
Justin
Everything works except my other pages…. Can’t figure it out
Matt
Similar issue for me. Have added it to a subfolder on another one of my domains, but when I navigate to it, I’m shown the Themes 404 page. When I try to go directly to any of the other pages, I get my hosts 404 page. Any ideas anyone?
Ryan
I’ve gone through all the steps, and my site ends up not looking at all like it did. It appears most of the CSS didn’t transfer over. I was using the Divi theme.
Here is what it looks like:
Any tips?
Amefon
HELLO
i got this error while trying to import my database onto the site
Error
SQL query:
—
— Database: `lcmi`
—
CREATE DATABASE IF NOT EXISTS `lcmi` DEFAULT CHARACTER SET latin1 COLLATE latin1_swedish_ci;
MySQL said: Documentation
#1044 – Access denied for user ‘lazarbwn’@’localhost’ to database ‘lcmi’
how do i solve this?
WPBeginner Support
Check your MySQL username, MySQL host, Database, and MySQL Password.
Admin
Amefon
i do not understand. Am I to change the MySQL details or what.
Mike Casile
Have not done this yet, but local site is looking good. I do have 2 questions (which may really be too big and may require follow-on articles).
1. If I go thru this and it comes out nice on the live site … but I want to continue doing new development locally, is there a similar process for incremental changes?
2. How will this be impacted if I use multiSite (which I’m NOT doing right now).
Thanks,
Roman
It depends on what your changes are affecting – if you have changed some css or php code in theme, you will need tu push changed files on server using FTP. If you change some wordpress settings, you only need to go through steps of copying your database.
Ameira
Thank you for this tutorial – after 2 weeks of trying everything under the sun finally found out what was missing. I have been able to access my website but images are missing and the layout is all over the place. I followed step 7 and it did improve the improve slightly but still quite a mess – any ideas on what else I can do?
Soo
Easy to understand and follow.
The best tutorial about”How to Move WordPress From Local Server to Live Site”.
Thank you
zavera
Hi WPBEGINNER SUPPORT, i have created custom wordpress site with some pages and used all the steps you mentioned here and all worked correctly but my pages urls are still localhost how to change these urls for pages?
WPBeginner Support
If you can access the admin area then go to settings -> General and change your WordPress URL and Site URL. Or look at the step 5 to do that through phpmyadmin.
Admin
Daniel Afriyie Gyimah
ples we need the information in a downloadable PDF format
Andres
Hello ! I tried using this method and I get the following error:
lessphp fatal error: load error: failed to find /Applications/MAMP/htdocs/breg/wp-content/themes/theme43776/bootstrap/less/bootstrap.lesslessphp fatal error: load error: failed to find /Applications/MAMP/htdocs/breg/wp-content/themes/theme43776/style.less
Warning: Cannot modify header information – headers already sent by (output started at /home/weliketo5/public_html/breg/wp-content/themes/CherryFramework/includes/less-compile.php:155) in /home/weliketo5/public_html/breg/wp-includes/pluggable.php on line 1207
Could anybody help me out?
Alfredo Garcia
While doing step #4: Import Wordpress Database on Live Site, I get the following SQL error:
Error
MySQL said: Documentation
#1064 – You have an error in your SQL syntax; check the manual that corresponds to your MySQL server version for the right syntax to use near ‘?’ at line 105
Can you tell me what is wrong and how I can fix this?
WPBeginner Support
The backup file you are trying to import could be corrupt. Export a fresh copy and then try again. If this does not work, then ask your web hosting provider to update your MySQL version.
Admin
Alfredo Garcia
Thank you. I’ll try it tonight.
Ngabe R
I was missing step 5. Thanks a lot. Very helpful!
Adam
Do I need to install WordPress on my server before beginning this process, or do I just follow the steps as listed?
WPBeginner Support
No, please see step 2. You will upload WordPress files from your local server to the live server.
Admin
Adam
Thanks, I’ve got it all working now! This was a really, really helpful tutorial!
Rod
Thanks, very helpful ! Once I worked out the correct server name on the host et all went well.
Yonatan
Great article and really helpful.
Tnx!
Momodu Oladapo Abraham
it worked thanks, however there arre still some links connecting to the local server address most experienced on the posts and blogs…what do i do ..please help…every other thing has worked fine except the posts. Thanks
Natharza
Hey
Everything worked out but the post links are not working. I do run the sql query still links were broken with the error “No input file specified.”
Please help
Michael
Thanks for this article. It saves me from stress of redesign online
Sarah
Thanks for a great tutorial, followed every steps and nothing went wrong !
THUMBS UP +++
Fongoh Tayong
Man, you are the bomb.
It worked for me like charm.
More power to you to write more tutorials on this. I am newbee to wordpress.
Thanks again.
Louise
Hi,
With step 2, if you dont have a public_html directory where else can you upload the file under? as per Milos question. I have gone into file manager and to httpdocs file and uploaded it there.
Thanks
Max
Thank you for a really simple, easy to follow tutorial on how to migrate a database. I notice that you didnt’ state to update the DB_HOST name, but otherwise this was great.
Stefano
Hi! First of all thnx for the detailed guide.
I followed all the steps without problem. Anyways, the theme and all the plugins i had installed on localhost are missing causing the page looking completely different. What can i do to import all previous plug-in and settings? Thank you in advance for toyr reply
WPBeginner Support
You can upload them from your computer using an FTP client.
Admin
Junn
Hi thank you for this tutorial, It works for me! However, I cant find the pages I created locally and settings are not right. It did let me install a new wordpress.
What went wrong?
Monique
hello. thanks for this tutorial. but i have a problem at step 6. All first 5 steps are done. but when i reload my site after changing URL in database. there is no such message as “Error Establishing Database Connection error” and my site is still opening in local host. please help what i should do now
Alex
How to create MySql db on my actual site. My provider can help me?
WPBeginner Support
Yes they can help you.
Admin
Miloš
Hi, it is me again. Now I have a problem with step seven. I put that code with my own web page
in my sql but 2 of five pages still don’t work. I propably didn’t understand your instructions very well. What do you mean by ”but don’t forget to change it with your own local site and live site URLs. ”?
Nadeem
Hi
could you please check your menu under the appearance and then click one by one those menu which is not working properly. hopefully you’ll find the errors.
Nady
Nikhil
Hi,
Thanks for the help…
All the steps are working perfect….
But When I am trying to login or Click on Any link….
It show me following msg….
My Website :
Internal Server Error
The server encountered an internal error or misconfiguration and was unable to complete your request.
Please contact the server administrator at webmaster@ to inform them of the time this error occurred, and the actions you performed just before this error.
More information about this error may be available in the server error log.
Additionally, a 500 Internal Server Error error was encountered while trying to use an ErrorDocument to handle the request.
What’s the solution of this error…
Dwayne Smith
Hi NIKHIL I am having the same problem did you manage to figure out what the problem was. If so could you please let me know your solution
Cheers
Dwayne
Mustapha
Very helpful post
thank you
Milos
I have a problem with step 6 since that I don’t know how to edit wp-config.php. The thing is that when I click right mouse and open view/edit there are no options for entering database name, user and password.
Also in step 3 I uploaded my WP files in htdocs file because that’s the only folder that I see. I use FileZilla.
I would appreciate very much if you could answer me on my email.
Miloš B.
Andrej
Milose… When you open wp-config.php file, you need to open it as a notepad document, and find at the beggining of the text database name, user and password, edit text manually and then save again.
Matt
I ran into an sql error 1064 when importing using a compressed export. Finally got it working by exporting as an uncompressed .sql