Many WordPress users prefer to work on their websites using a local server on their computer. This allows you to work on your website privately before making changes available online.
Eventually, you’ll need to move it to a live server to make it accessible to online visitors. This transition is crucial to ensure that your website functions properly on the live site.
We’ve worked on many local websites, so we had to learn the easiest way to transfer content to live websites.
In this article, we will provide step-by-step instructions on how to move WordPress from a local server to a live site.
Why Move WordPress From a Local Server to a Live Site?
Building your WordPress blog on a local server is a safe way to test changes on your website without affecting visitors.
When you have finished perfecting your website, the next step is to move from your local server to a live site.
Let’s show you two ways to move your site from a local server to a live site.
The first method uses a WordPress migration plugin and is recommended for beginners.
In the second method, we will show you how to manually move WordPress from a local server to a live site.
You can choose the method that works best for you:
Before You Migrate Your WordPress Site
You need to have a few things in place to migrate WordPress from a local server to a live server.
First, we assume that you have a WordPress site running on a local server (also called localhost) on your computer and that you have full access to it.
Next, you’ll need to have a domain name and web hosting.
We have heard countless stories from beginners who started with poor or free web hosting providers and regretted it. In our experience, choosing the right hosting provider is critical to the success of any website.
To make your decision easier, we recommend using Bluehost. They are an officially recommended WordPress hosting company, and they are giving WPBeginner users an exclusive discount + free domain and SSL.
Basically, you can get started for as little as $1.99 per month.
If you want a great Bluehost alternative, you can look at Hostinger. They are also offering an exclusive discount to WPBeginner users with a free domain name.
If you can afford to pay a little more, then check out SiteGround. They also have a special deal for WPBeginner readers.
If you need help setting up your website, then follow our step-by-step guide on how to make a website.
Finally, you will need an FTP program and know how to use FTP to upload your local server site to the live site.
Ready? Let’s begin migrating your WordPress site.
Video Tutorial
If you’d prefer written instructions, then just keep reading.
Method 1: Transfer WordPress From The Local Server to Live Site Using a Migration Plugin (Recommended)
This method is easier and recommended for beginners. We will be using a WordPress migration plugin to move WordPress from localhost to a live site.
Step 1: Install and Set Up the Duplicator Plugin
First, you need to install and activate the Duplicator plugin on your local site. For more details, see our step-by-step guide on how to install a WordPress plugin.
Pro Tip: There is also a pro version of Duplicator that offers secure backups, cloud storage, easy site restore, and more.
Upon activation, you need to go to the Duplicator » Backups page and click on the ‘Create New’ button.
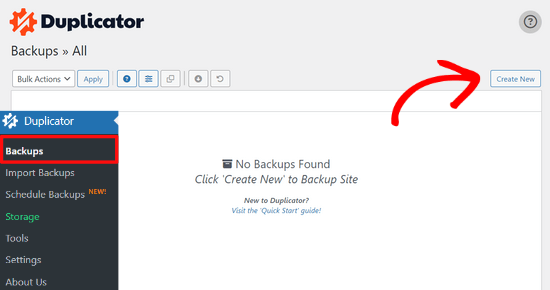
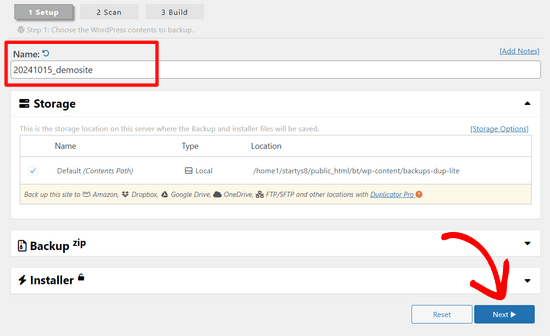
This brings you to a screen where you can give your backup a name.
Then, click the ‘Next’ button.
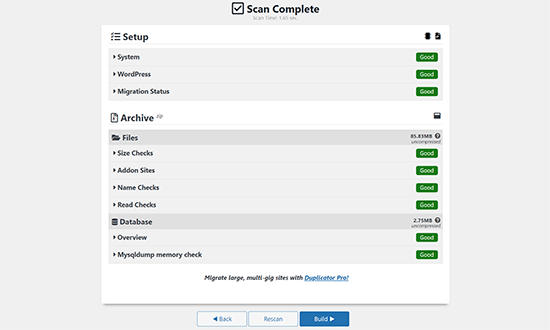
Duplicator will now run some tests to see if everything is in order.
If all items are marked ‘Good,’ then click on the ‘Build’ button.
This process may take a few minutes, depending on the size of your website. You must leave this tab open until it is complete.
Once finished, you’ll see download options for ‘Installer’ and ‘Archive’ packages. You need to click on the ‘Download Both Files’ button to download both files to your computer.
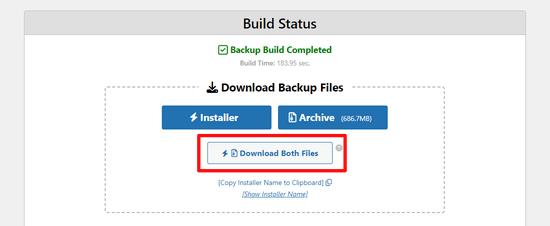
The ‘Archive’ file is a complete copy of your WordPress site. It includes all WordPress core files as well as your images, uploads, themes, plugins, and a backup of your WordPress database.
The ‘Installer’ file is a script that will automate the entire migration process by unpacking the archive file containing your website.
Step 2: Create a Database for Your Live WordPress Website
Before you can run the installer or upload the WordPress website from localhost to your hosting server, you need to create a MySQL database for your new live website.
If you have already created a MySQL database, then you can skip this step.
To create a database, you need to visit your hosting account’s cPanel dashboard. Then, locate the ‘Databases’ section and click on the ‘MySQL Database Wizard’ icon.
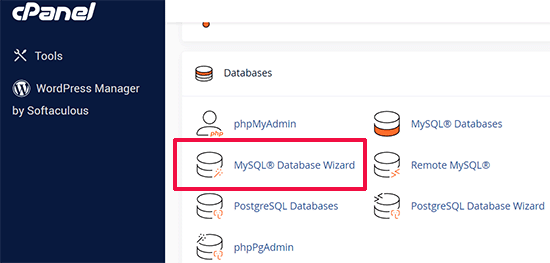
On the next screen, there’s a field to create a new database.
Simply provide a name for your database and click on the ‘Create Database’ button.

cPanel will now create a new database for you.
After that, you need to enter a username and password for your new user and then click the ‘Create User’ button.
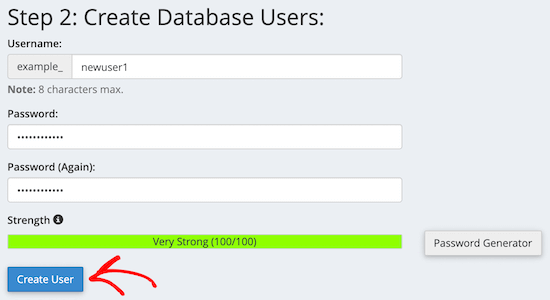
Next, you need to add the user you just created to the database.
First, click the ‘All Privileges’ checkbox.
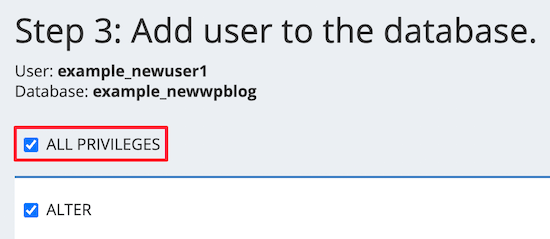
Then, scroll down and click the ‘Make Changes’ button to save your changes.
Your database is now ready to be used with your WordPress site. Make sure to note down the database name, username, and password. You’ll need this information in the next step.
Step 3: Upload Files from the Local Server to the Live WordPress Website
Now, you need to upload the archive and installer files from your local site to your hosting account.
First, connect to your live site using an FTP client. Once connected, make sure that the root directory of your website is completely empty.
Normally, the root directory is the /home/public_html/ folder.
Some WordPress hosting companies automatically install WordPress when you sign up. If you have WordPress files there, then you need to delete them.
After that, you can upload the archive.zip and installer.php files from Duplicator to your empty root directory.

Step 4: Running the Migration Script
After you have uploaded the migration files, you need to visit the following URL in your browser:
http://example.com/installer.php
Don’t forget to replace ‘example.com’ with your own domain name.
This will launch the Duplicator migration wizard.
The installer will run a few tests and will initialize the script.
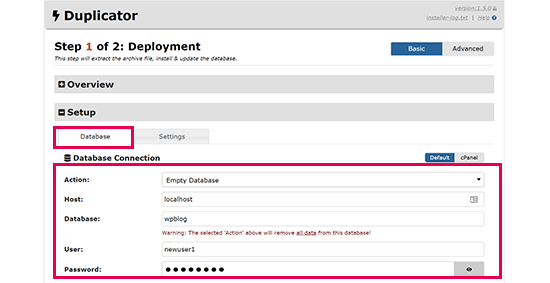
Under the Setup section, you will be asked to enter your MySQL host, database name, username, and password.
Your host will likely be a local host. After that, you will enter the details of the database you created in the earlier step.
Then, click on the ‘Validate’ button to make sure the details you entered are correct.
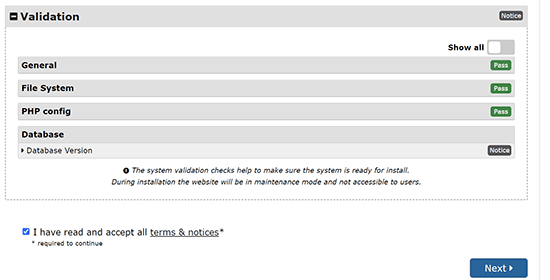
After that, click on the ‘Next’ button to continue.
Duplicator will now import your WordPress database backup from the archive into your new database.
It will also update URLs pointing to the local site and your new live site.
You can now click on the ‘Admin Login’ button to enter the WordPress admin area of your live site.

Once you log in to your live site, Duplicator will automatically clean up the installation files.
That’s all. You have successfully moved WordPress from the local server to your live site.
Method 2: Manually Transfer WordPress From the Local Server to the Live Site
In this method, we will show you how to manually move WordPress from the local server to your live site. It will be useful if the first method doesn’t work or if you prefer to do it manually.
Step 1: Export Local WordPress Database
The first thing you need to do is export your local WordPress database. We will be using phpMyAdmin to do that.
If you are unfamiliar with it, then you might want to take a look at our guide to WordPress database management using phpMyAdmin.
Simply go to http://localhost/phpmyadmin/ and click on your WordPress database. Next, click on the ‘Export’ button from the top menu bar.

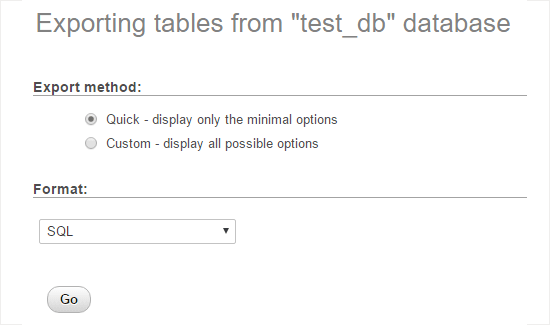
In the ‘Export method:’ option, you can choose ‘Quick’ or ‘Custom.’ Custom will provide you with more options to export your database.
But we recommend choosing ‘Quick’ and then clicking the ‘Go’ button to download your database.
Step 2: Upload WordPress Files to Live Site
Now, we will need to move all your website files to the live site.
To get started, go ahead and open your FTP client and connect to your web hosting account.
Once you are connected to your live site, make sure you upload the files in the right directory. For example, if you want the site to be hosted on ‘yoursite.com,’ then you will want to upload all the files in your public_html directory.
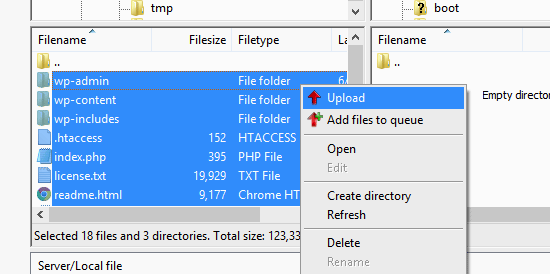
Now select your local WordPress files and upload them to your live server.
Step 3: Create a MySQL Database on Your Live Site
While your FTP client is uploading your WordPress files, you can start importing your database to the live server.
Most WordPress hosting providers offer cPanel to manage your hosting account, so we will show you how to create a database using cPanel.
First, you need to log in to your cPanel dashboard and click on the ‘MySQL Database Wizard’ icon, which can be found in the ‘Databases’ section.

On the next screen, you can create a new database.
You need to provide a name for your database, then click ‘Create Database.’

cPanel will now automatically create a new database for you.
Next, you need to enter a username and password for your new user and then click ‘Create User’.
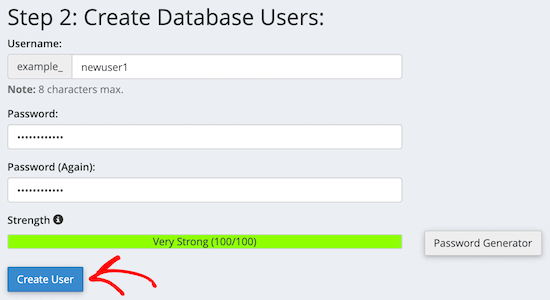
After that, you need to add the user you just created to the database.
First, check the ‘All Privileges’ checkbox.
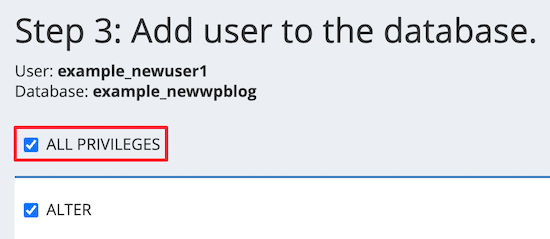
Then, scroll down and click ‘Make Changes’ to save your changes.
You’ve successfully created a new database for your live WordPress site.
Step 4: Import WordPress Database to Live Site
The next step in the process is to import your WordPress database.
Go to your cPanel dashboard, scroll down to the ‘Databases’ section, and click on ‘phpMyAdmin.’
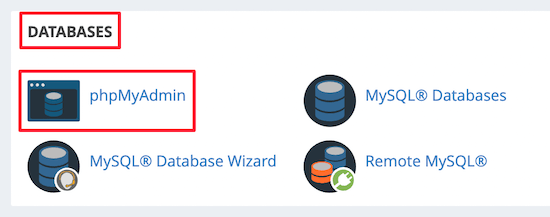
This will take you to phpMyAdmin, where you want to click on the database you just created above. phpMyAdmin will show your new database with no tables.
Next, click on the ‘Import’ tab in the top menu. On the import page, click on the ‘Choose File’ button and then select the database file from the local site you saved in the first step.
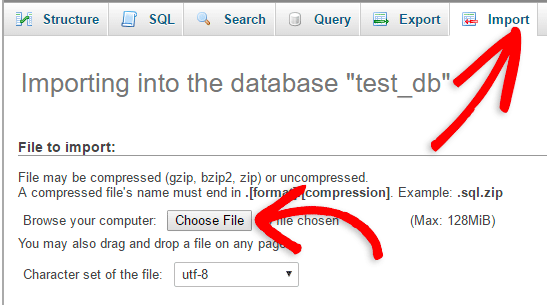
After that, click the ‘Go’ button at the bottom of the page. Your database will automatically be imported to phpMyadmin.
Step 5: Change the Site URL
Now, you need to change the site URL in your database so that it will connect with your live WordPress site.
In phpMyAdmin, look for the wp_options table in your database that you just imported above.
If you changed your database prefix, then instead of wp_options, it might be {new_prefix}_options.
Next, click on the ‘Browse’ button next to wp_options. Or, click the link in the sidebar to open up the page that has a list of fields within the wp_options table.
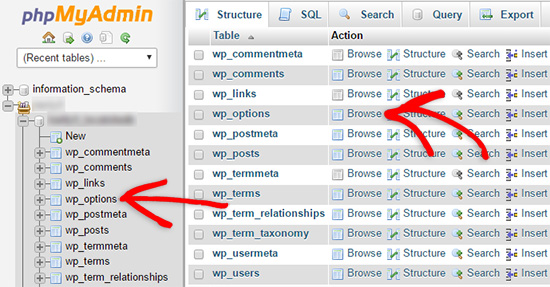
Then, in the options_name column, you need to look for the siteurl option.
Then, click the ‘Edit’ icon.

This brings up a window where you can edit the field.
In the input box option_value, you’ll see the URL of your local install, which will be something like http://localhost/test.
You need to insert your new site URL in this field, for example: https://www.wpbeginner.com.
Then, you can save the field by clicking the ‘Go’ button.
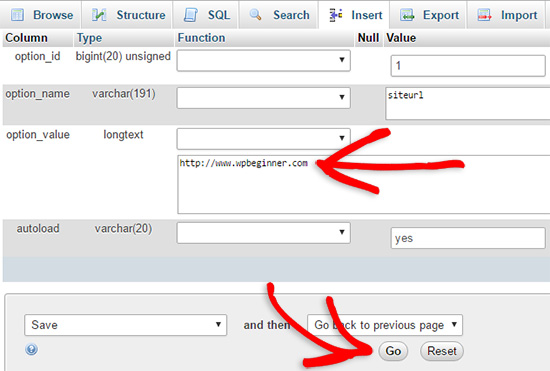
Next, you need to follow the same steps as above for the home option name. The wp_options menu can be a few pages long. Usually, the home option will be on the second page.
Then, update the home URL, so it’s the same as your live site URL.
Step 6: Set Up Your Live Site
Now that you’ve imported the database and uploaded your content, it’s time to configure WordPress.
At this time, your site should be showing an ‘Error establishing a database connection‘ error.
To fix this, connect to your website using an FTP client and open up the wp-config.php file.
You’ll be looking for the following lines of code:
// ** MySQL settings - You can get this info from your web host ** //
/** The name of the database for WordPress */
define( 'DB_NAME', 'database_name_here' );
/** MySQL database username */
define( 'DB_USER', 'username_here' );
/** MySQL database password */
define( 'DB_PASSWORD', 'password_here' );
/** MySQL hostname */
define( 'DB_HOST', 'localhost' );
You will need to provide the database name, username, and password you created earlier.
Next, save the wp-config.php file and upload it back to your WordPress hosting server.
Now, when you visit your website, it should be live.
After that, you need to log in to your WordPress admin panel and go to the Settings » General. Then, without changing anything, scroll to the bottom and click the ‘Save Changes’ button.
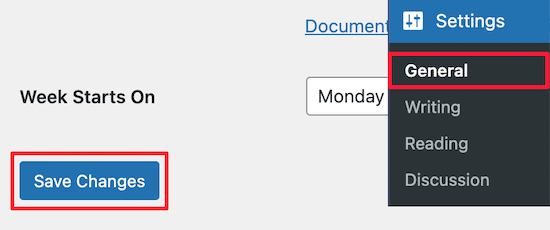
This will make sure that your site URL is corrected anywhere else that it needs to be.
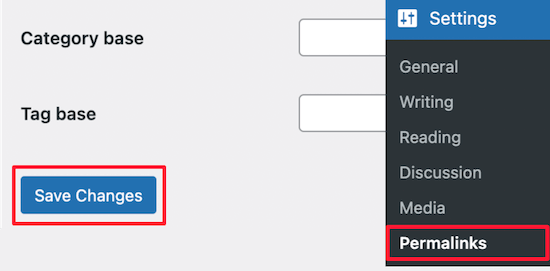
Once you’ve done that, go to Settings » Permalinks, then scroll down and click ‘Save Changes’ to ensure that all post links are working fine.
Step 7: Fix Images and Broken Links by Updating Paths
Whenever you are moving a WordPress site from one domain to another or from a local server to a live site, you’ll face broken links and missing images.
We’ll show you two ways to update URLs. You can pick one that works best for you.
1. Update URLs Using Search & Replace Everything Plugin (Recommended)
The safest way to fix this is by using Search & Replace Everything. It is a powerful WordPress plugin that allows you to easily perform bulk update tasks on your website without writing complex database queries.
First, you need to install and activate the Search & Replace Everything plugin.
After activation, go to Tools » WP Search & Replace page.
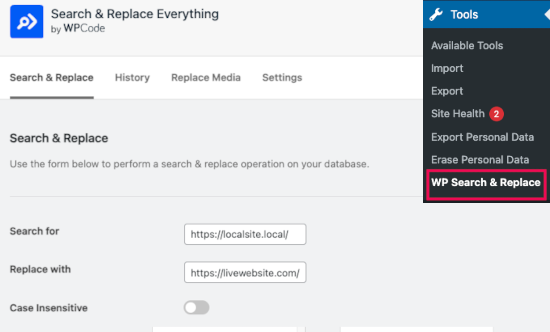
From here, you need to enter your local site URL in the ‘Search for’ field and your live site URL in the ‘Replace with’ field.
Scroll a little and click ‘Select All’ under the tables. This ensures that the plugin will look for the old URL everywhere in the database.
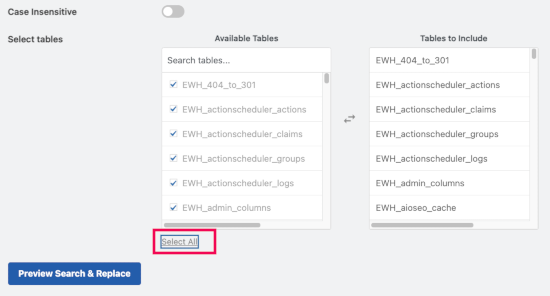
Now click the ‘Preview Search & Replace’ button to continue.
The plugin will search your database for all instances of the old URL and then preview the results.
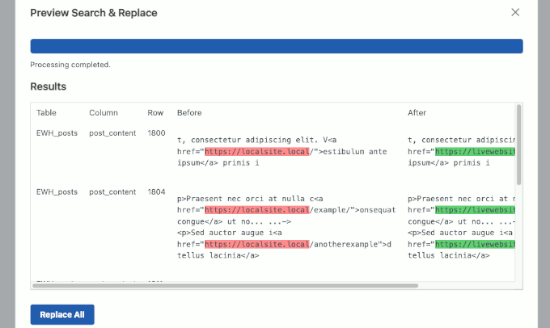
If everything looks good, click ‘Replace All’ to save the changes.
You’ll see a warning about the changes you are making. Click ‘Yes’ to continue.
The plugin will now update the database and replace local URLs with your current website URL.
2. Update URLs Manually (Advanced)
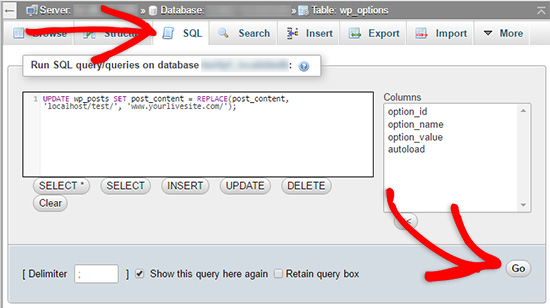
Another way to update the URLs is by using the following SQL query:
UPDATE wp_posts SET post_content = REPLACE(post_content, 'localhost/test/', 'www.yourlivesite.com/');
Simply go to phpMyAdmin, click on your database, and then click on ‘SQL’ from the top menu and add the query above.
Make sure you change it to your local site and live site URLs and click the ‘Go’ button.
That’s it. You have now successfully migrated WordPress from your local server to a live site.
Hopefully, your live website is up and running smoothly. If you notice any errors, you can check out our guide to common WordPress errors for help with troubleshooting.
We hope this article helped you move WordPress from a local server to a live site. You may also want to see our guide on moving a live site to a local server or look at the ultimate website migration checklist for practical WordPress migration steps.
If you liked this article, then please subscribe to our YouTube Channel for WordPress video tutorials. You can also find us on Twitter and Facebook.


divine
Nice article,
Everything was go fine until the signing up on wordpress Admin, i’ve had d domain name for a long time and I can’t remember my wp-admin login details. What can I do to rectify this problem?
Secondly, I tried visiting my site, it opened but the site kept saying the page could not be found, I need help pls
monica
Hi there,
So, My site is runing and seems to work on the Lovalhost/mysite
DB connection is good, settes permalinks to default.
BUT:
all the links fo to the domain (live site) what I’m missing?
O.o
Thanks in advance, great tuto
rdllngr
Everything worked for me. Thanks a lot!
Alem
Helped me go live Thank you.
aqeel
hi plz help i am having this errer when i click import my database plz help
Error
SQL query:
—
— Database: `testword`
—
— ——————————————————–
—
— Table structure for table `wp_commentmeta`
—
CREATE TABLE IF NOT EXISTS `wp_commentmeta` (
`meta_id` BIGINT( 20 ) UNSIGNED NOT NULL ,
`comment_id` BIGINT( 20 ) UNSIGNED NOT NULL DEFAULT ‘0’,
`meta_key` VARCHAR( 255 ) COLLATE utf8mb4_unicode_ci DEFAULT NULL ,
`meta_value` LONGTEXT COLLATE utf8mb4_unicode_ci
) ENGINE = INNODB DEFAULT CHARSET = utf8mb4 COLLATE = utf8mb4_unicode_ci AUTO_INCREMENT =1;
MySQL said: Documentation
#1046 – No database selected
Prasanna
at the top of everything type USE ;
eg if my database name is wordpress then type
use wordpress;
Ngeshlew
Needless to say, you are the website that I always come to check whenever I want to migrate my local WordPress site to a live server.
Thank you guys for the easy steps.
Wafir Manakad
Hey,
Thanks a lot.
I had two queries:
1. On my new website (destination website), I am copying the old files onto an empty public html folder. That is the way right? There is no need to pre-install wordpress on new site?
2. Everything was fine right until the end. I am moving my website from one domain to another.
Finally when I open the new domain, part of the website loads, and partly there are errors. This is the error message:
Warning: include_once(/home/laprimaa/public_html/wp-content/themes/charlottetheme/charlottetheme/theme/plugin/advanced-customizer/lib/ctAdvancedCustomizerMethods.class.php) [function.include-once]: failed to open stream: No such file or directory in /home/laprimaa/public_html/wp-content/themes/charlottetheme/charlottetheme/framework/createit/ctFilesLoader.class.php on line 143
Does this mean I have not uploaded my files correctly?
Any help would be much appreciated.
Best Regards
sandeep kumar singh
how we can give the link of other page except home . i have given the url of home but by using your tutorial i have added post query but my site is not working till now .so please give me information to resolve this.
Shubhayan Ghoshal
Shouldn’t we be replacing the website name -> localhos/{dirname} for ‘guid’ column rather than post_content column?
justin
Okay everything was sailing smooth until I went to import the new database. Upon trying to import it it only puts in wp_commentmeta, wp_comments, wp_links, wp_options and then spits out the error code: ” #1064 – You have an error in your SQL syntax; check the manual that corresponds to your MySQL server version for the right syntax to use near ‘?’ at line 2 “. Now the whole site is down and I don’t have a clue what the heck it is referring too when it says “line 2”. Line 2 of what? And of course the Manual is so friggin helpful man I’ve never seen such helpful stuff (is there a way to type sarcastically?) Please help…
Frosty
Thanks mate. You are a diamond! Ran into a few problems, mainly 123 reg php address was incorrect but got there in the end.
Many many thanks
kathy
Hi, I am trying to import the database but appear to be getting an error. Any ideas anyone? I’m new to wordpress land.
WPBeginner Support
Can you please only paste the error line?
Admin
kathy
I’ve exported my local database and tried to import and it’s returning the below.
Database: `root_wordpress-trunk`
Table structure for table `wp_comments`
#1046 – No database selected
Any help would be greatly appreciated.
Rob
Hello,
I have migrated my site from local to host server. I followed all steps and everything went right but finnaly, I am missing content (posts, pages etc.). Does anybody has any advice?
Yosifov
Hallo, all worked nice so far, but I reached the step 5 where phpmyAdmin is not giving me the option to edit siteurl and home..
amin
thanks for this tutorial ,
I follow this steps and it work correctly i have domain and hosting from godaddy.
Adeel Ashraf
really awsome work (Y)
kanav
do i need to copy all of my data on a live server with preinstalled wordpress ?
like godaddys managed wordpress ?
WPBeginner Support
Yes.
Admin
Claire
Hello,
I have followed all of the steps above, and everything has gone correctly up until the very last part.
I have edited and uploaded the wp-config.php file and now my webpage is just a blank screen and I have not been able to get into edit it in wordpress. I thought I had lost the whole thing…. I changed the urls in php.myadmin back to local/wordpress and can access it again.
What is going wrong please? Any help appreciated!
Thanks, Claire
WPBeginner Support
Undo the changes you made to wp-config.php you have probably missed something when editing it.
Admin
Katy
Ok I’m having the same problem and I’ve uploaded and reuploaded and changed the wp-config.php file. If I deliberately put in something incorrect it shows error establishing database connection. When I put in the correct information I just get a blank page. Blank page for /wp-admin as well.
Jessica CHu
I’m having this same problem… I’m also not able to get access to wordpress back despite changing the wp-config back to the original settings. Have been through all the instructions step by step. I’m using MAMP and Filezilla on EasySpace… Please help!
Michelle Whittaker
Thank you so much! This was exactly the step-by-step resource I needed! I did get a dB error trying to import the gzipped file but I went back and exported the dB as a zip file and imported into new dB and that worked fine.
Chris Jacobsz
Hi,
Thank you for the excellent article. I am a novice and struggled with Duplicator but got my website up and running by following these instructions step by step. Only one thing, my SQL query to update the broken image links did not work. So I had to do it manually.
Thanks very much.
Chris
Mike
Excellent article!!!
One thing to note: Please be sure you know the SQL host server name before you begin! It took me a little while to figure out that “localhost” in the wp-config.php file needed to be changed to the name of my hosting server.
Everything in the article is spot on and saved me hours of moving my Dev site to my hosted provider….
Arjun
Mike, I am using godaddy and how do I find out my SQL host server name? Currently leaving it as ‘localhost’ in wp-config.php file is not helping. Any help appreciated. Been trying but with no luck.
Maggie Walker
Thank you SO SO SO much for this article!!! I am setting up a WP site for a friend for the first time and it was SO helpful to have this article to walk me through the process of going from local to live! I’m a Front End Dev so the help with all of the PHP, SQL, and FTP was incredibly useful.
darrync
hmm, not working for me.
I went through and did this first time and had problems with php.errors.
So I tried a 2nd time and then i finally got the the ‘Error Establishing Database Connection error’
Then progressed until yes i saw my live site.
However when i click on the login to WP admin on the now live site, it takes me to a directory of wp-admin and the whole WP GUI is not shown!
This leads to me think there was an WP install problem…or..?
Note I am a newbie to WP, PHP, CSS, so please explain as if to talk to a 5yo child please :DDDD
thanks
WPBeginner Support
You need to update WordPress urls. If you can use the admin area then go to Settings > General and make sure you have the URL of your live site in both fields.
Admin
obai and hill
I am following the steps and they are very clear and works well every time.
However, this time i followed the steps and when i reached to step 6 where i will have to set up the WP account, the website worked without giving me the error establishing database connection message.
The problem is i can access the new website wp-admin and the pages redirect me to the testing domain. please help
Dave
Thanks for the article. Very helpful!
I have a question. My current live site (fatcow hosting) is running on a very old version of wordpress. My new local site is ready with the latest of everything. I wanted to create a subdomain and test this new site live on different devises and browsers before actually taking it live.
My question is can I have 2 versions of wordpress running on my hosting site? Will ask the host too, but thought I would ask here as well. So the idea is have my current site which is outdated running while I beta test my new site. Once the new site is all good, then I will replace the old with the current. Good idea? Silly naive thinking from a beginner?
Thanks for any help!
-Dave
Bhaumik Dhandhukia
Thank you very much. My site is live and running.
Shaheryar
Thank you!!!!!!!!!!! Life saver article.
Helped me a lot!!!!!!!!! I did everything step by step. Had to change database names accordingly, had to fix broken links manually but hey, its just small stuff to change which I fixed it quickly.
Really appreciate your time and effort to create such a userful site.
Thanks.
cyberwaver
I did everything mentioned here. Mine is am transferring from one host to another host I followed every step here but my website is still showing blank.
check any help will be appreciated.
Wellbein
Hello . I tried all the process and it seems lie I’m the only one here who s a problem. The problem is the white screen. I can’t troubleshoot because the screen is blank. OMG. I am very sure that I followed the instructions when in fact it isn’t my 1st time to migrate a local site to the live site. What does the white screen means? Please help!!
Don_Kihot
I have developed child theme locally, what are the steps to upload to live server?
WPBeginner Support
Simply upload your child theme folder to /wp-content/themes/ directory on your live site. See our guide on how to create WordPress child theme.
Admin
george
thanks for d dis update, my site uploaded well but d pages are not opening fulling, d post and home page open well but the page just open half well. pls help me
olenyash
Best guide i have been through so far — on everything. Thank you a tonne
Dale Powell
This article has saved my life since the day it was published. Can’t thank you enough
Osama
Great Work !
This Transfer Method Works Good Work
Thank You
Ben
Excellent article. I’ve just followed it step by step for my new business website I’ve been developing on WAMP.
Keep up the great work!
Ben.
Rudra
Really great thanks man
Juan C
THANKS MAN!!!!!
Matthew Eaton
At step 5, I cannot alter the site url or home. It won’t give me the option of editing.
What went wrong?
Chris
There is an icon like “pencil”, you can click that
Adam
When I import all files and database I have error 500 on subpages… Why??
anthony
when I import my database not all of the tables are there. I’m wondering what I’m doing wrong….
Jay Doshi
Firstly You have to select your database(Click on your create database name) and then import your .sql file.
Kailashkumar
Sir i want to upload WordPress site form local host to live server.
Robin
One tip maybe I can help someone with this.
My database from my localserver was far too big to import due to the import limit.
I have used the 7ZIP program to zip my exported database to a gzip file.
This has solved the problem for me.
Thanks for the article! At the moment my website is uploading…
Thijs
Thank you very much for the tutorial. I regret to say that after step 5 everything went blank.
The site is gone and I am not able to recover the information.
I can not believe that creating a simple site can be so difficult.
Robin
Thanks for the info.
Tomorrow I am going to replace my wordpress website. I am reading some people are having issues with the thaccess file. Do I have to change the site adress in this file or not?
Thanks!
Claudio
This was certainly a very helpful tutorial, but why go through such a lengthy process when you can just export and import everything? There might be a couple of things missing like the media library but that’s really easy to download and upload.
I’ve been creating child themes for a while and this what i do for my clients:
– create the whole child theme abs site offline
-once finished simply select expert everything from the settings
-install WordPress on the line host
-select import and point it to the xml file produced before
-that’s it! All your post and pages should be there now
– simply install the cold theme you’ve created and tweak what ever looks “funny”.
I hope this helps.
Aurang Zeb Khan
I am trying since 2 days, “i spend almost full day” but could not succeed. I wanted to try a simple website with only one post so that i could get to know how the whole process will go when i complete my site in the wordpress.
I have done all the steps successfully but when i try to import database to the hosting website an error occurs and i dont know how to solve this. i am using SmartFTP. can anybody help?
Alex Evans
Hi, I understand this process, but can anyone send me a link or tell me the process for taking a locally hosted WP site and uploading it to go live, where there already exists a site on the domain?
For example if I’m creating a new site for someone and now I need the locally hosted site to appear for said domain instead of the hold one.
I’m confused on how DNS works
Raja Asad
Hi ,
please anyone help me out
actually i did all these steps that mentioned above but still couldn’t upload my site form local host to live server
what else i do ?
Asad
Hi ,
i did these all steps but yet i am able to transfer my site from local to c panel
please suggest one thing more is there already word press install on c panel or we have to install it there ?
PAUL
Hi
Thanks for an excellent article – clear, concise, well-illustrated and easy to follow. I’ve been uisng Duplicator for ages, but it just decided – this time – that it wasn’t going to play fair!
Everything worked perfectly until Step 7. The SQL query fixed some, but not all, path changes. I then resorted to the Velvet Blues plugin, which fixed all but one path. I’m still struggling to find a solution for the following:
I have a plugin which utilises its own (two) stylesheets. While Velvet Blues has changed the path to one stylesheet, the other doesn’t want to change. Any ideas how I can effect this manually?
Thanks and regards
Paul (“Webbo”)