Many WordPress users prefer to work on their websites using a local server on their computer. This allows you to work on your website privately before making changes available online.
Eventually, you’ll need to move it to a live server to make it accessible to online visitors. This transition is crucial to ensure that your website functions properly on the live site.
We’ve worked on many local websites, so we had to learn the easiest way to transfer content to live websites.
In this article, we will provide step-by-step instructions on how to move WordPress from a local server to a live site.
Why Move WordPress From a Local Server to a Live Site?
Building your WordPress blog on a local server is a safe way to test changes on your website without affecting visitors.
When you have finished perfecting your website, the next step is to move from your local server to a live site.
Let’s show you two ways to move your site from a local server to a live site.
The first method uses a WordPress migration plugin and is recommended for beginners.
In the second method, we will show you how to manually move WordPress from a local server to a live site.
You can choose the method that works best for you:
Before You Migrate Your WordPress Site
You need to have a few things in place to migrate WordPress from a local server to a live server.
First, we assume that you have a WordPress site running on a local server (also called localhost) on your computer and that you have full access to it.
Next, you’ll need to have a domain name and web hosting.
We have heard countless stories from beginners who started with poor or free web hosting providers and regretted it. In our experience, choosing the right hosting provider is critical to the success of any website.
To make your decision easier, we recommend using Bluehost. They are an officially recommended WordPress hosting company, and they are giving WPBeginner users an exclusive discount + free domain and SSL.
Basically, you can get started for as little as $1.99 per month.
If you want a great Bluehost alternative, you can look at Hostinger. They are also offering an exclusive discount to WPBeginner users with a free domain name.
If you can afford to pay a little more, then check out SiteGround. They also have a special deal for WPBeginner readers.
If you need help setting up your website, then follow our step-by-step guide on how to make a website.
Finally, you will need an FTP program and know how to use FTP to upload your local server site to the live site.
Ready? Let’s begin migrating your WordPress site.
Video Tutorial
If you’d prefer written instructions, then just keep reading.
Method 1: Transfer WordPress From The Local Server to Live Site Using a Migration Plugin (Recommended)
This method is easier and recommended for beginners. We will be using a WordPress migration plugin to move WordPress from localhost to a live site.
Step 1: Install and Set Up the Duplicator Plugin
First, you need to install and activate the Duplicator plugin on your local site. For more details, see our step-by-step guide on how to install a WordPress plugin.
Pro Tip: There is also a pro version of Duplicator that offers secure backups, cloud storage, easy site restore, and more.
Upon activation, you need to go to the Duplicator » Backups page and click on the ‘Create New’ button.
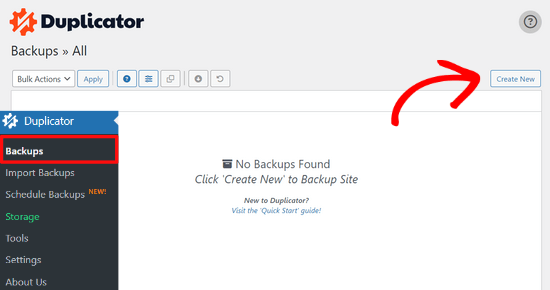
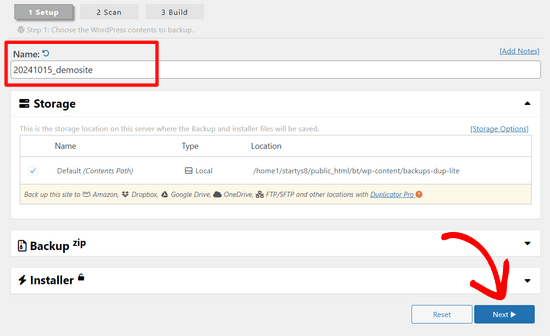
This brings you to a screen where you can give your backup a name.
Then, click the ‘Next’ button.
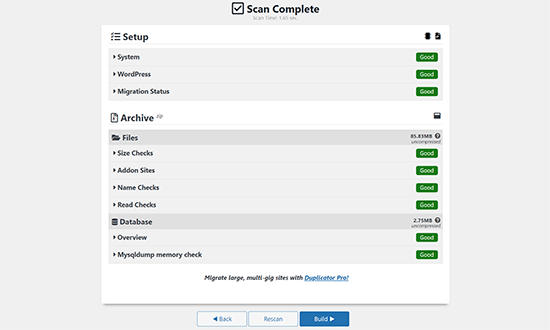
Duplicator will now run some tests to see if everything is in order.
If all items are marked ‘Good,’ then click on the ‘Build’ button.
This process may take a few minutes, depending on the size of your website. You must leave this tab open until it is complete.
Once finished, you’ll see download options for ‘Installer’ and ‘Archive’ packages. You need to click on the ‘Download Both Files’ button to download both files to your computer.
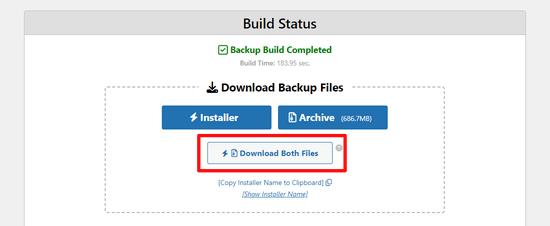
The ‘Archive’ file is a complete copy of your WordPress site. It includes all WordPress core files as well as your images, uploads, themes, plugins, and a backup of your WordPress database.
The ‘Installer’ file is a script that will automate the entire migration process by unpacking the archive file containing your website.
Step 2: Create a Database for Your Live WordPress Website
Before you can run the installer or upload the WordPress website from localhost to your hosting server, you need to create a MySQL database for your new live website.
If you have already created a MySQL database, then you can skip this step.
To create a database, you need to visit your hosting account’s cPanel dashboard. Then, locate the ‘Databases’ section and click on the ‘MySQL Database Wizard’ icon.
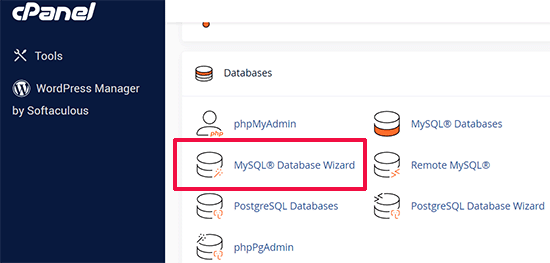
On the next screen, there’s a field to create a new database.
Simply provide a name for your database and click on the ‘Create Database’ button.

cPanel will now create a new database for you.
After that, you need to enter a username and password for your new user and then click the ‘Create User’ button.
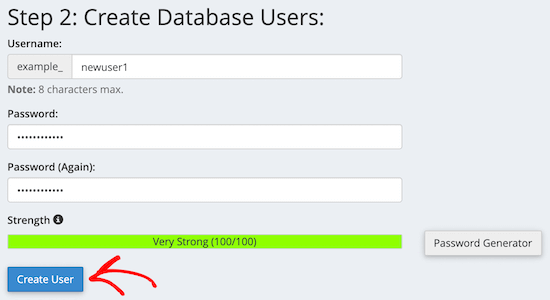
Next, you need to add the user you just created to the database.
First, click the ‘All Privileges’ checkbox.
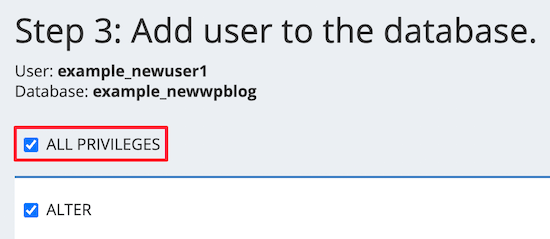
Then, scroll down and click the ‘Make Changes’ button to save your changes.
Your database is now ready to be used with your WordPress site. Make sure to note down the database name, username, and password. You’ll need this information in the next step.
Step 3: Upload Files from the Local Server to the Live WordPress Website
Now, you need to upload the archive and installer files from your local site to your hosting account.
First, connect to your live site using an FTP client. Once connected, make sure that the root directory of your website is completely empty.
Normally, the root directory is the /home/public_html/ folder.
Some WordPress hosting companies automatically install WordPress when you sign up. If you have WordPress files there, then you need to delete them.
After that, you can upload the archive.zip and installer.php files from Duplicator to your empty root directory.

Step 4: Running the Migration Script
After you have uploaded the migration files, you need to visit the following URL in your browser:
http://example.com/installer.php
Don’t forget to replace ‘example.com’ with your own domain name.
This will launch the Duplicator migration wizard.
The installer will run a few tests and will initialize the script.
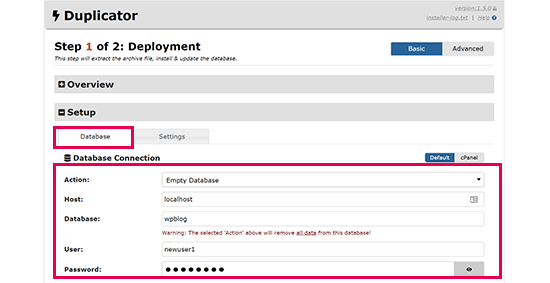
Under the Setup section, you will be asked to enter your MySQL host, database name, username, and password.
Your host will likely be a local host. After that, you will enter the details of the database you created in the earlier step.
Then, click on the ‘Validate’ button to make sure the details you entered are correct.
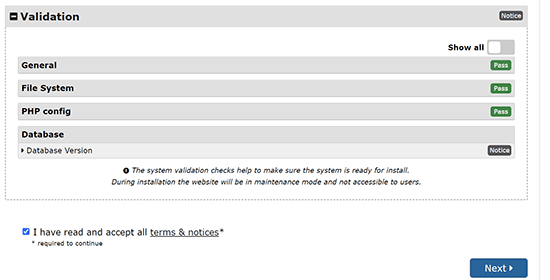
After that, click on the ‘Next’ button to continue.
Duplicator will now import your WordPress database backup from the archive into your new database.
It will also update URLs pointing to the local site and your new live site.
You can now click on the ‘Admin Login’ button to enter the WordPress admin area of your live site.

Once you log in to your live site, Duplicator will automatically clean up the installation files.
That’s all. You have successfully moved WordPress from the local server to your live site.
Method 2: Manually Transfer WordPress From the Local Server to the Live Site
In this method, we will show you how to manually move WordPress from the local server to your live site. It will be useful if the first method doesn’t work or if you prefer to do it manually.
Step 1: Export Local WordPress Database
The first thing you need to do is export your local WordPress database. We will be using phpMyAdmin to do that.
If you are unfamiliar with it, then you might want to take a look at our guide to WordPress database management using phpMyAdmin.
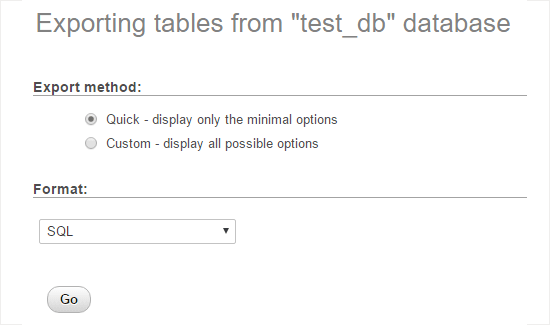
Simply go to http://localhost/phpmyadmin/ and click on your WordPress database. Next, click on the ‘Export’ button from the top menu bar.

In the ‘Export method:’ option, you can choose ‘Quick’ or ‘Custom.’ Custom will provide you with more options to export your database.
But we recommend choosing ‘Quick’ and then clicking the ‘Go’ button to download your database.
Step 2: Upload WordPress Files to Live Site
Now, we will need to move all your website files to the live site.
To get started, go ahead and open your FTP client and connect to your web hosting account.
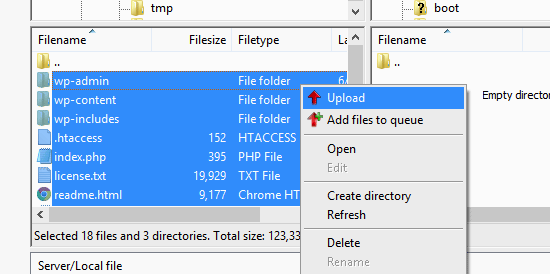
Once you are connected to your live site, make sure you upload the files in the right directory. For example, if you want the site to be hosted on ‘yoursite.com,’ then you will want to upload all the files in your public_html directory.
Now select your local WordPress files and upload them to your live server.
Step 3: Create a MySQL Database on Your Live Site
While your FTP client is uploading your WordPress files, you can start importing your database to the live server.
Most WordPress hosting providers offer cPanel to manage your hosting account, so we will show you how to create a database using cPanel.
First, you need to log in to your cPanel dashboard and click on the ‘MySQL Database Wizard’ icon, which can be found in the ‘Databases’ section.

On the next screen, you can create a new database.
You need to provide a name for your database, then click ‘Create Database.’

cPanel will now automatically create a new database for you.
Next, you need to enter a username and password for your new user and then click ‘Create User’.
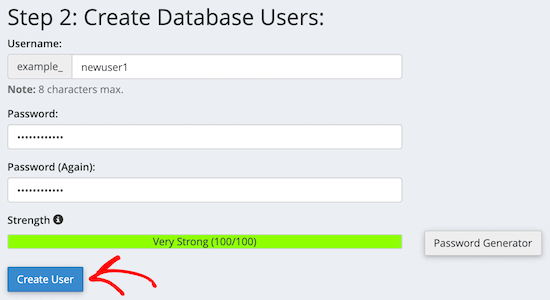
After that, you need to add the user you just created to the database.
First, check the ‘All Privileges’ checkbox.
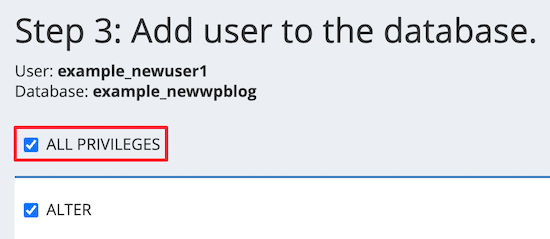
Then, scroll down and click ‘Make Changes’ to save your changes.
You’ve successfully created a new database for your live WordPress site.
Step 4: Import WordPress Database to Live Site
The next step in the process is to import your WordPress database.
Go to your cPanel dashboard, scroll down to the ‘Databases’ section, and click on ‘phpMyAdmin.’
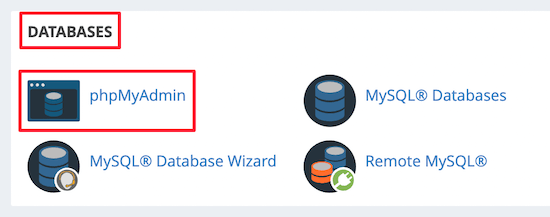
This will take you to phpMyAdmin, where you want to click on the database you just created above. phpMyAdmin will show your new database with no tables.
Next, click on the ‘Import’ tab in the top menu. On the import page, click on the ‘Choose File’ button and then select the database file from the local site you saved in the first step.
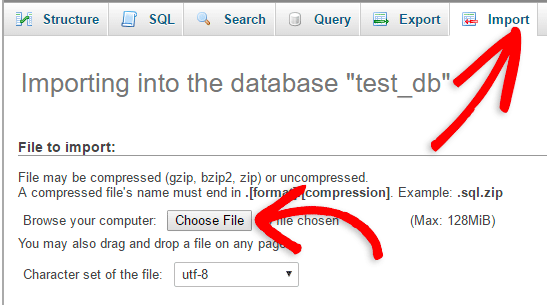
After that, click the ‘Go’ button at the bottom of the page. Your database will automatically be imported to phpMyadmin.
Step 5: Change the Site URL
Now, you need to change the site URL in your database so that it will connect with your live WordPress site.
In phpMyAdmin, look for the wp_options table in your database that you just imported above.
If you changed your database prefix, then instead of wp_options, it might be {new_prefix}_options.
Next, click on the ‘Browse’ button next to wp_options. Or, click the link in the sidebar to open up the page that has a list of fields within the wp_options table.
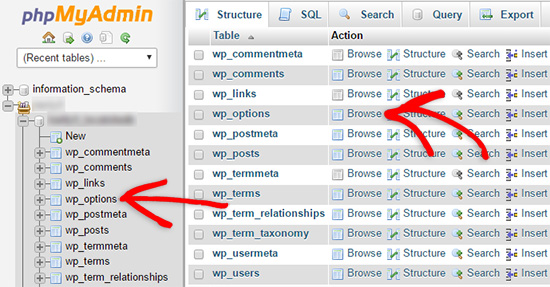
Then, in the options_name column, you need to look for the siteurl option.
Then, click the ‘Edit’ icon.

This brings up a window where you can edit the field.
In the input box option_value, you’ll see the URL of your local install, which will be something like http://localhost/test.
You need to insert your new site URL in this field, for example: https://www.wpbeginner.com.
Then, you can save the field by clicking the ‘Go’ button.
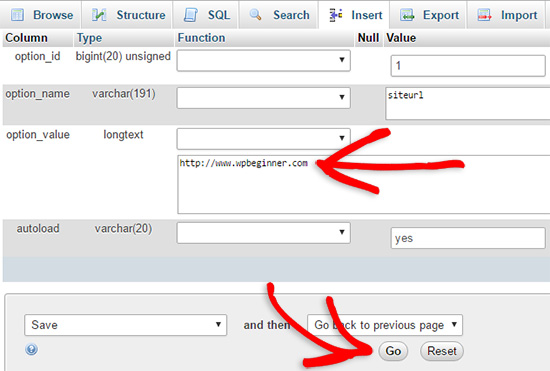
Next, you need to follow the same steps as above for the home option name. The wp_options menu can be a few pages long. Usually, the home option will be on the second page.
Then, update the home URL, so it’s the same as your live site URL.
Step 6: Set Up Your Live Site
Now that you’ve imported the database and uploaded your content, it’s time to configure WordPress.
At this time, your site should be showing an ‘Error establishing a database connection‘ error.
To fix this, connect to your website using an FTP client and open up the wp-config.php file.
You’ll be looking for the following lines of code:
// ** MySQL settings - You can get this info from your web host ** //
/** The name of the database for WordPress */
define( 'DB_NAME', 'database_name_here' );
/** MySQL database username */
define( 'DB_USER', 'username_here' );
/** MySQL database password */
define( 'DB_PASSWORD', 'password_here' );
/** MySQL hostname */
define( 'DB_HOST', 'localhost' );
You will need to provide the database name, username, and password you created earlier.
Next, save the wp-config.php file and upload it back to your WordPress hosting server.
Now, when you visit your website, it should be live.
After that, you need to log in to your WordPress admin panel and go to the Settings » General. Then, without changing anything, scroll to the bottom and click the ‘Save Changes’ button.
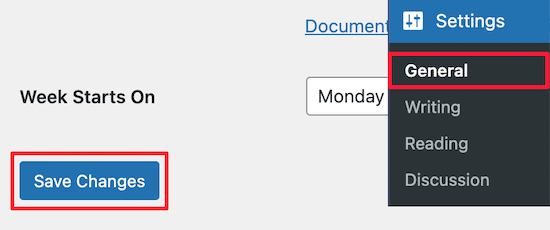
This will make sure that your site URL is corrected anywhere else that it needs to be.
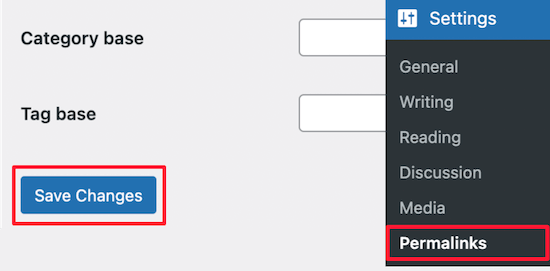
Once you’ve done that, go to Settings » Permalinks, then scroll down and click ‘Save Changes’ to ensure that all post links are working fine.
Step 7: Fix Images and Broken Links by Updating Paths
Whenever you are moving a WordPress site from one domain to another or from a local server to a live site, you’ll face broken links and missing images.
We’ll show you two ways to update URLs. You can pick one that works best for you.
1. Update URLs Using Search & Replace Everything Plugin (Recommended)
The safest way to fix this is by using Search & Replace Everything. It is a powerful WordPress plugin that allows you to easily perform bulk update tasks on your website without writing complex database queries.
First, you need to install and activate the Search & Replace Everything plugin.
After activation, go to Tools » WP Search & Replace page.
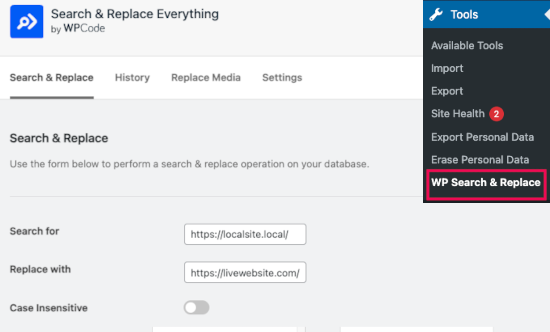
From here, you need to enter your local site URL in the ‘Search for’ field and your live site URL in the ‘Replace with’ field.
Scroll a little and click ‘Select All’ under the tables. This ensures that the plugin will look for the old URL everywhere in the database.
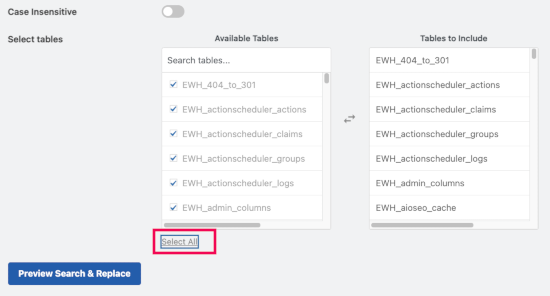
Now click the ‘Preview Search & Replace’ button to continue.
The plugin will search your database for all instances of the old URL and then preview the results.
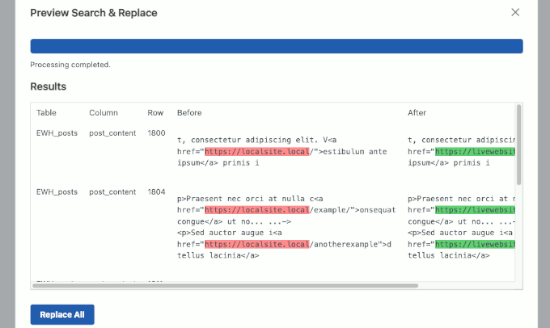
If everything looks good, click ‘Replace All’ to save the changes.
You’ll see a warning about the changes you are making. Click ‘Yes’ to continue.
The plugin will now update the database and replace local URLs with your current website URL.
2. Update URLs Manually (Advanced)
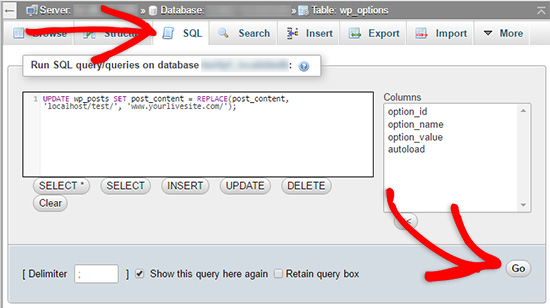
Another way to update the URLs is by using the following SQL query:
UPDATE wp_posts SET post_content = REPLACE(post_content, 'localhost/test/', 'www.yourlivesite.com/');
Simply go to phpMyAdmin, click on your database, and then click on ‘SQL’ from the top menu and add the query above.
Make sure you change it to your local site and live site URLs and click the ‘Go’ button.
That’s it. You have now successfully migrated WordPress from your local server to a live site.
Hopefully, your live website is up and running smoothly. If you notice any errors, you can check out our guide to common WordPress errors for help with troubleshooting.
We hope this article helped you move WordPress from a local server to a live site. You may also want to see our guide on moving a live site to a local server or look at the ultimate website migration checklist for practical WordPress migration steps.
If you liked this article, then please subscribe to our YouTube Channel for WordPress video tutorials. You can also find us on Twitter and Facebook.


ANTONIO
Some days ago I posted I had used method #1 successfully. I am now trying again, from scratch, with no success.
I have two webs in one host (two subdomains: www and blog). one seats in /public/ and the other seats in /public_blog/.
(so, not a subfolder but a sibling, in my host provider). Both (www and blog subdomains) have a SSL.
I got to enter the WP admin area, clean the remaining files; posts and pages are listed, but clicking preview shows a blank page. No errors on the log
I don’t know how to trace and find out the steps (although I have the dup-installer-log.txt
thanks
WPBeginner Support
You would likely want to reach out to your hosting provider to ensure that the subdomain is set to the correct folder location for the most common reason for that issue.
Admin
Rob H
Brilliant tutorial.
I went with option 1. Got write through to point 4, but then on trying to launch Wordpress, I received a “too many redirects”. Spent ages trying to figure out what I had done wrong, trying all the suggested for the error type and turned out not to be my fault. It wasn’t working because the database version I was using on Wamp was newer than the version on my hosting company 1and1 ionos.
I called up 1and 1 CS’s to ask if they could update the database version and it appears they must have had other complaints. 2 days later, database version updated and my local website transferred to the live site within minutes.
So…… database versions is another thing to consider if you get problems.
Thanks for such an excellent tutorial, I will use this method again in the future.
WPBeginner Support
Thanks for sharing your solution should anyone else run into this issue
Admin
Antonio
Perfect. I used method #1. Now the site (in server) is up and running.
But, then, when I add some posts, pages, menus in localhost,… how can I update the real site, without starting from scratch again?
thanks
WPBeginner Support
You could use the duplicator method to move the updated content over to your current site
Admin
Antonio
Thanks. I will try.
I didn’t notice my post was published yesterday, so I just wrote a new one asking the same question.
Sorry for the inconvenience.
WPBeginner Support
No worries
Bahadur
My website working fine on localhost but when i upload it to my live domain some of the Social button images are not showing can you help please ?
WPBeginner Support
We would first recommend reaching out to the support for the plugin you are using to ensure there isn’t a hiccup that is specific to transferring the content.
Admin
Luisa
Hi! I followed every step but once I get to step 4 and click on Admin Login I get an error saying “Too many redirects occurred trying to open […]. This might occur if you open a page that is redirected to open another page which then is redirected to open the original page”.
How can I fix that?
WPBeginner Support
For that error you would want to try the troubleshooting steps in our article here: https://www.wpbeginner.com/wp-tutorials/how-to-fix-error-too-many-redirects-issue-in-wordpress/
Admin
Anita Steen-van Meerveld
Hi, I’ve followed the instructions so far, and everything seems to go as it has, but the problem begins on step 4.
I’ve uploaded the migration files, after check the file is 1.2 gig.
After launching the installer.php the message is : file is 4k, please upload the complete file.
I am sure that the uploaded file is completely uploaded.
The process stops here, what can I do?
WPBeginner Support
You would want to reach out to duplicator’s support and let them know the error and they will be able to assist.
Admin
Jessica
Thankyou for this fantastic tutorial! I am building a new website locally but I already have a live site running that I will want to completely overwrite with the new one. Do I need to delete my whole live website before migrating? Both are running Wordpress but are completely different themes… thanks!
WPBeginner Support
It would normally be best to remove the site you are replacing so you do not have unnecessary additional files on your server.
Admin
nurudeen
In my opinion I recommend you guys to please organize a complete video tutorial, it gonna be a great practical guide and more helpful and much easier, for it may allow to view in real doing until results achieve.. Thanks you guys for good job you are offering.
WPBeginner Support
Thank you for your recommendation
Admin
Reggie
Hi, I did this and now my slider/carousel does not work live but it shows and works on localhost. What can I do to fix this? Thank you.
WPBeginner Support
It would depend on what error you are running into at the moment. If you reach out to the slider plugin’s support they should be able to assist.
Admin
Gage
Hi I really appreciate the in depth explanation. I am completely finished with step 5, changed my URL and Home to my actual URL i am using, but now when I type in my URL it still gives me the “if you are the owner login to launch site”. Not sure what I’m missing but i dont get an error message.
WPBeginner Support
Hi Gage,
Please recheck if you uploaded WordPress files to the correct directory. If you are unsure, then ask your hosting provider and they will let you know which directory you should upload it to.
Admin
Vladimir
Thank. Very useful tutorial.
WPBeginner Support
Thank you
Admin
Tarun Bisht
Thanks for sharing the post, i will surely try.
WPBeginner Support
Glad our post can help you
Admin
Hazel beaver
I normally love your tutorials and have built my two personal websites with your help and guidance… But this is too complicated for me!
When I run Duplicator If doesn’t list all the entries as ‘good’. The size check and add on checks come back as having a warning. so I can’t get any further. My site isn’t that big.. but I think it’s trying to package everything ( including back-up and plugins that I assume I don’t need to migrate. Is there a way round this ( I’m trying to down load my live site to WAMP so I can work on using a new theme )
WPBeginner Support
As long as they are only warnings you should be able to continue, if you click on the section with the warning it should let you know different options on how to change from warning to good. You can also enable filters to ignore certain files/folders
Admin
Fahim
Good post.
WPBeginner Support
Thank you
Admin
Ravi gupta
Great! Thanks for sharing this information I am so very happy to read this information
WPBeginner Support
Glad you like our article
Admin
Rosa
Hi there! I’ve followed your instructions so far, and everything seems to go as it has, but I’ve stuck on Step 6.
I read: “To fix this, connect to your website using an FTP client and edit wp-config.php file. Provide the database name, user and password you created earlier in Step 3. Save the wp-config.php file and upload it back to your server. Visit your website, and it should be live now.”
Can you please be more specific? Where exactly do I find wp-config.php file and how do I edit it?
WPBeginner Support
You would find the wp-config file where your WordPress folders are which is normally in the public_html or www folder of your hosting. You would use a text editor such as notepad or similar to edit the content of the file
Admin
Hirr
Could be more helpful if you uploaded a video..
WPBeginner Support
Thank you for your recommendation, we’ll certainly take a look for a possible video
Admin
Mike
“Click on the Import tab in the top menu. On the import page, click on Choose File button and then select the database file you saved in Step 1.” I cannot locate this file – no idea where to even look.
WPBeginner Support
Hi Mike,
In the first step you would have saved a file to your computer. This is the file you need to import here.
Admin
Samad
Thank you very much for the information,
I have been doing these wrong in the past.
Jim Thorne
Fantastic how-to article. I followed it and easily migrated my site from localhost to the live server. Thanks for posting! I’m a newbie at moving a site, so I had to figure out some of the simplest things. One thing I had to discover was how to move the file folders from my computer to the host server using cPanel. After researching this, I discovered to ZIP the entire folder with all of its subfolders into a ZIP file and then upload that one file.
Christian
Fix Images and Broken Links by Updating Paths: How to update background images? The method mention in step 7, only work normal image not background images. So how to update images?
WPBeginner Support
Hi Christian,
You’ll have to manually update those.
Admin
Alex
Hi guys, great tutorial.
But when i try to access my site through the url, it asks me to re-install Wordpress (i mean is shows me the wizard of the Wordpress when it starts)
Plus, when you say go to the database and create a new user, mySQL doesn’t have an option.
Olaniyan
Hello please i followed all the steps but at the end of it all am getting an error message stating Erro In Establishing a database connection message
Steph
Hi, how do I proceed if there is no cPanel? Thank you in advance!
Jasonas
Hello! Great article. Just two things that I think would be cool to read on this subject.
1.Are there any tips of workflow in order to avoid the broken links, images etc. that you mention?
2.Also, I’ve read plugin reviews where users claim that some bad plugins will leave “trash code” (unusable code and files) after the uninstall/deletion of the plugin, which eventually makes their website slower. Is that true? If yes how could we, as beginners, detect that “trash code” (essentially the leftovers of plugins that we deleted) and remove it?
In my local website I try many plugins that I don’t intend to use and will end up deleting (like many others do), so I am interested in this.
Thank you in advance.
WPBeginner Support
Hi Jasonas,
1. You can follow the steps above in order they appear to avoid broken links.
2. You can view leftover data in your WordPress database by using phpMyAdmin. However, we don’t recommend beginners to do that unless they are certain that this data is slowing down their website.
Admin
Sally
Hi,
I have been building my site on the local server, I now want to move it over to a temporary Url on my Wordpress which is installed on my hosting package to finish and then once ready it will be pointed to the domain name which currently hosts the old site, I have attempted the above steps but I get as far as step 1 and have no idea where the export file goes?
Sorry if this is a silly question but can’t seem to find it anywhere!
Any help would be much appreciated.
Thanks,
Sally
WPBeginner Support
Hi Sally,
Export file is automatically downloaded to your computer. Check your computer’s Downloads folder or any other folder where your browser usually stores downloaded files.
Admin
Sally
Hello,
Thanks, sorry can’t find it there at all. I emptied the folder and did it again but nothing appeared in there at all, hence asking the question.
All Safari downloads go into the normal download folder, so don’t know where it could be going. Going to give it a go with Duplicator and see if I get any further!
Thanks,
Sally
Sheuen
I think maybe you can try choose download custom instead of download quick, and then in output field, choose “Save output to a file” > Compression: > gzipped
JD Simpkins
Depending on your setup, it may not automatically download. It may open up in a new screen and you can then copy/paste it into a file and save yourself. Not sure if this is just a MAMP thing or what but when I migrated over to working on a Mac, this part of the steps changed.
Sally
Hi,
Your tutorials are great, thank you!
I have just been following this thread and not sure if what I am doing is wrong but I do Step 1 (Export) but no idea where the file that I am exporting goes?
I am running a local server on my Mac and have got stuck here, am I missing something?
I am trying to get my website from the local server to Wordpress running on my hosting package with 123 Reg. This is going onto a temporary URL until I am ready to move onto the domain which has currently got the old website on it.
Any help will be much appreciated.
Many thanks
Sally
Ahmad Lone
Thank you so much.
Ismail
I have a wordpress website on live server, i want to replace it by another wordpress server that i created on localhost, i want to keep the same host and same domaine name. what should i do please ?
Sandy
This is very helpful. I want to ask about the next step. What if I continue to develop locally and want to sync changes from time to time ? Do you have a tutorial for that ?
DEAN O
I have an issue where my laptop died with localhost MAMP server. I have been able to extract the all the files from the hard disc but I can’t run a database export.
I have an laptop set up with XAMP.
Any thoughts?
Mauricio
Sunday evening.
The client wants the website.
I have tried Duplicator all day long, no way.
Problems with PHP and DB, just doesn’t work… until I get to your post.
Back to basics man, manually put the live on air.
Thanks for sharing.
Its the simpler idea yet we try to automate things and get less work done sometimes.
Had to share with you my truly akcnowledgment.
Nicely done
Stefan
Thank you! This guide is perfect. I use it every time I forget how I move wordpress from local to live!
Chell
I have recieved a complete WP “filesystem” through an FTP server from a supplier of mine, and I want to creat a new webpage with these files, but with my own domain.
Can I use this “walk-through” for this?
Sorry silly questions, but I have only worked on WP through a cloud solution
WPBeginner Support
Hi Chell,
You will also need the WordPress database not just the files. Once you have both database and WordPress files, then you will be able to upload them to your own domain name and import the database.
Admin
Scott
Hello. I have finished building my site on a local server and ready to move it to my live server. I am assuming that before I follow your steps, that I would need to install WordPress on my hosting account first. Is that correct? And if so, should I click the box that says “Automatically create a new database for this installation” ? If I do that, I will need to replace that database with the one from my local server, right? Or should I leave that box unchecked since I’m about to migrate a new database to it? Thanks.
WPBeginner Support
Hi Scott,
No, instead of installing WordPress you will be moving one from your local server to the live site. Similarly, you will export your local database and then import it on your live server’s hosting account using phpmyadmin via cpanel.
Admin
Bryn Why
Hi, after updating my wp-config.php file to reflect the database information, I am now presented with the below when accessing the live site:
Fatal error: Class ‘WP_Widget_Media’ not found in /home/…/wp-includes/widgets/class-wp-widget-media-audio.php on line 17
Manos Liakos
Dude, you are a life saver. That thing with the SQL query to change the links just saved me. I’ve been trying for 2 days straight to fix the site not displaying properly when accessing it from public ip through my domain name, even if “siteurl” and “home” were correctly configured. Thanks!
WPBeginner Support
Hi Manos,
Glad you found the solution. Don’t forget to join us on Twitter for more WordPress tips and tutorials.
Admin
Shreshta
Thank you in advance.
I have to upload the word press website from my local machine to the web server my company owns which sits in the same building as I work. My problem is I am not using any hosting services so I am not sure what to do when it comes to the file manager step for the database transfer. Just to be clear, how would I go if I were to upload the website from my local machine to the private company server without using a web hosting service.
Dimitris
Hello I am going to do this migration, but I have a question. What happened if i have to upload a website to a server but in my localhost this website is a part of multisite? How can I isolate this website from the local Wordpress Network and finally upload it to a real web server?
Olumide
phpMyAdmin – Error
Error during session start; please check your PHP and/or webserver log file and configure your PHP installation properly. Also ensure that cookies are enabled in your browser.
session_start(): open(SESSION_FILE, O_RDWR) failed: No such file or directory (2)
The above is what i get and my site is not working please help.
WPBeginner Support
Hi Olumide,
If the error occurs on your live site, then please contact your hosting provider. If this happens on your local server, then this means your local server set up is not properly configured.
Admin
Angela
I just followed these steps to move a local site to active and none of my local site transferred over.
Olakorede O
Please i am having issues with step 7. i imputed the life site but what will i put for the local site? thanks
Dimitri
Thanks god for this article !
The Step 6 saved my life, it could not be found anywhere on the internet !!!
Kisses from France
Marlon
Hi WPBEGINNER SUPPORT et al,
Thanks I have found your article helping people out there. I hope I can find your favor to my problem. After having modifies by adding codes in functions.php (live site) i can’t view or access the website anymore, it always shows the message saying:
Notice: ob_end_clean(): failed to delete buffer. No buffer to delete in /home/dh_awey63/website/wp-content/plugins/nextgen-gallery/nggallery.php on line 92
ParseError thrown
syntax error, unexpected ‘ang’ (T_STRING)
I used to searched in google the message error and got some advices to access it thru FTP FileZilla client, but I can’t login successfully I always got an error in: “Response: 530 Login incorrect”. “Error: Critical error: Could not connect to server”. Is there a way i can edit the functions.php file to delete my comments there and put back the site in normal, I just don’t know if the web developer have configured ftp account, that freelance developer left his messy and lousy stuff in his web design and has gone out after he receives the payment. I am really new to this area and don’t know what to do. Please help. Thank you very much.
WPBeginner Support
Hi Marlon,
You can also access your WordPress files using the File Manager in cPanel under your web hosting account dashboard. Once you are connected to your site using file manager, you need to locate your functions.php file and undo the changes you made earlier.
Admin
Marlon
Hi WPBEGINNER SUPPORT,
Thank you for your prompt reply. I sad I really have no idea if the guy who build the site created a cpanel account, I really don’t know the login details if there’s any. That bad guy never replies my messages after he receives the money from us. Please help me what to do if there’s any available options. Please visit the website at rheumacares.ph. Thank you very much.
Victor
Hi, I’m with a problem in step 4. After importing my database I get an error message. I don’t now what I did wrong in the process and I don’t know how to fix it. Could you give me some advice? I’m posting the error message below
Thanks
Error
SQL query:
—
— Database: `meusite`
—
— ——————————————————–
—
— Table structure for table `wp_commentmeta`
—
CREATE TABLE `wp_commentmeta` (
`meta_id` bigint(20) UNSIGNED NOT NULL,
`comment_id` bigint(20) UNSIGNED NOT NULL DEFAULT ‘0’,
`meta_key` varchar(255) COLLATE utf8mb4_unicode_520_ci DEFAULT NULL,
`meta_value` longtext COLLATE utf8mb4_unicode_520_ci
) ENGINE=InnoDB DEFAULT CHARSET=utf8mb4 COLLATE=utf8mb4_unicode_520_ci
MySQL said: Documentation
#1050 – Table ‘wp_commentmeta’ already exists
WPBeginner Support
Hi Victor,
The table in your database already exists. If you do not have any content on your live site, then you can simply DROP all tables in your WordPress database and then try to import again.
Admin
Jonathan
Thank you for a fantastic article!
I have locally built a wordpress site which I would like to replace a site currently live online.
If I want to upload the local site to a test environment online, am I able to do this without the need to setup a new database? i.e. am i able to share the same database being used by the live site? If so how can I do this?
Cheers, Jon
Jon
Fantastically helpful article thankyou! I have been building a wordpress site locally to replace one that is hosted online.
I would like to move the locally hosted one to online in a test environment so that it does not replace the existing site.
You instructions suggest that I need to setup a new SQL database for which I will incur charges. Is there a way that I can upload the test site to the existing database without disturbing the live site? If so how?
Thanks,
Jon
WPBeginner Support
Hi Jon,
It is not recommended, but you can change the table prefix in the wp-config.php file of your test site to something unique. Use the same MySQL database as your live site. Doing so your live website’s database will have tables for different WordPress installs.
Admin
Jojo Esposa Jr
Can I use the Cpanel Softaculous installation of WordPress, then simply upload the sql database and the current theme I used? Uploading the entire wordPress files from my laptop to the live site using ftp takes very long since my internet connection is extremely slow, (2 mbps).
WPBeginner Support
Hello Jojo Esposa Jr,
Yes, you can do that.
Admin
Lyada Emmanuel
Hello i followed all the steps ,however when i open login page to wordpress i get this
Internal Server Error
WPBeginner Support
Hi Lyada,
Please see our guide on how to fix internal server error in WordPress.
Admin
Madison Duncan
Hello,
I am confused by step two. When I click on my FTP client account it prompts me to use Cyberduck, but then I am not sure which files to upload or where (how to I make sure it is on public html?). I completed step one, so are those the files that I am supposed to upload? I just don’t see all of those anywhere. Thanks!
WPBeginner Support
Hi Madison,
This tutorial is about moving a WordPress website built on local server (Your computer) to a live website. If you have a local server installed on your computer (programs like Wamp, MAMP, XAMP), then you will find local files on your computer. These are the files you need to upload.
The first step only exports your database. You will need it in Step 4.
Admin