Want a safe space to experiment with your WordPress website without the fear of breaking something on your live site?
Moving your WordPress site to a local server on your computer is the perfect solution, in our opinion, especially for developers, designers, or WordPress beginners.
Installing WordPress on your computer (local server) allows you to easily learn WordPress and test things. When you move a live WordPress site to a local server, it enables you to experiment with the same data as your live site.
In this article, we’ll show you how to easily move a live WordPress site to a local server.
Why and Who Would Want to Move a live WordPress Site to Local Server?
If you have been running WordPress website for sometime, you may want to try out new themes or a plugin. However, doing this on a live website may result in poor user experience for your users.
To avoid this, many users create a copy of their WordPress website on a local server to test new themes, plugins, or do development testing.
This allows you to set up your theme with all your content and test all the features without worrying about breaking your site. Many users copy their site to a local server to practice their WordPress and coding skills with actual site data.
Even though you can do all the testing with dummy content in WordPress, real site data gives you a better visual representation of how these changes will appear on your live site.
Preparing to Move a Local Site to Local Server
First, you need to make sure that you always back up your WordPress website. There are several great WordPress backup plugins that you can use.
Secondly, you need to install a local server environment on your computer. You can use WAMP for Windows, and MAMP for Mac. Once you have set up the environment, you need to create a new database using phpMyAdmin.
Simply visit the following URL in your browser to launch phpMyAdmin.
http://localhost/phpmyadmin/
http://localhost:8080/phpmyadmin/
From here you need to click on ‘Databases’ tab and create a new database. You’ll need this database to later to unpack your live site data.

You are now ready to move your live WordPress site to local server.
Method 1. Moving Live WordPress Site to Local Server using Plugin
This method is easier and recommended for all users.
The first thing you need to do is install and activate the Duplicator plugin. For more details, see our step by step guide on how to install a WordPress plugin.
Duplicator allows you to easily create a duplicate package of your entire website. It can be used to move your WordPress site to a new location, and can also be used as a backup plugin.
Note: There is a free version of Duplicator that you can get started with. However, Duplicator Pro comes with unlimited backups and more advanced features.
Upon activation, go to Duplicator Pro » Backups from your WordPress admin sidebar. To create a new package, you need to click on the ‘Add New’ button.
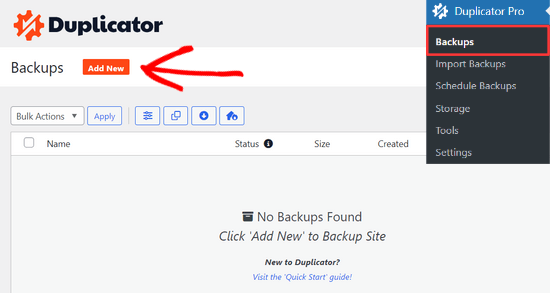
Duplicator will then start the backup wizard.
First, you need to enter a name for your backup package. You can also use the dynamic tags to automatically create a name format like the date and your site title.

Then, expand the ‘Storage’ section and choose a storage location.
For this tutorial, we’ll use the default location. You can click the ‘Add Storage’ link to add a new location, like Dropbox or Google Drive, if you want.
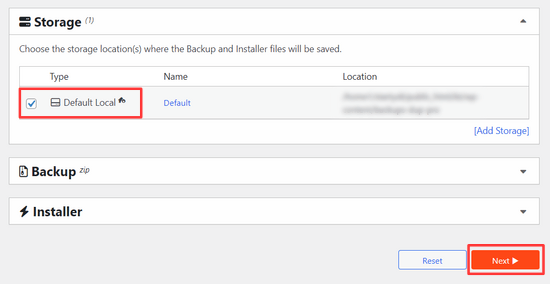
Click on the ‘Next’ button to continue.
The plugin will then scan your website and run some background checks. It will then show you a summary of those checks.
If everything looks good, then click on the ‘Create Backup‘ button to continue.
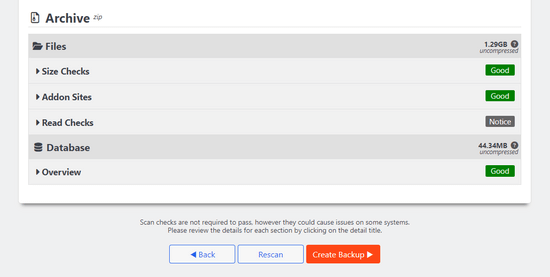
Duplicator will now create your website package.
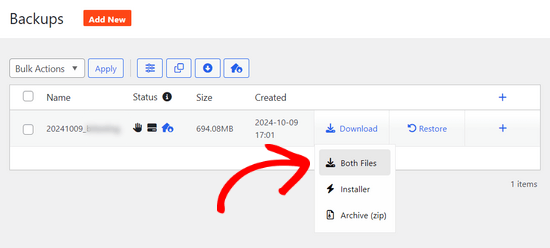
Once finished, you’ll see an archive zip file that contains all your website data, and an installer file. You need to download both files to your computer.
You are now ready to unpack and install these files on your local server.
First, you need to create a new folder in your local server’s root folder. This is the folder where your local server stores all websites.
For instance, if you are using MAMP, then it will be /Applications/MAMP/htdocs/ folder. Alternatively if you are using WAMP, then it would be C:\wamp\www\ folder.
Inside this folder, you can make new folders for each new website that you want to import or create on your local server.
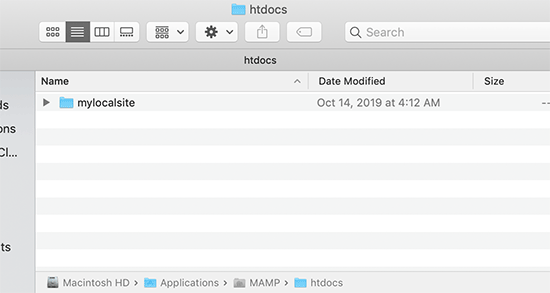
After that, you need to open the folder you created for your local website and then copy and paste both the archive zip file and the installer script you downloaded earlier.
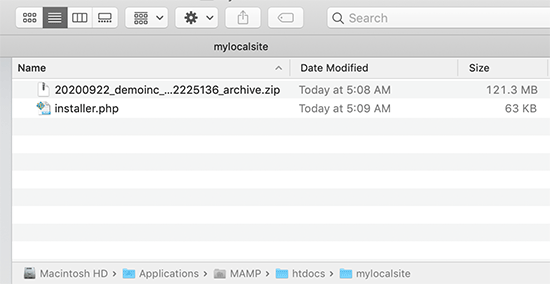
To run the installation, you need to open the installer.php script in your web browser.
For example, if you pasted both files in /mylocalsite/ folder, then you will access them in your browser by visiting http://localhost/mylocalsite/installer.php.
You will now see the Duplicator installation script like this:
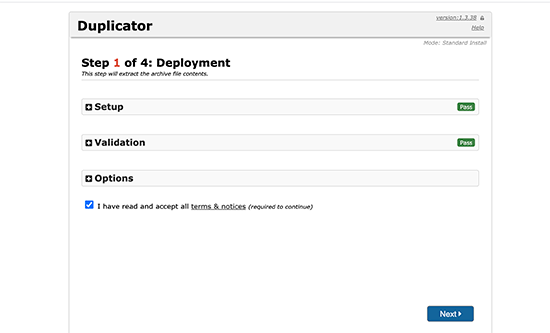
Click on the ‘Next’ button to continue.
Duplicator will now unpack the archive zip file and will ask you to enter your local site’s database information. This is the database you created earlier.
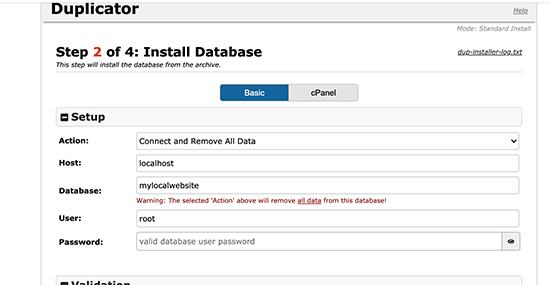
The server name is almost always localhost and username is root. In most cases, your local server installation does not have a password set for root, so you can leave that blank.
At the bottom of the page, you’ll see a ‘Test Database’ button that you can use to make sure your database information is correct.
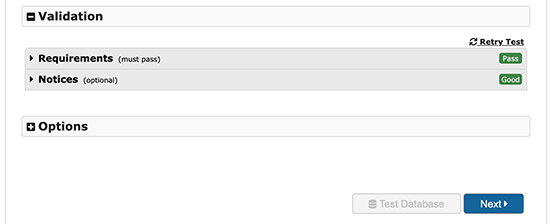
If everything looks good, then click on the ‘Next’ button to continue.
Duplicator will now import your WordPress database. After that, it will ask you to double-check the new website information that it has automatically detected.
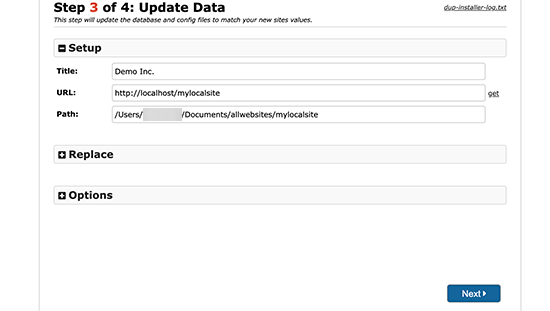
Click on the ‘Next’ button to continue.
Duplicator will now finish the setup and will show you a button to log into your local site. You’ll use the same WordPress username and password that you use on your live site.
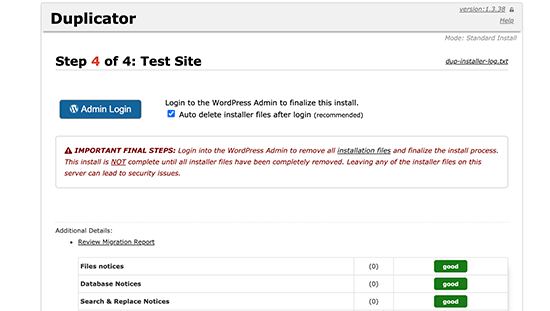
That’s all, you have successfully moved your live site to local server.
Method 2. Manually Move a Live WordPress Site to Local Server
In case the plugin does not work for you, then you can always manually move your live site to a local server. The first thing you would need is to back up your website manually from your WordPress hosting account.
Step 1. Export your live site’s WordPress database
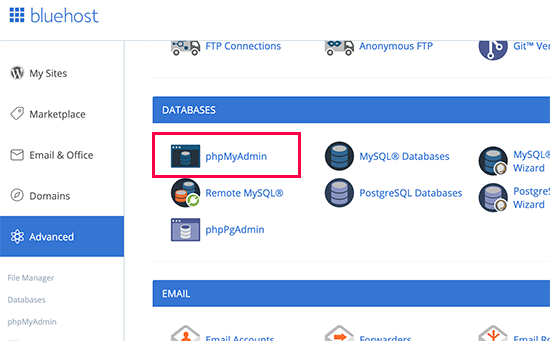
To export your live site’s WordPress database, you need to log into your cPanel dashboard and click on phpMyAdmin.
Note: We’re showing screenshots from Bluehost dashboard.
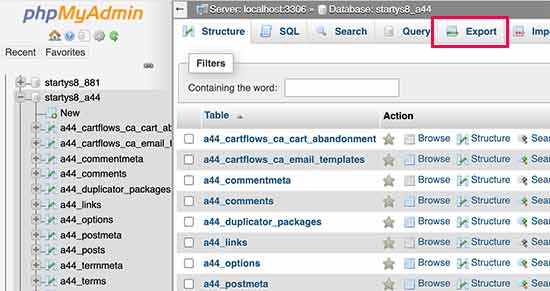
Inside phpMyAdmin, you need to select the database you want to export and then click on the export tab on the top.
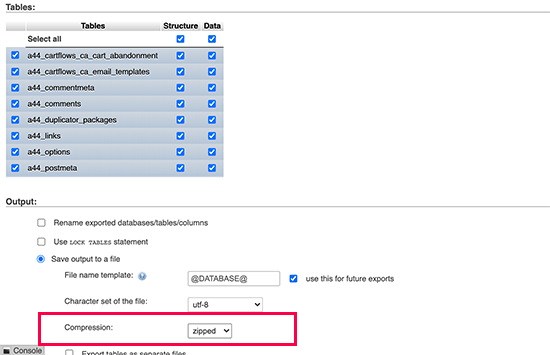
phpMyAdmin will now ask you to choose either quick or custom export method. We recommend using custom method and choosing zip as the compression method.
Sometimes WordPress plugins can create their own tables inside your WordPress database. If you are not using that plugin anymore, then the custom method allows you to exclude those tables.
Leave rest of the options as they are and click on the ‘Go’ button to download your database backup in zip format.
phpMyAdmin will now download your database file. For more details, see our tutorial on how to backup your WordPress database manually.
Step 2. Download all your WordPress files
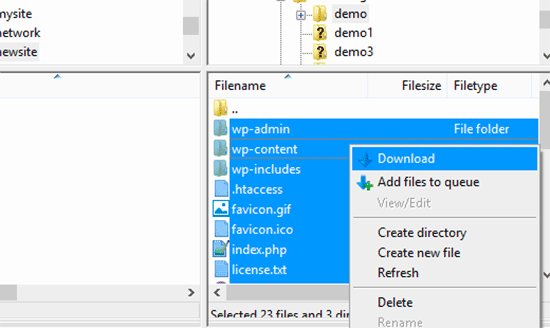
The next step is to download your WordPress files. To do that you need to connect to your WordPress site using an FTP client.
Once connected, select all your WordPress files and download them to your computer.
Step 3. Import your WordPress files and database to local server
After downloading your WordPress files, you need to create a folder on your local server where you want to import the local site.
If you are using WAMP then you would want to create a folder inside C:\wamp\www\ folder for your local site. MAMP users would need to create a folder in /Applications/MAMP/htdocs/ folder.
After that, simply copy and paste your WordPress files in the new folder.
Next, you need to import your WordPress database. Simply open the phpMyAdmin on your local server by visiting the following URL:
http://localhost/phpmyadmin/
Since you have already created the database earlier, you now need to select it and then click on the ‘Import’ tab at the top.
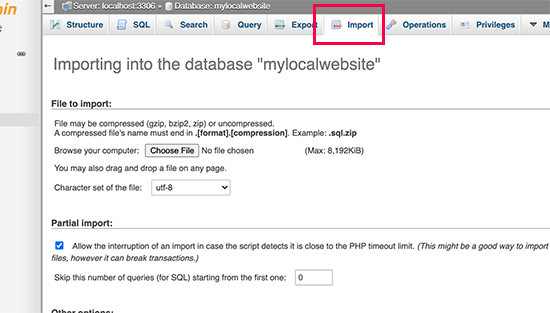
Click on the ‘Choose File’ button to select and upload the database export file you downloaded in the first step. After that, click on the ‘Go’ button at the bottom of the page.
phpMyAdmin will now unzip and import your WordPress database.
Now that your database is all set up, you need to update the URLs inside your WordPress database referencing to your live site.
You can do this by running an SQL query in phpMyAdmin. Make sure you have selected your local site’s database and then click on SQL.
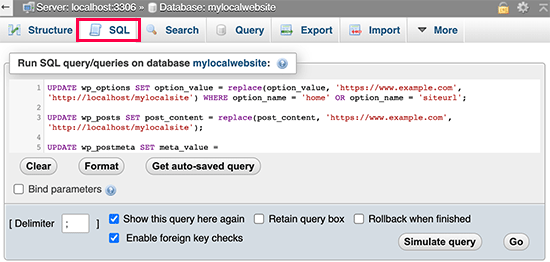
In phpMyAdmin’s SQL screen copy and paste this code, make sure that you replace example.com with your live site’s URL and http://localhost/mylocalsite with the local server URL of your site.
UPDATE wp_options SET option_value = replace(option_value, 'https://www.example.com', 'http://localhost/mylocalsite') WHERE option_name = 'home' OR option_name = 'siteurl'; UPDATE wp_posts SET post_content = replace(post_content, 'https://www.example.com', 'http://localhost/mylocalsite'); UPDATE wp_postmeta SET meta_value = replace(meta_value,'https://www.example.com','http://localhost/mylocalsite');
This query will replace refences to your live site’s URL from database and replace it with the localhost URL.
Step 4. Update wp-config.php file
The final step is to update your local site’s wp-config.php file. This file contains WordPress settings including how to connect to your WordPress database.
Simply go to the folder where you installed WordPress on your local server and then open wp-config.php file in a text editor like Notepad.
Replace the database name with the one you created in phpMyAdmin on your localhost.
After that, replace the database username with your local MySQL username, usually it is root. If you have set a password for the MySQL user root on your localhost, then enter that password. Otherwise, leave it empty and save your changes.
/** The name of the database for WordPress */
define('DB_NAME', 'database_name_here');
/** MySQL database username */
define('DB_USER', 'username_here');
/** MySQL database password */
define('DB_PASSWORD', 'password_here');
You can now visit your local site in a browser window by entering the URL like this:
http://localhost/mylocalsite/
Replace ‘mylocalsite’ with the name of the folder where you copied your WordPress files.
That’s all, your live WordPress site is now copied to your local server.
We hope this article helped you learn how to easily move a live WordPress site to local server. You may also want to see our guide on how to easily make a staging site for WordPress for testing, or how to move a WordPress site from local server to live site.
If you liked this article, then please subscribe to our YouTube Channel for WordPress video tutorials. You can also find us on Twitter and Facebook.


Jiří Vaněk
Duplicator has made many things easier for me, from automatic cloud backups to website migrations. Thanks to this guide, I set up a local server on Windows and adjusted PHP to match exactly what’s on the server where the live version of the website is running. It’s an invaluable tool when I need to safely test a new plugin or configuration, so I can observe the site’s behavior elsewhere instead of on the live site, where it could have disastrous consequences. This is truly an invaluable tool for every tester, and thank you for this tutorial.
Jakob Uzioa
So i followed the instructions to manually move the site to the letter using wampserver but when i navigate to the file path localhost/mysite and hit enter, the site does not open but instead only a file downloads which is called. ” download” which is a php file:
/**
* Front to the WordPress application. This file doesn’t do anything, but loads
* wp-blog-header.php which does and tells WordPress to load the theme.
*
* @package WordPress
*/
/**
* Tells WordPress to load the WordPress theme and output it.
what could be the problem ?
WPBeginner Support
Please ensure you go through the installer.php when first installing the site and ensure WAMP is running as common possible reasons for that issue.
Admin
Tye
Thanks for the tutorial, its more clear than a lot of the ones I found online, I have a problem though, migration all fine, the site is running but I cannot login with the usernames I had on the live site, cannot access the admin dashboard to create new usernames either. Help please?
WPBeginner Support
If your users are not working then you could manually add a user following the steps in our article below. You would be able to use your file manager instead of FTP for a local installation.
https://www.wpbeginner.com/wp-tutorials/how-to-add-an-admin-user-in-wordpress-using-ftp/
Admin
Mark
Thank you for this tutorial, you run a very helpful website. It took me a long time to run through this, as there are alot of steps and I find a lot of ways to go wrong! I ended up using the file names that you used in your examples, to reduce complication. And success! Much appreciated.
WPBeginner Support
Glad our guide could help!
Admin
Lina
Thanks for the great tutorial! However, it only works for my home page. When I try to open a subpage, I see this error message: “The requested URL was not found on this server.” Can you help me here?
Best regards,
Lina
WPBeginner Support
It would depend on the method you used but we would recommend ensuring you used the SQL update as that should fix your URLs in your database. You may also want to ensure the links you are using in your menu are not custom URLs as that can be a common reason for that issue as well.
Admin
Awais
is the above code is right ?
I copy and paste in SQL but every time this massage comes,
0 rows affected. (Query took 0.0046 seconds.)
WPBeginner Support
The code should work but especially if you’ve already run it once, there will be no change in your site and it will come back with 0 affected.
Admin
Deb
Hi, thanks for your fab instructions. I used the Duplicator method and everything works…except when viewing the site my images/thumbnails don’t show up (broken image), until I click on them. Then they show in their own window, as expected.
They do show properly in the wp dashboard editor.
Cheers, Deb
WPBeginner Support
There are a few possible reasons but for a starting point you could try regenerating the thumbnails following our guide below as the most common solution for that error:
https://www.wpbeginner.com/plugins/regenerate-thumbnails-new-image-sizes-wordpress/
Admin