Want a safe space to experiment with your WordPress website without the fear of breaking something on your live site?
Moving your WordPress site to a local server on your computer is the perfect solution, in our opinion, especially for developers, designers, or WordPress beginners.
Installing WordPress on your computer (local server) allows you to easily learn WordPress and test things. When you move a live WordPress site to a local server, it enables you to experiment with the same data as your live site.
In this article, we’ll show you how to easily move a live WordPress site to a local server.
Why and Who Would Want to Move a live WordPress Site to Local Server?
If you have been running WordPress website for sometime, you may want to try out new themes or a plugin. However, doing this on a live website may result in poor user experience for your users.
To avoid this, many users create a copy of their WordPress website on a local server to test new themes, plugins, or do development testing.
This allows you to set up your theme with all your content and test all the features without worrying about breaking your site. Many users copy their site to a local server to practice their WordPress and coding skills with actual site data.
Even though you can do all the testing with dummy content in WordPress, real site data gives you a better visual representation of how these changes will appear on your live site.
Preparing to Move a Local Site to Local Server
First, you need to make sure that you always back up your WordPress website. There are several great WordPress backup plugins that you can use.
Secondly, you need to install a local server environment on your computer. You can use WAMP for Windows, and MAMP for Mac. Once you have set up the environment, you need to create a new database using phpMyAdmin.
Simply visit the following URL in your browser to launch phpMyAdmin.
http://localhost/phpmyadmin/
http://localhost:8080/phpmyadmin/
From here you need to click on ‘Databases’ tab and create a new database. You’ll need this database to later to unpack your live site data.

You are now ready to move your live WordPress site to local server.
Method 1. Moving Live WordPress Site to Local Server using Plugin
This method is easier and recommended for all users.
The first thing you need to do is install and activate the Duplicator plugin. For more details, see our step by step guide on how to install a WordPress plugin.
Duplicator allows you to easily create a duplicate package of your entire website. It can be used to move your WordPress site to a new location, and can also be used as a backup plugin.
Note: There is a free version of Duplicator that you can get started with. However, Duplicator Pro comes with unlimited backups and more advanced features.
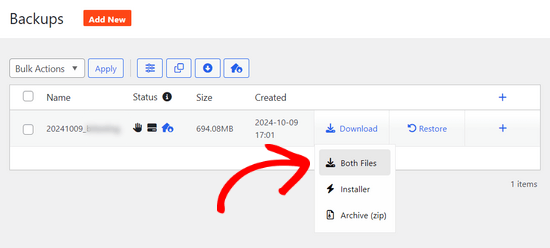
Upon activation, go to Duplicator Pro » Backups from your WordPress admin sidebar. To create a new package, you need to click on the ‘Add New’ button.
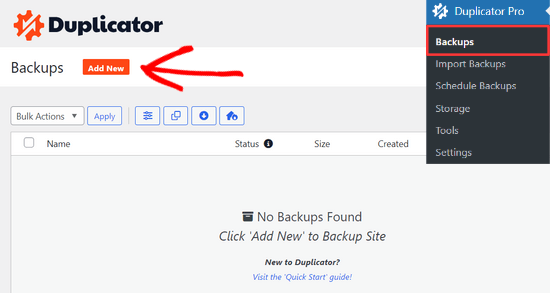
Duplicator will then start the backup wizard.
First, you need to enter a name for your backup package. You can also use the dynamic tags to automatically create a name format like the date and your site title.

Then, expand the ‘Storage’ section and choose a storage location.
For this tutorial, we’ll use the default location. You can click the ‘Add Storage’ link to add a new location, like Dropbox or Google Drive, if you want.
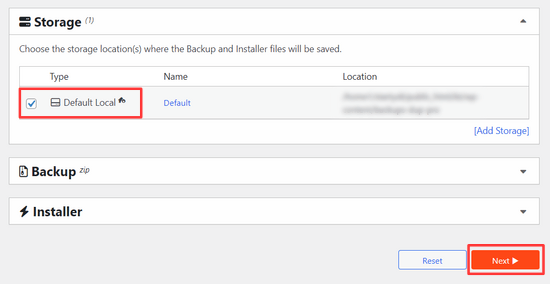
Click on the ‘Next’ button to continue.
The plugin will then scan your website and run some background checks. It will then show you a summary of those checks.
If everything looks good, then click on the ‘Create Backup‘ button to continue.
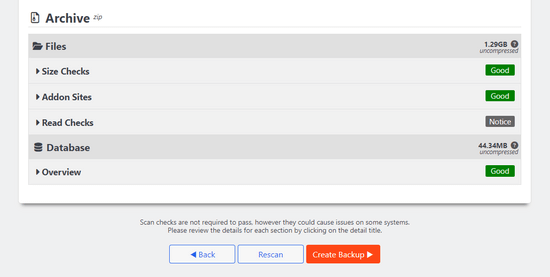
Duplicator will now create your website package.
Once finished, you’ll see an archive zip file that contains all your website data, and an installer file. You need to download both files to your computer.
You are now ready to unpack and install these files on your local server.
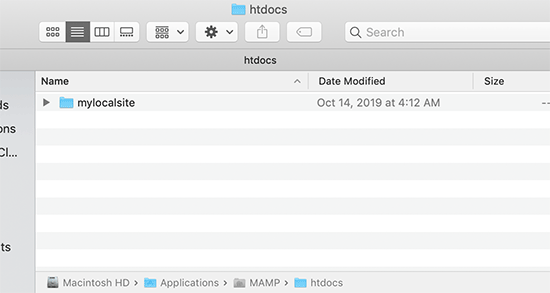
First, you need to create a new folder in your local server’s root folder. This is the folder where your local server stores all websites.
For instance, if you are using MAMP, then it will be /Applications/MAMP/htdocs/ folder. Alternatively if you are using WAMP, then it would be C:\wamp\www\ folder.
Inside this folder, you can make new folders for each new website that you want to import or create on your local server.
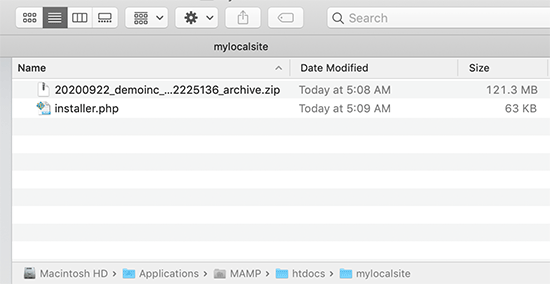
After that, you need to open the folder you created for your local website and then copy and paste both the archive zip file and the installer script you downloaded earlier.
To run the installation, you need to open the installer.php script in your web browser.
For example, if you pasted both files in /mylocalsite/ folder, then you will access them in your browser by visiting http://localhost/mylocalsite/installer.php.
You will now see the Duplicator installation script like this:
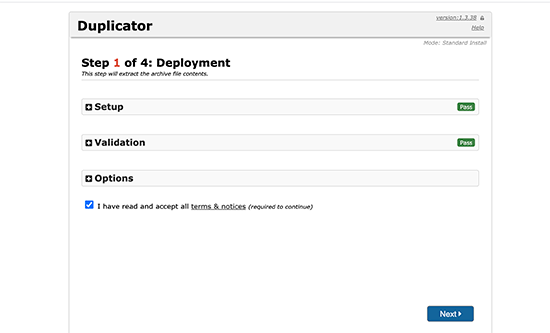
Click on the ‘Next’ button to continue.
Duplicator will now unpack the archive zip file and will ask you to enter your local site’s database information. This is the database you created earlier.
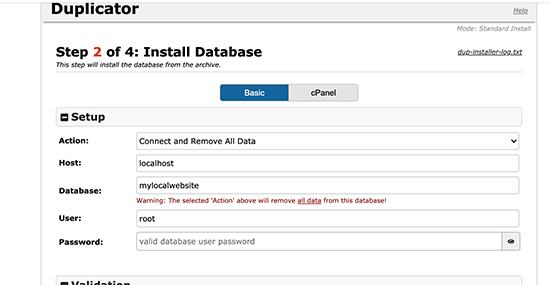
The server name is almost always localhost and username is root. In most cases, your local server installation does not have a password set for root, so you can leave that blank.
At the bottom of the page, you’ll see a ‘Test Database’ button that you can use to make sure your database information is correct.
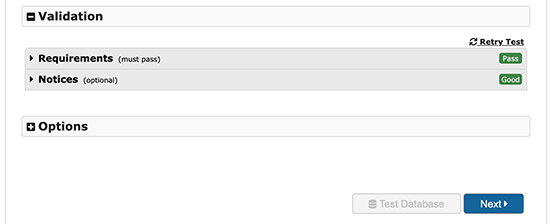
If everything looks good, then click on the ‘Next’ button to continue.
Duplicator will now import your WordPress database. After that, it will ask you to double-check the new website information that it has automatically detected.
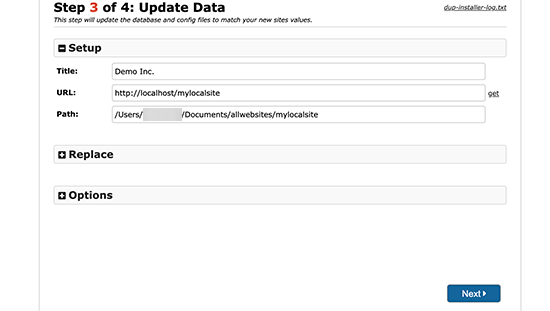
Click on the ‘Next’ button to continue.
Duplicator will now finish the setup and will show you a button to log into your local site. You’ll use the same WordPress username and password that you use on your live site.
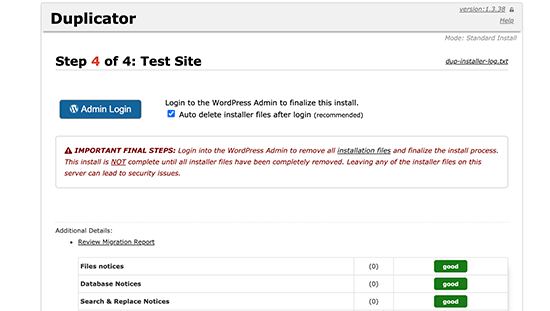
That’s all, you have successfully moved your live site to local server.
Method 2. Manually Move a Live WordPress Site to Local Server
In case the plugin does not work for you, then you can always manually move your live site to a local server. The first thing you would need is to back up your website manually from your WordPress hosting account.
Step 1. Export your live site’s WordPress database
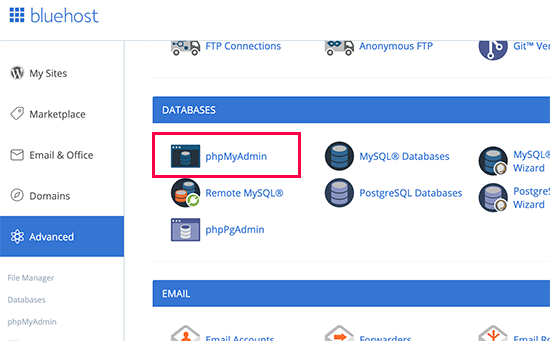
To export your live site’s WordPress database, you need to log into your cPanel dashboard and click on phpMyAdmin.
Note: We’re showing screenshots from Bluehost dashboard.
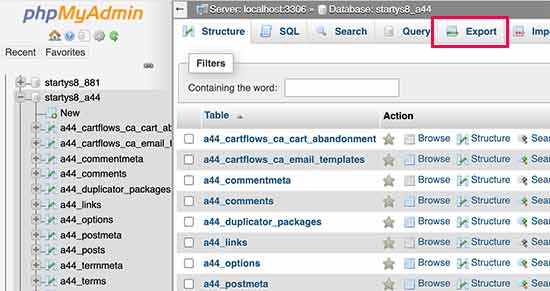
Inside phpMyAdmin, you need to select the database you want to export and then click on the export tab on the top.
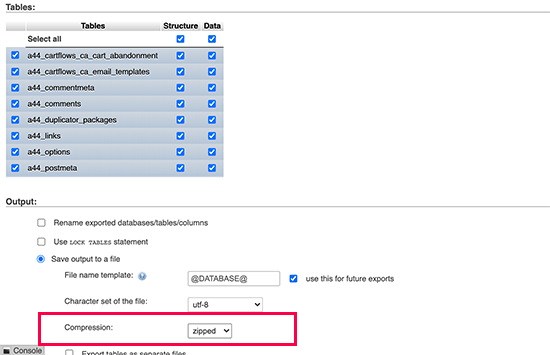
phpMyAdmin will now ask you to choose either quick or custom export method. We recommend using custom method and choosing zip as the compression method.
Sometimes WordPress plugins can create their own tables inside your WordPress database. If you are not using that plugin anymore, then the custom method allows you to exclude those tables.
Leave rest of the options as they are and click on the ‘Go’ button to download your database backup in zip format.
phpMyAdmin will now download your database file. For more details, see our tutorial on how to backup your WordPress database manually.
Step 2. Download all your WordPress files
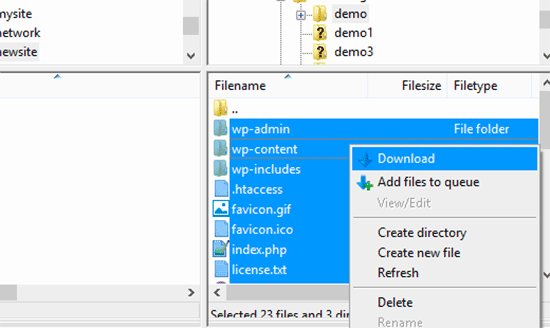
The next step is to download your WordPress files. To do that you need to connect to your WordPress site using an FTP client.
Once connected, select all your WordPress files and download them to your computer.
Step 3. Import your WordPress files and database to local server
After downloading your WordPress files, you need to create a folder on your local server where you want to import the local site.
If you are using WAMP then you would want to create a folder inside C:\wamp\www\ folder for your local site. MAMP users would need to create a folder in /Applications/MAMP/htdocs/ folder.
After that, simply copy and paste your WordPress files in the new folder.
Next, you need to import your WordPress database. Simply open the phpMyAdmin on your local server by visiting the following URL:
http://localhost/phpmyadmin/
Since you have already created the database earlier, you now need to select it and then click on the ‘Import’ tab at the top.
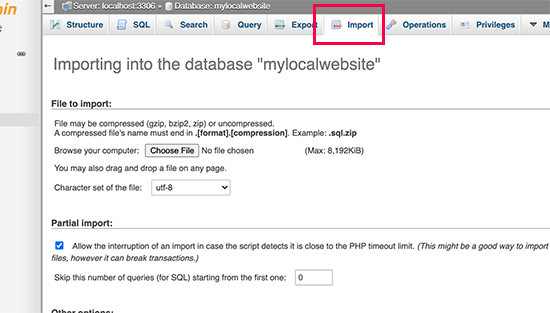
Click on the ‘Choose File’ button to select and upload the database export file you downloaded in the first step. After that, click on the ‘Go’ button at the bottom of the page.
phpMyAdmin will now unzip and import your WordPress database.
Now that your database is all set up, you need to update the URLs inside your WordPress database referencing to your live site.
You can do this by running an SQL query in phpMyAdmin. Make sure you have selected your local site’s database and then click on SQL.
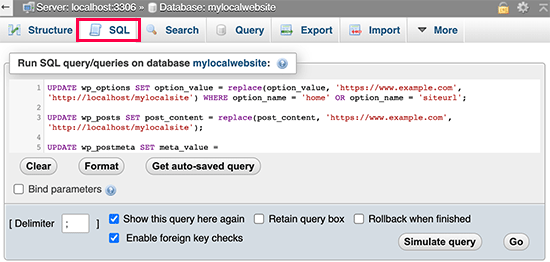
In phpMyAdmin’s SQL screen copy and paste this code, make sure that you replace example.com with your live site’s URL and http://localhost/mylocalsite with the local server URL of your site.
UPDATE wp_options SET option_value = replace(option_value, 'https://www.example.com', 'http://localhost/mylocalsite') WHERE option_name = 'home' OR option_name = 'siteurl'; UPDATE wp_posts SET post_content = replace(post_content, 'https://www.example.com', 'http://localhost/mylocalsite'); UPDATE wp_postmeta SET meta_value = replace(meta_value,'https://www.example.com','http://localhost/mylocalsite');
This query will replace refences to your live site’s URL from database and replace it with the localhost URL.
Step 4. Update wp-config.php file
The final step is to update your local site’s wp-config.php file. This file contains WordPress settings including how to connect to your WordPress database.
Simply go to the folder where you installed WordPress on your local server and then open wp-config.php file in a text editor like Notepad.
Replace the database name with the one you created in phpMyAdmin on your localhost.
After that, replace the database username with your local MySQL username, usually it is root. If you have set a password for the MySQL user root on your localhost, then enter that password. Otherwise, leave it empty and save your changes.
/** The name of the database for WordPress */
define('DB_NAME', 'database_name_here');
/** MySQL database username */
define('DB_USER', 'username_here');
/** MySQL database password */
define('DB_PASSWORD', 'password_here');
You can now visit your local site in a browser window by entering the URL like this:
http://localhost/mylocalsite/
Replace ‘mylocalsite’ with the name of the folder where you copied your WordPress files.
That’s all, your live WordPress site is now copied to your local server.
We hope this article helped you learn how to easily move a live WordPress site to local server. You may also want to see our guide on how to easily make a staging site for WordPress for testing, or how to move a WordPress site from local server to live site.
If you liked this article, then please subscribe to our YouTube Channel for WordPress video tutorials. You can also find us on Twitter and Facebook.


Joseph
Hi, just came across this tutorial today, I found out about some of the steps from other tutorials, but my problem is with the SQL Query. I get the error # MySQL returned an empty result set (i.e. zero rows). I followed all your steps about changing site names etc but cant work this one out and so obviously i cant then connect to the local site. I used the Duplicator before on another site but it wont work so good on this one because of all the images on my photo site, ie timeout issues. Kinda going around in circles here, so help would be good.
Thanks,
Joseph
Yarina
Joseph, check that the table prefix on the SQL tables you are working with are the same. I had this issue before when I didn’t realize that the theme I was copying from had a non typical prefix (wp_extra-text instead of just wp_). When you create the new db on phpMyAdmin, make sure that the prefix matches that of the old db. Hope this helps!
Alan OldStudent
I tried using Duplicator, and that worked with one minor glitch. So then I dropped the database and tried the manual method. All steps proceeded well until it came time to import. I recreated the database and went to import. Afterwards, I got this error message: “#1064 – You have an error in your SQL syntax; check the manual that corresponds to your MySQL server version for the right syntax to use near ‘default’, ‘This is the default profile, used when no profile is specified.’, ‘a:’ at line 7”
To me that looks like gobbledygook. Do you have any idea what went wrong and how I can do the import manually?
Regards,
Alan
WPBeginner Support
This could be a syntax error or conflict caused by using different versions of MySQL. To solve this, when exporting your database choose the same MySQL version as your local install. Also make sure that you are using the same character set for both database tables.
Admin
Em Cloney
Just a quick thing I noticed: the Duplicator file is called “installer.php” rather than “install.php”.
Ben
I noticed the same thing. Great article, though. So glad I heard about this plugin from you guys.
wpva
Hi I decided to do it manually
I created a database for my Wordpress site on my local server and tried to import the database that I downloaded before to my computer but im getting this error message:
SQL query:
—
— Database: `aguilar_jmln1`
—
— ——————————————————–
—
— Table structure for table `gm_AnythingPopup`
—
CREATE TABLE IF NOT EXISTS `gm_AnythingPopup` (
`pop_id` int(11) NOT NULL,
`pop_width` int(11) NOT NULL DEFAULT ‘380’,
`pop_height` int(11) NOT NULL DEFAULT ‘260’,
`pop_headercolor` varchar(10) NOT NULL DEFAULT ‘#4D4D4D’,
`pop_bordercolor` varchar(10) NOT NULL DEFAULT ‘#4D4D4D’,
`pop_header_fontcolor` varchar(10) NOT NULL DEFAULT ‘#FFFFFF’,
`pop_title` varchar(1024) NOT NULL DEFAULT ‘Anything Popup’,
`pop_content` text CHARACTER SET utf8 COLLATE utf8_bin NOT NULL,
`pop_caption` varchar(2024) NOT NULL DEFAULT ‘Click to open popup’
) ENGINE=MyISAM AUTO_INCREMENT=2 DEFAULT CHARSET=utf8;
MySQL said:
#1046 – Aucune base n’a été sélectionnée
Kin
It is saying that no database was selected.
Yeah I got that as well.
You need to make sure that you clicked on a database before hitting the ‘import”, if not the admin tool will try to import the .sql file on nothing!!
TMo
Wonderful tutorial on how to manually go through this process. Thank you for the clear directions and photos!
Shane Levine
Hi, is Duplicator an acceptable method for keeping a backup website? I have been using BackWPup but it looks like Duplicator also allows you to create a backup…
Dennis Crayon
Hi I am not sure if I just got lucky but I was able to download and setup the local version quickly. The only problem I am having is that I have to set permalinks to default which is fine locally will I be able to set them back to post name later when I push the whole thing live? Thanks just getting this far is great
WPBeginner Staff
Yes, you can change permalinks after putting your site live.
Felix
Dennis, I am new to wordpress but I have so far learnt key configuration issues. Could you lease hel on changing permalinks from default to post name?
Iftikhar Raja
Just an observation to share.
If you choose custom structure as permalink, it might not work. The work around is to chose default permalink and save the changes. It worked for me after several hours of head scratching
Hope it helps
Mario
If you’re using WAMP you need to turn on mod_rewrite to enable custom permalinks.
Click Wamp -> Apache -> Apache Modules -> rewrite_module
WPBeginner Staff
It is usually enabled by default.
isboleas
Perfect! I did it manually just in wp-config.php must change and the line
/** MySQL hostname */
define(‘DB_HOST’, ‘127.0.0.1 ‘);
With ip appear in phpmyadmin in left up corner.
Anindyo Yudhistiro
I’ve followed all the steps, but I still can’t see my database in my local wp. I still only have Hello World post.
I’ve imported it, change all the url’s, and many row has already affected.
Keith Davis
I used the manual method but the SQL query wouldn’t work for me.
I had to go into the wp-options and change url in siteurl and home table and then all was fine.
Keith Davis
Hi guys
The Duplicator method looks good.
Do you know how much free disc space you need to create the packages?
Nana
Any ideas why it gives me a “Welcome to the famous five-minute install” screen?
WPBeginner Staff
It is possible that your WordPress URL and Site URL are set to localhost/xammp. If you can access the admin area go to settings and set it to your WordPress install directory.
Je
I checked and it’s definitely not set to that. It is so strange!
Je
I figured it out. It was the W3 cache in the htaccess file causing problems. Thanks for you help and for this awesome tutorial!
Jen
Great tutorial, I did everything exactly like you said….I thought it was working until I tried to change the theme and it wouldn’t change. Then I started trying to navigate to other pages and it took me to localhost/xammp. Everytime. Any ideas?
dion
Hi. I did all of this(using the manual option, but when I click on any option, ie login or one of the menu options, I get “the requested URL … was not found on this server”
wagster
If you copy the SQL query straight off the screen above, you will get the line numbers as well, which will throw an error like the above. Click ‘View source’ and copy the clean code from there.
MrDev
Thanks for this article. I tried the manual route of moving a WordPress site to localhost, however my stylesheets are not loading. For some reason the ‘href’ is not being set on all my stylesheets. Any idea what might be going on?
WPBeginner Staff
We would feel more confident recommending BackupBuddy for backups.
NikkiC4lyf
Would you recommend using the Duplicator plugin for doing backups as well as moving sites?
Kin Tatsu
Great tutorial! The problem I’m having is when I login to to wp-admin with the same login and password I used for my live site I get “ERROR: Invalid username. Lost your password?” The username and password are correct for the live site but incorrect for the localhost site. I tried to retrieve password with my email address but it says that my email address is not registered. Any ideas?
pbr
I have only one word about this steps…AAWWEESSOOMMEE!!!!
StefsterNYC
Did you check your Prefixes?
pels
got same error
StefsterNYC
You may have missed a table or something. Do a search for the old prefix. Also make sure you’re using a fresh new WP-CONFIG. I find that sometimes that messes things up.
StefsterNYC
Sorry for the delay Mark. Not sure I understand your question. Hopefully I can answer something here.
If you started with a config file and it originally started with the wp_ and you didn’t use a custom one you’ll be fine. Just remember the config has to match the DB. If you worked locally and are migrating everything to a live site and you use the same DB and same Config that you worked locally with everything should be fine. Just remember to change Username, Password and Hostname.
The key here to remember here is Prefixes. So many people teach you how to do this and that but they miss the one thing that can mess it all up for you. And that is the Prefix.
And User Roles, if missed can cause a major headache when adding Admins manually. So be careful when changing and working with prefixes. They are absolutely a great way to tighten up WP sites. I highly recommend using a custom prefix always. dbh_234_ something like that is a great way to protect your site(s).
WPBeginner Staff
If your live site’s mysql host is not localhost, then you need to change it to localhost. You may also need to change the database name to the database on your local computer. Same goes for DB username which is usually root on local servers, and db password which is usually blank.
Mark
Hi just to be clear the password in the config.php file should be the same as the one you use for myphpadmin? because that seems to work for me?
StefsterNYC
Great tutorial. I believe one thing was missed. Prefix. For those of you that use a prefix in the config, make sure when you query the db you change the wp for the query to your prefix. Otherwise your query won’t reset the urls correctly.
Mark
If I have a local install and I move the database live, the prefix will remain the same correct? Do I need to do anything?
Cypherinfo
Error 404: Object not found: The requested URL was not found on this server. The link on the referring page seems to be wrong or outdated. Please inform the author of that page about the error.
If you think this is a server error, please contact the webmaster.
” I followed all of the steps you wrote.
Sophie
These instructions are exactly what I needed. Thank you!!!
However, I seem to have encountered a problem…
When updating the URLs in my database for those of the local server, it returns a #1064 – error in your SQL syntax near line 3. Could you possibly suggest a solution?
Would I need to include the port number when updating the http://localhost/ part of the code?
Please Help!!
Vtin
One more newbie trouble here! Sorry for the inconvenience.
Of course, I think I’ve done everything correctly (probably not). When I try to access the site via localhost, in the screen appears the index.php file line by line, instead of loading it.
Any ideas?
W
This was fantastic. Super quick and worked exactly as intended.
Paul Sahota
Can you please show how to move a live wordpress site to local using backup buddy on mac using MAMP. I have tried multiple times but it does not work for me. I can easily do the opposite.
thanks
Jeremy
After transferring the live site to my local server (wamp), I navigate to the destination in browser and get a “Not Found” wordpress error. The site’s navigation loads though and when clicked it takes me to the live site. Am I missing something rudimentary?
Kin
I am getting the same thing. I followed all the steps. Then came back to check again, but the error remains. I am seeing that a couple of people above had the same problem as well. Any idea guys of why this is happening?
Sinuhe
Thank you!!! I just finished moving my site and a subdomain to a new hosting service and it worked like a charm. I am no techie, actually I am philosopher I really appreciate you taking the time to explain this info in detail.
Sam
Hey, I did everything the same way you said in manual method.
after setup,
I can see homepage of my website on local server.
But when I try to navigate to other page, I get following error:
“Not Found: the requested URL /test/logistics was not found on this server.”
Please help
Bill
I just ran into the same issue. I went into site/wp-admin. Then went to Setting > Permalinks and just clicked Save Changes. It updated something and all of my links work.
Look at that! My first contribution to the community.
Isabela Santos
thank you! But I had to disable it for it to work…
Mark
Brilliant!
John
Awesome. Worked great! Thanks for posting this.
Natalia
Hi,
I followed your tutorial on doing it manually to the T, but I still get an error message. I am pulling my hair, here…
I’m pretty new to WP and I still have to figure out how to actually enter the new content and modify the files… but I can’t even get it to work locally
This is the message I get:
“Error establishing a database connection”
Which I don’t understand, because I did everything as you said in your tutorial.
Help, please!!
Natalia
Tried it all over again a second time and still same error message… I’m going crazy
Natalia
I even tried in a remote server and I got the same error message. I don’t know what I’m doing wrong… there must be a path somewhere that I’m forgetting about and it’s just not reading the right db…
Someone, please, help!!
WPBeginner Support
Natalia, the most common cause for this error is incorrect database information. On your live site, you need to edit your wp-config.php file. Make sure that the database information in this file matches the database you have created for your live site.
Admin
Kathi Kostiuk
Thank you, your site is super helpful. New to WP, inherited a site, got it localhost so I can learn/test. When trying to ‘upload’ a pic, get this: C:/wamp/www/testsite/wp-content/uploads. Is its parent directory writable by the server? No errors shown in phpMyAdmin, permissions on folders, users look right. Could you possibly direct me to a solution? Have looked everywhere I can think of. Thanks.
WPBeginner Support
When you moved the site to localhost, did you change the siteurl and homeurl options? If you didn’t then you need to add these two lines to your
wp-config.phpfiledefine('WP_HOME','http://localhost/yoursite'); define('WP_SITEURL','http://localhost/yoursite');1-click Use in WordPress
Admin
Kathi Kostiuk
Thank you, will do that.
Julie Rondeau
Hi,
Great tutorials! Thank you, however i keep getting an “Unknown” Error code 0 from the Duplicator Plugin when trying to create the packages. Is there any other way you could recommend? Any help would be really appreciated.
Thank you so much,
Best from Paris.
J.
WPBeginner Support
You can also manually backup your localhost site and restore it on live server.
Admin
Rehan
Best tutorial ever!!
Ashley
Hi! Thank you so much for your great tutorials! Everything worked out great, but I when I was supposed to “resave permalinks” it wouldn’t let me login. I got that fixed and I am logged in now, but where do I go to resave them now that I don’t have that pop up? I’m assuming this is why when I try to click on posts it gives me a “not found page” ? Thanks in advance!
WPBeginner Support
You can save permalinks from Settings » Permalinks.
Admin
Jesse
Can I ask how you fixed the login problem? I’m getting the same issue.
Yarina
Hi! This all worked great until I had to login to the wp dashboard, my login didn’t work and even after changing it manually in the users table, I couldn’t log in, any ideas…?
Angela
Thank You! I’ve been trying to do this for some time now. I’ve watch several YouTube videos but could not get it to work correctly. This was so easy….the best thing ever. Again thanks!
Ivan
Hi,
I followed your instructions to the letter (and sing lol), but was not successful. I think it has something to do with WP installation. I have not installed it, just copied it.
Brett Golding
Didn’t work for me just ended up with a blank white home page after I ran the program. Re tried 3 times.
WPBeginner Support
Checkout how to resolve white screen of death issue.
Admin
Jason Moore
Thank you! This is was too easy!
ron
Hi, I’m trying to do exactly this, but I get a 500 Internal Server Error right after I put the database details and hit the Run Deployment button, I get the progress animation and after about 10 or 15 seconds I get the error.
I was looking at the error logs located at C:\wamp\logs and I could only find this line that seemed somewhat relevant: “Invalid command ‘RewriteOptions’, perhaps misspelled or defined by a module not included in the server configuration”.
I’ve successfully used duplicator in the past, but going from webserver to another webserver.
Any ideas?
WPBeginner Support
Please take a look at our guide on how to fix 500 internal server error in WordPress.
Admin
Usama Noman
Thanks, seems like this is a tutorial posted upon my request Thanks guys you are doing good.
WPBeginner Support
Yes it is Usama. Thank you for suggesting it to us.
Admin
Jamie Mannion
Good guide, but I think you missed the part where you update wp-config.php with the new database details – name is the new name, username is ‘root’ and password is empty.
I tried it manually and it all looks good but the links take me to the WAMP server configuration page, even though the URLs are updated – can’t figure it out. I can get the home page and admin, but that’s it. Cheers!
WPBeginner Support
Thanks for pointing out updating wp-config.php thing. We have updated the article.
As for your redirection issue. Try deleting .htaccess file from wordpress installation on your localserver.
Admin
Jamie Mannion
Awesome, thanks! I removed the .htaccess, then visited the permalinks option page and saved and now we’re good! I should admit, the only reason I knew about the wp-config.php settings is because I’ve read your previous articles. Keep up the great work!
Kin
I put a question earlier today, but this worked out for me great.
Thank you.
Shahraar Khan
I do this manually. Just zip the files from the server and download it… export the database and replace all the links in my text editor. just a 5 min work.. But anyhow your tutorial is also a very good alternative.