Imagine you have an online store, and one of your products becomes really popular. Lots of people start ordering it, and you’re super happy! But then, you notice that some customers are buying everything at once.
At first, this might seem good, but it can cause problems. Other customers can’t buy the product, your stock runs out too fast, and some people might buy a lot just to sell it for a higher price.
At WPBeginner, we have helped many online stores and know that not setting limits can lead to big problems, like running out of products, losing sales, or even being the victim of a scam.
In this article, we will show you how to set limits on purchases in WordPress to help keep your store fair and balanced.
Why Limit Purchase Quantity in WordPress?
Stock management can make or break your store’s reputation. Limiting purchase quantities makes sure that all customers will receive their orders and you never sell a product that isn’t in stock.
You ensure a more even distribution of your products by setting a cap on how many units a customer can purchase at once. This way, more customers get a chance to buy what they want, you avoid going out of stock, and you maintain a fair shopping environment.
It’s all about balancing the scales to keep your store running smoothly and your customers happy.
Without this limit, you risk a few big buyers dominating your sales, which can lead to frustrated customers who miss out and might not return. It also helps you manage your inventory better and prevents anyone from not getting the products they want.
That said, let’s take a look at how to limit purchase quantity in WordPress. We’ll cover three ways to do it, and you can use the quick links below to jump to the method you want to use:
Method 1: Limiting Purchase Quantity in WordPress With WooCommerce
Chances are, if you are researching how to limit purchase quantity in WordPress, then you have an online store.
Most store owners who sell physical products need to restrict the quantity to avoid out-of-stock purchases, which would simply lead to refunds.
For WooCommerce store owners, you’re going to need to buy and download the Min/Max Quantities extension.
If you need help with this, then please see our ultimate WooCommerce tutorial.
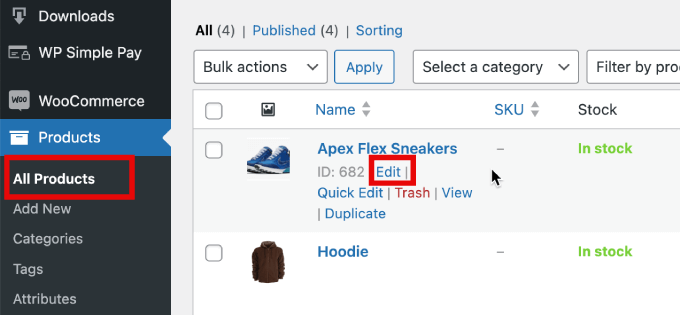
Then, go to Products » All Products. From here, you need to click ‘Edit’ under the product to which you want to add restrictions.
From here, scroll down to the Product Data section. In the General tab, you’ll see the option to enter the minimum and maximum quantities.
The ‘Group of’ field means that you can enter the quantity that the product must be purchased in multiples.
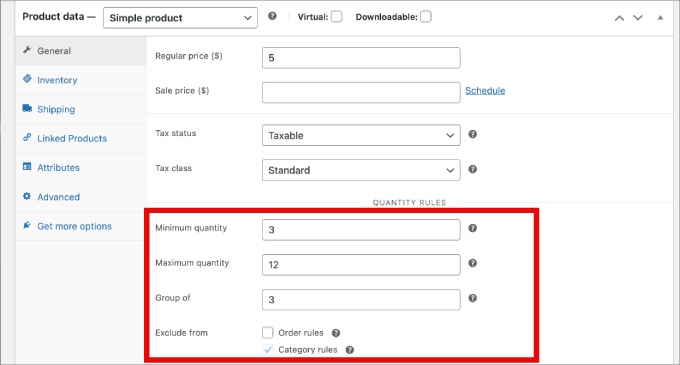
From here, all you have to do is save the product, and the purchase limit will be in effect!
Method 2: Limiting Purchase Quantity in WordPress With WP Simple Pay
If you don’t have a complete eCommerce store, then WP Simple Pay is the best solution for selling products in WordPress.
WP Simple Pay is the best Stripe payments plugin that allows you to accept one-time and recurring payments without setting up a shopping cart. We have thoroughly tested it in real time and found it scalable and reliable. To learn more, see our WP Simple Pay review.
For example, here’s a few use cases where WP Simple Pay could be helpful for limiting purchase quantity:
- Event tickets: You can allow more people to attend by limiting ticket purchases from each individual.
- Service bookings: You can use WP Simple Pay for appointment bookings like consultations or personal training sessions. Limiting the number of bookings per customer ensures fair access to your time and services.
- Membership fees: When selling memberships, you can limit the number of purchases to prevent abuse or fraudulent signups for your membership site.
You will first need to install and activate the WP Simple Pay plugin. For more details, please see our guide on how to install a WordPress plugin.
Once activated, you’ll be taken to the setup wizard. This wizard guides you through the process of integrating Stripe, making it easy to connect your Stripe account with your site.
Click on ‘Let’s Get Started’ to begin.
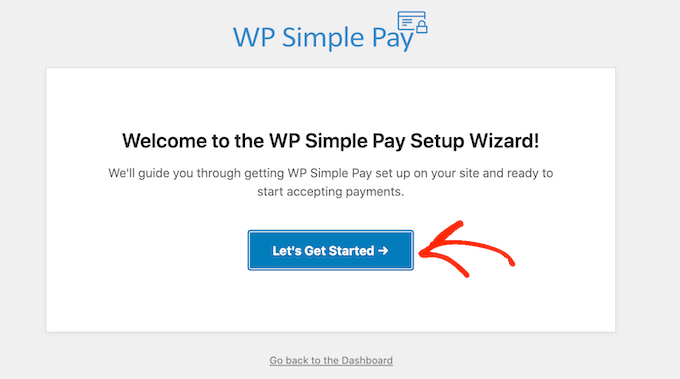
Continue with the setup wizard to link your WordPress site to Stripe.
You then need to click ‘Connect with Stripe.’
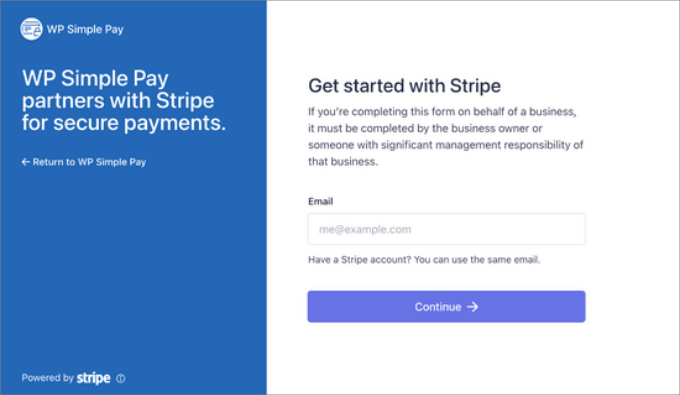
Next, you’ll need to create a new Stripe account or connect an existing one to your site.
All you will have to do is type in your email and password for your Stripe account.
From here, you can select your account and hit ‘Connect.’
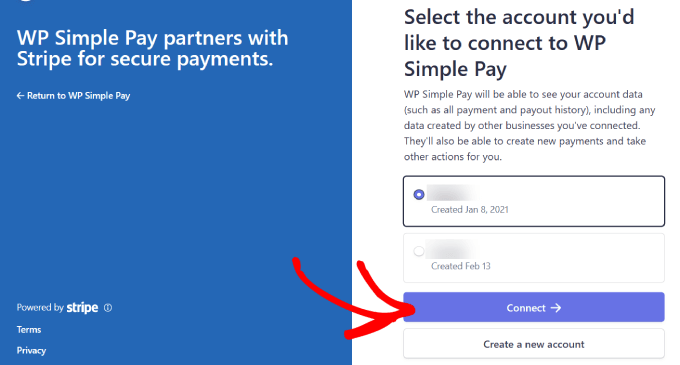
Once you’ve successfully connected Stripe to your site, it’s time to create an order form and set purchase quantity limits for your products.
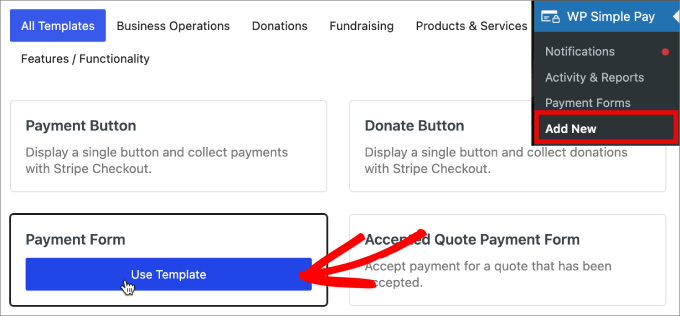
You’ll go to WP Simple Pay » Add New. From there, you’ll see a variety of pre-built templates to choose from.
While this works for any form template, we will use the payment form template for this tutorial.
Hover over ‘Payment Form’ and click ‘Use Template.’
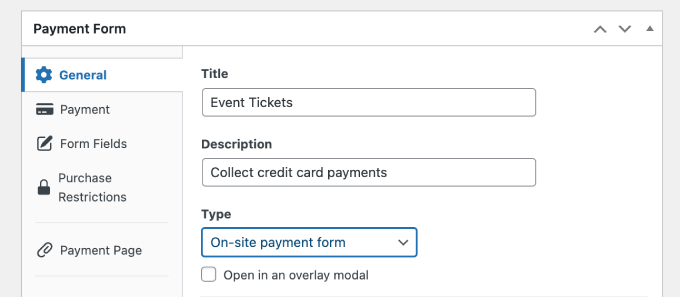
After choosing your preferred form template, you will be directed to the General settings page, where you can tailor your payment form to your needs.
This is where you can adjust the title, description, and form type to meet your specific needs.
If you prefer to host the payment form on your own site, select ‘On-site payment form’ under Type. Alternatively, if you want to host the form on Stripe’s checkout page, then choose ‘Off-site Stripe checkout.’
Next, click on the ‘Payment’ tab, where you can configure Price Options. Here, you can offer multiple price options within a single form.
By default, you’ll see one price option set at $10.
For this tutorial, we’re adding two price options, which we will label as “Premium Access” and “Standard Access.”
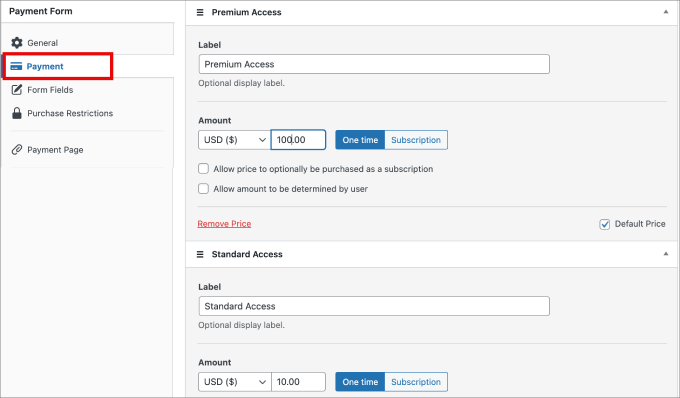
In this case, Premium Access is our top-tier product with very limited availability and a price of $100, while Standard Access is our most affordable option at $10.
Next, let’s set limits on the purchase quantities for the price options we have added.
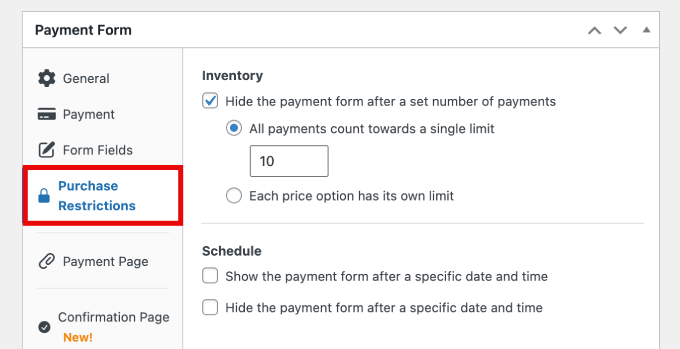
To do this, click on ‘Purchase Restrictions’ on the left. Under ‘Inventory,’ you’ll be able to create the purchase limit.
WP Simple Pay offers two ways to restrict purchases. You can either set a default limit for all price options on your Stripe payment form or configure separate limits for each price option.
In this example, we’ve set a restriction of 10 for all ticket purchases.
You can also configure a specific limit for each price. Just select ‘Each price option has its own limit’ and set the purchase limit for each option.
So here, we’ve limited the Premium Access to 5 and the Standard Access to 10.
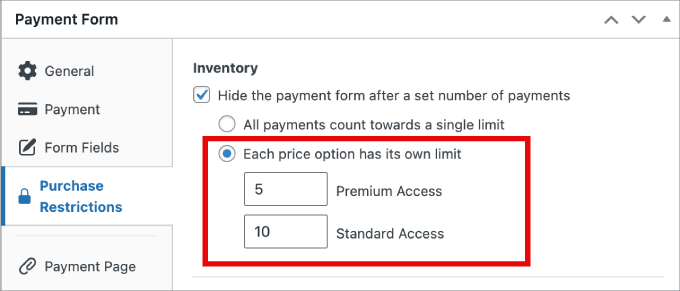
Once a product’s purchase limit has been reached, customers won’t be able to buy it.
Now, if your payment form is ready to go, you can hit the ‘Publish’ button on the right side of the screen.
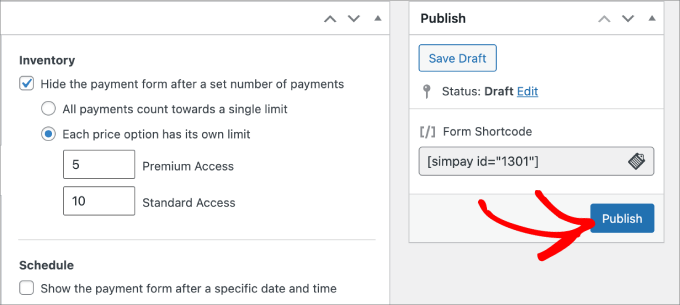
All that is left to do is add your new payment form to your website. To embed the form, navigate to the post or page where you want to publish it.
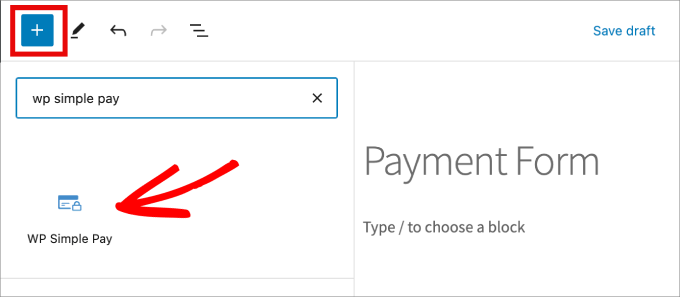
Click on the + icon and then add the WP Simple Pay block.
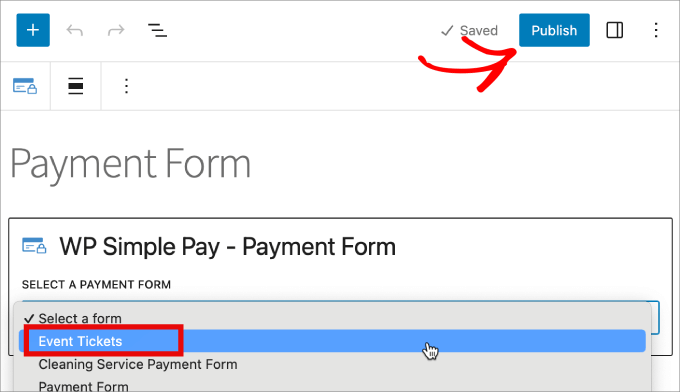
Next, just select the payment form you’ve created. The form should appear in the block editor.
Finally, just click ‘Publish.’
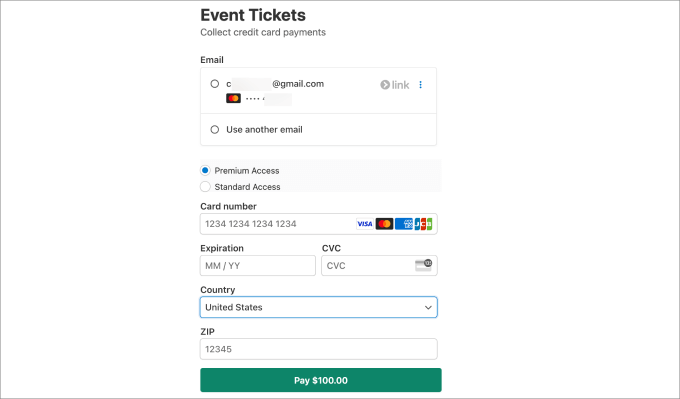
Finally, you’ll want to preview the form to see how it looks on the front end.
You can even make a test payment to make sure the restriction works as intended.
Method 3: Limiting Purchase Quantity in WordPress With Easy Digital Downloads
Generally, digital products don’t require stock control. However, for situations like selling virtual tickets or other “digital” items with limited availability, the ability to limit the total number of purchases can be very useful.
Adding a limit can also add FOMO and create real scarcity without having to use a countdown timer.
If you sell digital products such as courses, ebooks, or templates, then you’ll want to use Easy Digital Downloads. The core Easy Digital Downloads plugin doesn’t include stock tracking by default, but you can easily add this functionality with a simple extension.
Several of our partner brands are currently using it to sell their plugins, and have reported a positive experience. To learn more, see our Easy Digital Downloads review.
Note: You can purchase the Purchase Limit extension separately, or if you have the Professional Pass subscription plan, it’s free to download.
First, you’ll need the Purchase Limit extension.
After purchasing and installing it, navigate to the edit screen of the product you want to set a purchase limit on.
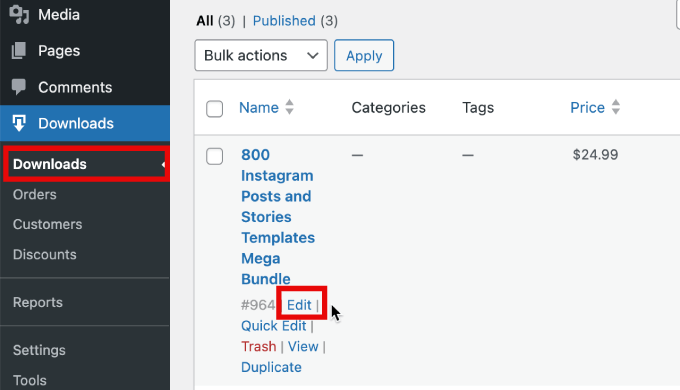
You can do this by going to the Downloads » Downloads page and then clicking ‘Edit’ on the digital product you’d like to make changes to.
If you haven’t created a digital product yet, then just follow our beginner’s guide on how to sell digital downloads on WordPress.
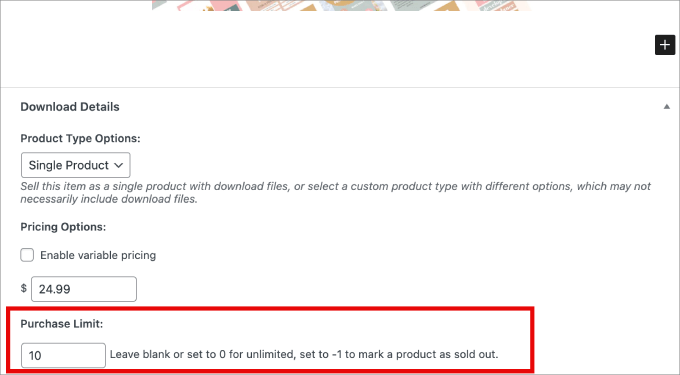
Next, scroll down under Download Details. A new option titled ‘Purchase Limit’ should appear.
You can set the number to the quantity that can be purchased. If you leave the number at 0, customers can purchase an unlimited quantity. But if you set it at -1, the product will be marked as sold out.
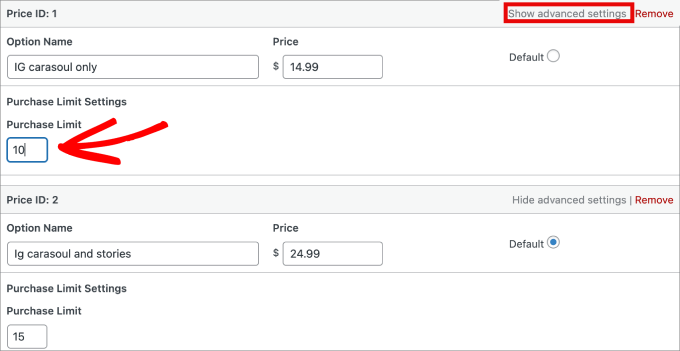
You can also set the purchase limits if you have multiple pricing options. Simply click ‘Show advanced settings’ and then the ‘Purchase Limit Settings’ will appear.
Then, add the purchase limit you’d like for each pricing option.
Then, simply update your digital product page.
There you have it! You now have three methods for restricting the purchase quantity, and you can use the preferred solution based on your needs.
We hope this article helped you learn how to limit purchase quantity in WordPress. You may also want to see our expert pick of the best WooCommerce plugins for your store or our tutorial on how to increase WooCommerce sales.
If you liked this article, then please subscribe to our YouTube Channel for WordPress video tutorials. You can also find us on Twitter and Facebook.


Dennis Muthomi
Well, as someone who has implemented purchase limits in my own WooCommerce store, I can attest to the importance of this feature.
One additional tip I’d like to share is to communicate these limits clearly to customers. Adding a note near the “Add to Cart” button explaining the purchase limit helps manage customer expectations and reduces support inquiries.
The section on WP Simple Pay caught my attention, as I hadn’t considered using it for limiting event ticket purchases. This could be a game-changer for small businesses or organizations running events without a full e-commerce setup.
Thank you SO MUCH for the comprehensive breakdown!
Jiří Vaněk
Thank you for the perfectly explained article. I was particularly interested in setting limits for digital products, which don’t have a physical quantity but where we needed to restrict the number of items per customer to prevent illegal reselling. Specifically, this was about tickets for an event with a limited number of attendees, and there was high demand. This article completely met my expectations, and the implementation is not overly complex. That’s why I really enjoy using WooCommerce in this regard—every problem usually has a relatively simple solution.
Mrteesurez
You’ve highlighted some crucial points about stock management. Setting purchase limits not only ensures that your customers receive their orders but also helps prevent stockouts, which can damage your store’s reputation. In my experience, implementing quantity caps has also helped in managing high-demand products during peak sales periods. This strategy ensures that more customers can access popular items, leading to increased customer satisfaction and repeat business. Additionally, it helps in balancing inventory levels, reducing the risk of overselling, and maintaining a positive customer experience.
Kzain
thank you so much for this helpful guide I wanted something like this to Limit my digital download purchases like Etsy, is there any way to show the only left quantity for customers to know
WPBeginner Support
To set that up you would need to set up inventory management. We cover more in our article below:
https://www.wpbeginner.com/beginners-guide/how-to-prevent-overselling-out-of-stock-items-in-wordpress/
Admin
Muhammad Dilawar
Thank you for showing a great way to limit product stock on Woocommerce WordPress store. It is really helpful when it comes to limit viral products and everyone has an equal right to buy. This seems like an ethical practice that must be applied to Woocommerce stores to stop reselling and price-gouging.
WPBeginner Support
You’re welcome!
Admin