Installing WordPress on your Mac lets you explore its features without needing a web host.
You’ll get to know how WordPress works and see if it’s right for your project. It’s also perfect for testing themes and plugins before making your site live. Plus, experimenting locally gives you the freedom to make mistakes and learn.
We’ve played around with local sites a lot, both on Mac and Windows computers. And in this tutorial, we will share 2 simple methods for setting up WordPress on your Mac.
Note: Not using Mac? We also have a tutorial on how to install WordPress locally on Windows.
Why Install WordPress Locally on Mac?
Normally, you need a web hosting account and a domain name to make a WordPress website.
However, the core WordPress software is free to download and can be run locally on your computer. This local WordPress site will not generally be available on the internet, and it can only be viewed on your computer.
The advantage of this approach is that you can privately practice using WordPress, try it out, and see what type of websites you can make.
You can also use this local installation to test different WordPress themes and plugins before installing them on your live website.
What Do You Need to Install WordPress Locally on Mac?
WordPress is written mainly in PHP, a server-side programming language. To run PHP, you’ll need web server software and a MySQL database management system installed.
Now, installing all these software independently and making them work with each other sounds like a daunting task.
Luckily, there are free development tools that make it super easy to install them as one package, even for the less tech-savvy users. With that in mind, here are 2 methods for easily installing WordPress locally on a Mac without any special server administration skills:
Ready? Let’s get WordPress running on your computer.
1. Install WordPress Locally on Mac Using Local WP (Recommended)
Local WP is a WordPress development tool that allows you to easily set up a local server on your Mac computer. You can also use Local on Windows and Linux to set up WordPress.
First, you’ll need to visit the Local website and click on the ‘Download’ button at the top right corner of the screen.
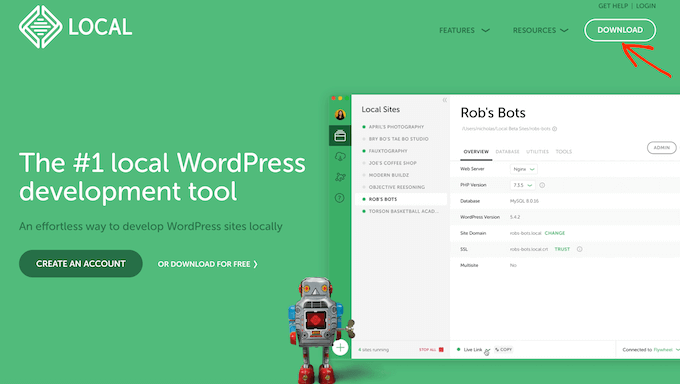
This will open a Download Local popup window.
Here, let’s choose Mac as your platform.
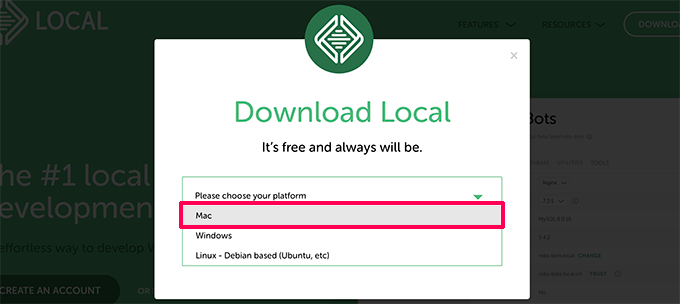
Local will then ask you to complete a short form.
After typing in your name, email address, and phone number, you can go ahead and click on the ‘Get it Now’ button.
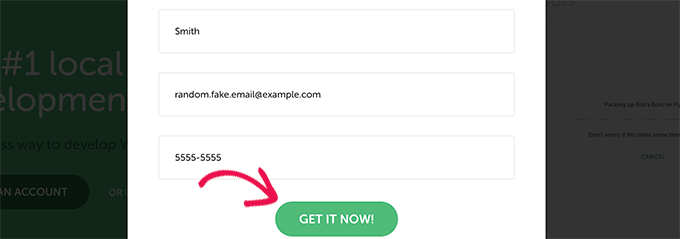
This will download the Local installation file to your computer. You can double-click to open the downloaded file as soon as it’s finished downloading.
You’ll then see a setup wizard, which will guide you through the process of installing Local on your computer.
Mac users simply need to drag the Local app into their ‘Applications’ folder.
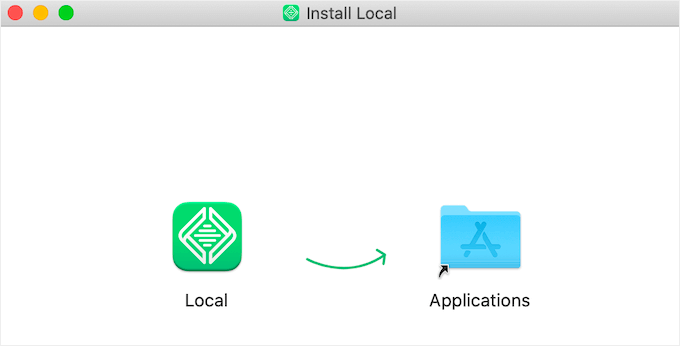
Once the installation is finished, you’ll be able to launch the Local app from the Applications folder.
Upon the first launch, you may be asked a few questions and create a free Local account. These steps are optional, and you can skip them if you want.
Creating a WordPress Website in Local
Local makes it very easy to create a local website and install WordPress quickly.
To get started, simply click the ‘Create a new site’ button to continue.

On the next screen, you’ll need to enter your site name.
After that, go ahead and click the ‘Continue’ button.

Next, you’ll be asked to choose your platform.
Local allows you to choose which version of PHP, Apache, and MySQL you want to use.
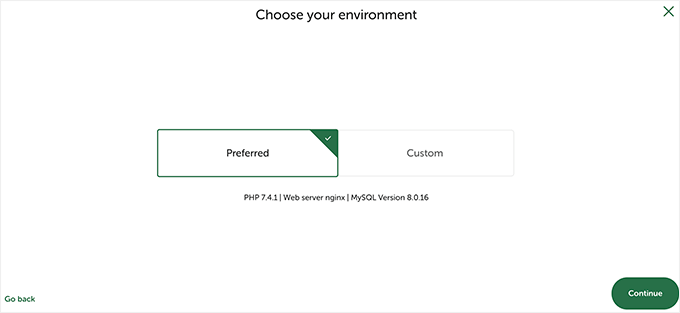
If you are unsure, then choose the ‘Preferred’ settings and click on the ‘Continue’ button.
Finally, you will need to enter a WordPress username and password. Then, you can click the ‘Add Site’ button.
Local will now download and install WordPress to create your website. You may be prompted to enter your Mac username and password to make changes.
Once finished, you’ll see information about your newly created website with buttons to visit the WordPress admin area or view your local site.
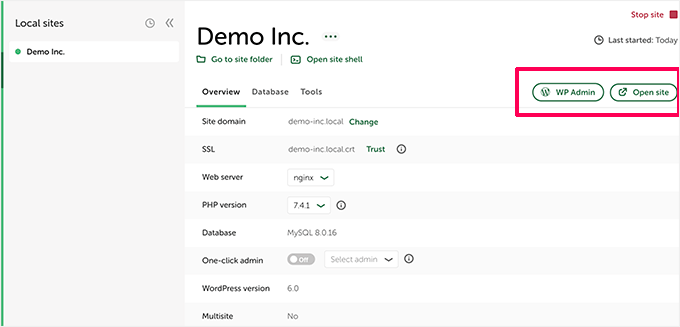
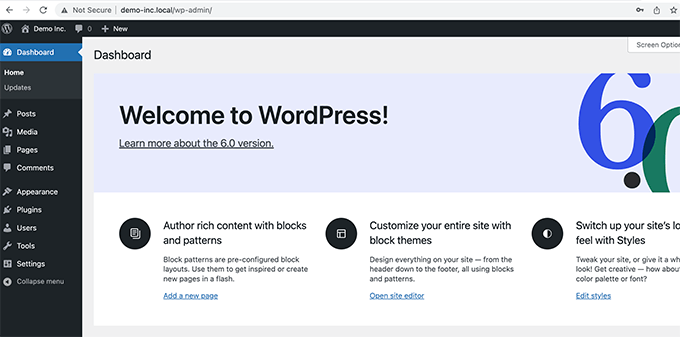
You can now visit your website or log in to the WordPress admin area.
From here, you can use your locally hosted WordPress site just like you would manage a live website.
You can install plugins and themes and design your website as you see fit.
2. Install WordPress Locally on Mac Using MAMP
MAMP is a popular program that allows you to run WordPress on your Mac computer.
First, let’s visit the MAMP website. Here you should see the latest version of MAMP & MAMP Pro.
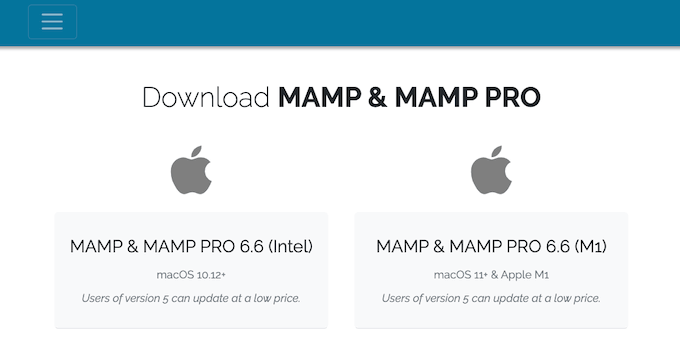
MAMP has separate downloads for different versions of the macOS operating system.
Not sure which version of macOS is installed on your computer? To find out, simply click on the Apple icon in your computer’s toolbar.
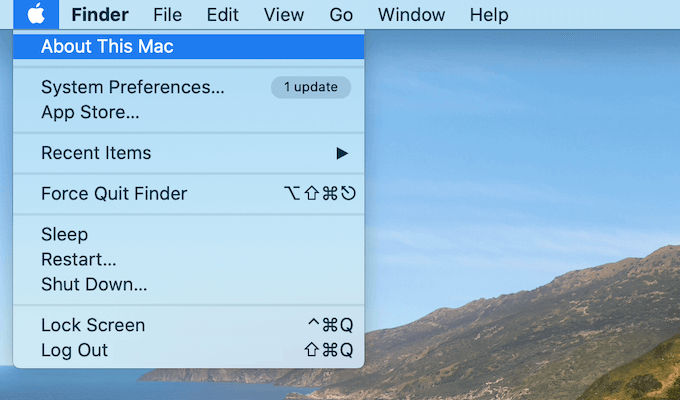
You can then click on the ‘About This Mac’ option.
This will open a popup that shows lots of information about your computer, including your version of macOS.
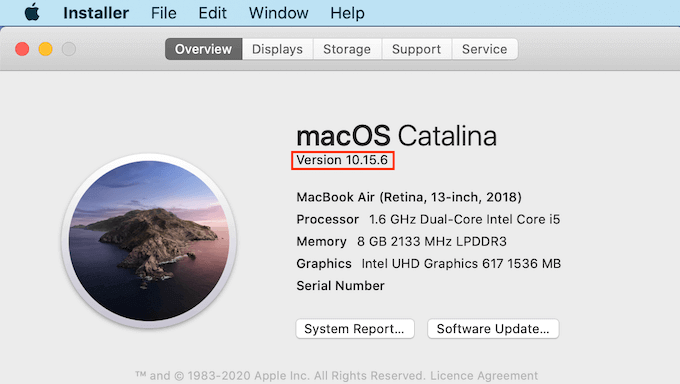
You can now download the correct version of MAMP for your operating system.
Once your download is finished, double-click on the MAMP .pkg file. This will launch the MAMP installer.

Now, simply follow the onscreen instructions to install MAMP.
After installing this program, go ahead and launch MAMP by opening your computer’s ‘Applications’ folder.
Here, you’ll find 2 versions of MAMP. MAMP Pro is the paid version, so make sure you select the free version.
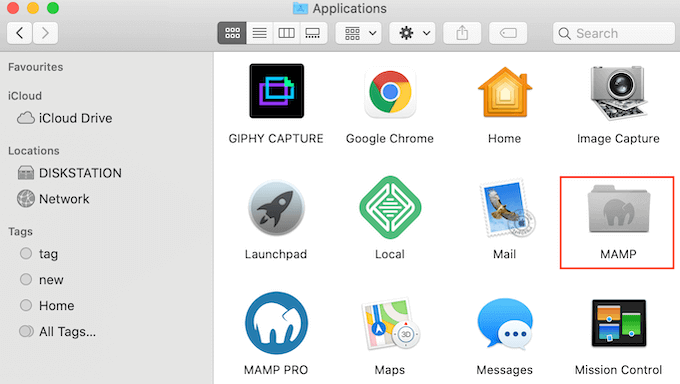
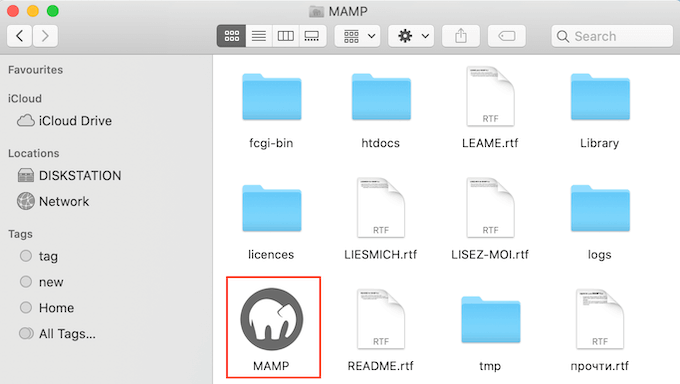
Inside this MAMP folder, you’ll find various files, plus a MAMP application.
Simply double-click to launch the MAMP app.
Before you get started, we recommend configuring a few settings to make your MAMP experience better.
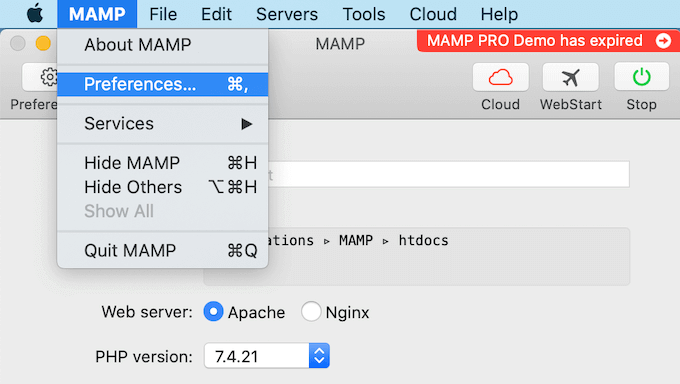
To make these changes, you’ll want to click ‘MAMP’ in your toolbar and then select ‘Preferences….’
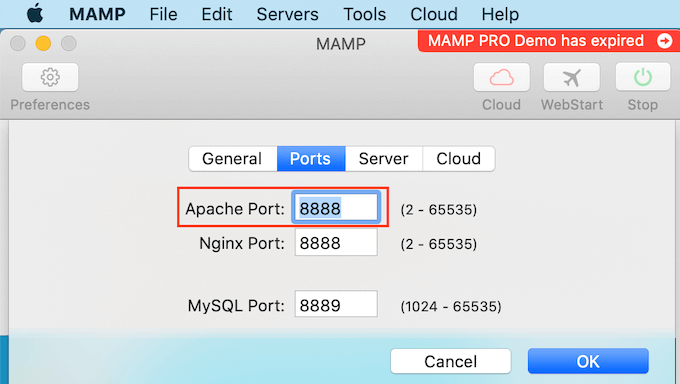
In the popup, you’ll want to switch to the ‘Ports’ tab.
You can now check which Apache Port MAMP is using. We recommend switching to Apache Port 8888 if MAMP isn’t already using this port.
The next step is to set up your document root folder. This is where you will create and store all of your local WordPress websites.
By default, MAMP uses the /Applications/MAMP/htdocs/ folder, but you can change this to any other location.
In the ‘Preferences…’ dialog box, let’s click the ‘Server’ tab. Your document root should now be visible.
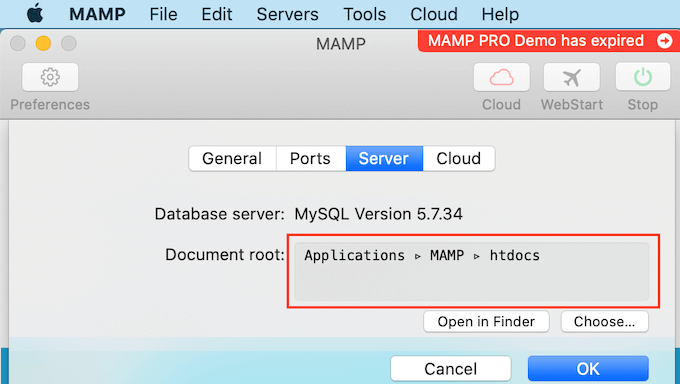
To store your sites in any other folder, go ahead and click on the ‘Choose…’ button.
This will open a popup where you can choose a new location. You may also want to create a new folder to store all your WordPress websites.
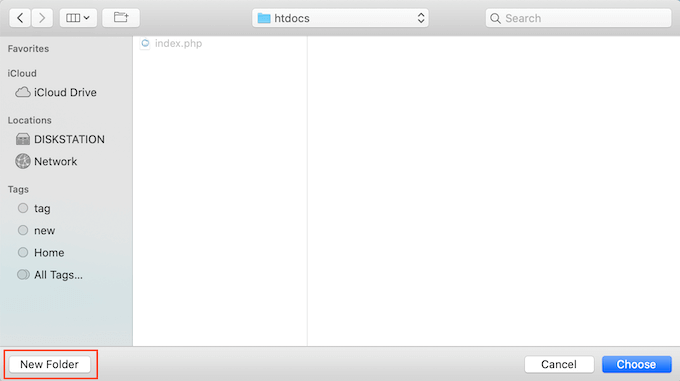
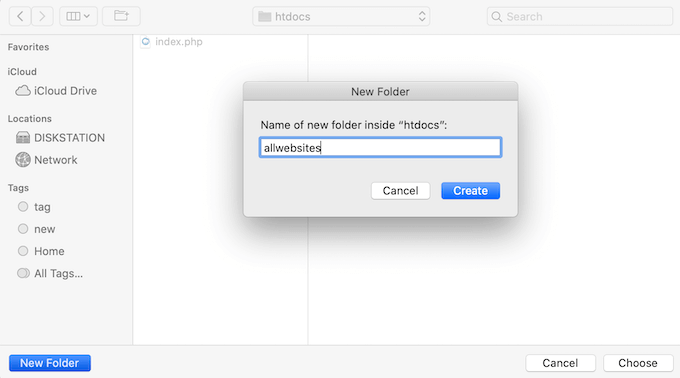
You can name this folder anything you want.
For this article, we will store our websites in a folder called ‘allwebsites.’
Installing WordPress on MAMP
Now that you’ve set up MAMP, it’s time to install WordPress on your Mac computer.
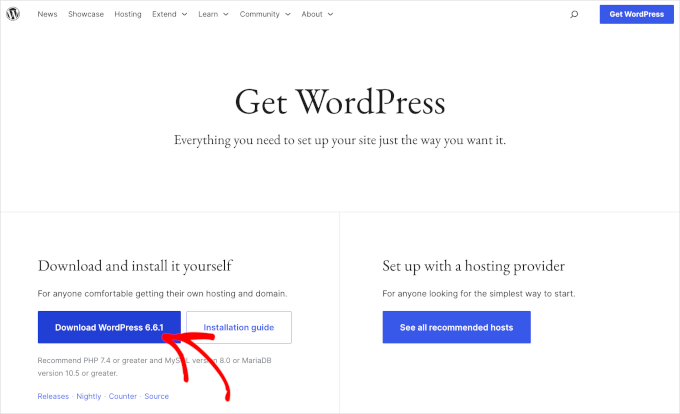
First, you’ll need to visit the WordPress.org website and download the latest version of WordPress Core.
NOTE: There are two versions of WordPress. For more details, see our comparison article on WordPress.com vs. WordPress.org.
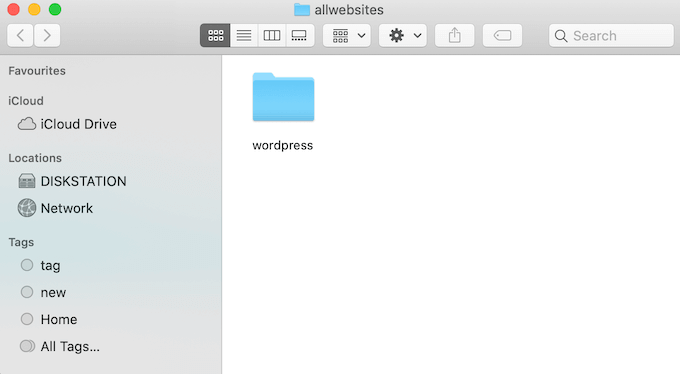
After downloading the file from WordPress.org, you just need to unzip it. This will create an unzipped ‘wordpress’ folder.
Now, simply copy this folder into your MAMP document root folder.
Since we changed the document root folder, we need to copy ‘wordpress’ into applications/MAMP/htdocs/allwebsites.
WordPress needs a database to store all of its content and data. You’ll need to create this database before you can create a local website.
Don’t worry – it’s not as hard as it sounds.
In the MAMP ‘Preferences…’ window, simply click the ‘OK’ button. This should launch the MAMP application in a new browser tab.
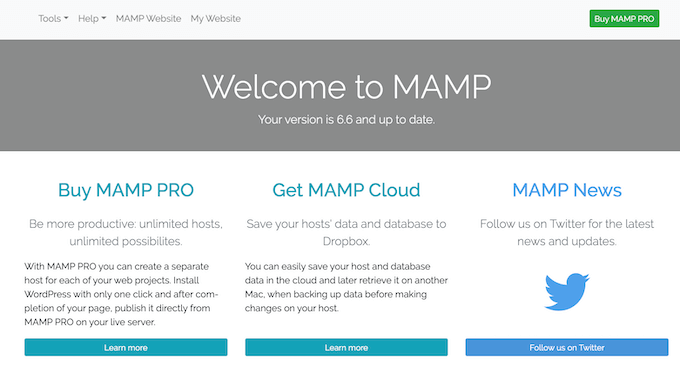
Your next task is to launch phpMyAdmin. This is a web-based application for managing your website’s MySQL database.
In the toolbar, let’s navigate to Tools » phpMyAdmin.
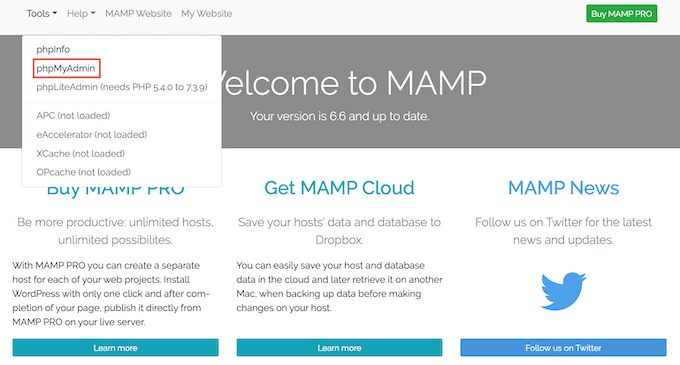
This will open phpMyAdmin in a new tab.
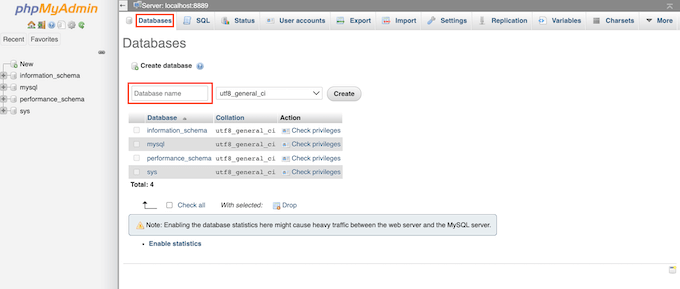
In the phpMyAdmin dashboard, you’ll want to go to the ‘Databases’ tab.
You can now type a name for your database into the ‘Database name’ field with anything you want. Just be sure to remember the name, as we’ll be using it in the next step.
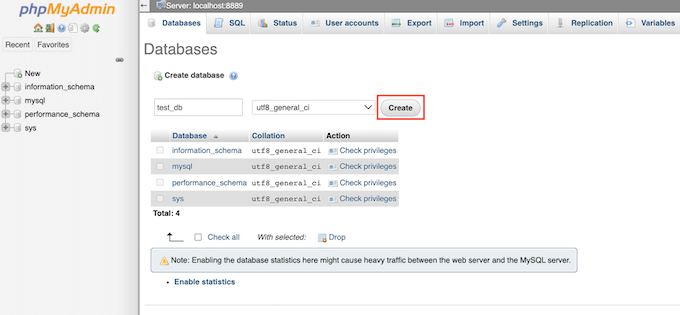
For this tutorial, we will call our database ‘test_db.’
After typing your database name, you can click the ‘Create’ button.
PhpMyAdmin will then create your database.
Now, it’s time to install WordPress.
In a new browser tab, simply go to http://localhost:8888/. If you’re using any port other than 8888, simply change this URL to mention your port.
You should now see a link to the ‘wordpress’ folder you copied into your root document folder. Go ahead and click this link. This will open the WordPress installation wizard.
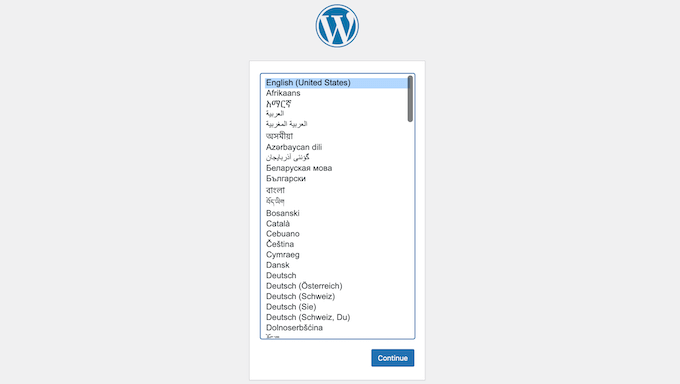
The WordPress installation wizard starts by asking you to choose a language. After making your choice, you can click on the ‘Continue’ button.
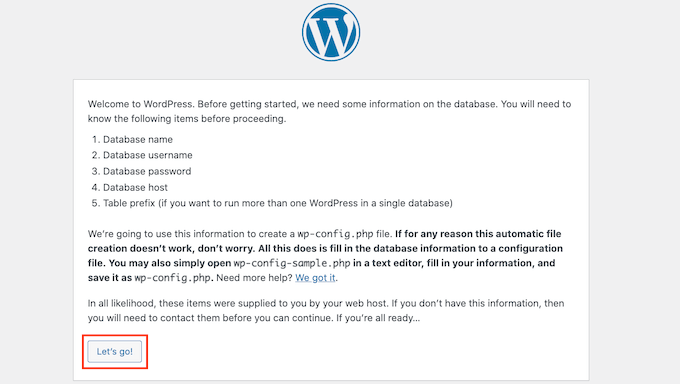
On the next screen, WordPress will show you the list of all of the information it needs to complete the installation.
After reading this screen, go ahead and click on the ‘Let’s go’ button to move forward.
The setup wizard will now ask for your WordPress database information. For the database name, simply type the name you created in the previous step.
For ‘Username’ and ‘Password,’ simply type ‘root.’
You can then type ‘localhost’ into the ‘Database Host’ field. Localhost means the database and website are hosted on the same server, which, in this case, is your Mac computer.
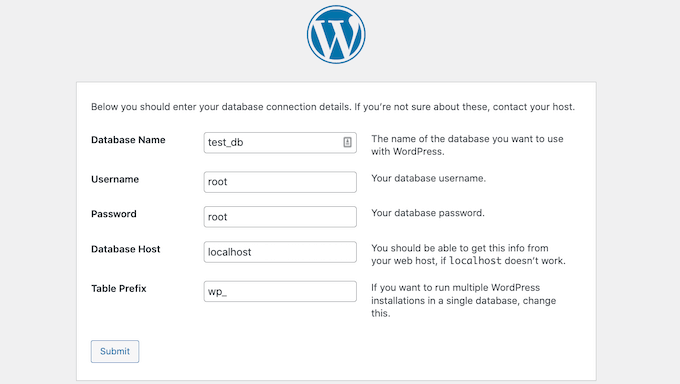
After typing all this information, simply click the ‘Submit’ button.
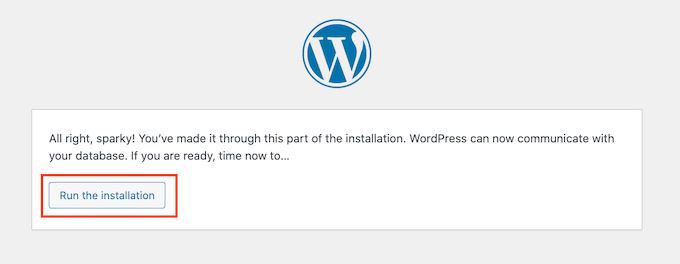
WordPress will now connect to your database and create a configuration file for you. Once it’s finished, you’ll see a success message.
To move on to the next step, you can click the ‘Run the installation’ button.
On the next screen, WordPress will ask you to add a site title. For example, you might use your business name. Most WordPress themes show this title at the very top of your website.
If you’re unsure about your site title, no need to panic. You can change the title in your WordPress dashboard at any point.
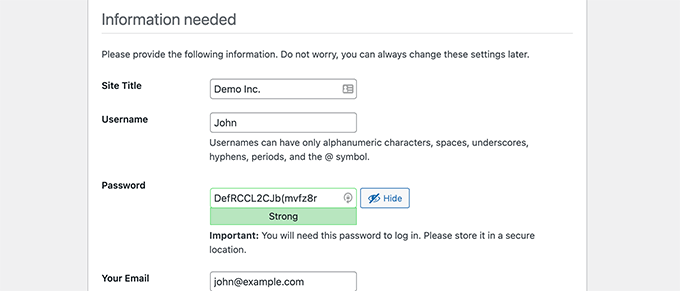
You’ll then need to create a username and password. This is the login information you’ll use to access your WordPress dashboard.
You can also type your email address into the ‘Your Email’ field. This is the address where WordPress will send all of its admin emails.
After completing this form, click on the ‘Install WordPress’ button.

WordPress will now run the installation.
After a few moments, you should see a ‘Success!’ message.

To jump straight to your WordPress login screen, click the ‘Log in’ button.
You can also log into your local WordPress website using the following URL: http://localhost:8888/wordpress/wp-login.php
Note: If you’re using a different Apache Port, you’ll need to change the ‘8888’ part of this URL.
You can now go ahead and log into your WordPress site by entering the username and password you created in the previous step.
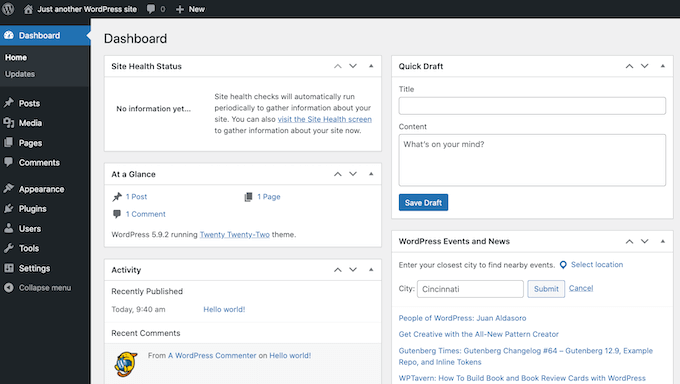
This will take you to the WordPress dashboard.
Trying WordPress Locally on Mac
A local install is perfect for testing out WordPress or developing websites on your computer. Now that WordPress is running locally on your Mac, here are a few things you may want to try:
- Experiment with the best WordPress themes.
- Try to find your perfect WordPress theme.
- Test out essential WordPress plugins locally.
- Learn WordPress programming by creating your own plugins and custom themes.
Moving Your Local WordPress Install to Live Website
Once you’ve played with WordPress locally, you may want to move your WordPress install to a live website. This is the only way others will be able to see your website.
To do that, you’ll need to buy a domain name and web hosting.
A domain name is your website’s address on the internet, and web hosting is where your website files are stored. You can think of web hosting as your website’s home on the internet.
For web hosting, we recommend Bluehost. They are one of the biggest hosting companies in the world and are also officially recommended by WordPress.org.
Luckily, Bluehost is offering WPBeginner users a discount on hosting, a free SSL certificate, and a free domain name. Basically, you can turn your local WordPress installation into a live website for $1.99 per month.
Once you have purchased hosting, you might want to see our article on how to move WordPress from a local server to a live website.
We hope this article helped you learn how to install WordPress locally on Mac. Next, you may also want to check out our guide on how to make a website with WordPress or see our comparison of the best managed WordPress hosting companies.
If you liked this article, then please subscribe to our YouTube Channel for WordPress video tutorials. You can also find us on Twitter and Facebook.


WPBeginner Staff
Since we don’t know what went wrong when you deleted the site earlier. We would recommend you to create a new site. Basically repeat the whole process all over again. Except this time create a new directory in your document root folder. Do the same with MySQL DB. Then install WordPress in the new directory using your new MySQL DB.
Steve
Great instructions! I was able to set up a site, but I needed to delete it and start over. I trashed the SQL database and the previous site folder. But when WordPress goes to install itself now, I get a huge error log in the browser saying that a ton of files, info “already exist.” Do I need to get rid of some other previously installed files and, if so, which ones?
Minyan
When I type in http://localhost/wordpress (I name the wordpress folder under the root folder of MAMP wordpress), it shows “404 not found. The requested URL /wordpress was not found on this server”. Can anyone tell me what I did wrong?
Schalk
Minyan,
Any luck with your “404 not found’ issue ??
ej
having the same problem. please help!
Ish
Instead of typing in ‘http://localhost/wordpress’,
just type in ‘localhost’ instead and it should bring you to the wordpress page.
Worked for me, hope it does for you!
ThankQ
Michelle Hamilton
These instructions are the best and easiest to follow out there. I actually used them to help my instructor set up Wordpress on her new mac and I used them to set it up on the mac I use in my internship. Thanks so much!!!
Michelle Hamilton
These are the best and easiest to follow instructions out there. I actually used them to help my instructor install MAMP on her mac. I had already used them to do it for my internship that I am participating in. Great Job!!!
Julie Valin
Thank you very much for this great step-by-step tutorial! Very helpful for this first-time MAMP user, when at first I felt overwhelmed. Now I’m feeling informed and happy, and I always like to comment on those posts/tutorials that have really helped me. Kudos!
WPBeginner Staff
You can set up a staging environment for on a live server. Take a look at our guide on how to create staging environment for a WordPress site
Haley
Thanks for this tutorial – quick question for you: I’m designing a site for a client that I will have to build offline using MAMP, however I see the note about only being able to view it on my computer. Is there a way that my client (located in another state) can review the progress without making it live on their site?
Hannah
Oh god, thank you wpbeginner team so much. First time I’ve ever used MAMP and nothing seemed to say ‘Hey, for all you dummys, here’s how you install Wordpress’- it just assumed we would know. *forever grateful*
Frank
Too easy guys, thanks a lot!
Alex Koch
Really appreciate your help. MAMP 3.0.3 comes with a slightly different interface and a different setup – you have to redirect Apache to /bin/phpMyAdmin/ in oder to setup your mysql database for wordpress and THEN redirect Apache to you actual root directory localhost/mysitewahtever/ where you put wordpress.
Wordpress can access the db nevertheless.
Rich
Thank you for this easy to follow guide! I finally got the motivation up to move forward with a project I’ve almost completed and this guide really helped. Thanks again!
megan Dickson
This was AWESOME. SO EASY.
Thank you!
Tim Aldiss
Really useful, thanks
Tom Nguyen
Is it possible to receive emails from WordPress installed on a local server? I’m only asking because I had installed WordPress and forgot my administrator password. I click the Lost Your Password link to start the password reset process, but I never received an email.
I just ended up going to the local phpMyAdmin interface and reset the password that way.
Kate
I made an assumption when installing mamp/wordpress with my website name. The “website name” I used to set it up using your tutorial is not my website name my business currently owns and I am redoing. I thought if I used that one it would mess up the current site. So…..do I have to go back and put my “real” website name in the install files or can I just switch it over to my current domain name when I am done with the new wordpress site? Thanks!
Leigh
hey
followed steps ….up to setting up to part of .. new database – used test_db as per example
opening http://localhost/mysite in browser and getting 404 kicking out.
should be saying …
WordPress will notify you that it was unable to find wp-config.php file. !!!
…directory set cool , to mysite
///using default mamp ports
thanx for help in advance man !
smiles
Kate
I guess the issue was that I named my wp folder that contains all my wp files in hpdocs folder within MAMP using 2 words. Therefore I put a space in between and when I went to put the local host/mydomainname/wp-admin/ address to find my dashboard I apparently had to add a %20 due to the space. It seems to work now so I think I did it right! Thanks again for your sites guidance and prompt help. I really appreciate it and have added your site to my bookmarks and subscribed!
Kate
Well apparently it was so simple I was missing the part that I needed to put the _db after my new database I created Solved!
Kate
I am switching to wordpress from drupal and I appreciate and value your great resources and thorough steps coming from a newbie with no tech experience and knowledge!! I am having the same problem that Jen did above (12/12/2013). I’m using a Macbook Pro and got as far as trying to figure out whether the database that I set up in my wp-config file exists. I did the steps you recommended (it says all privileges are granted in my root user) , but maybe I’m doing it wrong cause I’m still getting the same error message as she did? Maybe I need another way of explaining the steps? I closed Skype and ensured websharing wasn’t on, but that didn’t change anything. Totally stumped!!
WPBeginner Support
Kate once you start MAMP, you need to go to http://localhost/phpmyadmin create a new database. Open your wp-config.php file and enter the database name on the line:
define('DB_NAME', 'YourDBNameHere');Let us know if this solved your problem.
Admin
Daniel
Thanks for the guide.
Now i have installed wordpress onto my mac, and have created a website. How do I go about starting a new website?
Thanks Dan
WPBeginner Support
Repeat the process by installing WordPress in a new directory (folder) and by creating a new database.
Admin
Syed
I am going through a nightmare. Thanks to your instructions, everything was running fine until today when I clicked on upgrade to the new MAMP version and went for an install, thinking that it will happen in the background.
It appears that the upgrade has either erased my data or has put it away. Incidentally, I had a full copy of the main drive on a different drive (the whole MAMP folder). I can see the folders and files in both places but when I try to start MAMP from the different drive where the old MAMP folders are placed, it still boots up with the new version and I can’t start my site.
I have no way to really know what to do next. Kindly help. Thanks
netyx
Thanks for the guide!
I have a problem though. I created a database and then MySQL server crashed. It’s not working anymore. Could you help me please anyone?
arzu
very helpful, thank you
Art
Yeah dude, this was very helpfull, thanks a lot!
Derek
Great tutorial. Thanks. It all worked fine for me until the very end. After I successfully installed wordpress I clicked on “View Site” and got a white splash screen that says “Your Website” followed by instructions on how to make it “live.” I don’t want to go live. I just want to work on building a theme locally. But for whatever reason, I’m just not able to view the site.
Help!
Thanks.
Ian
Perfect guide, much appreciated
Brandon
A breeze. Many thanks!
GH
Thank you so much. Very helpful explanation.
Jen
I just installed MAMP and my servers won’t start. Have you ever had this problem before? I tried restarting and re-reading the steps, thanks!
WPBeginner Support
check error logs in the directory where you installed MAMP
Admin
Jen
PLEASE HELP! I CANNOT FIND AN ANSWER AND IM ON A DEADLINE!
So everything was working until I clicked the ‘open start page’ button. Originally it just populated a web browser that only said:
It Works
Then, after refreshing it send me straight to the create config screen for wordpress and skipped the database start section. When I submitted the information your tutorial included it says :
“We were able to connect to the database server (which means your username and password is okay) but not able to select the (my database name) database.”
What do I do to fix this?? I was reading online and it says that there are some issues with Mac Mountain Lion, so I turned off the web sharing, which was the solution for this problem on all other sites. Please please please help!!
– Jen
WPBeginner Support
Jen, open your wp-config.php file which is located in your WordPress installation’s root directory. Look at the Database, database username and password sections. Go to phpmyadmin by typing
http://localhost/phpmyadminin the browser. Make sure that the database name in your wp-config file exists. Also check that the username used in wp-config file has all privileges by clicking on the Users tab in phpmyadmin.Admin
brad
i rescind my prior victory, when i finished working on my site, I stopped the servers and quit MAMP. When I restarted MAMP to work on a new project a few hours later I am unable to access any files in htdocs without a 404 error. MAMAP support forums have almost no responses to this issue, any one here have this issue? Any possible help? I’m not a tech person, just a designer so this is mostly greek to me.
Brad
Thanks for a simple and well explained tutorial! I got this up and running in under 15 mins!
Daniele
Thank you guys! Really helpful for a young Mac user like me!
jeroen faber
Great guide!
One thing: the following line in the guide:
“Open a new browser window and type http://localhost/mysite.”
didn’t take me to the WordPress installation screen, just typing “localhost” in the browser did.
Did i make some mistake in the configuration or….?
WPBeginner Support
seems like you have installed wordpress in your main www or htdocs or web directory under your Apache installation.
Admin
Dee
Thanks for this, it was really easy to follow and I had no problems at all!
Ton in 't Veld
I’ve made many sites already with Dreamweaver. Now I want to set up a WordPress blog for my wife. I installed MAMP. So far so good. In the preference I tried to start the servers. MySQL Server worked immediately, but the Apache server doesn’t go to green. I alreadyI switched off Skype (as advised before.
Many thanks for looking atmy problem.
WPBeginner Support
Sometimes skype is running in the background check in the activity monitor to make sure that skype is not running in the background.
Admin
George
Everything was going well until I got to, http://localhost:8888/wordpress. For some reason the Apache Server wouldn’t start with a port of 80. Please tell me what I’m not doing or doing wrong.
Thank you,
George
Editorial Staff
This is happening if you have Skype running. You need to change the port in Skype or quit skype while using Mamp.
Admin
Justin
That was exactly what I needed. One hang up I had was that “Web Sharing” was turned on in my Mac OSX “System Preferences.” It was causing a duplicate Apache server to run, which prevented phpmyadmin or the “Start Page” from running.
Editorial Staff
Thanks for sharing that with us Justin. Hopefully it will help others who read the comments
Admin
Jonas
Hi,
Followed your instructions an successfully installed WP. Many thanks
JaY Srivastava
Thanks for saving me real time, i knew how to do that on windows, but since i use my mac as my main work laptop it was getting difficult for me to test websites.
I have been always fan of wpbeginner but now i guess it has grown more.
Thanks Again !
RW
Been using my first install of mamp ever since I read this tutorial. The only thin that I’m struggling with is, porting it over to a live production site. I’m assuming I have to export my DB and then import it using phpmyadmin, but obviously, some things will have to change. Also have to manually upload all upload folders as well.
Does anyone have recommended workflow ideas?
Thanks,
Bob
Editorial Staff
If you have BackupBuddy, then you can easily create a full backup file and import that. To do it manually:
1. Install WordPress on new site and copy/paste the /wp-content/ directory from the old site.
2. Import all content using phpMyAdmin
3. Change the site_url and home_url options in wp_options to reflect the new site.
4. Login to the new site and go to Settings > General and click on the save button.
5. Go to Settings > Permalinks and click on the save button.
Admin
RW
perfect! thanks! never loved backupbuddy as it didn’t reliably work for me. the manual approach looks simple! thanks so much!
Bob
RW
I’ve been using MAMP for a week now and absolutely love it. Makes testing so much faster!
Thanks,
Bob
Gautam Doddamani
i have been using XAMPP from a long time and its serving me well…it has the same functionality as MAMP and perfectly runs on a mac
Raihan
this post is very useful to me. for this i saved this page
Gunstra
Great Tut, thank you.
Debbie
Finally, concise, step-by-step instructions on how to set-up Wordpress. I have followed other instructions and still get lost on what to do. Thank you so much!!
Christopher Anderton
I’m using MAMP myself, however, there is a even simpler way to get up and running in notime using MAMP Stack (http://bitnami.com/stack/mamp) and the WordPress module (see the modules section at the page).
Luke
Definitely a useful process! I wish I had this article the first time I tried to set this up. It would have been a huge help!
What’s your opinion on modifying the hosts file to allow using a DNS name for the local site ( example.com instead of localhost )? Good practice? Bad practice?
I’ve personally found it helpful when transferring a site I’ve developed locally to a live server.
RW
That’s so helpful. I’ve read about doing this and I think it will save so much time working locally on sites. I guess it has to be configured (or reconfigured) for different sites?
Thanks,
Bob