Have you ever tried to upload a file to your WordPress site and hit a brick wall? It’s super frustrating when you can’t upload that image, plugin, or theme you need. Our readers often ask us for help with file upload issues because they can bring your workflow to a crawl.
Sometimes, these file upload limits can unexpectedly stop you from adding content to your media library or installing those larger plugins and themes you need. It’s like being stuck with your hands tied. And it’s even more annoying when you don’t know how to fix it!
But don’t worry, we’re here to help. We love that WordPress is such a configurable platform, and there are often multiple ways to solve the same problem.
In this guide, we’ll show you the easiest ways to increase the maximum file upload size in WordPress. We’ll get you past those limitations so you can get back to doing what you love – running your website!
Why Increase the Maximum File Upload Size in WordPress?
Your WordPress hosting provider will set a default maximum file upload size when you sign up and install WordPress. Your hosting provider defines this limit, and it usually ranges from 2MB to 500 MB.
For most WordPress website owners, this limit will be more than enough.
However, there are times when you’ll need to raise this limit so you don’t run into upload errors.
For example:
- You run a photography website and need to upload large images.
- Your design or photography portfolio has large images.
- You want to install a larger WordPress theme or plugin.
- You want to sell digital products like eBooks, photos, videos, and more.
- You regularly update content and add audio, photos, and more that are beyond the current limit.
That being said, let’s show you how you can increase the maximum file upload size on your WordPress site.
Note: Keep in mind that displaying a lot of large files on your website can seriously slow down its speed and performance. That’s why we typically recommend never to upload videos to WordPress.
Since most users have different WordPress hosting setups, we will cover the following:
- How to Check Your Maximum File Upload Size Limit in WordPress
- Method 1: Contact Your WordPress Hosting Provider
- Method 2: Create or Edit an Existing php.ini file
- Method 3: Add Code to Your WordPress Theme functions.php File
- Method 4: Add Code to Your .htaccess File
- Method 5: Use a WordPress Plugin to Increase File Upload Size
How to Check Your Maximum File Upload Size Limit in WordPress
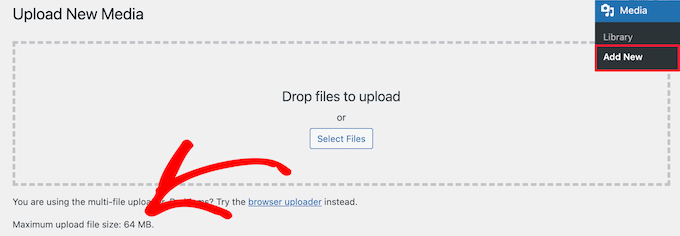
WordPress will automatically show the maximum file upload size limit when you are uploading images or other media.
To check this, simply go to Media » Add New in your WordPress admin panel, and you will see the maximum file upload size limit for your WordPress site.
Now that you know how to find the size limit, let’s show you how to increase the maximum upload size in WordPress.
Method 1: Contact Your WordPress Hosting Provider
One of the easiest ways to increase the maximum file upload size in WordPress is to reach out to your WordPress hosting provider.
This is a relatively simple task for their customer service team and can be done in a couple of minutes.
For beginners, this can be much easier than adding code to WordPress and editing server files.
Simply head over to your hosting provider’s website, like Bluehost, and log in.
Then, click the ‘Chat’ icon at the bottom of the screen. You can then ask the support staff to increase the file upload size on your WordPress site.
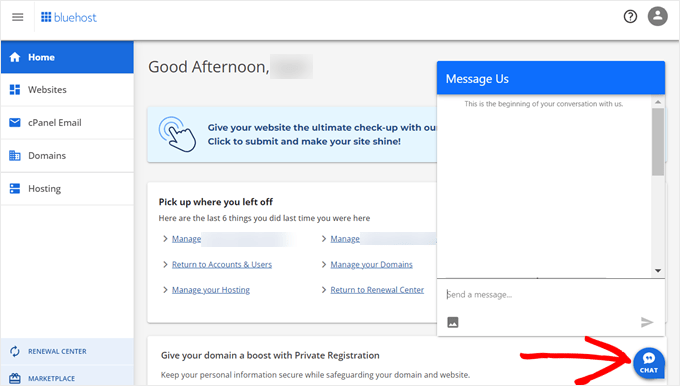
You can also reach out to support from within your hosting account dashboard.
Method 2: Create or Edit an Existing php.ini file
Another way to increase the maximum file upload size is by creating or editing a file called php.ini. This file controls a lot of settings for your WordPress hosting environment.
Most WordPress hosting providers like Bluehost have a beginner-friendly cPanel to help manage your website.
If your web host has a cPanel dashboard, then you can increase the file upload size through the built-in tools.
Note: The following is from the Bluehost cPanel. However, most shared hosting providers will have similar steps.
You will find a cPanel button at the bottom of the Hosting tab in Bluehost.
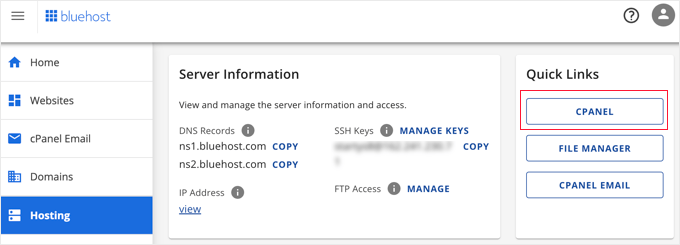
Clicking this button will open your cPanel dashboard.
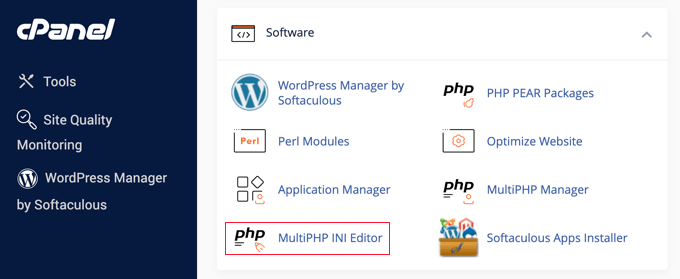
Now you need to scroll down to the Software section and click on ‘MultiPHP INI Editor’.
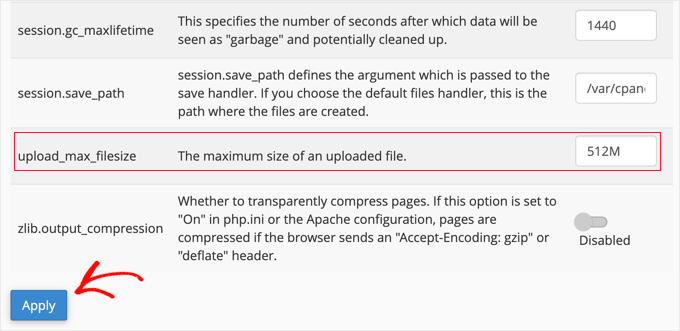
Next, scroll down to the section labeled ‘upload_max_filesize’ and enter a new maximum filesize into the box.
Then, click the ‘Apply’ button.
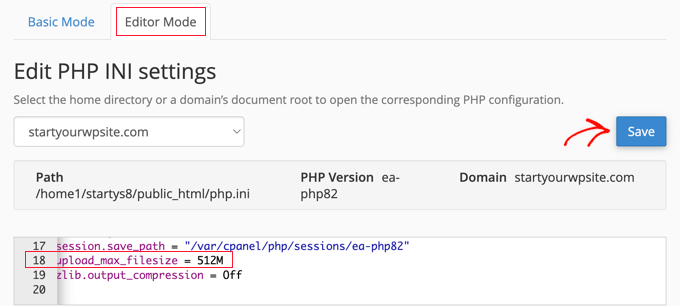
Alternatively, you can click the ‘Editor Mode’ menu tab, and then you can change the maximum file upload size directly in the editor.
You need to edit the ‘upload_max_filesize’ section to increase your file upload size.
Once you are finished, just click the ‘Save’ button.
Edit php.ini by Adding Code
If your current hosting provider doesn’t offer the cPanel option, then you’ll need to edit this file manually.
To do this, you can use an FTP client or the file manager option in your WordPress hosting control panel.
If you are using shared hosting, then you might not see the php.ini file in your hosting directory. If you don’t see one, then simply create a file named php.ini and upload it to your root folder.
Then, add the following code snippet to the file:
upload_max_filesize = 256M
post_max_size = 256M
max_execution_time = 300
You can modify the ‘256M’ limit to the file size you need for your WordPress blog.
Method 3: Add Code to Your WordPress Theme functions.php File
This method involves adding code to your functions.php file in your WordPress theme.
Instead of editing the file directly, we recommend using WPCode. It’s the best code snippets plugin that allows you to add code to your website without breaking it.
If you haven’t done this before, then see our beginner’s guide on how to add custom code in WordPress.
First, you need to install the free WPCode plugin. For more details, see our step-by-step guide on how to install a WordPress plugin.
Upon activation, you should navigate to Code Snippets » + Add Snippet.
You will need to hover your mouse over the ‘Add Your Custom Code (New Snippet)’ option and then click the ‘+ Add Custom Snippet’ button.

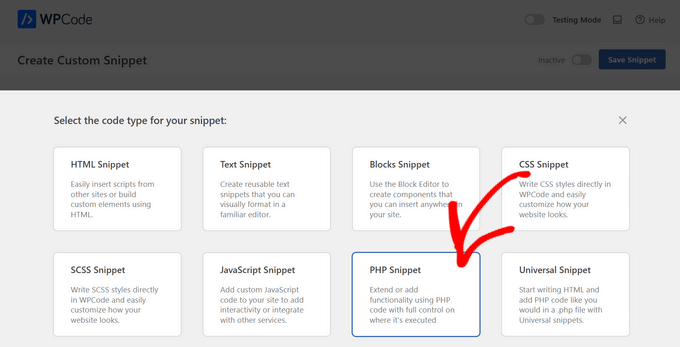
Next, you need to choose ‘PHP Snippet’ as the code type from the list of options that appear.
On the following screen, enter a name for your new snippet, which can be anything to help you remember what the code is for.
Then, you can copy and paste the following code snippet under ‘Code Preview’. Make sure you change ‘256M’ to the maximum file size you need:
@ini_set( 'upload_max_size' , '256M' );
@ini_set( 'post_max_size', '256M');
@ini_set( 'max_execution_time', '300' );
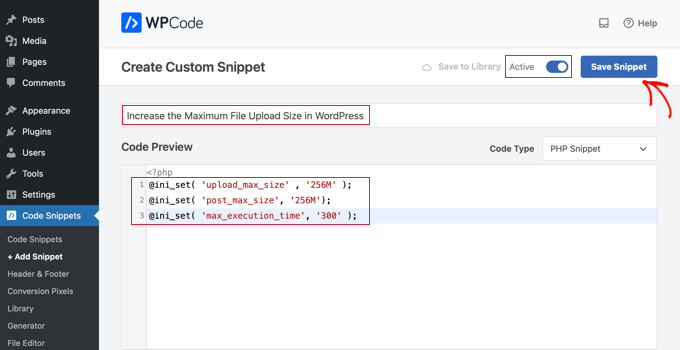
Finally, switch the toggle at the top to ‘Active’ and then click the ‘Save Snippet’ button. The code will now be executed on your website.
Method 4: Add Code to Your .htaccess File
Another way to increase the maximum file size is by modifying the .htaccess file. This file controls the high-level configuration settings for your website.
To do this, you need to log in to your website server via FTP. If you haven’t done this before, then see our guide on how to use FTP to upload files to WordPress for beginners.
After that, you need to locate your .htaccess file in your website’s root folder.

If you can’t find your .htaccess file, then it could be hidden by your file manager or FTP client. To learn more, see our guide on why you can’t find the .htaccess file on your WordPress site.
Next, you need to add the following code snippet to your .htaccess file:
php_value upload_max_filesize 256M
php_value post_max_size 256M
php_value max_execution_time 300
php_value max_input_time 300
To increase your maximum file upload size even more, simply change the ’64M’ to the size you require.
Method 5: Use a WordPress Plugin to Increase File Upload Size
Another way you can increase the maximum file upload limit is by using the WP Increase Upload Filesize plugin. If you are not comfortable adding code to WordPress, then this could be a good option for you.
The first thing you need to do is install and activate the plugin. For more details, see our guide on how to install a WordPress plugin.
Upon activation, navigate to Media » Increase Upload Limit in your WordPress admin panel.
This brings you to a screen where you can select a new file upload size in the ‘Choose Maximum Upload File Size’ drop-down.
Then, click the ‘Save Changes’ button.

Note: The maximum file upload size will be set by your hosting provider. If you need a file size limit that’s larger than the one listed in the drop-down, then you need to contact your hosting provider and ask to increase the limit.
Video Tutorial
If you don’t enjoy following written instructions, you can check out our video tutorial instead:
We hope this article helped you increase the maximum file upload size in WordPress. You may also want to see our guide on how to add additional file types to be uploaded in WordPress and our expert picks of plugins and tips to improve the WordPress admin area.
If you liked this article, then please subscribe to our YouTube Channel for WordPress video tutorials. You can also find us on Twitter and Facebook.


Being Stealth
Adding php.ini file in wp-admin folder worked for me. Yahoooo thanks.
Mouad Chafai
Thanks php.ini method worked perfectly.
i’ve created the php.ini
wp-adminphp.ini
add lines:
upload_max_filesize = 64M
post_max_size = 64M
max_execution_time = 300
thanks for the article.
Saleh Shaukat
Thanks .htaccess worked for me perfectly !!.
Dan Rosenberg
PHP.INI method worked perfectly. Thanks!
Ben Peacock
Sorry please find this instead Login to the root machine type the following command nano /usr/lib/php.ini
find ; Maximum size of POST data that PHP will accept.
post_max_size = 2M change this to 64
Save and exit and then you should be able to upload what you need hope this helps
QuangPham
Thanks for the instructions on how to fix.
Voicu Ioan Virgil
Thanks, great tutorial !
Maria McCarthy
Adding the php.ini file to my wp-admin folder SPECIFICALLY worked for me as well! Thanks everyone! Only took me almost 4 hours to find a page that had the info which would work for me – lifesavers!
pete
found the php.ini worked in wp-admin network php.ini
Tabassum Javaid
htaccess method works fine for me. thanks
Mike
with some host ( godaddy ) for example, there may be some additional steps.
And to what php you are running. For godaddy with php5, rename php.ini to php5.ini and remember if you have accuracies running, you will have to temp. end them before the file will even take over, or wait awhile for it.
System Processes / End all
jaymz
Many thanks for the article. For self-hosted there’s another way as methods 2 and 3 didn’t work for me as the .htaccess change had no effect and neither did adding a php.ini file in /wp-admin. It was simply a case of finding the existing php.ini file for Apache. On Ubuntu I ran;
sudo find / -name php.ini
This found my ini file in /etc/php5/apache2/
All that was needed was to locate the parameters and update the values for;
upload_max_filesize
post_max_size
max_execution_time
Thanks for getting me there!
D Winzell
Thanks for writing this. The php.ini does need to be in the wp-admin directory to function correctly. Just checked my host (Vaurent) and they allows up to 105M file uploads so I am going to find something that size and see if it makes it’s merry way up to my blog.
Matt
I just want to add, using godaddy you cannot use the htaccess method, it will throw you into a 500 internal service error.
You must use the php.ini method. Only difference will be you have to have a php.ini and a php5.ini and the lines must be added to both. The files need to be in the root directory of where the wordpress install is, not in the wp-admin folder, outside of it.
Also if you have multiple wordpress installations This has to be done and placed into each directory that each wordpress installation is located.
GSJha
Very Good Post.
sandeep
php_value upload_max_filesize 64M
php_value post_max_size 64M
php_value max_execution_time 1500
php_value max_input_time 1500
i use these values in .htaccess and it works !
thanks
Thyme
So I did all of those and changed the php.ini in the /etc folder (my site is on mediatemple’s grid-service) and nothing was working but then I vaguely remembered there was something I had to change in the network settings if my installation was multisite and there it was. Ugh.
So yeah, if you’ve got a Wordpress network, go to your network settings and change the max file size upload near the bottom of the page.
Alex
This is the only thing that worked for me, I tried all the options, I’m on 1&1
memory_limit = 32M
upload_max_filesize = 32M
post_max_size = 32M
file_uploads = On
** Size can be anything
The key was the “file_uploads” line
Place this in the /wp-admin/ folder.
Kristina
Worked for me! I’m on Bluehost.
Thanks for your post
Brandon
this worked for me after everything else hadn’t. I’m so relieved!
I’m also on 1&1. Once I added the “file_uploads = On” line to my php.ini file it worked like a charm!!
thanks!
Hafeez Ansari
Thank you Alex, This works for me in /wp-admin/ folder. Problem solved.
Jordan Miller
Thank you so much
Mike
Awesome! thanks Alex. I was limited to 2mb…really useful.
Sam
Alex you are the great! Your solution worked for me! Many thanks!
Johnny T
Genius! This worked for me! Just to clarify. Create a php.ini file in the wp-admin folder and only add the lines of code in Alex’s post. FTP this to your server and you’re good to go. Thanks Alex. You are a genius!
Luan
Thanks you Johnny and Alex! It was really helpful.
vanniee
what is the name of the file?
Togi Tan
But, it’s not working on free hosting. All methods I’ve tried. I think this might depend on server.
Duncan
Wow wow wow wow! Thank you for that clear comment that helped me get it to work. You are a star.
Nomo
Alex – Your post continues to be helpful. Very much appreciated!
Noor
Worked by .htaccess method. Salute man.
Bogdan
Great advice. My upload limit was 8MB and I only tried the htaccess trick and it worked, it increased to 64MB. I tested it and it is owrking beautiful! Thank you so much for your great advice!
VoidnessMD
Important thing to note: Using the php.ini method requires that the file be located in the wp-admin folder, not the root of your WP installation.
DJ
THANKS!! This sorted it out for me on my end
David Connolly
Superb… clear and the final solution worked.
a big thank you
Bongo
This website is the coolest for learning WP! Keep up the good work guys…more please…more! lol
Editorial Staff
Thanks for the kind words
Admin
Ido Schacham
Finally, a post that clearly explains how to change the memory limit in WP. Thanks!
mostafa
hi.
i successfully did it with the third method. my upload size was 8 M, but now its 64 M. for me its more than enough.
Thanks a million.
by the way i’m from Iran.
Rowan Evenstar
The creating a php.ini file and popping it on the route sorted it straight away!
Cheers, much appreciated!
assassinateur
thnx, but i am in a shared hosting so nothing work, i did put the php.ini in wp-admin and in the blog folder and in the homefolder and dodnt work also .htaccess didnt work changed the theme and didnt work
Arvind Kukreti
Adding code in .htaccess file might throw you 500 Internal Error… the best way is create a php.ini file and upload it in wp-admin folder
Stephen Afije
Waooo that was brilliant one there all i did was to create php.ini and uploaded to the wp-admin folder it worked like no other thing thanks
leo
htaccess method works fine for me. thanks
Andrew Lilly
Hi,
I have done all of the above and still wont let me import an 11mb xml file. i need it as its got 1500 products on i need to import.
I have spoken to my virtual server provider 1and1 and they said all i need to do is add the code to the .htaccess file but it doesnt seem to work
Please someone help
Editorial Staff
If none of the above works, then the only person who can help you is your host.
Admin
Ali Amer
It may be related to MIME Type. In that case, resolve it from cpanel
Dominique
None of this worked for me. I tried them all. I am using WPEngine to host.
Any suggestions?
Editorial Staff
Ask WPEngine to increase the limit for you.
Admin
Thad
The htaccess method worked for me. Thanks for the post. Good info, well presented.
Richard
php.ini option worked for me but on the php.ini file in /wp-admin directory
Mike
perfect – worked a treat – set to 200MB and works fine.
Matheus M.
In localhost work the .htaccess. But in host only php.ini. Thanks for help.
dan
Yes, php.in works in /wp-admin. thanks
marin
Thanks htaccess worked for me appreciate it.
Makarand Mane
I have hosting on mediatemple. First two methods are not worked me. Only htaccess methos is worked for me.
Thanks.
Gavin
I found that php.ini was hidden in the cgi-bin folder which some shared servers have in their root directories. I amended this as above (AND added a php5.ini jut in case) but until I’d amended this, nothing else worked. Thanks for the VERY useful thread!
Cath
Thanks Gavin, none of the other methods worked for me then I saw your comment, there were php.ini and php4.ini files were in the cgi-bin folder. I found the relevant code in both files – post_max_size = , and upload_max_filesize = , amended these and now all works fine.
Jarod Billingslea
Thank you very much for this article!
Void lon iXaarii
thank you so much! had tried so many solution and your .htaccess finally worked
Anthony
The only thing that worked for me was to create/edit a php.ini file and add the following:
memory_limit = 100M upload_max_filesize = 100M post_max_size = 100M file_uploads = On
and uploading it to the wp-admin folder.
Alan
Option 2 worked perfectly fine, though I had to place the php.ini file into the wp-admin folder instead of the root directory.
phpinfo was detecting the php.ini file in the root, but not WordPress.
I currently have WP 3.2 installed…
RPaterson
Thanks for that extra tip, this is what finally worked for mine
arun
thanks anthony, your method saved me a lot.
Quest The Wordsmith
This is exactly what worked for me as well.
RamiAlloush
Thx
Snowboard
thx for this post , but what is the default limit ?
almb1111
64 MB
kat1111
It was 8MB, but I got it to 192 MB @almb1111
kat1111
Ty for responding, I finally got some help with it, I needed to change the PHP to PHP-5.
kat1111
I am evidently newer than most here, I don’t understand which is “root” directory, is it Editor under the Appearance tab? Also, I don’t undertand how to get to hcaccess. Any help is appreciated.
jameserie
htaccess method works for me. – cheers!
nycxs
If you are using PHP5 the file should be called php5.ini and be in the root of the shared folders.
MyDreamDinZ
What is the highest limit for upload
can i set it to 1024M ?
alexlee.cs
The .htaccess method works for me. Thanks.
rajkanuri
Thanks for the code.. it is really helpful for me..
pranjalgupta2009
Yes ! putting php.ini also in wp-admin works for me. thanks
Snipsley
Thanks, but neither of this worked for me.
But I found the solution!
I had to place that php.ini to /public_html AND /public_html/wp-admin and it works!
Biju Subhash
ya..the same thing works me too..
Thanks Snisley
Trond
Great! This worked for me as well I run Wordpress on an MS Server 2008 with IIS 7.5 from my host provider, btw
kenseneff
Worked for me as well. Thanks!
Kiran
Thanks dude. It’s works for me.
Rollie Osayan
Yes. It is also working here. thanks
Kaushik Biswas
At the end of a post, I want to display recent posts from that specific category under that post – how can I do this?