Over the years, several of our readers have asked us if it is possible to hide password-protected posts from a site. In our experience, yes, it’s possible – WordPress lets you create password-protected posts to reinforce privacy.
However, it has a downside. When these posts appear on your site, the titles will have a ‘Protected’ prefix. This can be distracting and make pages look less tidy. Plus, when visitors see these post titles but can’t access the content, it might make them curious or feel left out.
While managing WordPress sites over the last 16+ years, we’ve found effective ways to remove password-protected posts from the WordPress loop. Using a tool like WPCode, you can keep your site looking clean and streamlined without compromising security.
In this article, we’ll guide you through the steps to hide password-protected posts from WordPress loops.
Why Hide Password-Protected Posts in WordPress?
By default, WordPress displays a password-protected post with its title and the ‘protected’ prefix. Users must enter the password to view the post’s content.
This post prefix is visible on the homepage, in archives, in the recent posts widgets, and in other areas.
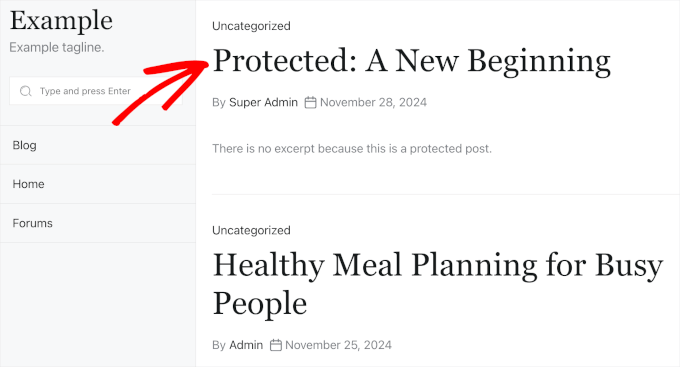
If you want to keep some content completely private, then this is not ideal for several reasons.
Users who don’t have passwords can still see the post title, which might be a problem in itself. They can also try to get access to the content with a brute-force attack. As we all know, passwords can be cracked.
With that in mind, we’ll show you how to hide your password-protected posts from the WordPress loop so that other users cannot see them. Here’s a quick look at all the steps you’ll take:
Let’s jump right in!
Step 1. Install a Code Snippet Plugin
To make specific changes to your site, some WordPress experts may tell you to add a custom code snippet to your theme’s functions.php file.
We don’t recommend this method as it’s not very beginner-friendly, and you risk breaking your website. Instead, you can use a code snippet plugin, like WPCode, to do the job.

WPCode is the best code snippet plugin on the market. For more information about the plugin, feel free to read our complete WPCode review.
The best part is that you can use the free version of WPCode to add a custom code snippet to your WordPress site.
So, first, go ahead and install and activate the free WPCode plugin. If you need help with the process, then check out our guide on how to install a WordPress plugin.
Expert Tip: Unlock advanced features like complete revision history, code scheduling, and access to 100+ expert-approved code snippets when you purchase the premium version of WPCode.
Step 2. Hide Password-Protected Posts in WordPress
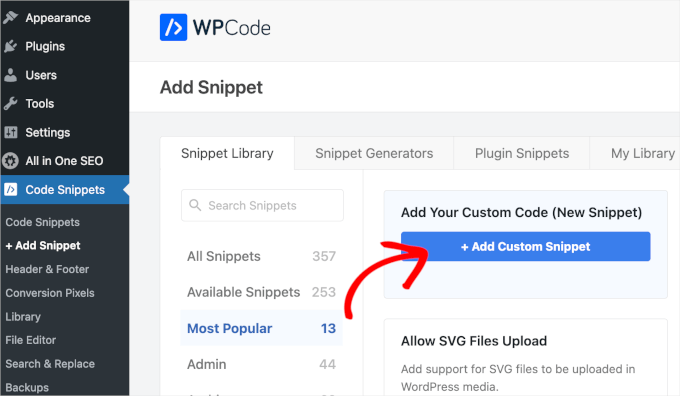
Once you’ve activated the plugin, navigate to Code Snippet » + Add Snippet from your WordPress admin area.
Then, simply click on the ‘Add Custom Snippet’ button within the ‘Add Your Custom Code (New Snippet)’ section.
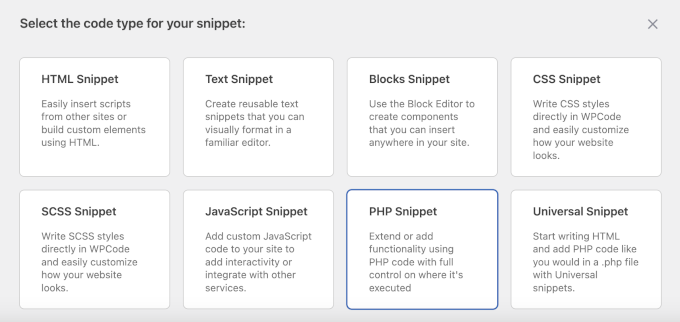
On the next screen, you’ll need to choose the code type for your custom snippet.
For this tutorial, we’ll need to use the ‘PHP Snippet’ option.
You’ll then be redirected to the custom code snippet editor.
From here, you’ll want to name the custom snippet first. We recommend using a clear name, like ‘Hide Password-Protected Posts.’ This will make organizing your custom code snippets easier down the line.
Next up, simply add the following code to the ‘Code Preview’ box:
function wpb_password_post_filter( $where = '' ) {
    if (!is_single() && !is_admin()) {
        $where .= " AND post_password = ''";
    }
    return $where;
}
add_filter( 'posts_where', 'wpb_password_post_filter' );
This code modifies the query sent to WordPress by using the posts_where filter. It asks WordPress to fetch all posts that do not have a password.
Here’s what it looks like in the editor:
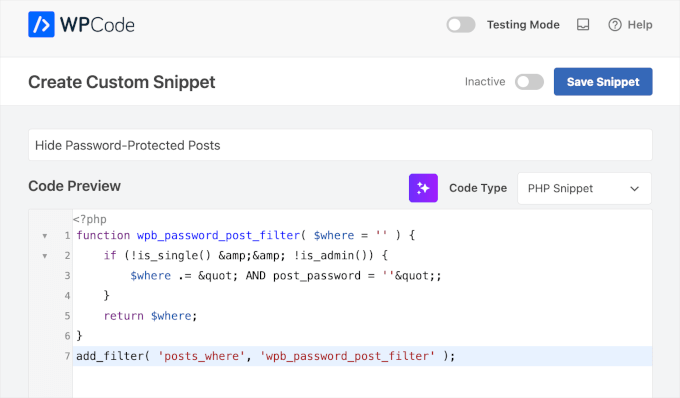
At this point, you’ll need to toggle the ‘Inactive’ switch to ‘Active.’
Then, go ahead and click ‘Save Snippet.’

By default, WPCode will auto-apply the code snippet everywhere on your WordPress site.
Now, if you visit your website, you will see that password-protected posts are no longer visible on the homepage, archives, or in widgets like recent posts.
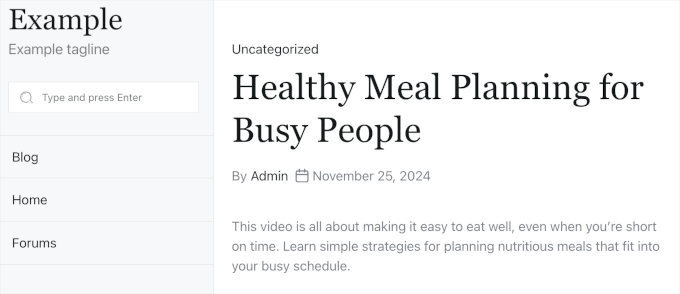
Keep in mind that you can still visit the post by accessing it through a direct URL.
Bonus Tip: Allowing Access to Protected Posts for Specific Users
The example above hides password-protected posts from all users. But what if you ran a multi-author WordPress site and wanted protected posts to be viewable by users with the capability to edit private posts?
Simply modify the above code with another conditional tag like this:
function wpb_password_post_filter( $where = '' ) {
   if (!is_single() && !current_user_can('edit_private_posts') && !is_admin()) {
        $where .= " AND post_password = ''";
    }
    return $where;
}
add_filter( 'posts_where', 'wpb_password_post_filter' );
In this example, we check if a user cannot edit the password-protected posts and only show the posts that don’t have passwords.
By doing so, all users with administrator and editor roles will see the password-protected posts on the front end of your site.
💡 Are you tired of customizing and managing your WordPress website all by yourself? The good news is you don’t have to!
With WPBeginner’s WordPress Maintenance & Support Service, our team of experts will make sure your site is up-to-date, create regular backups, provide around-the-clock uptime monitoring, and more!
Book a free consultation call, or check out all our Professional Services today!
We hope this article helped you hide password-protected posts from the WordPress loop on your site. You may also want to see our tutorial on how to change the prefix of private and protected posts in WordPress and our guide on different ways to protect content in WordPress.
If you liked this article, then please subscribe to our YouTube Channel for WordPress video tutorials. You can also find us on Twitter and Facebook.


David Brown
Thank you for explaining how to *really* do it in code; I wasn’t expecting that from a site called “wpbeginner.com”! (Still works in 2024 and WP 6.5.2, by the way.)
So many sites pretend to offer solutions but really want you to use their plug-in that overcomplicates some simple thing and leaves your site exposed to any vulnerabilities they might introduce and never patch.
WPBeginner Support
It would depend on the site and plugin as plugins can be for simply adding the same code as code from an article without needing to know how to edit files which is why sites recommend them. Glad you found our site and guide helpful
Admin
Rahul Rana
This was very helpful. Thank you very much
WPBeginner Support
You’re welcome glad our guide was helpful!
Admin
Vincent Zhang
Thank you guys so much. This really helped me. I appreciate it. Please keep more of this type of posts coming that do not involve using a plugin.
WPBeginner Support
When a plugin-free solution is available we will be sure to try to include it.
Admin
Louis Burkhardt
Thanks. Works great.
Mark
I created a site specific plugin and followed these steps and it worked for hiding my post on the “Posts” page of my site. However, the post is still visible on a Related Posts widget for each individual post. (Very similar to the image you have above, however my Password protected post is still visible.)
Is there anything I can do to fix this?
Alex
I wanted to make my own code adjustment to show the posts if you could read_private_posts.
function remove_password_protected_posts( $where = ” ) {
if (!is_single() && !current_user_can(‘read_private_posts’) && !is_admin() ) {
$where .= ” AND post_password = ””;
}
return $where;
}
add_filter( ‘posts_where’, ‘remove_password_protected_posts’ );
Great post as usual. Thanks.
Harin
Hi guys
I made a site specific plugin with the following code:
If I try to attach a nextgen gallery to my post, the gallery doesn’t load, as soon as I disable the plugin, the nextgen gallery goes back to normal.
Regards
Brandon
Thanks for this snippet. So helpful!
Regarding hiding these posts from the rss feed, I ran across this snippet.
function rss_filter_protected($query) {

  if ($query->is_feed) {

    add_filter('posts_where', 'rss_filter_password_where');

  }

  return $query;

}

add_filter('pre_get_posts','rss_filter_protected');
Chris
Thanks for that great tip!
But are these posts hidden from the loop with your code snippet also hidden from the RSS feed?
Louis Burkhardt
Based on a single test, the pw protected post is hidden from the RSS feed.