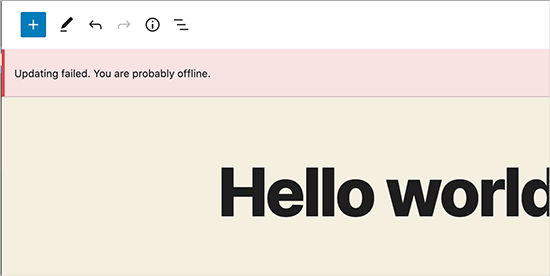
Seeing the WordPress “updating failed” or “publishing failed” error can be frustrating. Many users encounter this issue while trying to edit a post or page. Unfortunately, the error message is vague and doesn’t offer much help, especially for beginners.
We’ve been there, and we understand how this issue can lead to confusion and disrupt your workflow.
The good news is that fixing this problem is easier than it seems. After some trial and error, we’ve found the best way to fix WordPress updating and publishing failures.
In this article, we will walk you through the steps to fix the WordPress updating and publishing failed error. We will also explain what causes these errors and how you can prevent them in the future.
What Causes the Updating Failed or Publishing Failed Error in WordPress?
Failure to communicate with the WordPress REST API causes the updating failed or publishing failed error on a WordPress website.
Basically, WordPress sometimes uses a set of APIs (programming methods) called REST API to send and receive requests to the WordPress database.
If it fails to send and receive those requests, then some parts of your WordPress site may not be able to function. These include the block editor, which uses the API to send updates and publish requests to WordPress.
Why Is WordPress Unable to Use the REST API?
You might be wondering: if I didn’t make any changes to my website, then why did the REST API stop working on its own?
There are a number of scenarios that can prevent WordPress from using the REST API. For example, you may not be connected to the internet or have lost connectivity.
Other reasons may be a little more complicated. For instance, you may have accidentally changed the site URL, a WordPress plugin might be causing the issue, or a third-party service may be blocking the API calls.
With that in mind, we’ll take a look at how to troubleshoot and fix the WordPress updating failed error. You can use these quick links to jump between the methods:
- Step 1: Check Your Internet Connection and Site URL
- Step 2: Update Your WordPress Software
- Step 3: Check REST API Status Using WordPress Site Health
- Step 4: Disable All Your WordPress Plugins
- Step 5: Check Website Firewall Service
- Step 6: Enable and Review the WordPress Debug Log
- Step 7: Temporarily Switch to the Classic WordPress Editor
- Step 8: Increase Your PHP Memory Limit
- Final Step: Ask for Support
💡 Is your WordPress site giving you trouble? Relax, we’ve got your back! Our on-demand Emergency WordPress Support team is ready to tackle any issue and get your site back online fast. No need for long-term contracts, just quick, one-time fixes for whatever problem you face. Schedule a call, and let us fix it for you today!
Ready? Let’s jump right in!
Step 1: Check Your Internet Connection and Site URL
The most common cause of a WordPress publishing failed or updating failed error is losing the WiFi connection. If your computer loses the internet connection while you are writing a blog post, WordPress will fail to save your changes.
So, you’ll want to make sure you are connected to the internet by visiting other websites in a new browser tab.
If your internet is working fine, then the next thing you need to check is your WordPress site URL settings.
Simply go to the Settings » General page and ensure the ‘Site Address’ and ‘WordPress Address’ options are correct. For most websites, you should have the same URLs in both fields.
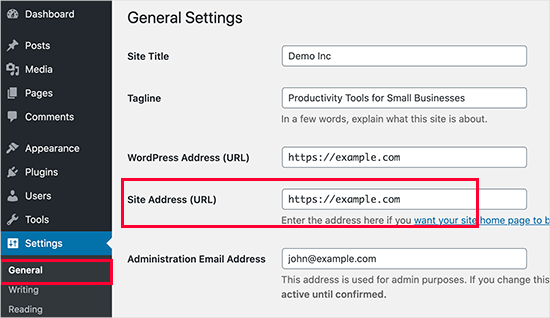
If your site URL settings look good and you are connected to the Internet, you can move on to further troubleshooting.
Step 2: Update Your WordPress Software
Sometimes, the updating failed or publishing failed error may occur because you’re using an outdated WordPress version.
An outdated WordPress core can sometimes contain bugs that can interfere with various functionalities, including publishing. Using the latest WordPress version, you can eliminate these bugs and potentially resolve the publishing failed error.
You can check out these guides about WordPress updates for more information:
- Beginner’s Guide: How to Safely Update WordPress
- How to Check and Update to the Latest WordPress Version
- Should I Update WordPress or Plugins First? (Proper Update Order)
- How to Better Manage Automatic WordPress Updates
In case it doesn’t help, you can continue to the following step.
Step 3: Check REST API Status Using WordPress Site Health
WordPress comes with a built-in site health tool, which shows important information about your site’s security and performance.
Simply go to the Tools » Site Health page to view the report. If the REST API is not working, then you will see it under recommended improvements, such as ‘The REST API encountered an unexpected result.’
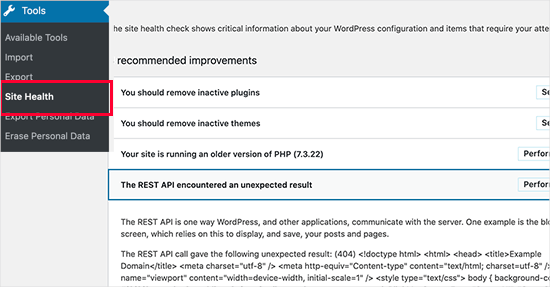
It might also show you some debugging information, explaining what happened when WordPress made the REST API call. Studying this may give you clues about which plugin or third-party service is causing the issue.
However, if it doesn’t give you any clues, then you can move on to the next step.
Step 4: Disable All Your WordPress Plugins
If a WordPress plugin is causing the REST API to misbehave, then the easiest way to find it out is by deactivating all your WordPress plugins.
You can go to the Plugins » Installed Plugins page and check the box at the top to select all plugins. After that, you’ll want to use the ‘Bulk Actions’ dropdown, select ‘Deactivate,’ and then click ‘Apply’ to deactivate all plugins.
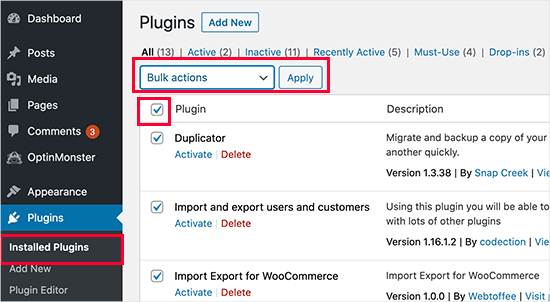
Next up, you can go to the post editor screen and try to update the post. If the ‘Updating Failed’ error disappears, then this means that one of your plugins was causing the issue.
You can now start activating your WordPress plugins one at a time and try to reproduce the error. Once you find the plugin causing the issue, you can seek support from the plugin author or find an alternative plugin.
On the other hand, if disabling all WordPress plugins didn’t remove the error, then let’s proceed to the next step.
Step 5: Check Website Firewall Service
If you are using a website firewall service like Cloudflare or Sucuri, then there is a chance that these services may block REST API requests.
This could happen if their firewall filters consider your IP address to be suspicious. They may also block REST API requests if your website is currently facing a DDOS attack.
If you are using Cloudflare, you can temporarily disable it to see if it resolves your issue. Typically, you can find your hosting’s Cloudflare settings in the ‘Domains’ section of your hosting account dashboard.
If you are using Sucuri, then you can reach out to their support team, and they can whitelist your IP address or let you know what’s causing the issue.
Plugins and firewall services are the most common cause of the updating failed error. However, if you still see the WordPress updating failed error, there are a few more things you can do.
Step 6: Enable and Review the WordPress Debug Log
WordPress comes with a built-in feature to keep a log of all WordPress errors. It does not log the REST API errors, but it will help you see if there are some other issues that may be causing the error.
Simply add the following lines to your wp-config.php file:
// Change WP_DEBUG to true

define( 'WP_DEBUG', true );

// Keep a log of WordPress errors

define( 'WP_DEBUG_LOG', true );
Don’t forget to save your changes and upload the file back to your server. For more information, check out our guide on how to easily enable WordPress debug mode.
You can now try publishing or updating a WordPress post to reproduce the error.
The next step is to connect to your WordPress hosting account using an FTP client and go to the wp-content folder. From here, simply download the debug.log file to your computer.
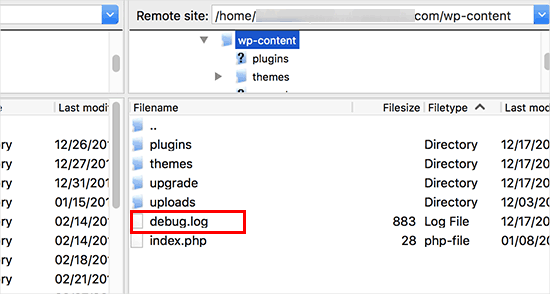
Next, you must open the debug file in a plain text editor like Notepad.
It may contain a few errors, warnings, or notices caught by WordPress as you worked on your site or a user visited it.
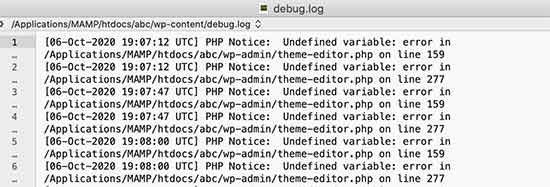
If you see something pointing to a plugin or theme file, then this can be a useful hint. You can then mention this error when asking for support on WordPress.org forums or from your hosting provider.
Step 7: Temporarily Switch to the Classic WordPress Editor
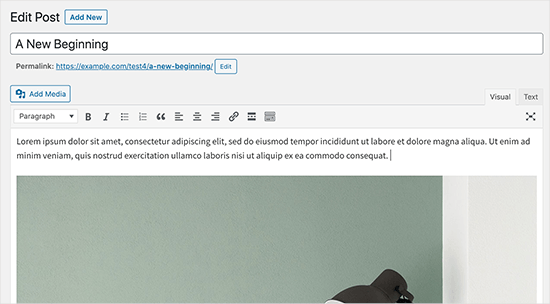
Enabling the classic editor, which is the old WordPress editor that does not rely on the REST API to update and publish content, is a temporary solution to this error.
You can enable it by simply installing and activating the Classic Editor plugin.
For more details, see our step-by-step guides on how to enable the classic editor in WordPress and how to disable Gutenberg.
Upon activation, you can simply edit the post you were working on. You can then save and publish it without seeing the updating failed or publishing failed error in WordPress.
Step 8: Increase Your PHP Memory Limit
The publishing process in WordPress can involve complex tasks like image processing, plugin execution, and database interaction. All these activities require memory to function properly.
When the PHP memory limit is reached during publishing, WordPress may not be able to allocate enough resources to complete the task. This can result in various errors, including failing to publish and update.
To solve this problem, you can increase the PHP memory limit to give WordPress more breathing room to handle the publishing process.
You can read our guide on how to fix the WordPress memory exhausted error for more information.
Final Step: Ask for Support
If all else fails, then you may need to ask for support. You can start by directly contacting your hosting provider. They have access to server logs and additional tools. The error could also be caused by a misconfigured server or glitch on their end.
You can also seek help on WordPress.org forums or the WPBeginner Facebook Group, where other experts and users can help you fix the error.
For more details, feel free to see our article on how to properly ask for WordPress support and get it.
We hope this article helped you fix the WordPress updating failed or publishing failed error. You may also want to bookmark our complete guide on the most common WordPress errors and how to fix them or our complete WordPress troubleshooting guide.
If you liked this article, then please subscribe to our YouTube Channel for WordPress video tutorials. You can also find us on Twitter and Facebook.


Shahed Hossain Prem
Thanks man nice and Helpful Article i was encountering this problem this article has help me
WPBeginner Support
Glad to hear our article was helpful!
Admin
Panneer
Thank you for your support.
WPBeginner Support
Glad we could help!
Admin
Gabor Horvath
Thank you for the detailed article.
For me the Updating Failed error was caused by two special emoji-like characters at the end of my blogpost. I deleted them and now everything works fine.
Sunday Zuoke
This is exactly the issue I had. Thanks for pointing that out.
Jiří Vaněk
Thank you for the instructions and description of possible errors. He encountered this problem once. I finally found out that the Twitter feed plugin was causing the problem. So it helped to deactivate the plugin and everything went well. But I can ask about another thing related to the update. Practically every time I update the WordPress core, everything goes fine, but the process says that no key was found. I still haven’t found what the problem is.
WPBeginner Support
From the sound of the error you may want to check any reCAPTCHA you have on your site as that is the first thing that comes to mind.
Admin
Jiří Vaněk
Thank you. Yes, two plugins use reCAPTCHA. I’ll see if there’s a problem here and thanks for the push forward.
Morteza
Hi
Thanks for your useful article…
I troubleshoot this issue by adding a shorter URL for permalink. It seems using long permalink caused the problem..
Regard
WPBeginner Support
Thank you for sharing the issue you ran into in case someone else has the same problem
Admin
Barney Davey
Thanks for the tips. I deactivated all plugins, and the error went away. Then I activated them one at a time and never found the problem. All plugins are active, and the error is gone. Fixed but without knowing the cause. I’ll take that over stressing to fix the problem any day.
WPBeginner Support
While knowing the error would be good, we’re glad to hear you were able to solve the issue!
Admin
A Stuart
I had a major issue with this.
Then I realized I timed out and just logged back in on a new window. I imagine might have lost my work to be updated if I used a separate tab or different machine to log in.
Go figure!
WPBeginner Support
Thanks for sharing your experience with this!
Admin
George Aprilov
Thank you for your advice! I reached Step 3 and followed the tedious process of deactivating and activating the plugins one by one. Finally, I found out that WooCommerce was the reason. Thanks!
WPBeginner Support
Glad our article was able to assist!
Admin