Are you seeing the ‘Upload: failed to write file to disk’ error when uploading files in WordPress?
This common error can be very frustrating for beginner users because it prevents you from uploading files to your WordPress site.
In this article, we will show you how to fix “Upload: failed to write file to disk” in WordPress.

Expert Tip: Are you sick of dealing with WordPress errors and ongoing maintenance tasks? Our WPBeginner Maintenance Services can take care of everything from updates to uptime monitoring so that you can focus on growing your business. Plus, you’ll have access to a 24/7 support team!
What Causes the Failed to Write File to Disk Error in WordPress?
This WordPress error can happen due to a number of reasons. However, the most common one is incorrect folder permissions.
Each file and folder on your website has a set of permissions. Your web server controls access to the files based on these permissions.
Incorrect permissions for a folder can take away your ability to write files on the server. This means your web server cannot create or add new files to that particular folder.
If you try to upload images or any other files from the WordPress admin area, then you will get one of the following error messages:
- WordPress failed to write to disk.
- WordPress has failed to upload due to an error failed to write file to disk.
- Unable to create directory wp-content/uploads/2016/03. Is its parent directory writable by the server?
With that being said, let’s look at how to troubleshoot the ‘Upload: failed to write to disk’ error in WordPress.
How to Fix the Upload Failed to Write to Disk Error in WordPress
First, you need to connect to your WordPress website using a FTP client.
For this tutorial, we are using the free FileZilla FTP client. If you are using some other FTP client, then the interface might look a little different.
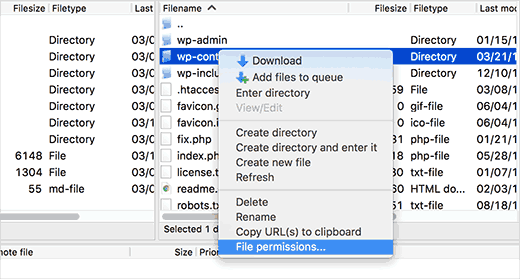
Once you are connected, you need to right-click on the wp-content folder and select ‘File permissions’.

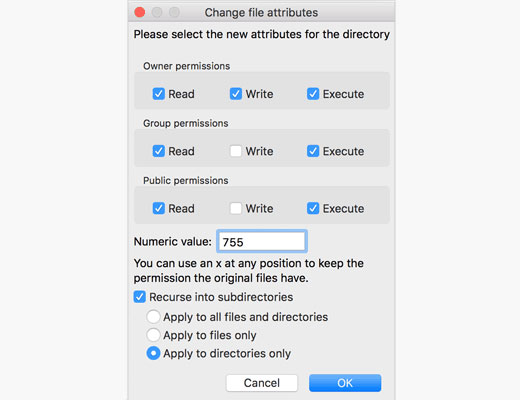
This will bring up the file permissions dialog box in your FTP client.
It will show you file permissions for the owner, group, and public.

You need to enter 755 into the Numeric value field.
After that, you must check the box next to ‘Recurse into subdirectories’.
Next, you need to click on ‘Apply to directories only’ option and then click the ‘OK’ button to continue.
Your FTP client will now set folder permissions to 755 and apply it to all sub-folders inside wp-content. This includes the uploads folder where all your images are stored.
You also want to make sure that file permissions for individual files in your wp-content folder are correct.
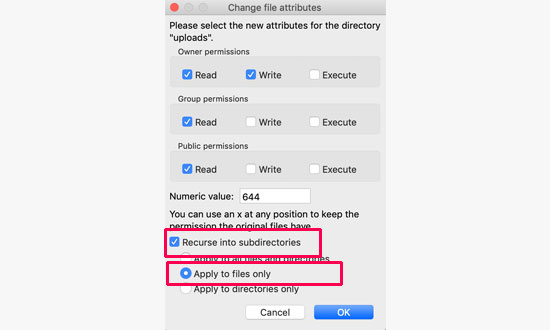
Once again, right-click on the wp-content folder and select ‘File permissions’. This time, we will change permissions for files.
Enter 644 into the Numeric value field and then check the box next to ‘Recurse into subdirectories’.
Now, click on the ‘Apply to files only’ option.

Click on the ‘OK’ button to continue. Your FTP client will now set file permissions to 644 for all files in the wp-content folder.
You can now visit your WordPress website and try uploading files.
If you still see the error, then you will need to contact your WordPress hosting provider and ask them to empty the temporary files directory.
WordPress uploads your images using PHP, which first saves the uploads to a temporary directory on your web server. After that, it moves them to your WordPress uploads folder.
If this temporary directory is full or poorly configured, then WordPress cannot write the file to disk.
This temporary folder is located on your server, and in most cases, you cannot access it using FTP. You will need to contact your web host and ask them to empty it for you.
We hope this article helped you resolve the ‘Upload: failed to write file to disk’ error in WordPress. You may also want to see our guide on how to fix common image issues in WordPress and our expert picks of the best WordPress plugins to grow your website.
If you liked this article, then please subscribe to our YouTube Channel for WordPress video tutorials. You can also find us on Twitter and Facebook.


Jiří Vaněk
Do I understand correctly that folders need to have 755 permissions so that PHP can write to them, i.e., upload files, but the files themselves need to have 644 permissions so that no one can exploit them by writing to them? Is that right? Or why should files have different permissions than folders?
WPBeginner Support
That is correct.
Admin
kehinde
i have try this process and still cant upload files
Farukh
Hello,
I am extremely confused. You repeated same process two times. First you changed file permissions of wp-content folder 755. Second you change the file permissions of wp-content folder to 644. You could change to 644 first time. Why twice. Confused please tell exactly what you did.
WPBeginner Support
Hey Farukh,
These are not the same process. First you would set folder permissions recursively to 755 for wp-content and all folders inside it, and then you set file permissions to 644 for all the files inside wp-content folder.
Admin
Felipe
Just give more space to your web hosting account
Kristin Larsen
I wanted to also let anyone who may be Googling this issue there is another cause specific to BlueHost users. Every once in a great while, if you’re on a shared hosting / cloud hosting environment, BlueHost’s temporary folder that holds browser uploads will fill up and prevent anyone from adding new images/uploads. If that happens, just call their tech support and ask them to empty their temporary folder. That will solve the issue. There’s nothing on our end that we can do as a user to clear it or prevent it.
Ivy
Thank you SO much for this comment. This just saved me so much time. My client uses BlueHost and I am building them a new website. I have never worked with BlueHost or run into this problem before until now.
Ashlee
Are there any other things to check after this process. All permissions are correct I uploaded one day and then the next day I couldn’t upload (no HTML changed) the temporary files have been cleared.
Thank you.