‘The link you followed has expired’ error usually appears when you’re trying to upload a large theme or plugin file to your WordPress site. This error doesn’t give many clues about what’s wrong, which is why WordPress beginners often find it difficult to resolve.
But thankfully, we’ve experienced various common WordPress errors before, and we know how to troubleshoot and fix them effectively. We’ve compiled the most reliable solutions in this guide.
In this article, we will show you how to easily fix ‘the link you followed has expired’ in WordPress.
What Causes ‘The Link You Have Followed Has Expired’ Error?
‘The link you followed has expired’ error usually occurs when you are trying to upload a WordPress theme or a plugin that is bigger than the file size limits set by your WordPress hosting provider.
Here’s what the message looks like:

Web hosting companies control the size of files you can upload to WordPress to improve the overall performance of your web server. You see, large files can cause your website to become unstable or slow.
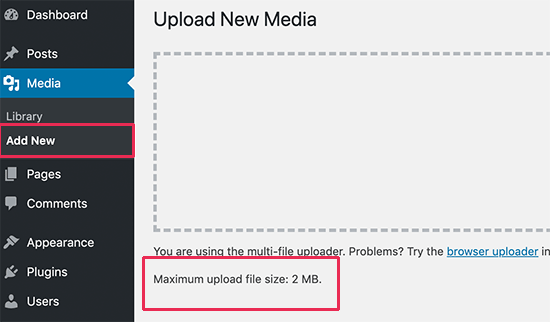
You can see the file size upload limit by visiting the Media » Add New page from your WordPress dashboard.
That being said, if these settings are too low, or you are trying to upload a larger file, then you may see errors like the memory exhausted error or the maximum execution time exceeded error.
And if you are trying to upload a WordPress theme or plugin, then the error you will see is ‘The link you followed has expired’.
With that in mind, let’s take a look at how to easily fix this problem.
Fixing ‘The Link You Have Followed Has Expired’ Error
The quickest way to fix ‘The link you followed has expired’ is by increasing the file upload size, PHP memory, and execution time limits for your WordPress website.
There are multiple ways to do that. We will show you all of them, and you can choose the one that looks easier and works in your hosting environment.
You can use the quick links below to jump to the method you want to use:
- Method 1: Increase Limits Using WPCode (Recommended)
- Method 2: Increase PHP Memory Limit in wp-config.php
- Method 3: Increase Limits in the .htaccess File
- Method 4: Increase Limits in the php.ini File
- Method 5: Update Your PHP Version
- Method 6: Check for Plugin Conflicts
- Method 7: Contact Your Hosting Provider
- Learn More Ways to Troubleshoot WordPress
Method 1: Increase Limits Using WPCode (Recommended)
Increasing limits in the functions.php file can be easy, but this method has a downside. Your site will return to the old limits if you change or update your WordPress theme.
That’s why we recommend using WPCode instead.
WPCode is the best code manager plugin for WordPress that allows you to add code snippets anywhere on your website without editing theme files like functions.php. That way, any customizations you make won’t be lost when you update or change your theme.
First, you will need to install and activate WPCode. For more details, please see our beginner’s guide on how to install a WordPress plugin.
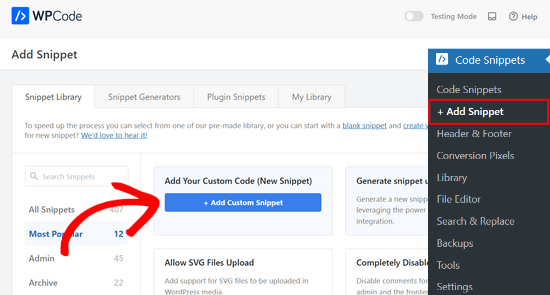
Once the plugin has been activated, simply go to Code Snippets » Add Snippet from your admin area.
This will take you to the built-in Snippet Library. From here, find the ‘Add Your Custom Code (New Snippet)’ option and click the ‘+ Add Custom Snippet’ button underneath it.
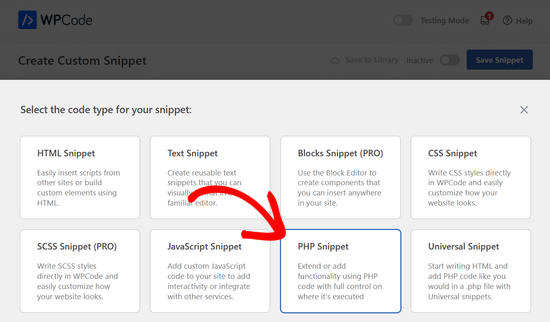
Next, you need to select ‘PHP Snippet’ as the code type from the list of options that appear on the screen.
After that, add a title for your snippet, which can be anything to help you remember what the code is for.
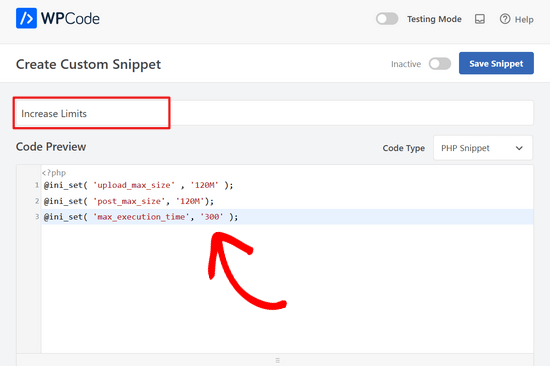
Then, copy and paste the following code into the ‘Code Preview’ box:
@ini_set( 'upload_max_size' , '120M' );
@ini_set( 'post_max_size', '120M');
@ini_set( 'max_execution_time', '300' );
In this code, we’ve increased the limits to 120 megabytes for upload and post sizes and the execution time to 300 seconds.
Feel free to adjust the values in upload_max_size and post_max_size to be more than the file you are trying to upload. You can also increase the max_execution_time to the time you think it would take for the file to upload.
Finally, you will need to toggle on the code snippet to make it active on your website.
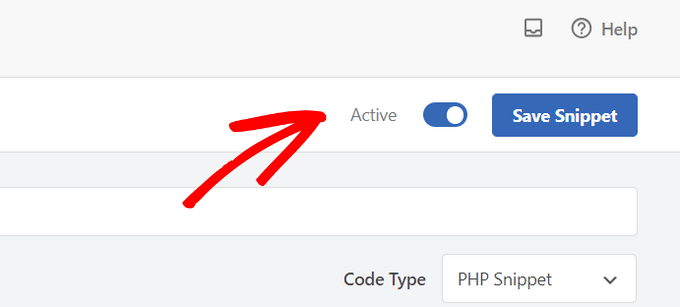
For more details, please see our guide on how to easily add custom code in WordPress.
Method 2: Increase PHP Memory Limit in wp-config.php
This method provides an alternative approach to increasing resource limits compared to the WPCode plugin.
While the WPCode plugin offers a user-friendly interface to manage code snippets without modifying core theme files, editing the wp-config.php file directly affects your WordPress core configuration.
You will need to use an FTP client or the File Manager app in cPanel to access your website files and locate the wp-config.php file.
For detailed instructions on finding and editing this file, check out our guide on how to find and edit the wp-config.php file.
Once you’ve accessed the wp-config.php file, open it for editing and paste the following line just before the line that says That's all, stop editing! Happy blogging.:
define( 'WP_MEMORY_LIMIT', '256M' );
This code tells WordPress to allocate 256MB of memory for your website. You can adjust the value in the ‘WP_MEMORY_LIMIT’ line to a higher amount if needed, but we recommend starting with this value first.
For more information about increasing PHP memory limits, check out our guide on how to fix WordPress memory exhausted error.
Method 3: Increase Limits in the .htaccess File
Another way to increase your PHP resource limits is to edit .htaccess, which is a core WordPress file.
Simply connect to your website using FTP or open your File Manager app and locate the .htaccess file in the root or public_html folder. Then, open it to edit it using a code editor.
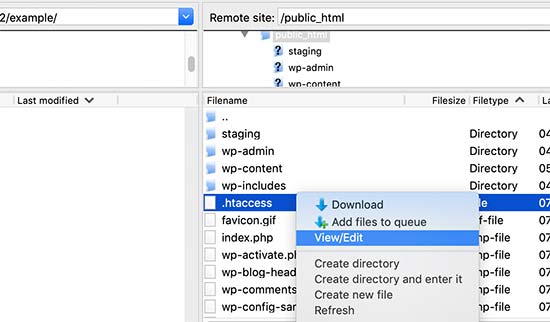
Now, you need to add the following lines of code at the bottom of your .htaccess file:
php_value post_max_size 128M
php_value max_execution_time 300
php_value max_input_time 300
Like the previous method, you can adjust the values to be more than the file you are trying to upload.
Finally, don’t forget to save your changes and upload the file back to your website.
Method 4: Increase Limits in the php.ini File
The php.ini file is a configuration file used by PHP and WordPress. You will need to connect to your WordPress site using an FTP client and look for the php.ini file in your site’s root directory.
Most users are on a shared hosting account, so they may not find this file in their site’s root folder. In that case, you will need to create a blank php.ini file using a plain text editor like Notepad and upload it to your website.
Now, edit the php.ini file and add the following code inside it:
upload_max_filesize = 128M
post_max_size = 128M
max_execution_time = 300
Don’t forget to save your changes and upload the file back to your website.
You can now visit your website and try to upload the theme or plugin file again. The error should disappear, and you should be able to upload the file.
If it doesn’t, go ahead and try the next method.
Method 5: Update Your PHP Version
Besides the previous methods, updating the PHP version can potentially fix the ‘The link you followed has expired’ error in WordPress. This is because an outdated PHP version can cause compatibility issues, which might lead to this error.
To safely do this for your website, check out our guide on how to update your PHP version in WordPress.
Method 6: Check for Plugin Conflicts
In rare cases, the ‘The link you followed has expired’ error might be caused by conflicts between WordPress plugins. Plugins can sometimes interact with each other in unexpected ways, potentially leading to issues with resource usage or how WordPress handles file uploads.
To see if a plugin conflict is causing the error, you can try deactivating all your plugins and then reactivating them one by one.
Navigate to the Plugins section in your WordPress dashboard. Select all plugins using the checkbox at the top, choose ‘Deactivate’ from the bulk actions dropdown menu, and click ‘Apply.’
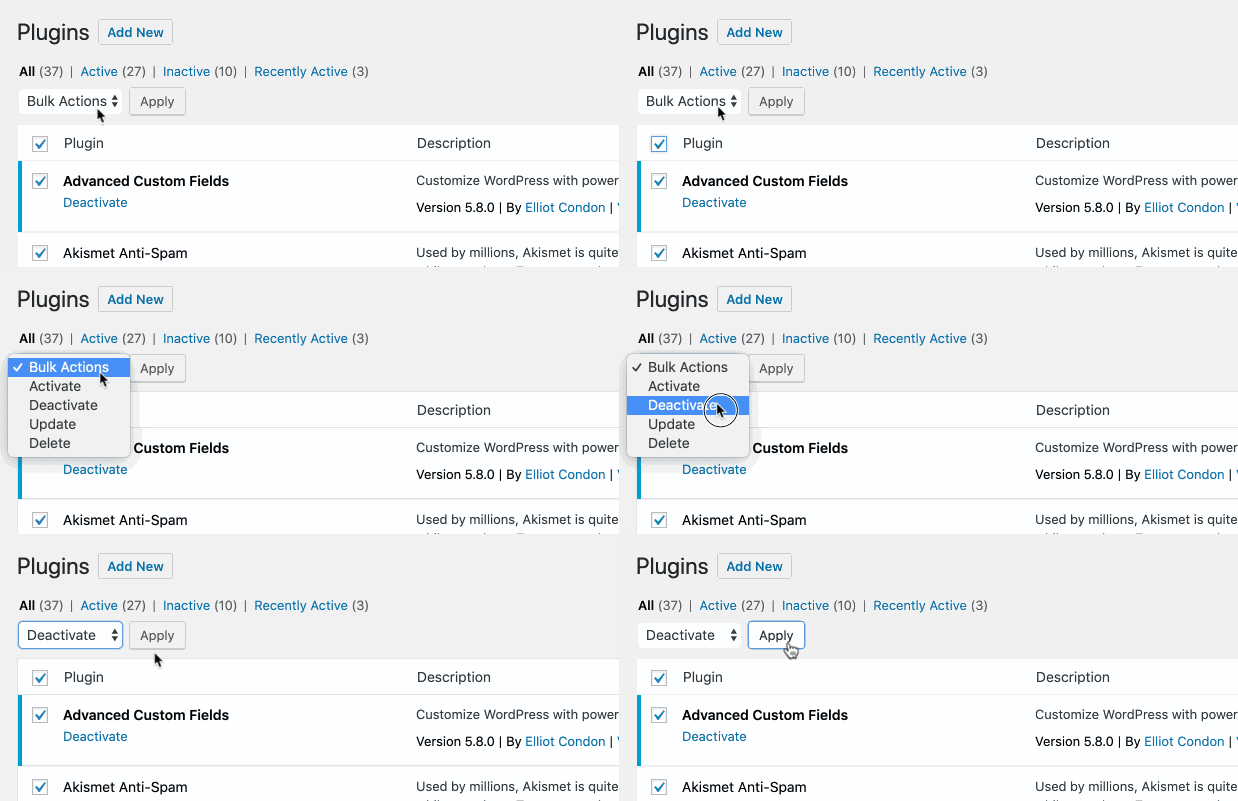
Try uploading the file again. If the error disappears, you know the conflict lies with the deactivated plugins. Now, reactivate each plugin one by one, testing the upload functionality after each activation.
Once the error reappears, you’ve likely identified the problematic plugin. From here, you can reach out to the plugin developer’s support for troubleshooting assistance.
If the error prevents you from accessing the WordPress admin area, don’t worry. You can refer to our guide on how to deactivate WordPress plugins when you cannot access the admin area.
Also, do note that outdated plugins can sometimes contribute to conflicts. Keeping your plugins updated to the latest versions can help minimize compatibility issues.
Method 7: Contact Your Hosting Provider
If all of the methods above do not work, then you may need to contact your WordPress hosting provider to see if the problem is on their end. If this is your first time asking for WordPress assistance, read our guide on how to get WordPress support the right way.
Alternatively, you can hire WPBeginner Pro Services’ premium WordPress support solution. Our experts will thoroughly look into your website and address the problem.
We also have WordPress maintenance services if you want all of your security and speed optimization tasks taken care of.
Book an appointment with our experts today and see how we can help you out.
Learn More Ways to Troubleshoot WordPress
Experiencing other errors on your website? Check out these guides to troubleshoot WordPress:
- How to Fix the WordPress White Screen of Death (Step by Step)
- How to Fix the 500 Internal Server Error in WordPress
- How to Fix WordPress Posts Returning 404 Error (Step by Step)
- How to Fix the HTTP Image Upload Error in WordPress (Easy)
- How to Fix the Error Establishing a Database Connection in WordPress
- How to Fix cURL Error 28: Connection Timed Out After X Milliseconds
- How to Fix “PHP Missing MySQL Extension” Error in WordPress
We hope this article helped you easily fix ‘The link you followed has expired’ in WordPress. You may also want to bookmark our guide on how to fix the most common WordPress errors and check out our list of the most common block editor problems.
If you liked this article, then please subscribe to our YouTube Channel for WordPress video tutorials. You can also find us on Twitter and Facebook.


Mohammed Sathik
For me Method 3 worked… Thank you mate
WPBeginner Support
Glad our guide was helpful
Admin
Syed Shan Shah
Nothing worked for me.
WPBeginner Support
If none of the methods from our guide were able to assist then we would recommend reaching out to your hosting provider to ensure they don’t have a setting on their end that is overriding your attempts.
Admin
Kevin
What worked for me was to create a .user.ini file in the public_html folder and put the code mentioned above for php.ini
WPBeginner Support
It would depend on how your server is set up as not all servers allow user.ini but that is good to know for servers that do
Admin
Jiří Vaněk
Editing limits using the .user.ini file also works on Linux. The directives are very similar. Some providers also prefer the user.ini file to the .htacess file. Thanks for the great video. In the end, it helped me to raise the limits only through the mentioned .user.ini.
WPBeginner Support
You’re welcome
Admin
Steve
Doesn’t work. I’ve run into this before and got it to work but it was awhile back. searched Google and found these instructions but they don’t work for my site.
WPBeginner Support
If none of the methods in our guide were able to help you, please reach out to your hosting provider and they should be able to assist.
Admin
Shane O'Sullivan
I am running Wordpress on my iMac at localhost:8888 but changing the sizes in wpcode made no difference. After editing the htaccess file, I was able to upload the theme, so cheers
WPBeginner Support
Glad to hear you were able to solve the issue!
Admin
Himesh
I followed every single step as mentioned to work around the problem of uploading a theme to wordpress when upload limit was too low. Used the WP Code Snippet to increase the limits and still the same message: “link expired”
WPBeginner Support
If our recommendations do not work for you, please reach out to your hosting provider and they should be able to assist with this issue.
Admin
Gabriel
I am using GCP.
It works only after modifying php.ini under fpm, and restart php-fpm
Modifying .htaccess would lead to internal server error.
WPBeginner Support
Thank you for sharing what worked for you!
Admin
Gary
I tried 3 methods all. But the limit value was not changed.
On the ‘Add New’ page from ‘Media’, the Maximum upload file size is still 2MB.
Do I need to restart service or something?
Please help me.
WPBeginner Support
Your hosting provider may be overriding the max file size, if you check with your host they should be able to assist!
Admin
Michael Douglas
Thanks for the help. This took care of the issue for me.
WPBeginner Support
Glad our guide was helpful!
Admin
Bernard
Very helpful thank you.
WPBeginner Support
You’re welcome!
Admin
Ry
Thank you!
Used .htaccess method.
WPBeginner Support
You’re welcome, glad that our recommendations were able to assist!
Admin
Syed Nauman Sajid
Brilliant and perfectly worked for me.
WPBeginner Support
Glad our guide could help!
Admin
Bob
People should check their settings. I left the M off from 128M. Really stupid but that was my issue.
WPBeginner Support
Everyone can make a typo like that but we’re glad you were able to find and solve the issue for you
Admin
Art Bejarano
I’m having an issue: I’ve added the htaccess text at the end and it did not work. I removed any formating on the text and it still did not work. I need help.
Ann
I tried all the steps but I still have the issue. I have the issue every time I click on save/submit. For example, update WordPress version. Enable debug mode in Elementor. Disable all plugins.
Please help to let me know how can I fix it, please.
Anurodh Keshari
In my dashboard Maximum upload file size is 512 MB. but still, I’m facing this issue but I’m facing this issue while deactivating the plugin… can you help me…
WPBeginner Support
You would want to check with your hosting provider to ensure they are not overriding any of your changes.
Admin
Cesar Puente
This guide helped me a lot. I had this problem with local WordPress. I couldn’t upload my customize theme to test it.
Thank you so much.
WPBeginner Support
Glad our recommendations were able to help
Admin
Akin
Method 2 worked for me like charm. Thank so much for this.
WPBeginner Support
Glad our recommendation helped you
Admin
Carly
Worked perfectly – thanks so much!
WPBeginner Support
Glad our guide was helpful
Admin
Tasmim
Really good suggestion. works really fine now
WPBeginner Support
Glad our recommendation helped
Admin
elijah
which location should i post the method one which line
WPBeginner Support
We would recommend taking a look at our guide below for understanding how to paste snippets:
https://www.wpbeginner.com/beginners-guide/beginners-guide-to-pasting-snippets-from-the-web-into-wordpress/
Admin
Tudor
It worked, thank you!
WPBeginner Support
Glad our guide was helpful
Admin
Andri
Thanks very much Method 3 worked.
But, Server error when I edit the .htaccess file and Adding to functions.php doesnt work.
WPBeginner Support
Glad our guide was helpful, if any of the methods don’t work then we would recommend checking with your host as those are settings that may be getting ignored due to server settings.
Admin
Rush
Thanks for help!
WPBeginner Support
You’re welcome
Admin
Khan
METHOD 2 worked perfectly.
I was trying to install the elegant theme
Thanks Brother!
WPBeginner Support
Glad our guide could help
Admin
Theo
Thank you, that was most helpful. I modified .htaccess.
WPBeginner Support
Glad our guide was able to help
Admin
Nathan
I get a 500 Internal Server error when I edit the .htaccess file. How do I add the code without getting this error. Adding to functions.php doesnt work for me
WPBeginner Support
Some workarounds for that specific error message can be found in our article below:
https://www.wpbeginner.com/wp-tutorials/how-to-fix-the-internal-server-error-in-wordpress/
Admin
Ravi
Many thanks, your method 2 worked for me on 04-JULY-2020. I have added following code before the tag:
php_value upload_max_filesize 128M
php_value post_max_size 128M
php_value max_execution_time 300
php_value max_input_time 300
WPBeginner Support
Glad our recommendation was helpful
Admin
James Voufo Safor
Thank you so much. This really worked!
I followed the second method and now I have the theme installed.
Keep doing what you do.
WPBeginner Support
Glad our guide could help
Admin
kwaku Vesper
thanks very much it worked
WPBeginner Support
You’re welcome, glad our guide could help
Admin
Waqar
Did all these methods but still getting the error
Don’t know what else to do
WPBeginner Support
You may want to reach out to your hosting provider to ensure they’re not overriding the changed you’re making and that they don’t see any errors from their end.
Admin
Steve
Sadly this explanation does not indicate in which folder the php.ini should be located/placed
WPBeginner Support
Apologies if our explanation was not clear, the php.ini should be in your site’s root folder.
Admin
Mark Ferguson
I have a client having this issue but only on the woocommerce login form. If you click link to try again it works. Any ideas?
WPBeginner Support
If the methods in this article and resaving your permalinks does not fix the issue, you would want to reach out to WooCommerce for assistance.
Admin