
The ERR_CONNECTION_RESET error is something we’ve seen many times. Recently, it hit one of our business sites during an important marketing campaign.
Instead of doing something drastic, we followed our usual troubleshooting steps. It does look scary, but it’s often caused by small issues that are easy to fix.
Since 2009, we’ve calmly handled countless WordPress site hiccups, including this one. Whether it’s a server glitch, a plugin problem, or a browser setting, there’s always a way to get your site back online.
In this guide, we’ll walk you through the exact steps we use to fix the ERR_CONNECTION_RESET error. These same steps have helped thousands of our readers get their sites back online in a flash.
What Is the ERR_CONNECTION_RESET Error in WordPress?
The ERR_CONNECTION_RESET error is something we’ve encountered, particularly in Google Chrome.
This error occurs when the browser manages to contact a website but fails to properly set up the connection to receive data.
As a result, the browser resets the connection, which prevents the server from sending data back to the browser. This can cause significant frustration for both site owners and visitors.
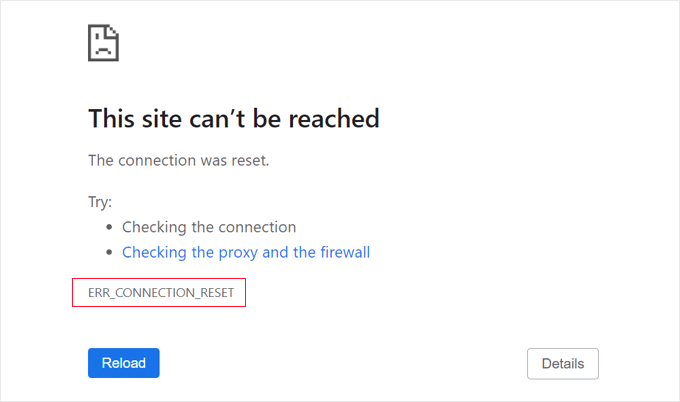
📝Note: Other browsers may show a similar message with different wording, such as “The connection was reset.”
While many WordPress errors are common, this message can be vague and doesn’t offer clear guidance. Beginners may find it particularly troublesome when it blocks access to their own website, including the WordPress admin area.
In our experience, this error typically indicates that the WordPress website is working, but something on the user side—usually the browser or internet connection—is preventing access.

🚨 Site Down? We’ve Got Your Back!
WordPress issues like ERR_CONNECTION_RESET strike at the worst times, but you don’t have to fix them alone. Our Emergency WordPress Support service jumps in fast to get your site back online, safe, and working like normal.
Now, let’s go through the steps to troubleshoot and fix the ERR_CONNECTION_RESET error in WordPress. You can follow the steps below or use the quick links for faster navigation:
- Make Sure the Website Is Working
- Restart Your Internet Connection
- Clear Your Browser’s Cache
- Turn Off Experimental Chrome Features
- Disable Your Computer’s Firewall and Antivirus
- Reset Your VPN Software
- Disable Your Proxy Server
- Clear Your DNS Cache
- Change Your DNS Server
- Reset Your TCP/IP Settings
- Hire Professional WordPress Help
- More DIY Help for Fixing WordPress Errors 🛠️
Make Sure the Website Is Working
Most of the time, the ERR_CONNECTION_RESET error is caused by something on your computer or network. But before jumping into fixes, it’s smart to check if the site is actually online.
We’ve come across a few cases where the site itself was down. You can use the free uptime checker tool from IsItWP to confirm if your site is working for everyone else.
Just visit the Website Uptime Status Checker and enter your site’s URL.
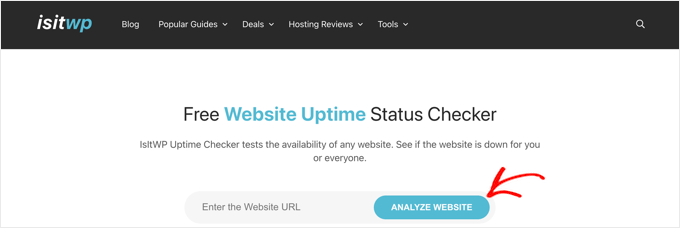
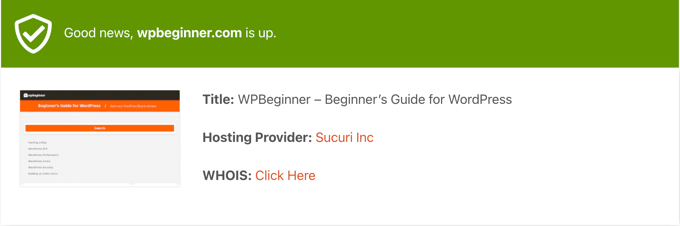
The tool will run a quick test and tell you if the site is up or down. It only takes a few seconds.
If the site is down, then you’ll need to wait until it comes back online before doing anything else.
If it’s your own website, it’s best to contact your WordPress hosting provider and let them know there’s an issue.
For extra peace of mind, you can even set up automatic alerts. Here’s our full guide on monitoring your WordPress site’s uptime.
If the tool shows your site is working fine, then the problem is likely on your side. Don’t worry — we’ll walk you through how to fix it step by step.
Restart Your Internet Connection
We’ve found that the simplest fix is often the one that works. Restarting your internet connection can quickly clear up network hiccups that cause this error.
Start by shutting down your computer. Then, turn off your modem and router, and wait for at least one minute.
Turn everything back on, wait for the connection to stabilize, and try visiting the site again. Sometimes, that’s all it takes.
Clear Your Browser’s Cache
Browsers store cached files to speed things up. But if those files go bad, they can stop your site from loading properly.
We’ve run into this many times. Luckily, clearing the browser cache is quick and easy.
First, try a hard refresh to reload the page without using the cache. On Windows, press CTRL + SHIFT + R. On a Mac, use CMD + SHIFT + R.
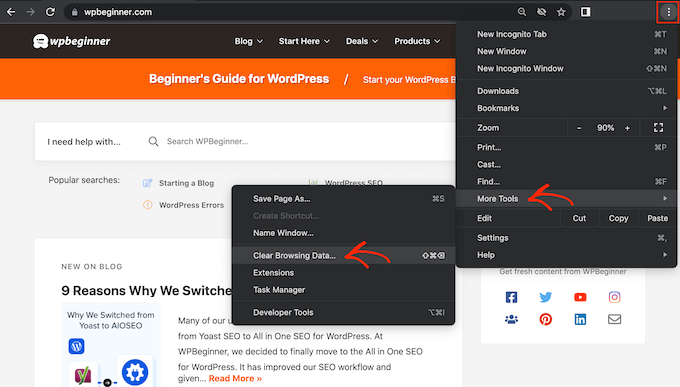
If that doesn’t work, then clear the cache completely. In Google Chrome, click the three-dot icon in the top-right corner. Go to ‘More Tools’ → ‘Clear Browsing Data.’
In the popup window, check the box next to ‘Cached images and files.’
By default, Chrome will clear all cached files. You can use the ‘Time Range’ dropdown to choose a specific time period instead.
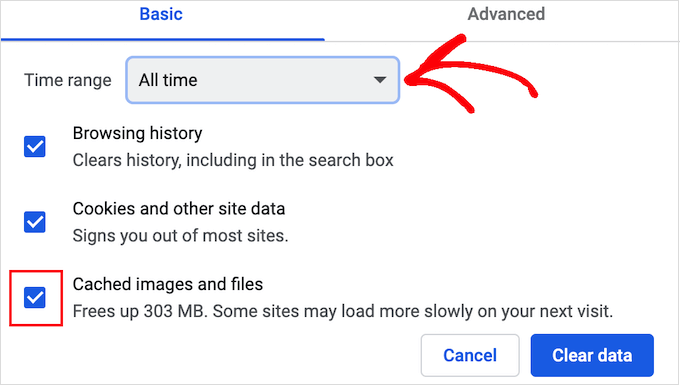
Feel free to uncheck other options like ‘Browsing history’ or ‘Cookies’ if you just want to clear cached files.
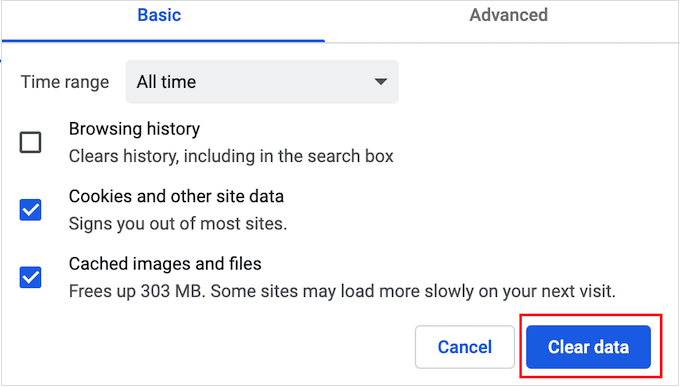
Once you’re ready, click the ‘Clear data’ button. Chrome will remove the cache, and you can try visiting the website again.
If you’re using a different browser, we’ve got you covered. Check out our beginner’s guide on how to clear your browser cache in any browser.
Turn Off Experimental Chrome Features
If you’ve enabled any of Chrome’s experimental features, then one of those may be causing the error.
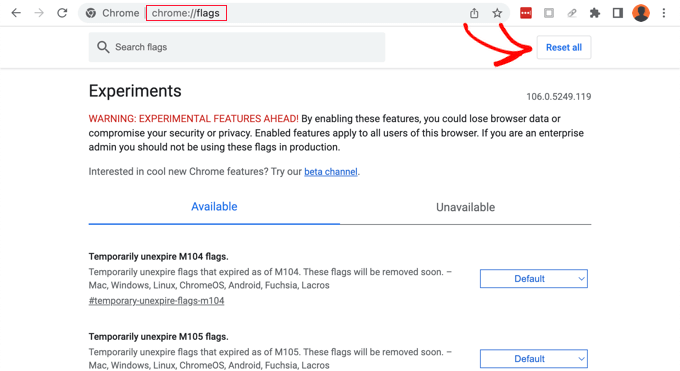
To turn them off, navigate to chrome://flags/ in Chrome. After that, click the ‘Reset all’ button at the top of the page.
Now, try to visit the website. If you still see the error message, then you should move on to the next solution.
Disable Your Computer’s Firewall and Antivirus
Installing antivirus and firewall software on your computer can keep you safe by blocking malware, but sometimes, they may also block trustworthy websites.
To test whether your firewall or antivirus program is blocking the connection, simply disable that software temporarily. Then, try to visit the website that was showing the error.
If the site loads without a problem, then you’ll know that the antivirus program or firewall was to blame. If this is the case, then we don’t recommend disabling it permanently.
Instead, you should check the software’s settings to see if you can whitelist this particular website. In this way, you can access the site while still protecting yourself against hackers, viruses, and other digital threats.
If you’re not sure where to find these settings, then try checking the software’s official documentation, forums, or social media pages for more information. Depending on your software license, you may also be able to contact customer support or the developer for help.
For more tips on protecting yourself against hackers without triggering a connection error, please see our ultimate WordPress security guide.
Reset Your VPN Software
You may have installed Virtual Private Network (VPN) software on your computer to protect your privacy, keep your information secure, and visit sites that are blocked in your location.
However, you may sometimes have problems with a VPN connection, or the VPN might not recognize a website’s IP address. Some VPNs will reconnect automatically if they encounter a problem, but you may have to reconnect your VPN manually.
We recommend checking your provider’s website or documentation for instructions on how to reset your VPN.
Disable Your Proxy Server
You may also experience connection errors when using a proxy server as an extra layer of security or to cache data. You will need to disable the proxy server.
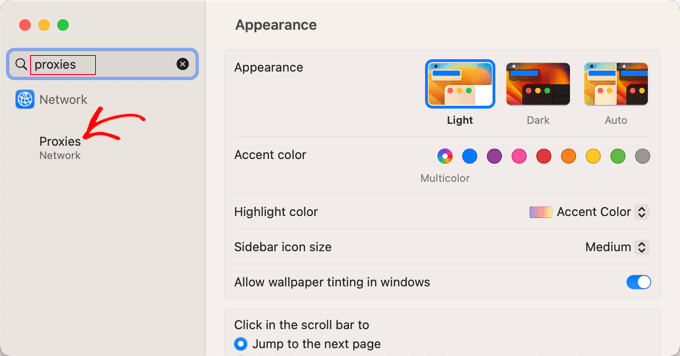
To do this on a Mac, you can start by clicking the ‘Apple’ icon in the toolbar and then selecting ’System Settings…’
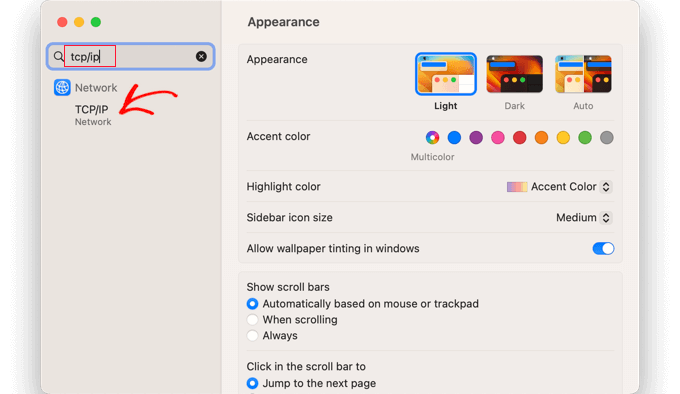
Next, you should type ‘proxies’ into the search box on the left and click the ‘Proxies’ menu item.
Now, you need to make sure that all the proxy settings are toggled to the Off position.
After that, you should click the ‘OK’ button to save your changes.
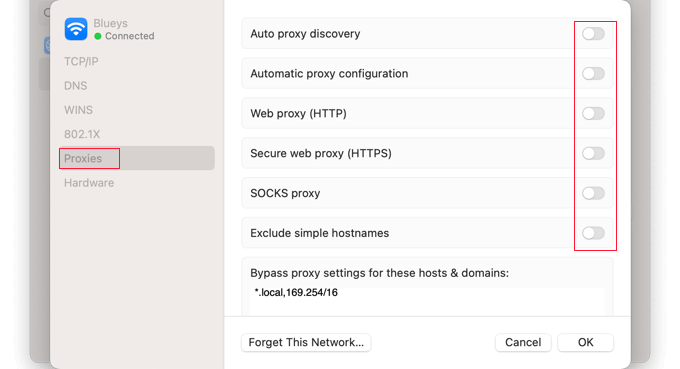
You can now try visiting the website to see whether you can access it without any problems.
Clear Your DNS Cache
Your computer stores the IP addresses of all the websites you visit so that the browser doesn’t have to look up the same IP address multiple times. This is called a DNS cache.
This helps websites to load faster, but the cached DNS information can get outdated. This may result in an error message, particularly if the site has moved to a new domain name or you’ve moved WordPress to a new host.
By flushing your DNS cache, you’ll get the latest information about a website, including its new domain name or address.
To help you out, we’ve created a complete guide on how to clear your DNS cache for Mac, Windows, and Google Chrome.
Change Your DNS Server
A DNS server is like the internet’s phone book. It lets your browser know which IP address it needs to visit when you type in a website’s domain name.
Your internet service provider assigns you a DNS server automatically. However, sometimes, this server may be unavailable, or it might have the wrong information. When that happens, you’ll experience connection problems.
You can solve this problem by switching to a different public DNS server, such as Google Public DNS. You can use any public server you want, but just be aware that the DNS provider will be able to see all the websites you visit.
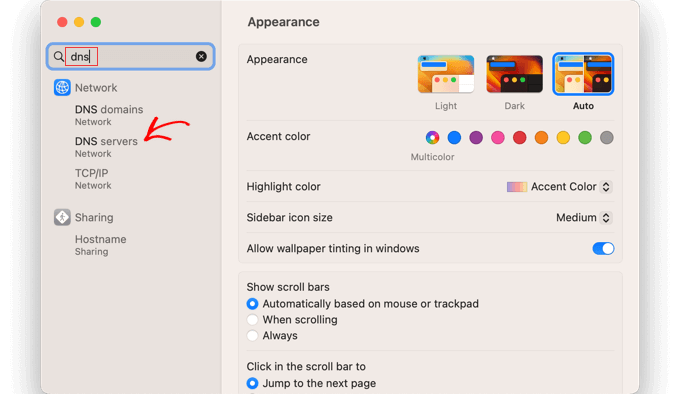
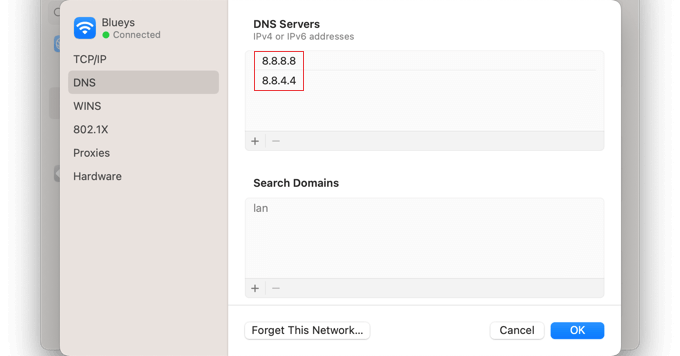
On a Mac, you should start by clicking the Apple icon at the top left of the screen and selecting ‘System Settings…’ from the menu. Next, you need to enter ‘DNS’ in the search box at the top left of the screen and then click the ‘DNS servers’ entry.
You will now see the address of your current DNS server.
Using the ‘+’ button at the bottom, you can add the two addresses for Google’s DNS servers. These are 8.8.8.8 and 8.8.8.4.
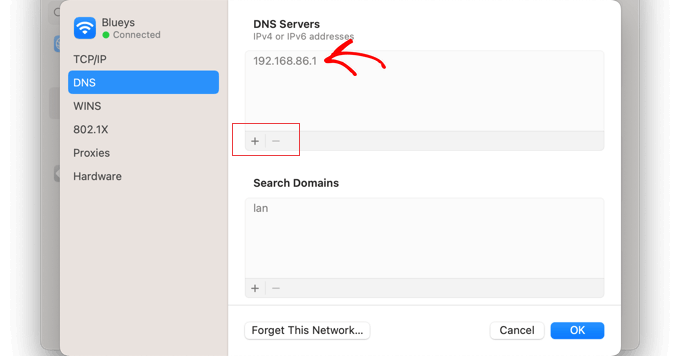
After that, you can click the old DNS server address.
Then, use the ‘-‘ button at the bottom to remove it.
When you’re finished, simply click on the ‘OK’ button to save your changes.
If you’re not using a Mac, then Google offers detailed instructions for most operating systems in their documentation on how to get started with Google Public DNS.
You’re now ready to visit the website to see whether this has removed the error message.
Reset Your TCP/IP Settings
TCP/IP is a set of protocols that control how data is sent and received over the internet.
If your internet connection is configured incorrectly, renewing your TCP and IP protocol will return the connection to its default settings, which may solve the problem.
Reset TCP/IP Settings on Mac
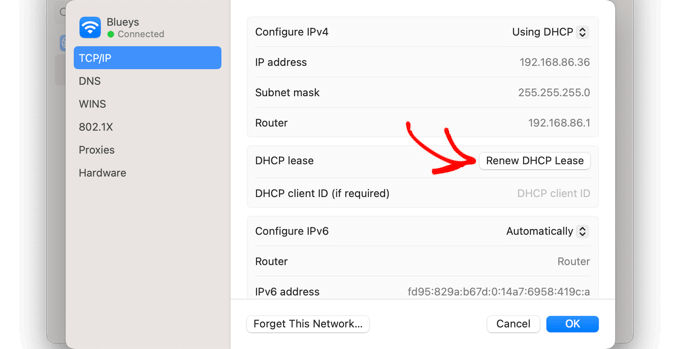
On a Mac, you need to open the System Settings app, search for TCP/IP, and then click the TCP/IP entry in the menu.
On this screen, go ahead and click on the ‘Renew DHCP Lease’ button.
You may need to confirm your choice by clicking the ‘Apply’ button on a popup.
Resetting TCP/IP in Windows
On Windows, you need to open the Command Prompt and open a series of commands. You should type each command separately and press the Enter key after each one.
First, Open Command Prompt as an administrator (search for “cmd” in the Start menu, right-click, and select “Run as administrator”).

After that, type the following commands, pressing Enter after each:
netsh int ip reset
netsh winsock reset
ipconfig /release
ipconfig /renew
ipconfig /flushdns
After that, you need to restart your computer and try visiting the website to check whether the error is fixed.
Hire Professional WordPress Help
If all else fails, you can check out our Emergency WordPress Support service. For a one-time fee, our expert WordPress engineers will troubleshoot and fix the error for you.
Here are some of the benefits of choosing our services:
- Fast Response Times: The service offers quick turnaround times to help resolve urgent issues before they impact your business.
- Expert Assistance: You get direct access to a team of WordPress experts who can quickly diagnose and fix problems, no matter how complex.
- Comprehensive Support: From plugin conflicts to theme errors, our service covers a wide range of issues, ensuring your site gets the help it needs.
- 24/7 Availability: Our support team is available around the clock, so you can get assistance whenever an emergency arises, day or night.
More DIY Help for Fixing WordPress Errors 🛠️
Running into a connection reset error can feel frustrating, but you’re definitely not alone. Here are some of our favorite guides to help you fix other common WordPress issues:
- Beginner’s Guide to Troubleshooting WordPress Errors (Step by Step)
- WordPress Form Does Not Work: 7 Troubleshooting Tips
- How to Monitor Your WordPress Website Server Uptime (Easy Way)
- Crucial WordPress Maintenance Tasks to Perform Regularly
We hope this guide helped you fix the ERR_CONNECTION_RESET error in WordPress. It’s always a relief when your site is back up and running — and we’re happy to be part of that journey.
If you ever get stuck again, don’t hesitate to check out our tutorial on how to contact WordPress support or explore the best WordPress support agencies we trust.
If you liked this article, then please subscribe to our YouTube Channel for WordPress video tutorials. You can also find us on Twitter and Facebook.


")
Jiří Vaněk
We were dealing with a similar issue after moving to a new server. The problem was hard to find because it only worked on some machines and perfectly fine on others. Finally, the advice to reset the DNS cache helped. It turned out that the original IP address was still in the cache, and after resetting the DNS cache, everything started to work perfectly fine. Normally, we probably wouldn’t figure it out.