Do you want to increase your Snapchat followers using your WordPress site? Recently one of our readers asked if it was possible to add Snapchat follow button on the site. Snapchat offers snapcodes which other Snapchat users can scan to follow you. In this article, we will show you how to add Snapchat snapcode in WordPress.
Video Tutorial
If you don’t like the video or need more instructions, then continue reading.
First thing you need to do is to visit Snapchat Snapcodes website. You will need to login using your Snapchat username and password. Upon login, click on the download button to download your Snapcodes.

Snapchat will download a zip file which you need to extract. Inside, you will find two image files snapcode.png and snapcode.svg.
These image files are QR codes that users can scan using Snapchat on their phones. See our guide on how to generate and add QR codes in WordPress to learn more about QR codes.
Now that we have our snapcode, the next step is to upload it to your WordPress site. We will show you two methods to add snapcode to your WordPress site.
Manually Upload and Add Snapcode to WordPress
The snapcode is just an image file, and you can add it to your WordPress site like you would add any other image file.
You can simply upload it by visiting Media » Add New page and then add the image in a sidebar widget. You can also use the Image Widget plugin to do that.
See our tutorial on how to add an image in WordPress sidebar widget for detailed instructions.
You can also add this snacode in your post or pages as well.
Using Snapchat Snapcode Widget
If the first method doesn’t work for you, then you can install and activate Snapchat Snapcode Widget plugin.
Upon activation, simply go to Appearance » Widgets page and locate Snapchat snapcode widget under the list of available widgets.
Next, you need to drag it to a sidebar or widget-ready area.

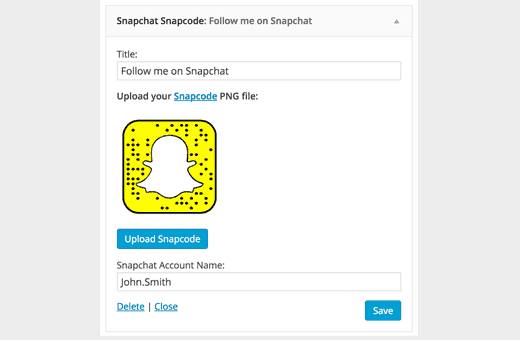
The widget will now appear in the sidebar column, and you should be able to see its settings. Simply click on the upload snapcode button to upload your snapcode.png file. You can also provide your snapchat username if you like. Click on the save button to store your widget settings.
That’s all you can now view your website, and you will see the snapcode in your WordPress sidebar.
We hope this article helped you add Snapchat snapcode in your WordPress blog. You may also want to see our list of best social media monitoring tools for WordPress users.
If you liked this article, then please subscribe to our YouTube Channel for WordPress video tutorials. You can also find us on Twitter and Facebook.


Have a question or suggestion? Please leave a comment to start the discussion.