Ever visited a website and thought, “Wow, this place is active—I want to be part of it!”? That’s the power of showing off your newest members.
Displaying recently registered users on your WordPress site creates a sense of community and encourages more people to join. It highlights an active, growing user base, which builds trust and drives engagement.
But there’s a catch – you need to do it right. That means balancing privacy, design, and seamless integration.
In this article, we’ll show you exactly how to display recently registered users in WordPress to spark more participation.

Why Display Recently Registered Users in WordPress?
If you run a membership site, online course, forum, or any other type of WordPress website that allows user registration, then you may want to display your recently registered users.
This adds social proof and also gives other members a chance to welcome new members to the community. If you run a small business website, you can even create a filterable directory of your team members or contributors.
There are all kinds of reasons to display your recently registered users in WordPress:
- Create a resource of shared contact information.
- Showcase a list of donors for your nonprofit.
- Highlight a list of recently registered business owners.
- Encourage new forum sign-ups by showing a large and active community.
With that in mind, we’ll show you how you can display recently registered users in WordPress. You can simply use the quick links below to jump straight to the method you want to use:
Ready? Let’s get started.
Method 1. Display Recently Registered Users by Adding Code to WordPress
The simplest way you can display your recently registered users is by adding code to WordPress.
Typically, people will tell you to add a custom code snippet to your theme’s functions.php file.
However, we strongly recommend that you avoid this. It’s not very beginner-friendly – one tiny mistake, you risk breaking your website.
Instead, we recommend using a code snippets plugin like WPCode. This way, you can safely add and manage custom code snippets on your site.
WPCode is the best code snippet plugin out there, and we use it on our own websites. For a deeper look into the tool, check out our detailed WPCode review.

So, let’s install and activate the WPCode plugin. If you need help, you can refer to our guide on how to install a WordPress plugin.
✋ Quick note: You can use the free WPCode plugin to add a custom code snippet. But if you want extra perks like code scheduling and history access, then upgrading to WPCode Pro is the way to go!
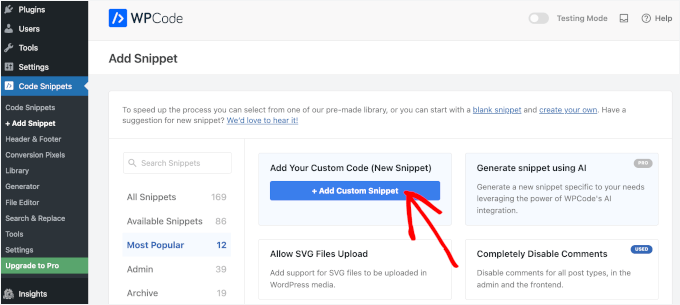
Upon activation, let’s first navigate to Code Snippet » + Add Snippet.
On the next screen, you’ll want to hover over ‘Add Your Custom Code (New Snippet)’ and click on the ‘+ Add Custom Snippet’ button.
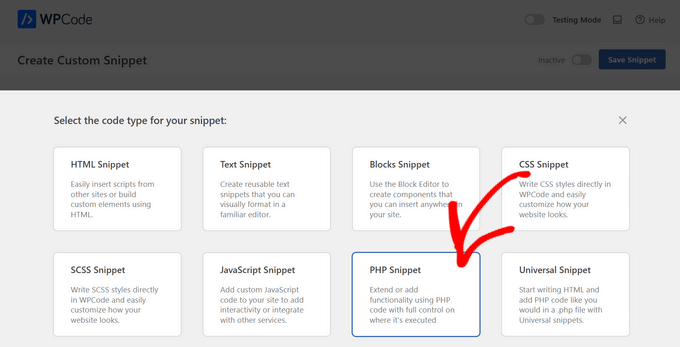
After that, WPCode will prompt you to choose a code type.
Here, you’ll need to click on ‘PHP Snippet.’
This will take you to the code editor.
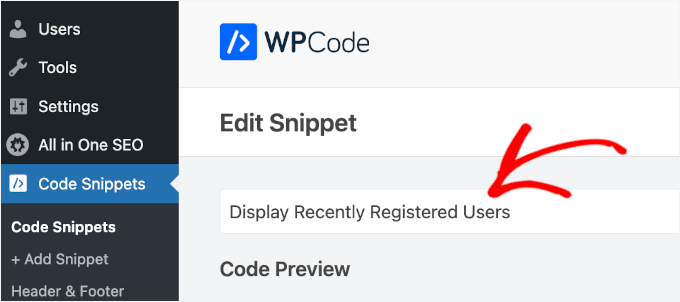
The first thing to do is name the custom code snippet. This is for your reference only, so feel free to give any name you want. Just be sure to use a clear name so it’s easier for you to refer to it later.
Then, you can go ahead and paste the following custom code snippet into the ‘Code Preview’ area:
function wpb_recently_registered_users() {

global $wpdb;

$recentusers = '<ul class="recently-user">';

$usernames = $wpdb->get_results("SELECT user_nicename, user_url, user_email FROM $wpdb->users ORDER BY ID DESC LIMIT 5");

foreach ($usernames as $username) {

if (!$username->user_url) :

$recentusers .= '<li>' .get_avatar($username->user_email, 45) .$username->user_nicename."</a></li>";

else :

$recentusers .= '<li>' .get_avatar($username->user_email, 45).'<a href="'.$username->user_url.'">'.$username->user_nicename."</a></li>";

endif;
}
$recentusers .= '</ul>';

return $recentusers;
}
add_shortcode('wpb_newusers', 'wpb_recently_registered_users');
Here’s what it might look like:
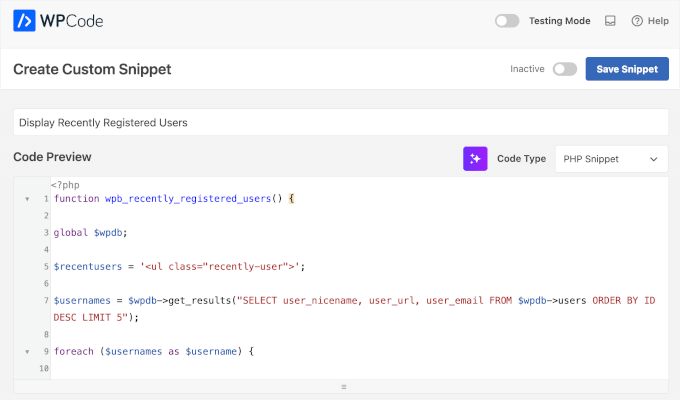
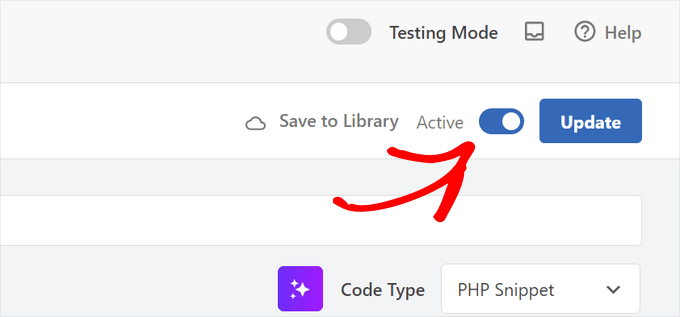
After that, you can toggle the ‘Inactive’ switch to ‘Active.’
And finally, don’t forget to click the ‘Save Snippet’ button.
This code snippet creates a simple list of your recently registered users and displays the avatar image and username.
To display the list on your posts or page, you can use the following shortcode:
[wpb_newusers]
To add the shortcode to your website, simply open the page where you want the list of users to display.
Then, you’ll want to click the ‘+’ add block icon, search for ‘Shortcode,’ and select it.

After that, you can paste the shortcode you copied above into the shortcode box.
When you’re done making changes, click the ‘Update’ or ‘Publish’ button to make your changes live.

You can follow the same steps by adding the shortcode to a post or a widget area.
Now, you can view your list of recently registered users:

Method 2. Display Recently Registered Users with Formidable Forms
Another way to display recently registered users is to use the Formidable Forms plugin.
It’s one of the top contact form plugins and best user registration plugins for WordPress. This plugin has advanced features that let you format, filter, and display user-submitted data, including user profile data, on the front end of your website.
Explore all the features we’ve tested in our complete Formidable Forms review.
Plus, you can use it to create all kinds of useful online tools like web directories, online calculators, and more. You also have complete control over your user directories’ appearance and function.
It even integrates with MemberPress, so you can easily display a list of your recently registered members on your membership website.
🚨 Important: Formidable Forms won’t automatically display all new users. Instead, it gives you complete control over which users and what information is displayed.
To display a user in your directory, a separate form must be created and filled out. We’ll show you how.
The first thing you need to do is install and activate the Formidable Forms plugin. For more details, feel free to see our guide on how to install a WordPress plugin.
Upon activation, you’ll need to go to Formidable » Global Settings.
Then, simply click the ‘Connect an Account’ button or manually enter your license key. You can find this information under your account on the Formidable Forms website.
Once you’ve done that, go ahead and click the ‘Save License’ button.

Next, you need to install the Formidable Directory addon. Depending on your plan, this addon may already be active.
If not, then you’ll need to go to the Formidable Directory page and click the ‘Get Formidable Directory’ button.
After you complete the purchase, it will automatically be added to your account.
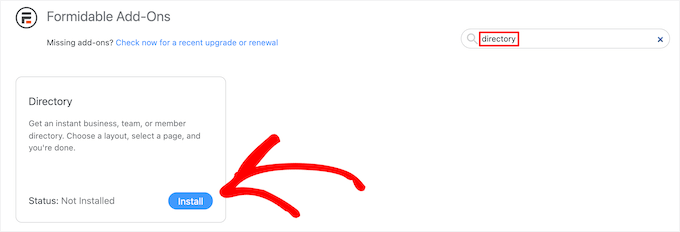
Next, let’s go to Formidable Forms » Add-Ons and search for the ‘Directory’ addon.
Once found, you’ll want to click the ‘Install’ button.
After that, navigate to Formidable » Global Settings.
Then, go ahead and click the ‘Directory’ menu option.

This will automatically start the setup wizard to help you create your user directory. If you haven’t connected your site to Formidable Forms, then you’ll be asked to do that now.
The next step is to click the ‘Install & Activate’ button to have any required add-ons ready for use.

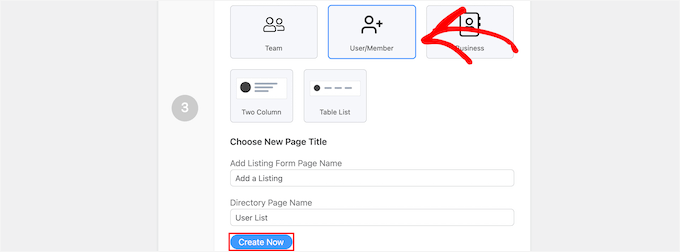
Now, you can click the ‘User/Member’ box to display your recently registered users and choose a ‘Two Column’ or ‘Table List’ display.
Then, simply enter a page name for your listing form and your directory page and click the ‘Create Now’ button.
This will automatically create the necessary forms, views, and pages to display your users, but it doesn’t publish them yet, so you can still make changes.
After that, you can click the ‘View Page’ button in the ‘Customize Your New Pages’ section.

This will take you to a page with your registered user list.
This page includes a search bar, an A-Z filter, and boxes containing each of your registered users. Feel free to take advantage of these features to explore your user list.
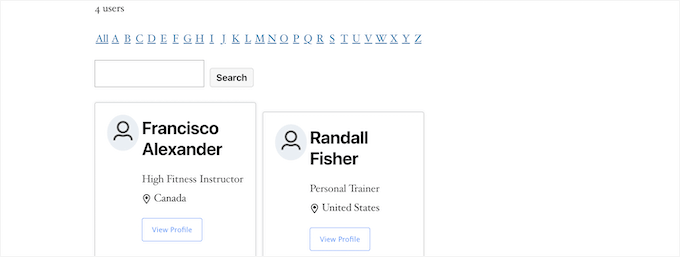
When everything is set, it’s time for publishing.
To do this, simply click the ‘Edit Page’ button at the top of the screen.

This will open the page editor screen. You can edit this page and make necessary adjustments just as you would with any other WordPress page.
When you’ve finished editing the page, you can click the ‘Publish’ button to make it live.

If you want to customize how your registered user directory looks, then go to Formidable » Views.
In this area, you’ll want to hover over the view that was just created and click ‘Edit.’

This will bring you to the view editor screen.
Here, you can fully customize how your user directory looks. For example, you could limit the number of users per page, filter and sort the user entries, or add more content to their individual profiles.
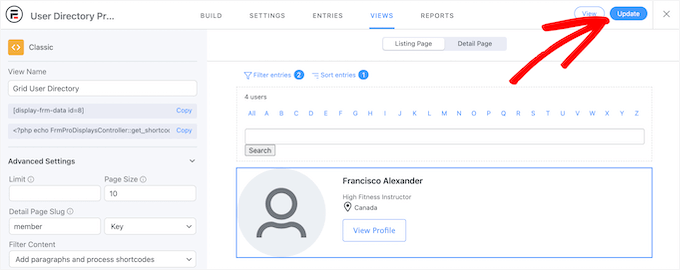
Once you’re finished making changes, go ahead and click the ‘Update’ button.
It will automatically update the user directory you published earlier.
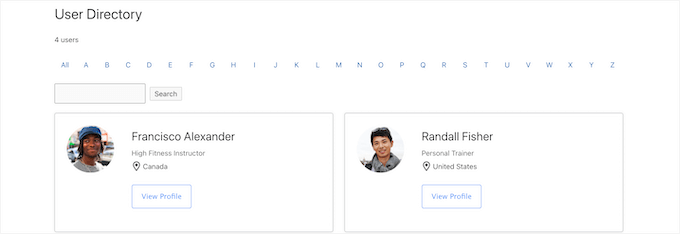
Publish Your Form to Collect Information From New Users
After you customize and publish your user directory, you’ll need to publish the form connected to the directory, too.
Users who have already registered on your WordPress site will need to fill out this separate form to be listed in the user directory.
First, you’ll want to navigate to Pages » All Pages and then click on the page that was created earlier. In this case, it’s ‘Add a Listing’.

This will bring you to the page editor screen, where you’ll see the page title and a shortcode.
Next, simply click the ‘Publish’ button to make your page live.

Now, you can view your page as well as your user registration form.
New users can use this form to fill out their user directory profile information on your website.

If you want to customize the form fields, then navigate to Formidable » Forms.
Next, click on the form you named earlier. In this case, the ‘User Directory Profile’ form.

This will launch the form builder.
If you want to add new form fields, simply drag them from the options panel on the left onto your form.

To delete existing form fields, you can click on the field and click the ‘Three Dots’ menu option.
Go ahead and click’ Delete’ from the available dropdown menu items.

Once you’ve finished customizing your form, make sure to click the ‘Update’ button to save your changes. Your form will then automatically update.
Method 3. Display Recently Registered Users with Dynamic User Directory
One more way to display recently registered users is with the free Dynamic User Directory plugin. While it’s not as advanced or customizable as Formidable Forms, it lets you display a simple list of your recently registered users.
The first thing you need to do is install and activate the plugin. For more details, see our step-by-step guide on how to install a WordPress plugin.
After that, you’ll need to go to Settings » Dynamic User Directory to configure your directory settings.
You can control how your registered user list is sorted in the ‘Sort Field’ dropdown. Then, you’ll choose which kind of directory type you want to display from ‘Directory Type’.

After that, you can enable a directory search feature by checking the ‘Directory Search’ box.
You can select certain user roles or specific users from the drop-down list if you want to exclude them.

Next, let’s control how your directory looks and the user information that will be displayed.
To do this, simply go to the ‘Listing Display Settings’ section. Here, you can control the user’s name, avatars, borders, and more.

Below that, in the ‘Directory Totals Settings’ meta box, you can choose the total number of users, customize the text, and more.
Displaying the total number of users can be helpful if you want to use social proof to encourage new users to create an account on your site.

Next, you can customize how the letter links and pagination will display on your user list.
You might want to set the number of users to show per page, change the spacing, and more.

Once you’re finished, go ahead and click the ‘Save options’ button at the bottom of the screen to save your directory.
This will create and display a shortcode for your user directory at the top of the page. You’ll need to copy this to add your directory to your site.

Simply open the page, post, or widget area to display your list of users.
The next step is to click the ‘+’ icon and search for ‘Shortcode.’ Once you find it, you can click on it.

Once you’ve added the ‘Shortcode’ block to the editor, you can paste the shortcode into the box.
Then, go ahead and click the ‘Publish’ or ‘Update’ button.

Now, you can view your list of recently registered users on your site.
You can repeat the above steps to add the list of recently registered users to a post or widget area.

Further Reading: More User Management Tips
Want to dive deeper? Here are more tips on user management to help your WordPress site run more smoothly:
- How to Allow Users to Invite Their Friends to Register in WordPress
- How to Show Personalized Content to Different Users in WordPress
- How to Send Email to All Registered Users in WordPress
- How to Restrict User Login to One Device in WordPress
- How to Apply CSS for Specific User Roles in WordPress
We hope this article has helped you learn how to display recently registered users in WordPress. Next, you may also want to see our guide on how to block a WordPress user without deleting their account or our expert picks of the best free user management plugins for WordPress.
If you liked this article, then please subscribe to our YouTube Channel for WordPress video tutorials. You can also find us on Twitter and Facebook.


Jiří Vaněk
Using MemberPress, I’ve set up a community website, and I’m constantly looking for various ways to encourage users to register so that the community can grow. I think that when others see people signing up, it will motivate them to register as well. This seems like a great and subtle way to show people that the community is expanding. Thanks for the perfect idea and a great detail to add to the puzzle of building a community website.
FM Brohi
Great! But with the Avatar, the Usernames of the members are coming on the list but I need to show their First Names.
How can I do that?
Jimmy
Hi,
This Recently Registered functions works great!
Just I have 2 questions you can help with?
1. The members (avatar) is there, but can it make it clickable to their profile? Right now is NOT clickable but just an avatar.
2. However, the users shown all in one column straight down, any possible to make it for example: 5 members on each row, 5 on 2nd row and so on… Total of 5 rows.
A mean if you have 100 plus new members registered, then it will keep auto scroll up or down for the newest members to show. like carousel.
Please advise help, Thanks
Uday
How to display users with only specific role?
Jonas
How can display registered users when they are logged in?
For example…….”Who are online”.
WPBeginner Support
See how to show real time online users in WordPress.
Admin
Edmond
So, how can i make it display like horizontally?
Adam
Hi,
Is there a possibility to display only users with specified roles?
I’d be really greatfull if you help me on that.
dimmka
Thanks for tutorial.
How to display quantity recently registered users in wordPress?
Edosa Uyi
Hello Editorial Staff, this post really helped me a lot. Please I want to display the date of registration along with each username,how can I do this?
andrewmichaelsa
Great post, managed to get it working easily. I would now like to style the list any ideas on how that is done?
Ben
I am wondering how to insert a space in between the avatar and the name. Also would like to know how to use the “username” of a buddypress username instead of registered name.
laura
Thank you. I really did not want to “wade in” to the level of just using plug ins for everything I do. However, I want to create a list that no plug in exists to create for me. So, I’ll try to “do it myself”. This helped because I see the basics of “how to do it”. Then, I just have to be more specific in what I do to try to make it put the fields in order that I want listed. LOL ~~ Let’s see how this works! (I will make sure to do backups before trying anything… and I am using a child theme also.) Thanks!
mark taylor
This is very good, how do i stop it showing admin username? Is there some code that can be added to stop admin from being shown, only blog subscribers.
WPBeginner Support
You can modify the SQL query on line 07 like this:
$usernames = $wpdb->get_results("SELECT user_nicename, user_url, user_email FROM $wpdb->users WHERE user_login != 'admin' ORDER BY ID DESC LIMIT 5");1-click Use in WordPress
Admin
Chris McCoy
you can also use the wp user query.
$user_query = new WP_User_Query( array(‘orderby’ => ‘user_registered’) );
Rick Meader
None of my new subscribers (including me, as a test) received their password from Wordpress. Is there a setting I need in order to have that done?
WPBeginner Support
You might have some email configuration issue. Are you getting any emails from your WordPress site? Like for example when a new user registers on the site or when a comment is awaiting moderation? If you are not, then we would recommend you to try WP Mail SMTP plugin.
Admin