Since the 5.3 version, WordPress automatically shrinks large images to improve website performance. That said, there may be occasions when you need to show high-quality images at their full size.
For example, whenever we have to showcase high-resolution photography or detailed product images on our WordPress sites, we find that it’s crucial to display them at their full size. This is also especially important for online stores where image quality can make or break a sale.
In this tutorial, we will show you how to display full-size images on a WordPress site.
When Should You Display Full-Size Images in WordPress?
One example of when you may need to display full-size images in WordPress is if you run a photography portfolio or graphic design store. If you sell your work as digital downloads, then you might want to display large images to show potential customers their true quality.
Even if you run a WooCommerce store for physical eCommerce products, you may still need to display some full-size images. You can use a product thumbnail image, which users can then click on to see the image’s original size and zoom in on the item’s details.
That said, large images can cause a lot of problems. They can slow down your website, which can then negatively affect its search engine optimization (SEO).
For this reason, WordPress now automatically resizes large images when you upload them. If an image is bigger than 2560 pixels in height and/or width, WordPress will proportionally scale it down to a smaller size, maintaining the original image dimensions.
Most WordPress hosting providers also limit the file size you can upload to the media library. This can be an obstacle if you have a lot of large images to display.
If you want to change the size limit, then you can read our guide on how to increase the maximum file upload size in WordPress.
Now, let’s see how you can display full-size images on your WordPress website. We have 4 methods to do this. Some may work better for single images, while others are better for multiple ones. Simply use the links below to jump straight to your preferred method:
Method 1: Use the Full Size Image URL (Best for Single Images)
If you only want to display one or two large images on your website, then you can simply add them using the original image URLs.
When you upload an image that exceeds the maximum dimensions, WordPress will scale that image to create a smaller version. However, the original, larger image remains intact.
First, go to Media » Library from the WordPress dashboard. Make sure to change your view to the ‘List’ view.
After that, hover your mouse over your large image. Look for the one whose file name has ‘-scaled’ at the end.
When the ‘Copy URL’ button appears, click on it.
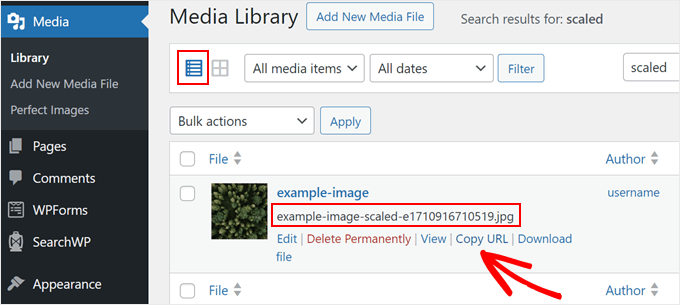
With that done, you can paste the image URL into your browser’s address bar and delete ‘-scaled….’ from the end of the image URL. Be careful not to remove the image format (.png, .jpg, .gif, and so on).
So, if the scaled image URL is http://example-website.local/wp-content/uploads/2024/03/example-image-scaled.jpg, then your original image URL is http://example-website.local/wp-content/uploads/2024/03/example-image.jpg.
When you visit that URL, then you will see the image in its original dimensions.
Now, you can add the image anywhere on your website. Since we are adding the image using a link, you will need to embed it rather than selecting it from the media library.
To do this, open the Gutenberg block editor for the post or page where you want to use the image. Then click on the ‘+ Add Block’ icon to add a new block. Here, you can select the Image block.
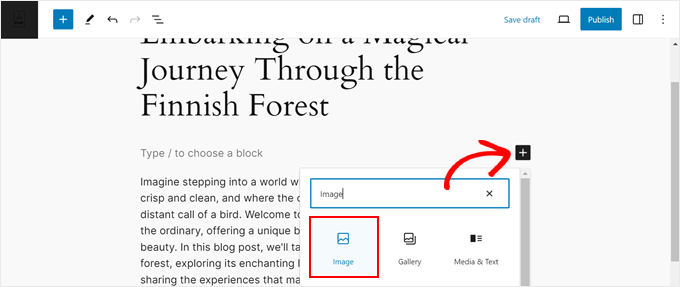
With that done, click on ‘Insert from URL.’
You can then simply paste the full-size or large image URL into the field, and press the ‘Enter’ key on your keyboard.
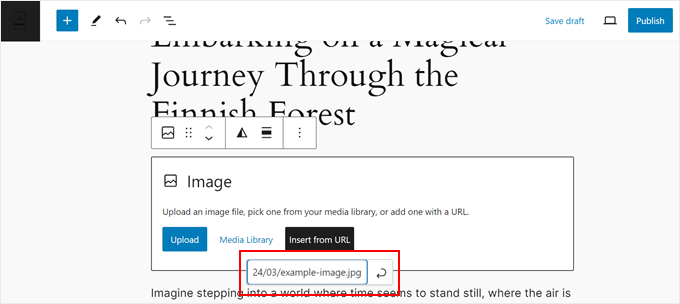
When you are ready to go live, just click ‘Publish’ or ‘Update.’ You can now visit this page or post to see the full-size image in action.
To add more full-size images, simply repeat the same process described above.
Method 2: Disable Image Scaling in WordPress (Recommended for Multiple Files)
If you want to display multiple large images, it’s best to disable the image scaling feature.
One way to do this is by adding code to your theme’s functions.php file. If this is your first time inserting code into WordPress, then you can see our guide on how to add custom code in WordPress first.
That said, if you want to make the whole experience much safer, then we suggest using WPCode. It’s the best code snippet plugin for beginners, and it’s a much safer way to add code without accidentally messing up your theme files.
Plus, if you update your WordPress theme, then the code will not be overwritten, and it will remain intact in WPCode.
Note: For this method, the free version of WPCode is enough, but feel free to get a premium plan if you want to use the testing mode feature. This lets you see how the code works without making permanent changes to your website.
To begin, you’ll need to install and activate the WordPress plugin on your admin panel. Once done, go to Code Snippets » Add Snippet.
Here, select ‘Add Your Custom Code (New Snippet)’ and click on the ‘Use snippet’ button.
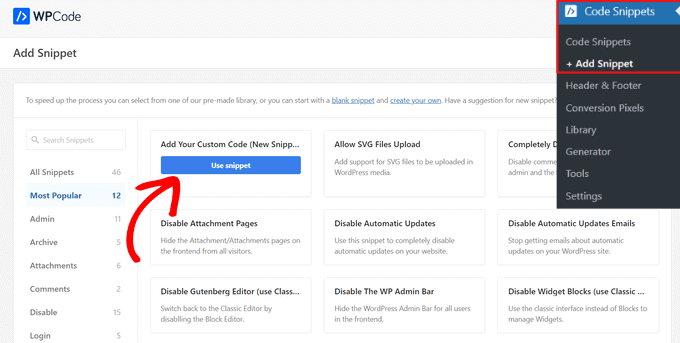
Now, type in a title for the custom code snippet. This can be anything that helps you identify the snippet in the WordPress dashboard.
After that, open the ‘Code Type’ dropdown and select ‘PHP Snippet.’
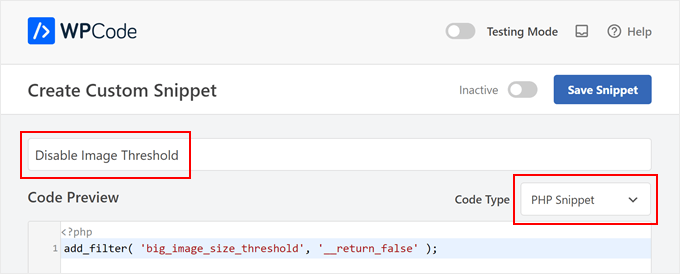
In the code editor, add the following code snippet:
add_filter( 'big_image_size_threshold', '__return_false' );
Once done, just scroll to the ‘Insertion’ section. WPCode can add your code to different locations, such as after every post, frontend only, or admin only.
To use the custom PHP snippet across your entire WordPress blog or site, click on ‘Auto Insert’ if it isn’t already selected. Then, open the ‘Location’ dropdown and choose ‘Run Everywhere.’
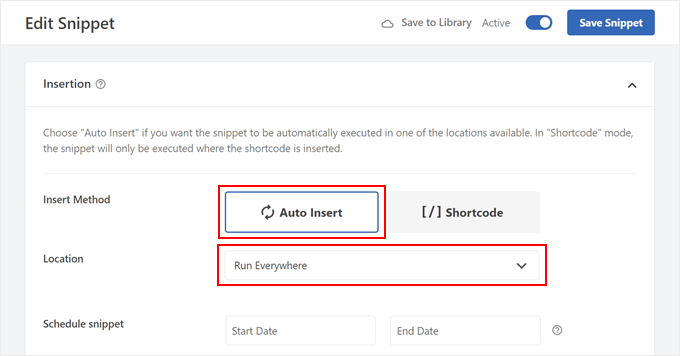
After that, you are ready to scroll to the top of the screen and click on the ‘Inactive’ toggle to change it to ‘Active.’ Finally, click on ‘Save Snippet’ to make the PHP snippet live.
Now, if you upload a large image, WordPress will use the original dimensions rather than resizing the image. You will always have access to the full-size image this way.
Method 3: Disable Image Scaling With a Plugin (For Complete Beginners)
If you find the code method too intimidating, then you can disable image scaling using Perfect Images. This free plugin allows you to create additional image sizes in WordPress, update your media metadata, and more.
First, you’ll need to install and activate the Perfect Images plugin. For more details on installing a plugin, see our step-by-step guide on how to install a WordPress plugin.
Upon activation, head over to Meow Apps » Perfect Images and check the Disable box next to ‘Image Threshold.’
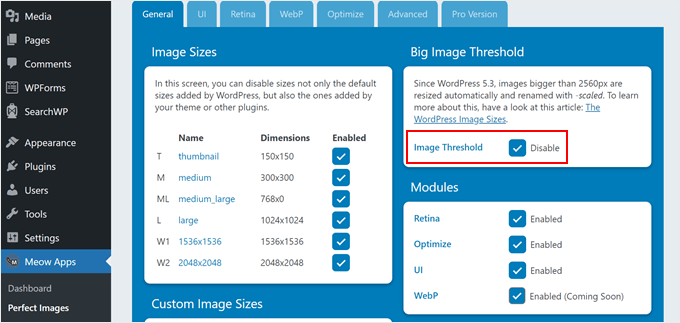
WordPress will now no longer add the ‘-scaled’ attribute to any image, so you can upload large media files and WordPress will show them the full size by default.
Method 4: Open Full-Width WordPress Images in a Lightbox (Best for Galleries)
The final option is adding a full-size image lightbox to your site, which is perfect if you are creating an image gallery, slider, or photo portfolio.
This method allows you to show smaller thumbnail images when the page first loads. Visitors can then click on any thumbnail to see the full-size image in a popup.
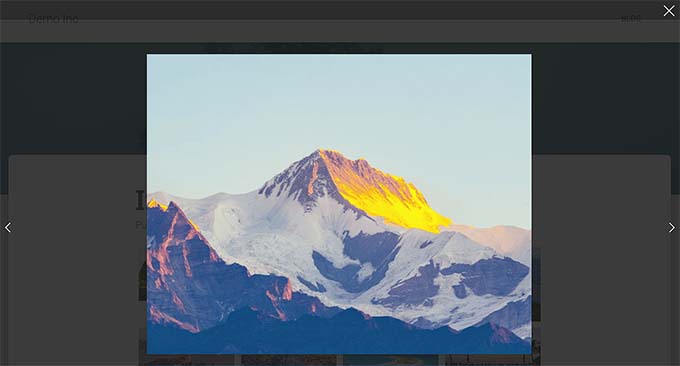
Just be aware that you need to disable image scaling beforehand using one of the above methods. If you don’t, then your lightbox will show the scaled-down version of your large images.
Once you’ve disabled image scaling, it’s time to create a gallery. We recommend using Envira Gallery, as it is the best WordPress image gallery plugin on the market.
Once you have Envira installed and activated, then, you can follow our step-by-step tutorial on how to add a gallery with a lightbox effect in WordPress.
Want to use a different gallery plugin? Check out NextGEN Gallery. During our testing, we found this plugin to be the best for pro photographers or artists, as it offers tons of features to display and sell your images professionally.
Bonus Tip: Optimize Your Images for Better Speed and SEO
Displaying full-size images on WordPress can be great for giving your website visitors a clearer view of your visuals. That said, these graphics can also slow down your website’s load times and negatively impact your SEO.
Because of this, we recommend optimizing your images to boost your WordPress website’s performance.
For example, you can compress the size of the image to make it smaller and faster to load. EWWW Image Optimizer is a great option, as it supports a wide variety of formats like PNG, JPEG, WebP, SVG, and PDF.
Another method for optimizing images is preventing WordPress from automatically generating the default WordPress image sizes.
When you upload an image to WordPress, it creates multiple copies in different size options. This can be useful when you need to display the image as a thumbnail or a medium size of the original file.
That said, if you don’t use them, they can take up a lot of space in your storage, so we suggest removing them if needed.
For more image optimization tips and tricks, just check out these guides:
- Great WordPress Plugins for Managing Images (Updated)
- How to Easily Optimize Image Files for the Web Without Losing Quality
- Beginner’s Guide to Image SEO – Optimize Images for Search Engines
- How to Easily Lazy Load Images in WordPress
We hope this article helped you learn how to display full-size images in WordPress. You can also go through our guide on ways to prevent image theft in WordPress and how to add text on top of an image in WordPress.
If you liked this article, then please subscribe to our YouTube Channel for WordPress video tutorials. You can also find us on Twitter and Facebook.


Jiří Vaněk
The disadvantage of displaying a large image is clear. It consumes a lot of data, especially for people on mobile devices, and the image gets resized to fit the display anyway. I’ve gotten used to using galleries instead. When I want to display an image in its full size, I insert a gallery into the post, even if it’s just with one image. This way, there’s a thumbnail in the article that anyone can click on to view the image in full size. I find it convenient, and the user can choose whether they want to see the image in full size or not. The best tools for this, in my opinion, are Elementor or Envira Gallery.
Mohammad Sharfuddin
I have also seen images are getting cropped by at least 15% at all corners automatically when inserted as image block in blog post. Is there any method to stop this?
Dilip Waghmode
I have uploaded 10-14 mb size images on the website.
And wordpress took the images in maximum 3-4 mb size images.
So user can download the image in actual size like 10mb.
Please let me know
Thank you
WPBeginner Support
It would depend on what plugins you have on your site for what could be changing the image size but you could disable the built-in image compression by following our guide below:
https://www.wpbeginner.com/wp-tutorials/how-to-increase-or-decrease-wordpress-jpeg-image-compression/
Admin