Adding social media links to your WordPress author profile pages can help you connect with your audience on different platforms and build a stronger online presence. While WordPress doesn’t include fields for social media profiles by default, there are simple ways to add them.
At WPBeginner, we have displayed social links on author profile pages for many years. We have found that it builds a sense of community and engagement that encourages our readers to connect with us on other platforms.
In this article, we will show you how to easily display your author’s Twitter and Facebook profile links in WordPress to add a personal touch to your website.

Why Display Author’s Twitter and Facebook Profiles on Your Site?
Social media platforms are an important source of traffic for your WordPress website. That’s why we put together a social media cheat sheet that will help you set up your social media profiles the right way.
Your authors will also have their own social profiles, and you can display them on your site to build credibility with your readers and strengthen your site’s authority.
Your visitors will be able to follow their favorite authors on social media and discover new articles on your site sooner. You can also add their social media profiles to your site’s schema, boosting your site’s trust score on Google and other search engines.
With that being said, let’s look at how to display an author’s Twitter and Facebook links on their user profile page:
Method 1: Displaying Social Links in the Author Bio
Some of the best WordPress themes will display an author info box below each article. You can use this feature to display simple links to your author’s social profiles.
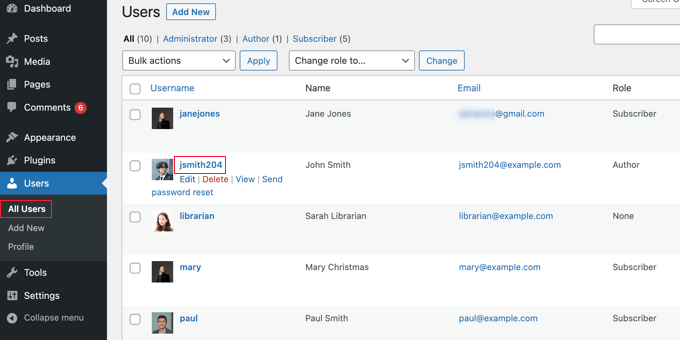
Simply go to Users » All Users in your WordPress admin panel and click the name of the author or the ‘Edit’ link underneath to open the Edit User page.
Next, you should scroll down to the ‘About the user’ section and look for the ‘Biographical Info’ box.
If it is there, then your theme has built-in support for an author box.

Here, you can type a description of the author using text or HTML. You can manually add HTML links for the author’s Twitter and Facebook profile URLs like this:
ADD BIO HERE. Follow them on <a href="https:/twitter.com/USERNAME">Twitter</a> and <a href="https://facebook.com/USERNAME">Facebook</a>.
Make sure you add a short biography about the author and change USERNAME to their actual Twitter and Facebook usernames.
Once you are finished, don’t forget to scroll to the bottom of the page and click the ‘Update User’ button to store your settings.
You will now see Twitter and Facebook links with the user’s bio on the posts that they write. Here’s how it looks on our demo website:

Method 2: Displaying Social Icons With an Author Bio Box Plugin
If your theme doesn’t display an author bio box, or if you want one that is more customizable and displays social icons instead of links, then you can use a plugin.
Simple Author Box is the best free author bio box plugin. It lets you customize nearly every aspect of your author bio box, including adding social media links for your authors.
First, you need to install and activate the Simple Author Box plugin. For more details, see our step-by-step guide on how to install a WordPress plugin.
If you want even more features, then there’s a pro version that lets you display an author box before or after content, add website links, get more social icon styles, include guest authors and co-authors, and more. See our Simple Author Box review for more details.
Upon activation, the plugin adds social media fields to each user profile. Simply navigate to the Users » All Users page in your WordPress admin area and click on the author’s name or the ‘Edit’ link below.

Tip: To quickly edit your own user profile, you can go to the Users » Profile page.
When you scroll to the bottom of the author profile, you will notice some new fields that have been added by the Author Bio Box plugin.
Scroll until you see the section labeled ‘Social Media Links (Simple Author Box).’ Now, you need to select ‘Facebook’ from the dropdown menu and then paste the URL to their Facebook profile into the next field.
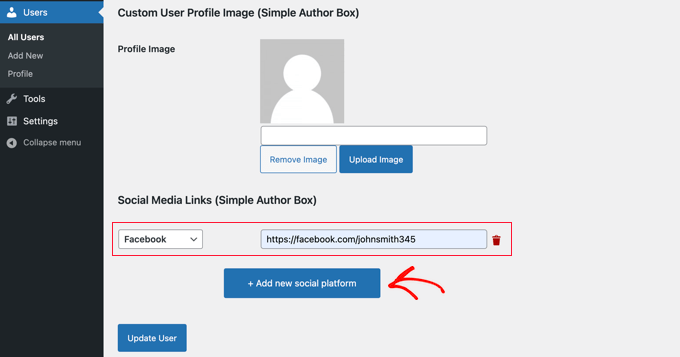
Now you can click the button labeled ‘+ Add new social platform.’
A new drop-down and field will be added where you can add their Twitter URL.
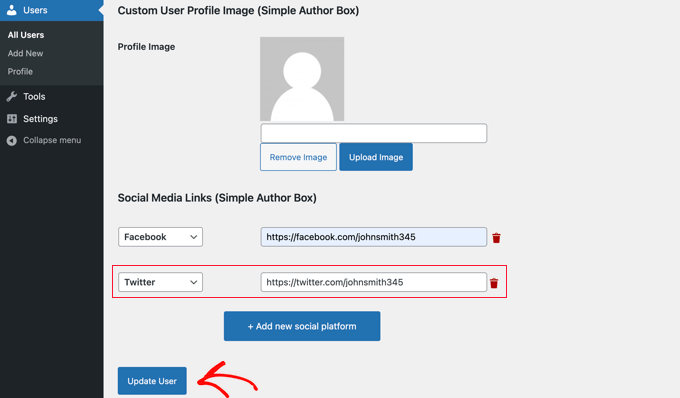
Once you have done that, make sure you click the ‘Update User’ button to store your settings.
Note: Don’t worry if the Facebook and Twitter URLs vanish after clicking the button. At the time of writing, there is a minor bug that hides the URLs, but the settings have been saved.
Now, Facebook and Twitter icons will be displayed with the author’s profile at the bottom of their posts. Clicking these icons will take your visitors to their social profiles, but these links will open in the same window as your WordPress blog.

If you would prefer that the links open in a new tab, then you can navigate to the Appearance » Simple Author Box page and then click on the ‘Elements’ tab.
Once there, you must find the option to ‘Open social icon links in a new tab’ and toggle it to the on position.
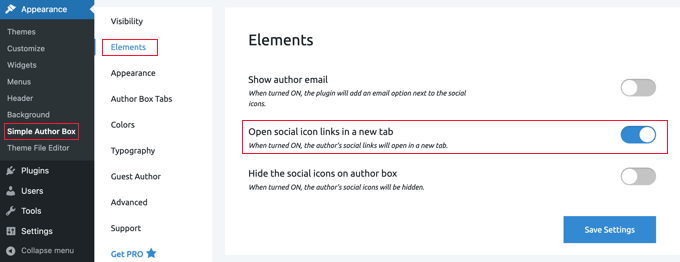
Now, the author’s social profiles will open in a new tab.
Method 3: Displaying Social Icons for Authors With a Page Builder Plugin
If you want to create a custom author profile page with social icons, testimonials, recent articles, star ratings, image carousels, and more, then we recommend using a plugin like SeedProd.
SeedProd is the best drag and drop page builder plugin for WordPress. It lets you easily create custom WordPress themes and page layouts, no coding required.
First, you need to install and activate the SeedProd plugin. If you need help, see our tutorial on how to install a WordPress plugin.
Note: There is a free version of SeedProd. However, you’ll need the Pro version to create a custom author page.
Once the plugin is activated, go to SeedProd » Theme Builder from the WordPress dashboard and click the ‘Theme Templates Kit’ button.
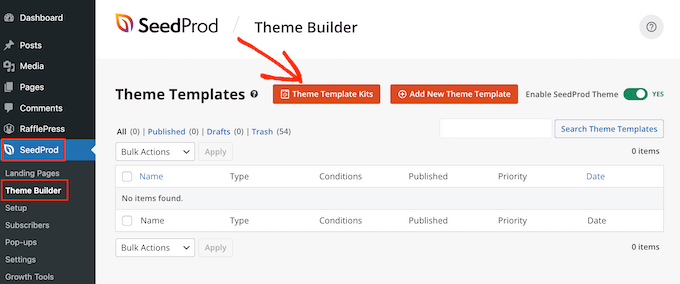
From here, you can choose one of SeedProd’s pre-made website kits.
Simply hover over the design you like and click the checkmark icon to select it.
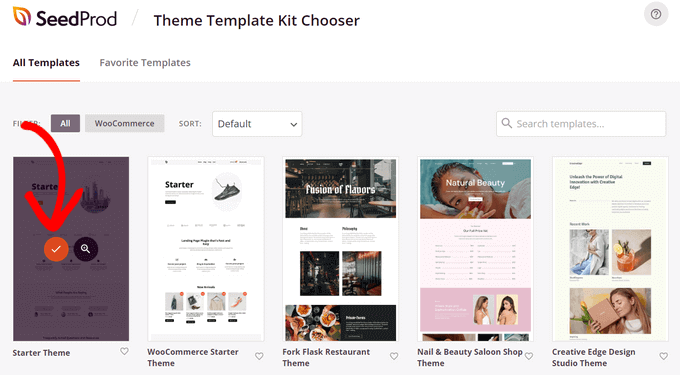
SeedProd will then import the website kit, which includes all of the template parts you need for a website, including the homepage, blog page, about page, and more.
You can customize all of these pages using SeedProd’s theme builder. See our guide on how to create a custom WordPress theme for more details.
Next, you need to create a new author page template by clicking the ‘Add New Theme Template’ button.
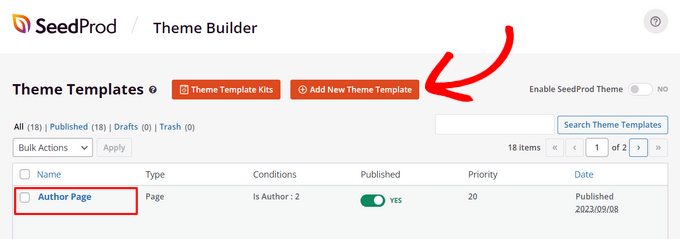
You can make the same author page layout for all writers or create a unique author page for each specific writer. For step-by-step instructions, see our guide on how to add a custom author profile page in WordPress.
Once you’ve created an author page template, you can start customizing it. This is easy using SeedProd’s ready-made blocks that you can drag and drop onto the page.
For example, you can add blocks like Headline, Text, Image, Author Bio, Author Box, Posts, and more to showcase anything you want about an author.
To add social profiles to your author profile page, find the ‘Social Profiles’ block on the left and simply drag it onto the page where you want to display it.
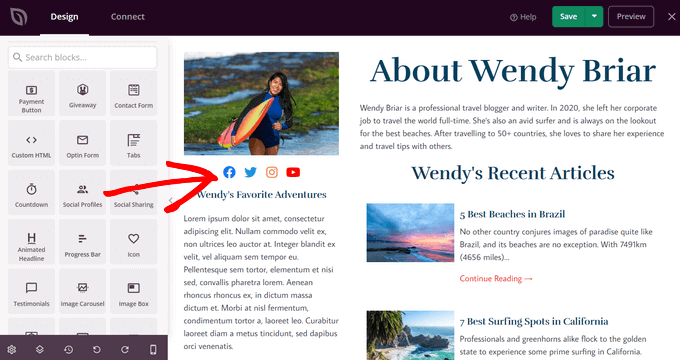
By default, the block displays social share icons for Facebook, Twitter, Instagram, and YouTube.
Next, click on the newly added block to open up the Editing panel for it. Here, you can select new social media platforms from the dropdown list.
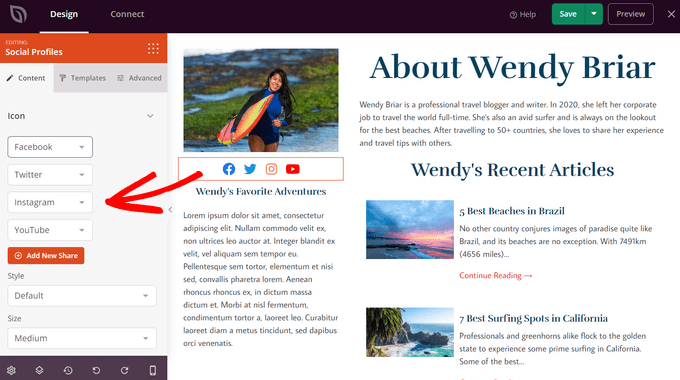
To create a custom social media profile button, choose the ‘Custom’ option from the dropdown list.
Then, click the gear icon to open the settings.
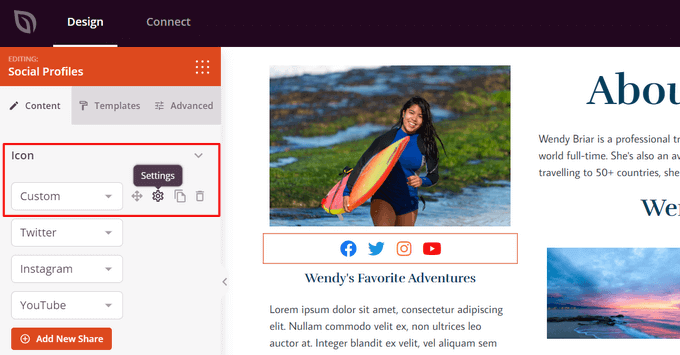
Now, you can choose a social media icon from SeedProd’s built-in Icon Library.
You will need to enter the URL of your social media profile.
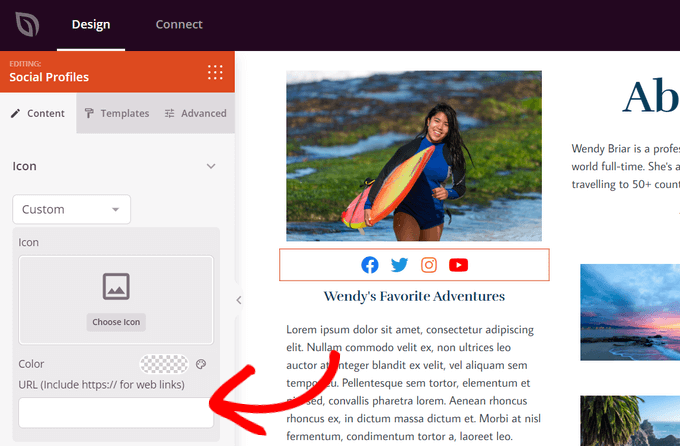
You can also change the icon color, size, alignment, style, and configure advanced settings. When you are done customizing, click the ‘Save’ button at the top of the screen and exit the theme builder.
Finally, you need to activate the SeedProd theme to publish your custom author page.
To do that, go to SeedProd » Theme Builder. From there, find the ‘Enable SeedProd Theme’ toggle and switch it to the ‘Yes’ position.
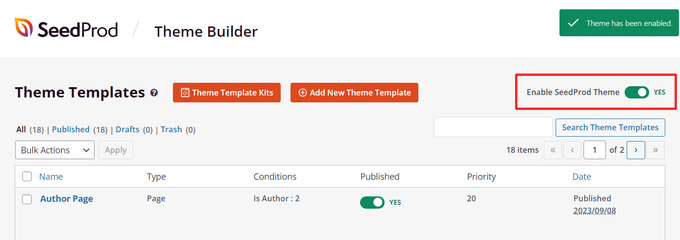
Now, your custom author profile page will be live on your WordPress site.
Method 4: Adding Social Profiles to Your Site’s Schema for SEO
All in One SEO (AIOSEO) is the original WordPress SEO plugin that’s used on over 3 million websites. It can also add social profile fields on the author’s profile page.
Unlike the other methods, this method will improve your website’s SEO since AIOSEO adds these social profiles to your site’s schema markup.
The problem is that AIOSEO does not automatically display them in the author bio. But don’t worry; we will show you how to do that.
For this tutorial, we will use the free version of All in One SEO since it allows you to add social profiles for your website and each user. However, AIOSEO Pro offers even more features to help you rank better in search engine results pages.
The first thing you need to do is install the free All in One SEO Lite plugin. For more details, see our step-by-step guide on how to install a WordPress plugin.
Once you have the AIOSEO plugin set up, you need to head over to the Users » All Users page and then click on the author’s name or the ‘Edit’ link just below.

This will open the Edit User page for that author.
Notice that AIOSEO has added a Social Profiles tab at the top of the page. You need to click on that tab now.
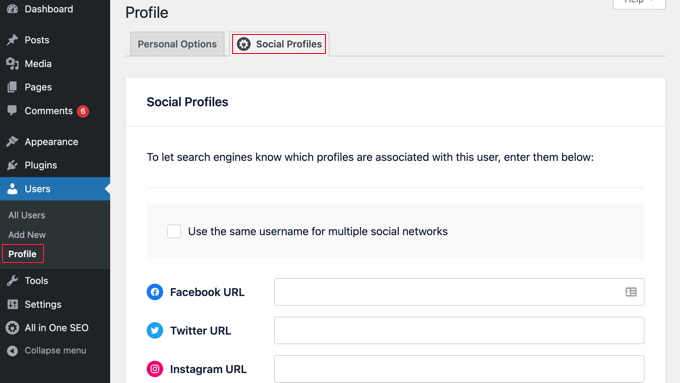
You can now enter the URL to the user’s social profiles in the boxes provided, such as:
https://facebook.com/johnsmith345
https://twitter.com/johnsmith345
Note that simply adding the username is not enough.
Alternatively, if the author uses the same username on multiple social networks, then you can click the box labeled ‘Use the same username for multiple social networks.’
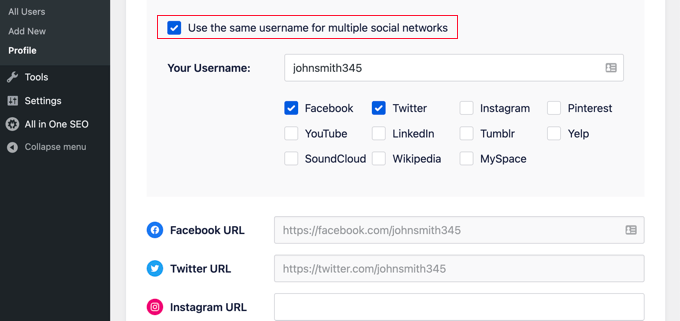
You can then type in that username and check the social networks it is used on. For other social networks, you can simply type the full URL as before.
Once you are done, click on the ‘Update User’ button at the bottom of the page to store your changes.
Pro Tip: If you have Twitter and Facebook profiles for your business or website, then you can add these to your site’s schema in a similar way by visiting All in One SEO » Social Networks and adding the links on the Social Profiles tab.
The author’s social media profiles have now been added to your site’s schema, helping search engines understand your site better. But they are not yet being displayed on your website.
Displaying AIOSEO Author Twitter and Facebook Links in Your Theme
Now, you need to display these fields as links in your theme.
If you are an advanced user, then you can display links from All in One SEO’s social profiles by editing your WordPress theme files. If you haven’t done this before, then check out our guide on how to copy and paste code in WordPress.
Note: If you are not familiar with editing your theme’s core files and adding custom code, then we recommend using AIOSEO to add the social profiles to your site’s schema and then display them on your website using method 1 or method 2 above.
Advanced users can add the following code to the theme files where you want to display the author profile links:
<?php
$twitter = get_the_author_meta( 'aioseo_twitter', $post->post_author );
$facebook = get_the_author_meta( 'aioseo_facebook', $post->post_author );
echo '<a href="' . $twitter .'" rel="nofollow" target="_blank">Twitter</a> | <a href="'. $facebook .'" rel="nofollow" target="_blank">Facebook</a>';
?>
Save your changes and view a post on your website.
Here’s how it looks on our demo website. We added the code snippet to the biography.php file in the template-parts folder of the Twenty Sixteen theme.

Alternative: Displaying Author Twitter and Facebook Links with AIOSEO’s Author SEO Addon
If you’re using AIOSEO Pro, you’ll get access to the powerful Author SEO addon. It helps you improve your Google E-E-A-T signals by demonstrating experience, authority, and trustworthiness in your schema markup and author bios.
In addition, unlike the free version of the plugin, you can automatically display Twitter and Facebook links in your author bios.
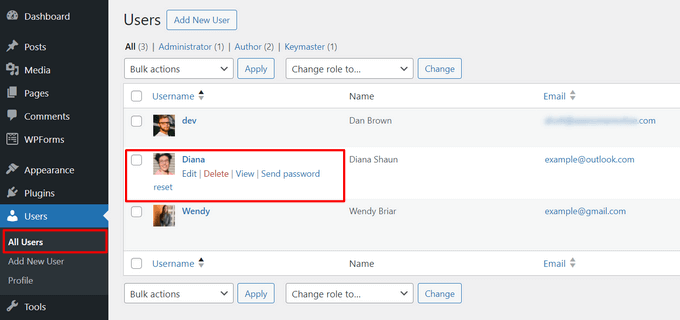
One the Pro plugin is activated, simply go to Users » All Users from the WordPress admin dashboard.
Then, click on the ‘Edit’ link below the author’s name.
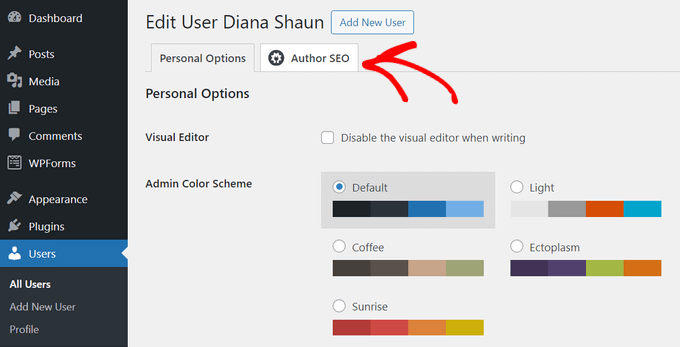
Next, click on the Author SEO tab at the top of the page.
This will open the Author SEO page where you can add more details about the author.
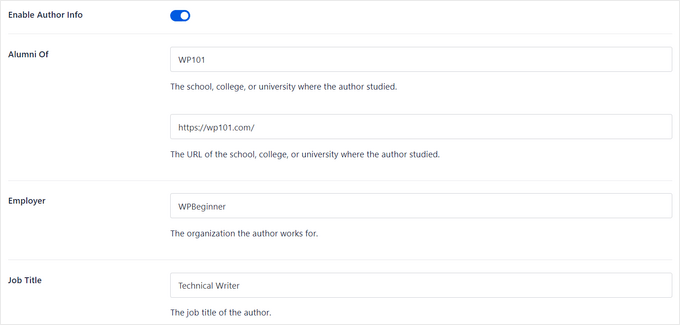
First, make sure that the ‘Enable Author Info’ toggle is in the ‘On’ position.
After that, you can add details like education, employer, job title, areas of expertise, and more, to validate your E-E-A-T signals.
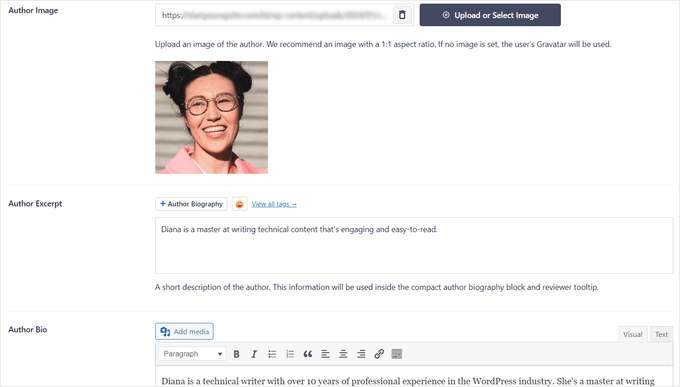
You can also add an author image, author excerpt, and full author bio.
You might like to see our guide on how to write an author bio.
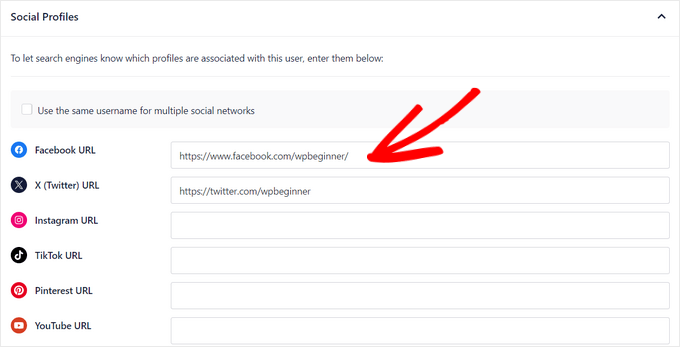
Then, you can scroll down to the bottom of the page to add the profile URLs for Facebook and Twitter.
You can also add URLs for Instagram, TikTok, YouTube, Pinterest, and more.
After that, toggle the switch to enable the Append Author Bio to Posts option.
This will automatically display a compact author bio on all posts written by the user.

When you’re finished filling out the Author SEO page, click the ‘Update User’ button to store your changes.
Now, you can visit a post to see your author bio with social network links in action. Here’s how it looked on our demo site:

Expert Guides on WordPress Authors
Now that you know how to display the author’s social profiles, you might like to see some other guides related to WordPress authors:
- How to Add New Users and Authors to Your WordPress Blog
- How to Change the Author of a Post in WordPress
- How to Add an Author’s Photo in WordPress
- How to Add an Author Info Box in WordPress Posts
- How to Add Multiple Authors (Co-Authors) for Posts in WordPress
- How to Remove Author Name from WordPress Posts
- How to List All Authors From Your Blog in WordPress
- How to Email Authors When Articles Are Published in WordPress
- How to Prevent Authors From Deleting Posts in WordPress
- Plugins to Efficiently Manage WordPress Multi-Author Blogs
We hope this article helped you learn how to display the author’s Twitter and Facebook profile links in WordPress. You may also want to see our guide on how to display recent tweets or our expert picks for the best YouTube video gallery plugins for WordPress.
If you liked this article, then please subscribe to our YouTube Channel for WordPress video tutorials. You can also find us on Twitter and Facebook.


Jiří Vaněk
I really like the Author Bio Box plugin because it matches what I see on larger professional magazines and what I want for my multi-author website. I appreciate that each author can write their own bio, so users can easily see who wrote the article and learn about their interests or experience. This is a great tip. With the activation of the MemberPress plugin and these other guides, I feel like I’m finally going to achieve what I envisioned for my website when I started creating a community and multi-user site.
WPBeginner Support
Glad our guides have been helpful!
Admin
beto
How can I display that on mobile versions ????
WPBeginner Support
If it is being removed on mobile versions then you would want to reach out to the support for your specific theme for assistance.
Admin
Manoj Solanki
How to disable the theme author box to use this plugin ?
Brandie
How can users add their social media links themselves?
Right now I can add it for my authors, but they cannot edit it themselves.
Ricardo Martins
Hi! I’m from Brazil! You frequently help me! Thank you!
So… I did not have success to add Facebook on my Author Box. Could you help me?
My Instagram and my website are showing, but Facebook not.
Touraj Aminfar
Very goood and useful , thanks
Abdelrahman Helmi
How to make it visual icons??
BImal
Can anyone give better explanation?
Vito
I would like to apply this to the page of the publication of the post, and insert text tags for each post. similar to the custom fields but with this style is that possible?
Thanks
Aamir
i am trying to include author google plus profile link in the template..
i have successfully added custum field to add google plus link in user profile of evry author but not able to include in the template …
i am using headway v3 ..
as its not posiible to edit files like author.php in headway i tried inserting the code directly in postpages by creating a Custum Code block but GooglePLus; ?> does not work…
please help..
Editorial Staff
Ask them about the related hooks that you can use to make it happen.
Admin
stephane.falzon
I try but it did not work and now it’s good. I do not understand why, but thx.
thegooch
What is the plugin’s name? I’d like to use it
richard
where in the theme function page should i place this code??
rayne
How do I add a dropdown instead of a text field?
Editorial Staff
For that you would have to write a mini-plugin calling the function and telling it to add the dropdown box.
Admin
Enk.
A little more in details, how can we get it working like we only write ‘wpbeginner’ in fields and it links automatically ?
Editorial Staff
Sure, more details added in the post.
Admin
Luke
Thank you for this.
Stupid question: What’s the code if you want to show only the info that’s displayed in user profile.
For example, when I add these in the user profile and don’t enter data, it still shows the icon.
Editorial Staff
You have to use a if then statement for that specific field in the database.
Admin
Nicole
Could you elaborate on how to write the if then statement for this?
Editorial Staff
If / Then statement are basics of PHP. This tutorial was added for developers. We would recommend looking at the PHP Tutorials site.
John (Human3rror)
very cool. i’m using it.