Carefully choosing ad placement is key to maximizing revenue and improving the user experience on your WordPress site. We’ve seen firsthand how strategic ad placement, especially on specific posts, can make a huge difference.
Displaying ads on specific posts allows you to target high-performing content, maintain a clean site design, and provide a less intrusive browsing experience for your audience. Plus, it increases ad visibility and helps you get more clicks.
In this article, we will show you how to easily display ad blocks in specific WordPress posts.

Why Display Ads in Specific WordPress Posts?
When visiting a WordPress website, you will often see banner ads in the sidebar or beneath the header. Since those are very common ad spots, they can lead to banner blindness, where users won’t notice the ads. In turn, this can affect the click rate.
By displaying ad blocks in specific WordPress posts, you can increase the visibility of your ads and target users who are most engaged with your content.
Not only does this help prevent ad fatigue by spreading out ads across multiple pages on your WordPress blog, but it also allows you to segment your audience. By showing targeted ads to users who are more likely to be interested in them, you improve your chances of engagement and clicks.
For example, a user who is reading one of your travel blog posts is more likely to be interested in an ad for travel gear or flights and may click on it to check out the prices.
Having said that, let’s see how to easily display ads in specific WordPress posts. You can use the quick links below to jump to the method you wish to use:
Method 1: Display Ad Blocks in Specific WordPress Posts Using WPCode (Recommended)
The easiest way to display ad blocks in specific WordPress posts is by using the WPCode plugin.
It is the best WordPress code snippets plugin on the market, making it super easy to place ads within any page, post, or widget area on your WordPress website.
With WPCode, you can show advertisements from third-party platforms like Google AdSense or your own hosted ads.
First, you need to install and activate the WPCode plugin. For more detailed instructions, see our beginners’ guide on how to install a WordPress plugin.
Note: You can also use the free WPCode plugin for this tutorial. However, upgrading to the Pro version will give you access to a cloud library of code snippets, smart conditional logic, and more.
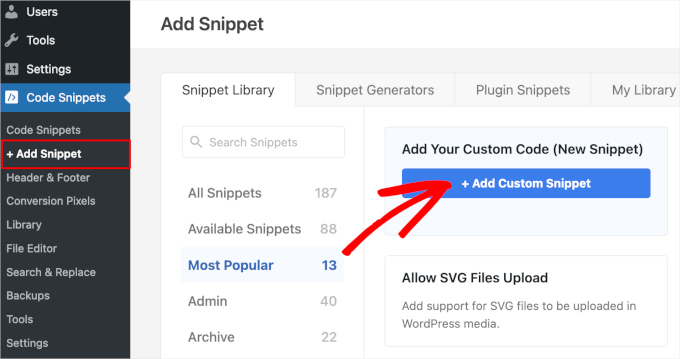
Upon activation, head over to the Code Snippets » + Add Snippet page in the WordPress dashboard.
From here, click on the ‘+ Add Custom Snippet’ button under the ‘Add Your Custom Code (New Snippet)’ option.
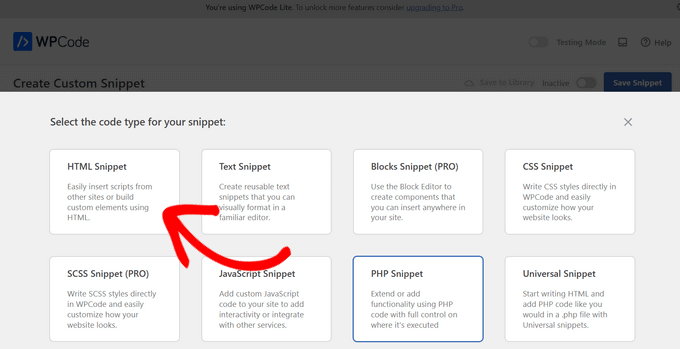
Then, you need to select ‘HTML Snippet’ as the code type from the list of options that pop up on the screen.
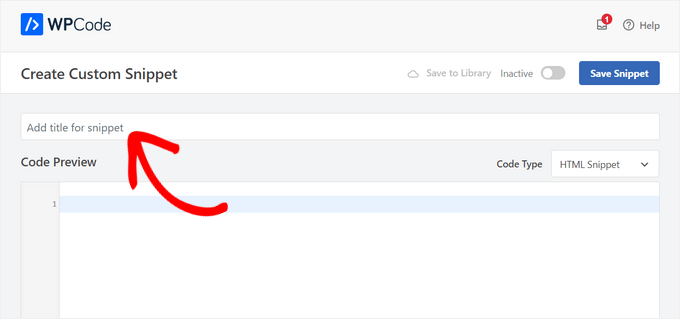
This will take you to the ‘Create Custom Snippet’ page, where you can start by typing a name for your code snippet.
The code snippet title is only for your reference and won’t be shown to users on the website’s front end.
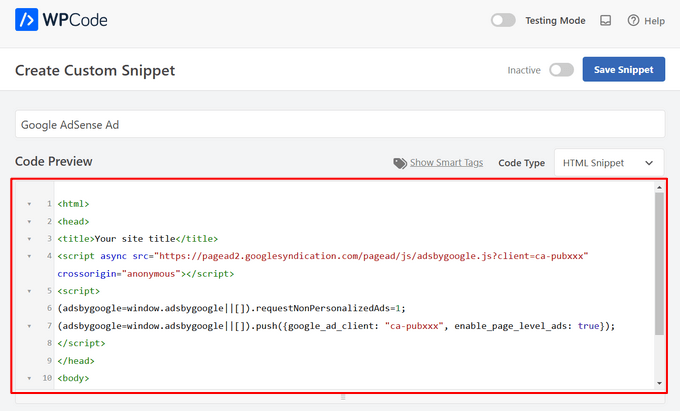
Next, you need to choose the type of ad you want to place on your site.
If you are using the ad code provided by Google AdSense, then you may want to see our guide on how to optimize your AdSense revenue in WordPress.
However, if you are creating your own ad, then you must get the code from the person who is paying you to show the ad on your site or write your own code.
Upon getting your ad code, simply copy and paste it into the ‘Code Preview’ box.
Once you have done that, scroll down to the ‘Insertion’ section and choose the ‘Auto Insert’ mode.
The ad will automatically be displayed in the specific post you pick.

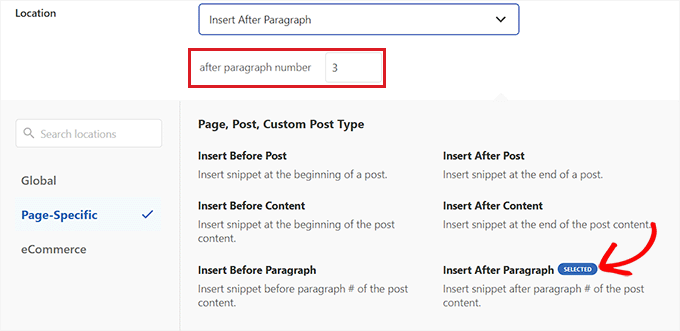
Next, click on the ‘Location’ dropdown menu to expand it, and then select the ‘Page-Specific’ tab from the left sidebar.
From here, choose the ‘Insert After Paragraph’ option.
You can also modify the number of paragraphs after which you want to insert ad snippet.
For example, if you want to display the ad block after the 3rd paragraph, then you can type this value into the ‘after paragraph number’ box.
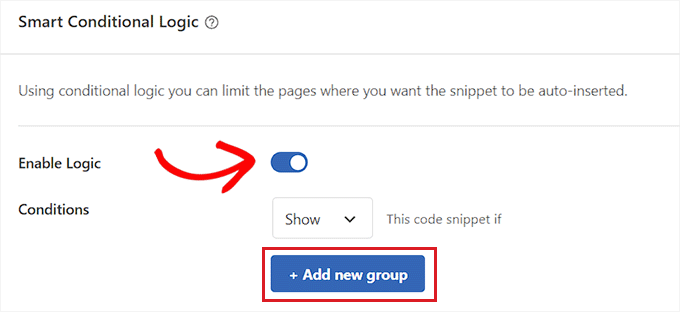
Next, scroll down to the ‘Smart Conditional Logic’ section and toggle the ‘Enable Logic’ switch to Active.
After that, make sure that the ‘Show’ option is selected for the code snippet condition. Once you have done that, just click the ‘+ Add new group’ button.
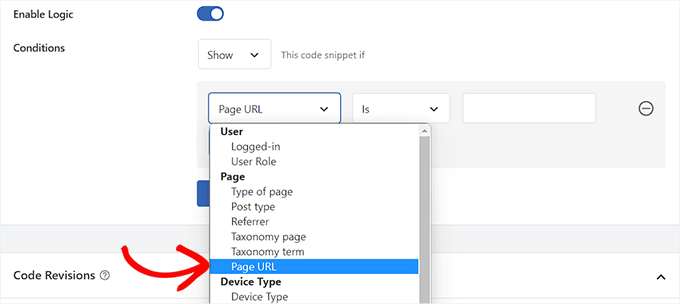
This will open up some new settings in the ‘Smart Conditional Logic’ section.
From here, you need to select the ‘Page URL’ option from the dropdown menu on the left.
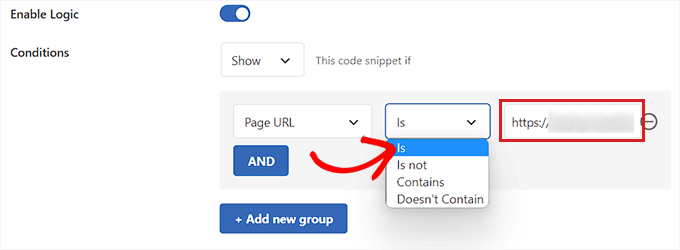
After that, you must select the ‘Is’ option from the dropdown menu in the middle.
Next, add the URL of the specific post where you want to display the ad block into the empty field in the right corner of the screen.
If you want to display this ad on more than one page or post, just click ‘AND’ and then follow the same process to insert the other post URL.
Once you have created this conditional logic, your ad block will only be displayed in that specific WordPress post.
Now, scroll back to the top and toggle the ‘Inactive’ switch to ‘Active’.
Finally, click the ‘Save Snippet’ button to execute the ad code on your website automatically.

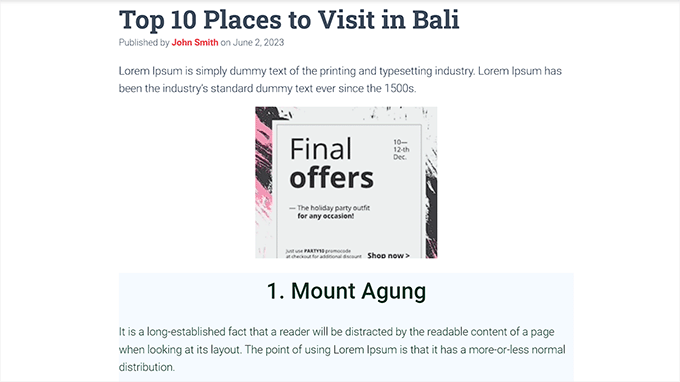
Now, you can visit the specific post you chose to see the ad block in action.
This is what it looked like on our demo website.
Method 2: Display Ad Blocks in WordPress Posts Using AdSanity
If you don’t want to use code on your website, then this method is for you.
AdSanity is a premium WordPress ad management plugin that allows you to create ad blocks and display them anywhere on your website. It works with any third-party ad network, including Google AdSense.
First, you need to install and activate the AdSanity plugin. For more details, see our step-by-step guide on how to install a WordPress plugin.
Upon activation, head to the Adsanity » Create Ad page from the WordPress admin sidebar.
From here, you can start by typing the name of the ad that you are creating.
Next, you must switch to the ‘Ad Hosted On-Site’ tab at the top if you are creating your own hosted ad.
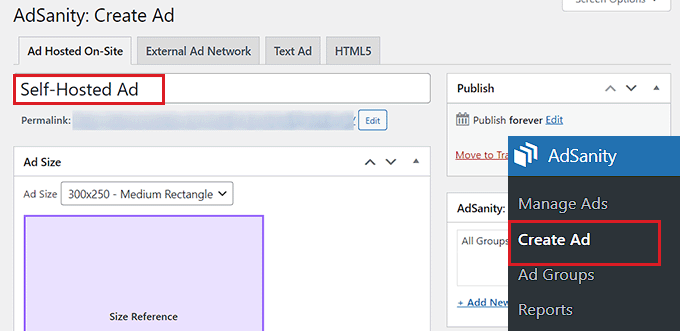
However, if you are displaying an ad from a third-party platform, then go to the ‘External Ad Network’ tab. Similarly, if you want to upload an HTML file for your ad, then you must switch to the ‘HTML5’ tab.
For this tutorial, we will be displaying a self-hosted ad in a specific WordPress post, but the steps will be the same for other types of ads.
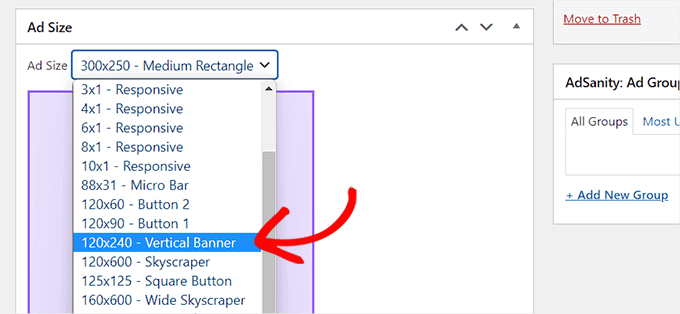
Once you have entered a name for your ad, select its size from the dropdown menu. This will be the banner size of the ad in your post.
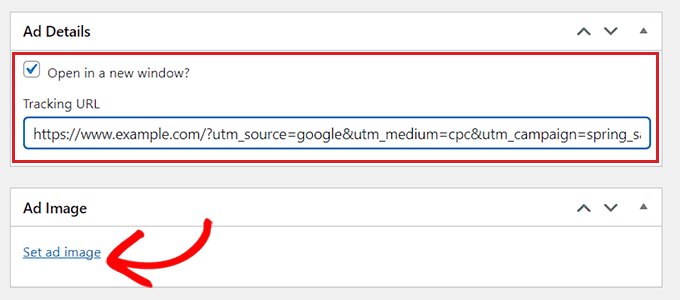
After that, scroll down to the ‘Ad Details’ section and copy and paste the tracking URL of the ad you want to display.
Once you have done that, check the ‘Open in a new window?’ option if you want the ad to open up in a different window when a user clicks on it.
You can also set an image for your ad by clicking on the ‘Set ad image’ link. This will open up the WordPress media library, where you can upload an image.
Finally, click the ‘Publish’ button at the top to save your changes.
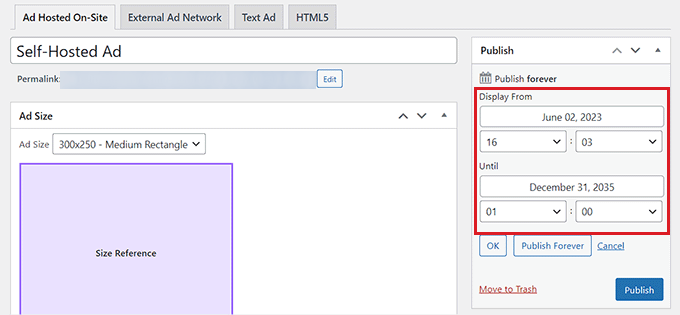
You can also click on the ‘Edit’ link in the ‘Publish’ section to set a start date and an expiration date for the ad.
Once you have clicked on the ‘Publish’ button, you can display the ad block on any page or post on your WordPress website.
Display the Ad in a Specific WordPress Post
First, you will need to open an existing or new WordPress post where you want to display the ad you created.
Once you are there, click the add block ‘+’ button in the top left corner of the screen to open up the block menu. Next, look for and add the AdSanity Single Ad block to the WordPress post content.
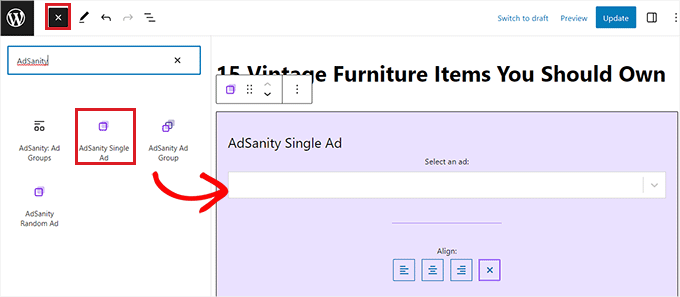
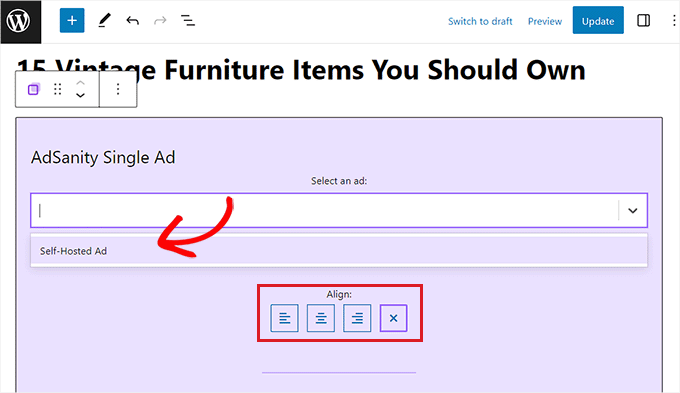
After that, select the ad that you want to display from the dropdown menu in the block.
You can also choose an alignment option for the ad block.
Finally, click the ‘Update’ or ‘Publish’ button at the top to save your changes.
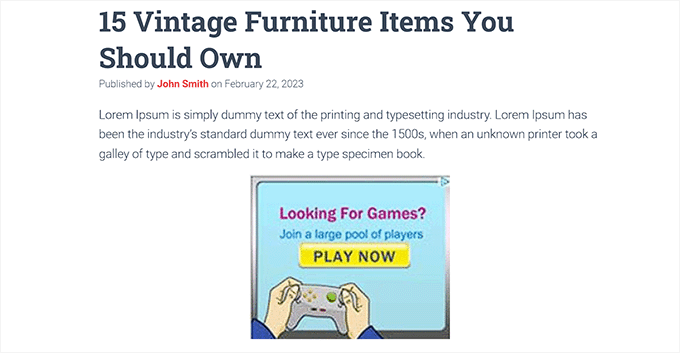
Now, you can visit your website to check out the ad block in action.
Bonus: Add Amazon Ads to Your WordPress Site
Other than promoting ads from other small businesses or WooCommerce stores, you can also display Amazon ads on your WordPress site.
These ads have a superfast approval rate, helping you easily earn money online. Plus, with Amazon, you can choose from a wide variety of products that are relevant to your niche, encouraging more users to click on them.
You can easily showcase Amazon ads on your own by creating an account on the Amazon Associates Program website.

Once you do that, simply generate your Amazon ads code and then display ads on your website using plugins like Pretty Links.
You can also create popups for your Amazon ads with OptinMonster, which is the best conversion optimization tool on the market.
For detailed instructions, see our tutorial on how to add Amazon ads to your WordPress site.
We hope this article helped you learn how to display ad blocks in specific WordPress posts. You may also want to see our tutorial on how to sell ads on your WordPress blog and our expert picks for the best affiliate marketing tool and plugins for WordPress to make money online.
If you liked this article, then please subscribe to our YouTube Channel for WordPress video tutorials. You can also find us on Twitter and Facebook.


Jiří Vaněk
Thanks for the great tutorial. I currently have Adsense with Google, but I don’t use it on the site. I was waiting for my traffic to grow a bit more. For the year 2024, I would like to monetize the website in the form of Adsense and I was thinking about how to do it. This article showed me a lot. Thank you very much for the explanation and practical examples.
WPBeginner Support
Glad the guide was helpful
Admin
THANKGOD JONATHAN
Thank you for this tutorial. However, please between WPCode and Adsanity which one has a better free version?
I want to use the free version can you recommend any one for me?
WPBeginner Support
WPCode would be the option that has a free version.
Admin
Ahmed Omar
A game-changing tutorial on displaying ad blocks in specific posts in WordPress!
Your step-by-step guide, especially the use of conditional tags, is a smart way to monetize specific content.
A technical tip: consider experimenting with Ad Plugin for advanced ad management and tracking. Thanks
Ram E.
Thanks for this another helpful post.
I’m exploring options as I’m planning to directly sell ad space on my blog in the near future. I also already read your guide on the best ad management plugins.
WPBeginner Support
Glad to hear our guide was helpful
Admin
Ralph
I was using Google Adsense auto placement and it is not optimal. In short content it looks like spam, and in long content there are even 2 or 3 full screen between ads. I want to change it and use some plugin. I was using “adinserter” to put shortcode in posts and change everything at once but it was for my products or affiliate banners. I’m wondering if the plugin is even neccessary. We have built in Wordpress blocks that can do the same. Isn’t it better for optimization to use that blocks rather than additional plugins?
WPBeginner Support
You can use the built-in blocks to include ads, the main thing that plugins allow is more options instead of only manual placements. There shouldn’t be a major optimization difference between using a default block and a plugin.
Admin
Kawsar Ahmed
Awesome article. Thank you so much for sharing tips.
I have a question, I have inserted multiple Google ads code inside an article with the wordpress default html block.
While doing this I have removed the bellow line only except the first one. It’s because the code is similar.
script/async=/src=/https://pagead2.googlesyndication.com/pagead/js/adsbygoogle.js/script
I thought if the resource was included once then it would work for all the available ads.
Please reply to me, is my thinking correct? Or if I am doing this, is there any possibility of mistracking to get the ads clicks revenue.
Thanks again!
WPBeginner Support
Unless we hear otherwise that should be doable with how Google’s ads work at the moment.
Admin
deepak Pandey
Thanks for this information. Amazing article.
WPBeginner Support
You’re welcome, glad you like our content
Admin
Bella
Hi there, I tried to install AdSanity but it does not come up in WP searches in the add new plugins section. Has it been discontinued and can you recommend a replacement?
WPBeginner Support
Hi Bella,
It is a paid plugin and you can buy it from AdSanity website.
Admin
raman
Great post. Wonderful information and really very much useful. Thanks for sharing and keep updating.
Narendra Singh
I have a website and I want to have a theme which has “Read More” or “Continue Reading” option and which is very easy to search in google search engine. Right now I have “Twenty Twelve” theme.
Kindly suggest
Narendra