When it comes to making updates or significant changes to your WordPress site, doing so directly can be risky. This is where a staging site comes in.
It is a perfect clone of your live website where you can safely test changes, troubleshoot issues, and refine updates before deploying them to your main site.
At WPBeginner, we use staging sites to test website updates before publishing them on our live sites. This saves us from potential downtime, broken features, and other complications.
In this step-by-step guide, we will show you how to easily create a staging environment for your WordPress site. We will cover several different methods and most of them only require a few clicks.
What Is a Staging Site?
A staging site is a clone of your live website that is used for testing changes before making them live. Staging sites help you catch errors, so you don’t break your live website.
In the past, it used to be very difficult to set up a WordPress staging site, but now that has changed so even a non-technical person can do it.
A lot of users install WordPress locally on their Windows or Mac computers to test changes. Once they’re done with the updates, they simply upload those changes from localhost to the live server.
The biggest problem with this approach is what if something that worked on your localhost does not work on the live server?
Often the local sites and live WordPress hosting servers are not running in the same environment.
Since the staging site lives on your web hosting server, you can easily prevent all those errors because it runs the same server configuration as your live site.
With that said, let’s take a look at how to set up a staging site for WordPress.
How to Easily Create a WordPress Staging Site
There are multiple ways to create a staging site for WordPress. The easiest is using your hosting provider’s built-in staging site feature.
Some of the best WordPress hosting companies already offer 1-click staging websites. If your website is hosted with one of them, then you can easily create a staging site without any hassle.
If you do not have one of these popular hosting solutions, then we also have a solution to help you create a WordPress staging site using a plugin (and even manually).
For faster browsing, you can use the navigation below to jump to the section that’s most applicable to you:
Creating a Staging Site on Bluehost
Bluehost is one of the best WordPress hosting companies. They offer a quick 1-click staging site solution with all their plans.
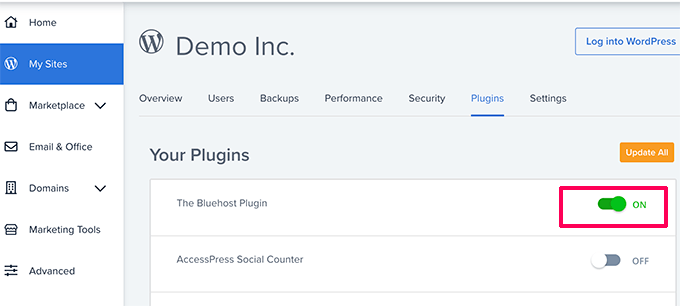
First, you must head over to your Bluehost dashboard and visit the ‘My Sites’ section.
Next, switch to the ‘Plugins’ tab and toggle the switch next to the ‘Bluehost Plugin’ option.
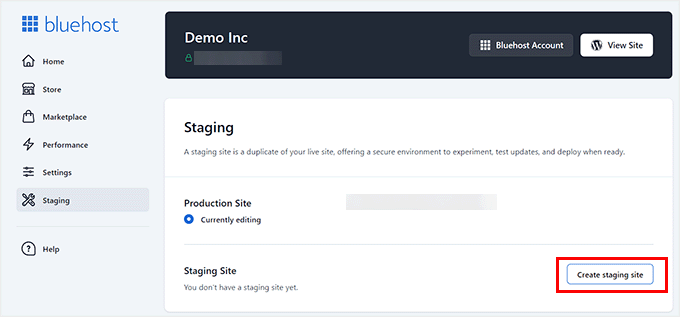
After that, head over to your WordPress site dashboard and visit the Bluehost » Staging page.
Now go ahead and click the ‘Create Staging Site’ button.
Bluehost will now prepare the staging environment for your website.
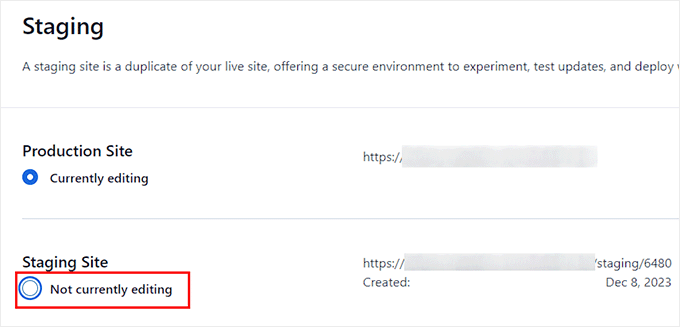
Once that’s done, it will display a Staging Site’ section where you must check the ‘Not currently editing’ box.
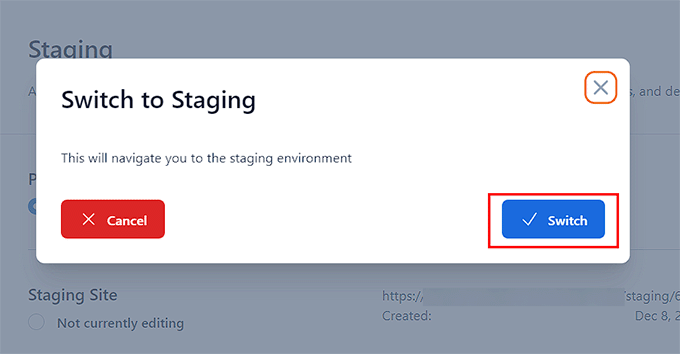
A prompt will now open up on your screen asking you to switch to the staging site.
From here, click the ‘Switch’ button.
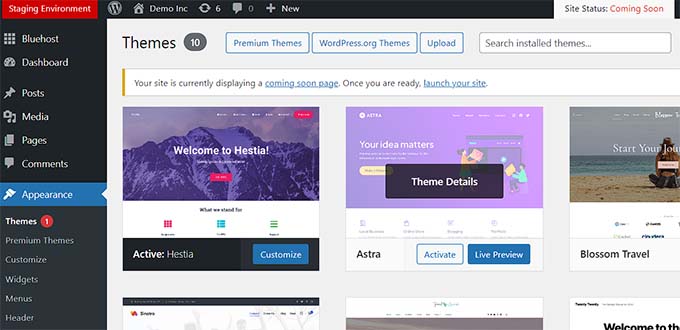
Once switched, you will see a button on the screen indicating that you are working on the staging website.
You can go ahead and work on your website without worrying about it affecting your live site.
Deploying Changes From Staging to Live Site on Bluehost
Once you are ready to push changes from staging to the live site, simply go to the Bluehost » Staging page from the WordPress admin sidebar.
From here, you’ll see the deployment options drop-down menu next to your staging website. You can deploy only the files, only the database, or deploy all changes.
If you’re not sure, then click on the ‘Deploy All Changes’ button to continue.
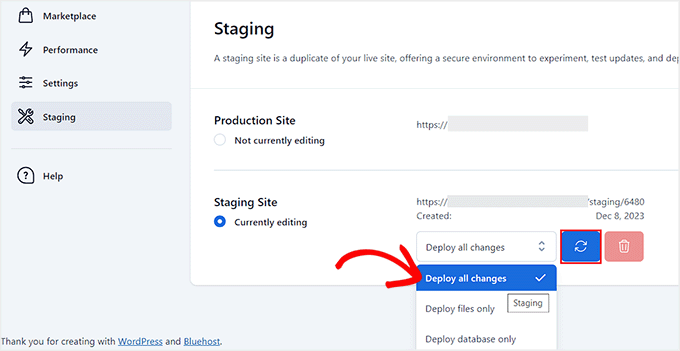
After that, click the ‘Deploy Site’ button next to the dropdown menu.
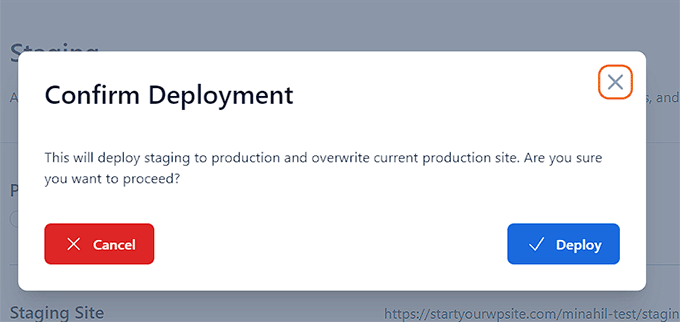
This will bring up a popup where you will be asked to confirm that you want to deploy the staging site to the production site. Click on the ‘Deploy’ button to continue.
Bluehost will now start deploying your staging site to the live site. Depending on the size of your website, this may take a while.
You can now switch back to your live website to see your changes in action by clicking on the Radio button under the Production site option.
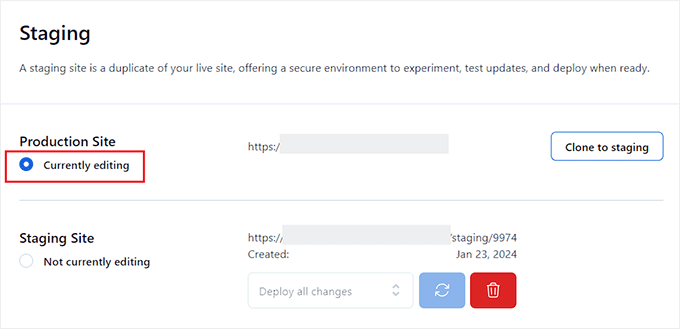
Cloning Production Site to Staging
Now, as you switch back to the production website any changes you make there are not automatically synced to your staging website.
In the future, if you want to test more things on your staging website you’ll need to duplicate your site.
To do this, you must visit the Bluehost » Staging page and click on the ‘Clone to staging’ button.
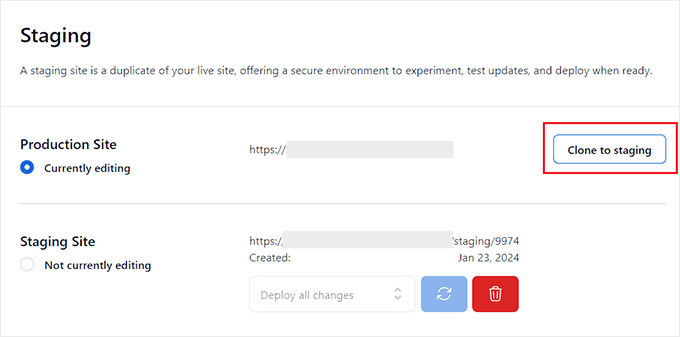
Bluehost will then clone the latest changes to your live website to your staging website. After that, you can switch to the staging website for testing and development.
Creating a Staging Site on SiteGround
SiteGround is another top WordPress hosting company offering a 1-click staging feature with their GrowBig and GoGeek plans.
We’ve been using this hosting at WPBeginner and have had a great experience with it. It’s been reliable, fast, and easy to manage, making it a solid choice for our website.
To learn more, see our SiteGround review.
If your website is hosted with SiteGround, then this is how you would set up a staging website.
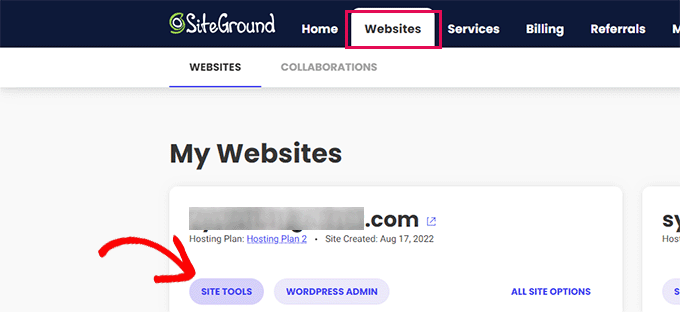
First, you need to log in to your SiteGround dashboard and switch to the Websites tab. From here you need to choose the Site Tools below your website.
On the next screen, you need to click on the WordPress » Staging menu from the left column.
From here, select your website and then provide a name for your staging copy.
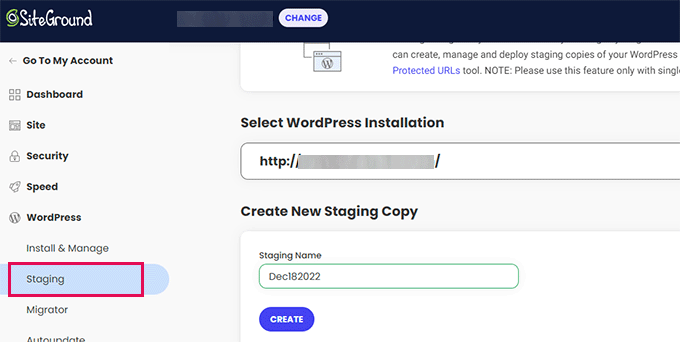
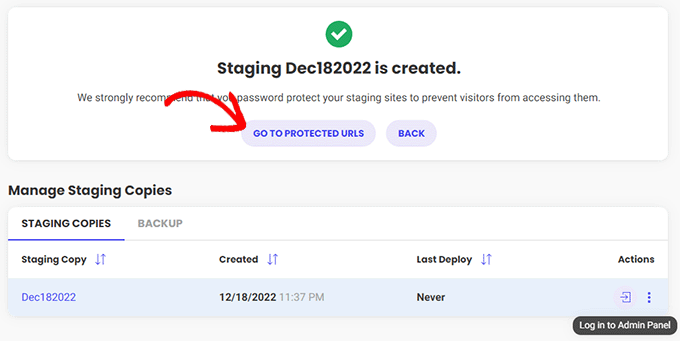
Click on the ‘Create’ button to continue and Siteground will create a staging copy of your website.
After that, you need to click on the ‘Go to protected URLs’ button so that you can password-protect your staging website and keep it private.
On the next screen, Siteground will automatically fill in the URL and path for your staging website.
You have to enter the username and password that you want to use to protect your staging site.
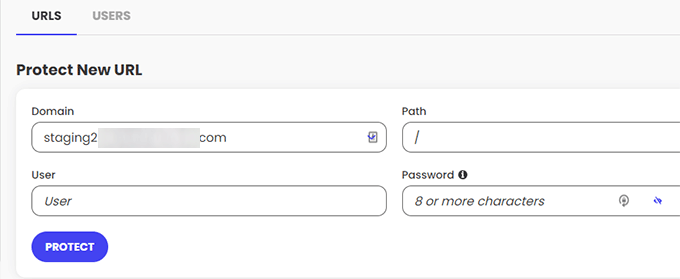
Click on the ‘Protect’ button to save your settings.
You can now go back to the WordPress » Staging page and click on the ‘Log in to Admin Panel’ button next to your staging website.

SiteGround will now open the WordPress admin area of your staging website. You can test your changes on this staging website.
Deploy Changes Back to Your Live Website
Once you have tried your changes on the staging website, you may want to merge them to your live website.
SiteGround makes this easy too.
Simply click on the WordPress » Staging menu from the left column. Then click on the three-dot menu next to your staging site under the ‘Manage Staging Copies’ section.

The menu will show you two deployment options. You can either choose the ‘Full Deploy’ or ‘Custom Deploy’ option.
The ‘Full Deploy’ option merges everything from the staging website to your live website. ‘Custom deploy’ allows you to select which files or data you want to merge.
If you are unsure, then choose the ‘Full Deploy’ option.
SiteGround will then copy the staging site to your live website.
Merging Live to Your Staging Website
Changes you make to your live website are not automatically copied to your staging website.
Each time you need to work on your staging website, repeat the process above to create a fresh staging website.
Creating a Staging Site on WP Engine
WP Engine is the best WordPress-managed hosting company in the world. Managed WordPress hosting is a concierge service for your WordPress site where the hosting provider takes care of updates, backups, security, and performance.
WP Engine offers a one-click staging solution with all their plans. If you are using WP Engine to host your website, then this is how you would set up a staging environment for your site.
First, you need to log in to your WP Engine dashboard. Next, go to the ‘Sites’ page and select your website by clicking on it.
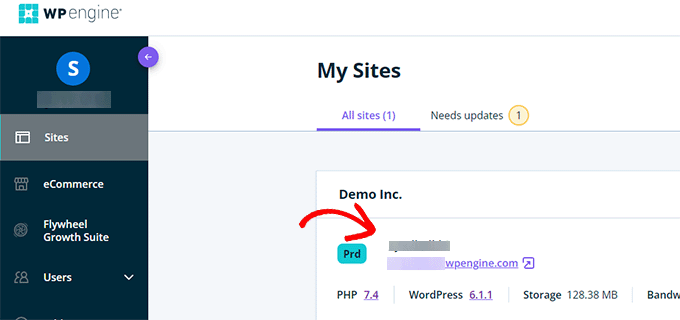
This will bring you to your website dashboard.
Now, you need to click on the ‘Add Staging’ link from the left column or select it under your site name at the top.
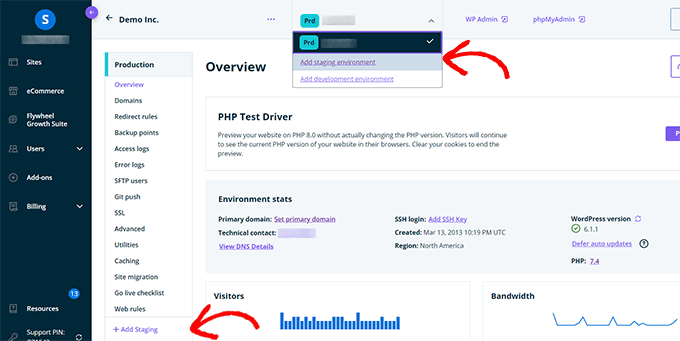
This will bring you to the ‘Add Environment’ screen.
You’ll be asked to choose how you wish to proceed with your staging environment.
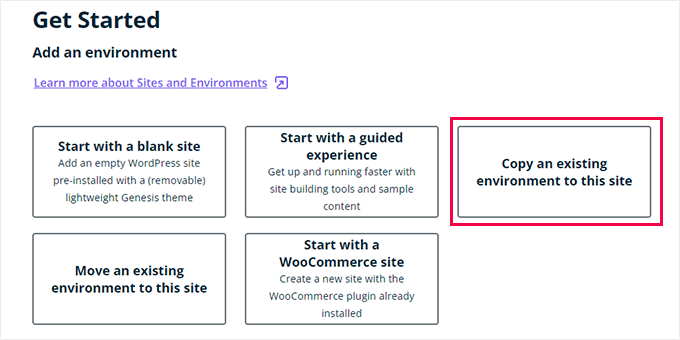
Here is what each of these options does:
- ‘Start with a new blank site’ creates a new empty site.
- ‘Start with a guided experience’ creates a new site with a guided experience and demo content.
- ‘Copy an existing environment to this site’ will copy your production or development environment to this site (e.g. copy your live site to this environment).
- ‘Move an existing environment’ moves an environment to this site (e.g. move the development environment to the Staging)
- ‘Start with a WooCommerce site’ creates a new WordPress site with WooCommerce pre-installed.
Since you want to create a staging copy of our live website, you’ll need to click on the ‘Copy an existing environment to this site’ option.
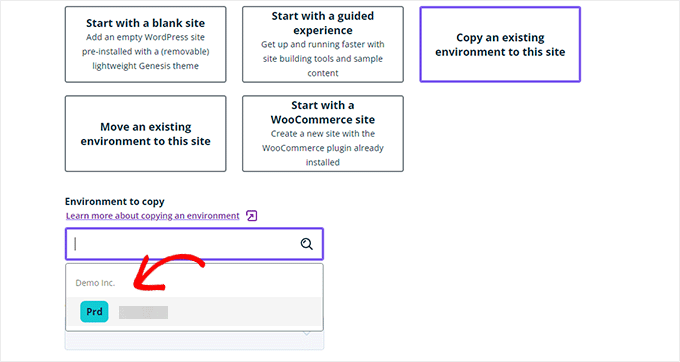
After choosing an environment choose the latest backup you want to copy from and then click on the ‘Next’ button to continue.
Now, you’ll need to provide a name for your staging site. This name will be used in your staging site URL. After that, choose STG (staging) as your environment type.
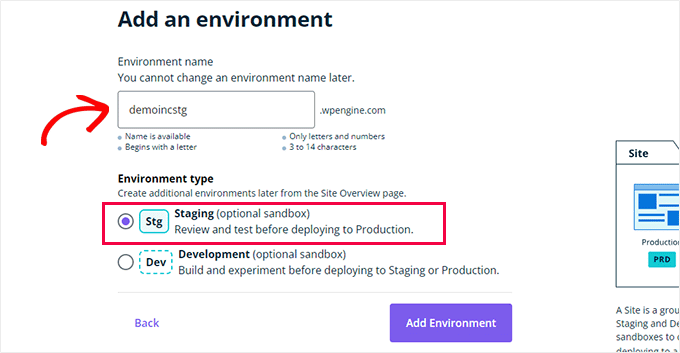
Click on the ‘Create Environment’ button to continue.
WP Engine will now create a staging site for you. After that, you will be redirected to your Staging environment dashboard.
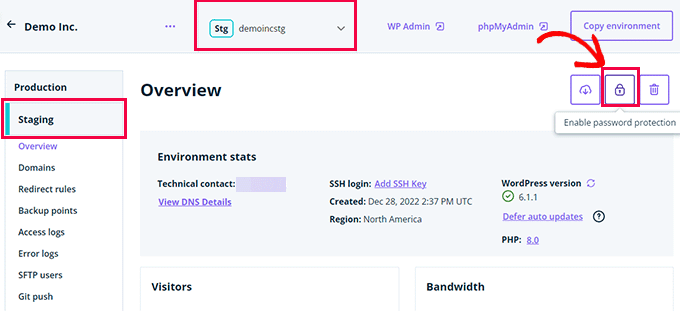
Next, you need to click on the Padlock button to enable password protection for your staging site.
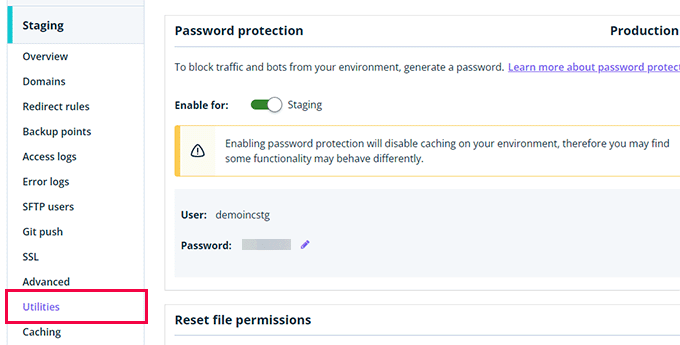
After that, you need to switch to the ‘Utilities’ tab to copy your staging site username and password.
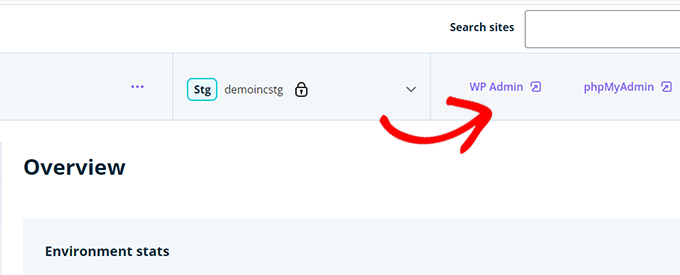
You can now click on the ‘WP Admin’ button at the top to log in to your staging website.
Feel free to make changes and try out features on the staging website just as you would in a typical WordPress site you install anywhere else.
Deploy Changes From Staging to Live Website on WP Engine
Want to merge changes you made on the staging website to your live website?
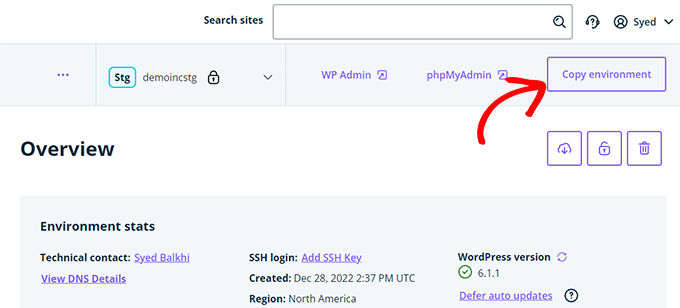
Simply click on the ‘Copy Environment’ button to begin deployment.
This will bring you to the options page. From here, you need to choose your source and destination environments for the copy.
Here you’ll select your staging website as the source environment and your production or live website as the destination environment.
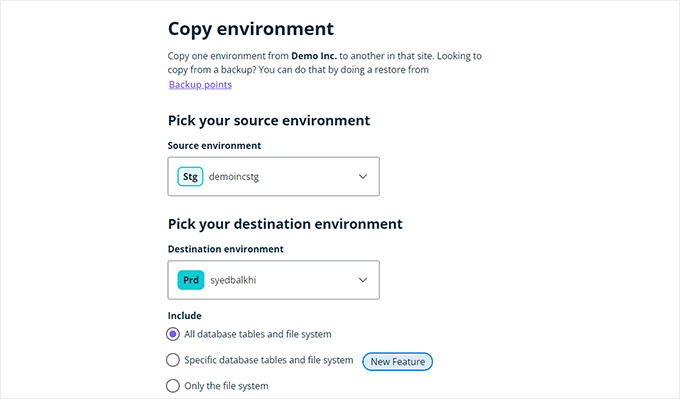
You can choose what you want to copy. For instance, you can copy all database tables and files, specific files and database tables, or only the file system.
Note: If you copy everything, you will lose any data stored on your live website after you use it to make the staging environment. This may include important data such as new posts, pages, customers, and orders. So it’s a good idea to run a backup of your live site before deploying from staging.
Next, click on the ‘Review and Confirm’ button to begin deployment. It will take a while to copy everything to your live website.
You will get an email notification when the process is complete.
Creating a Staging Site Using WordPress Plugin
If your WordPress hosting company does not provide a staging site feature, then you can still create a staging website using a WordPress plugin.
There are some disadvantages to using this method.
First, a plugin will have limited control over your hosting server. This is why it may not always give the best results.
Secondly, the plugin we will be using will store your staging site on its own servers. If you are concerned about privacy and data protection, this may not be ideal for you.
Lastly, the plugin has several known incompatibilities. Please check their incompatibilities page to make sure that your website is compatible.
That being said, let’s see how to create a staging WordPress site using a WordPress plugin.
The first thing that you need to do is install and activate the WP Stagecoach plugin. For more details, see our step-by-step guide on how to install a WordPress plugin.
Upon activation, the plugin will add a new menu item labeled WP Stagecoach to your admin bar. Clicking on it will take you to the plugin’s settings page.
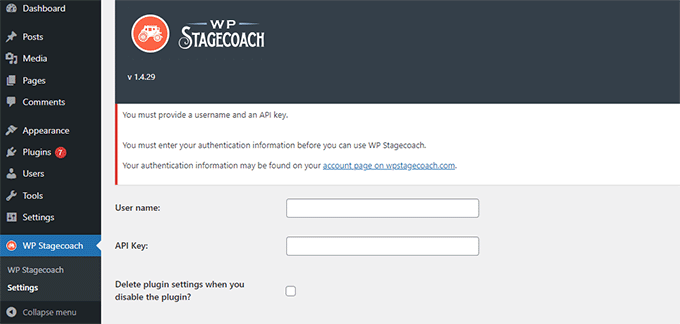
You will need to enter your WP Stagecoach username and the API key, which you can find in your account on the plugin website.
After that, you need to visit the WP Stagecoach » WP Stagecoach page and choose a name for your staging site. This name will also be used as the subdomain of your WordPress staging website.
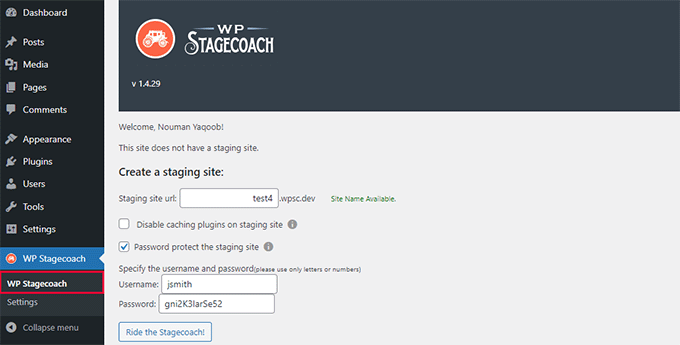
Don’t forget to check the box next to the ‘Password protect the staging site’ option. It will protect your staging website from public view and search engines.
Click on the ‘Ride the Stagecoach’ button to continue.
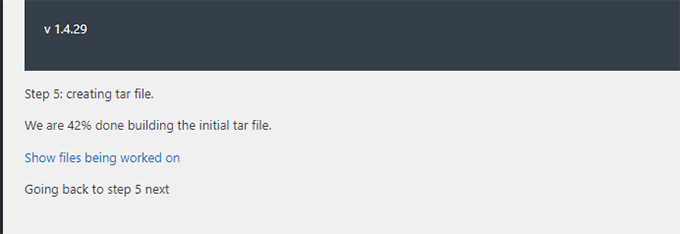
The plugin will now create a backup of your WordPress files and database to export them for your staging site.
It may take a while depending on the size of your WordPress website.
Once finished, you will see the link to your staging site and its admin area.
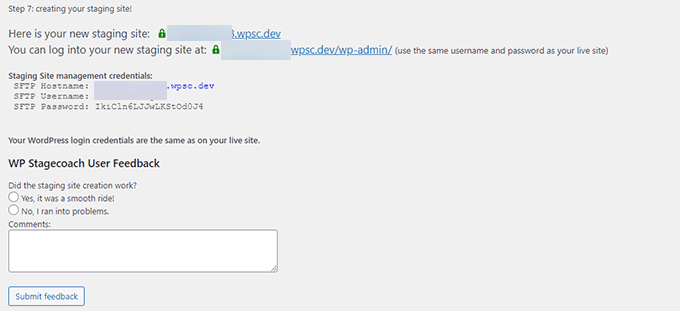
You can click the link to visit your staging site and start working on it.
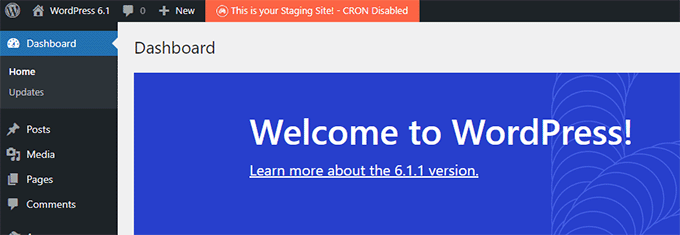
You’ll notice a bright orange message in the admin bar at the top indicating that you are working on your staging site.
Deploying Staging Site to Live Using WP Stagecoach
Once you are ready to import changes to your live site, head over to the WP Stagecoach » Import Changes page and click on the check for changes button.
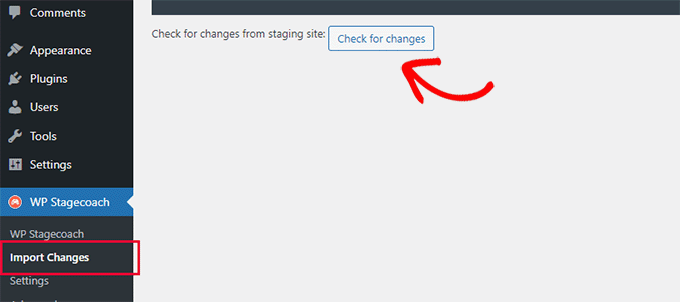
The plugin will now check for changes on your staging site and then show you options to import them.
You can choose from all changes, file changes, or database changes.
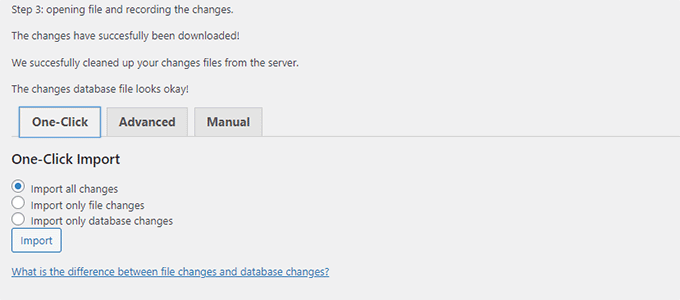
The plugin will show you the progress of the import and will notify you when it is done.
You can now test your live site to see if all changes were successfully imported.
Create a Staging Site for WordPress Manually
This method will teach you to manually create a staging site for your WordPress install. It is for advanced users and requires more work than other methods described above.
Another disadvantage of this method is that your website will be temporarily unavailable when deploying changes back from staging to the live server.
That being said, let’s see how to manually create a staging environment for your WordPress site.
First, you need to create a subdomain for your staging website. If you use Bluehost, then go to your hosting account’s dashboard and switch to the ‘Advanced’ tab.
Next, click the ‘Manage’ button next to the ‘cPanel’ option.
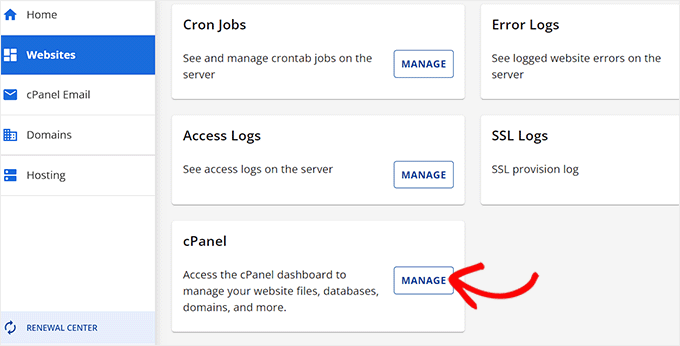
This will open the cPanel in a new tab where you must scroll down to the ‘Domain’ section.
From here, click the ‘Domains’ option.
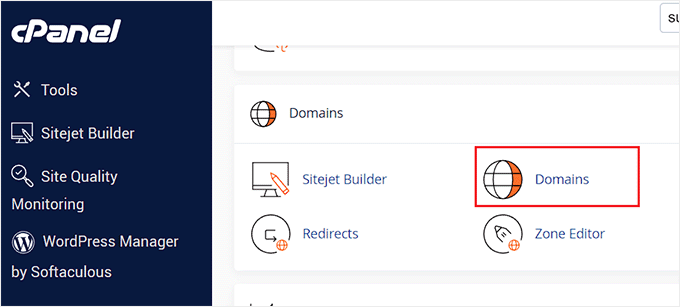
This will open a list of all the domains on your hosting account. Here, you must click the ‘Create a New Domain’ button.
Once you do that, a new page will open on the screen where you must write your subdomain followed by the domain name under the ‘Domain’ field like this:
subdomain.example.com
After that, simply click the ‘Submit’ button to store your settings.
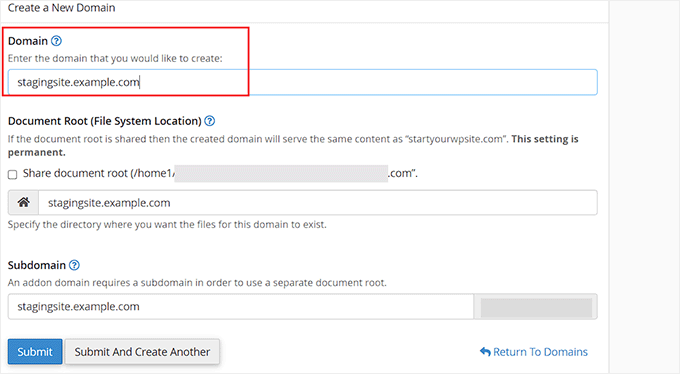
Note: We’re using Bluehost in our example screenshots, so your screen may look different.
Your hosting control panel will now add your subdomain, which you can use to import your live WordPress site.
Next, you need to install and activate the free Duplicator plugin on your live site. If you need full features, you can get the premium version of Duplicator here.
Several of our partner brands have also used this tool to create backups and have seen excellent results. To find out more, see our Duplicator review.
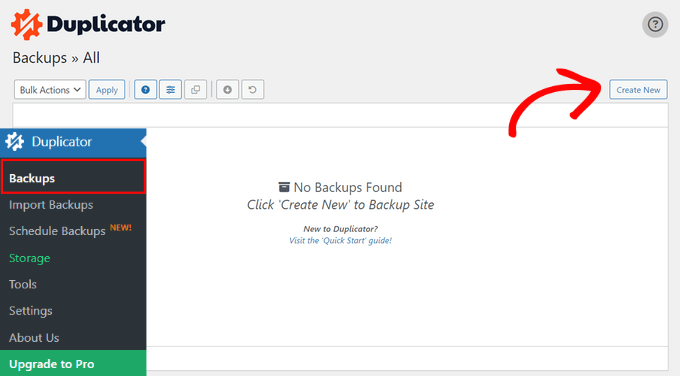
Upon activation, you need to click on the Duplicator menu in your WordPress admin sidebar and click on the ‘Create New’ button under Backups.
Next, you can enter a name for your backup and click on the ‘Next’ button to continue.
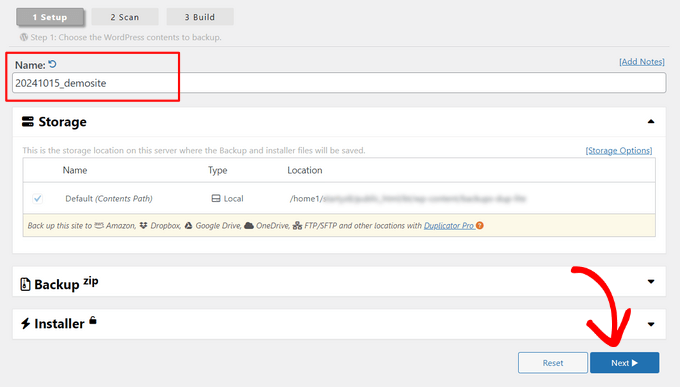
After that, Duplicator will now run the website duplicator wizard.
First, it will run some tests to see if everything is in order. If all items are marked ‘Good,’ then click on the ‘Build’ button.
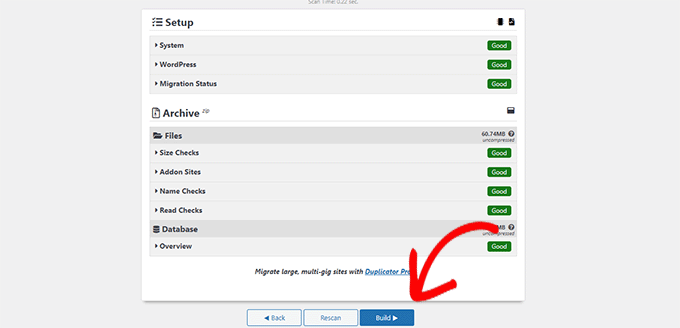
The plugin will now start creating a Duplicator backup package for your WordPress site. This process may take a few minutes depending on the size of your website.
Once finished, you’ll see download options for the Installer and the Archive package. You need to click on the ‘Download Both Files’ button to download both files on your computer.
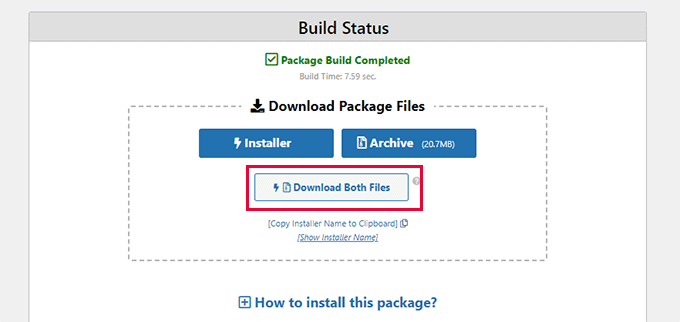
You’ll need to upload both of these files to the file directory of the subdomain you just created. For details, see our guide on how to use FTP to upload files to your WordPress website.
Next, your new staging WordPress site will need a new database. Let’s create one.
Head over to your WordPress hosting account’s control panel and switch to the ‘Advanced’ tab.
After that, scroll down to the ‘Databases’ section and click on the ‘Manage’ button next to it.
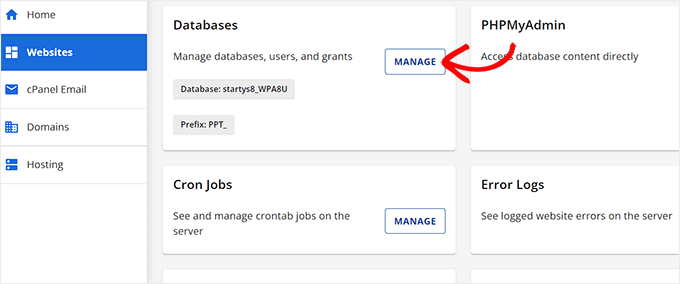
If you are not using Bluehost, then your WordPress hosting environment may look a bit different. Don’t worry, and just look for the Databases section.
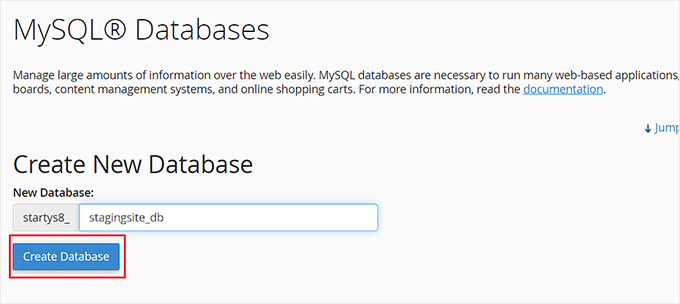
This will take you to the ‘MySQL Databases’ page where you can start by providing a name for your database.
Then, click the ‘Create Database’ button.
Next, you need to create a MySQL user for your database.
Scroll down to the MySQL Users section and provide a username and password for your new database user.
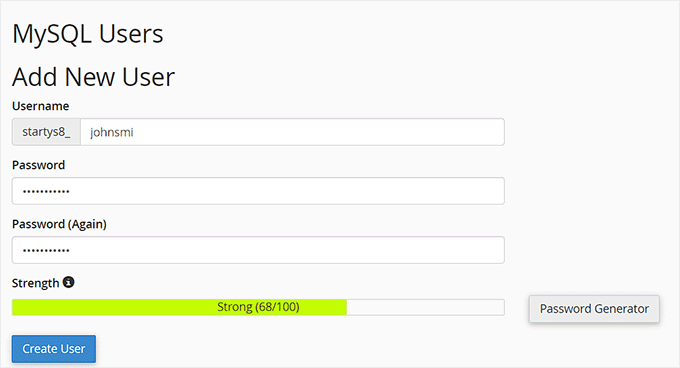
Now you must give this user permission to access and modify the database you created earlier.
Simply scroll down to the ‘Add user to database’ section and select your database and the user you just created.
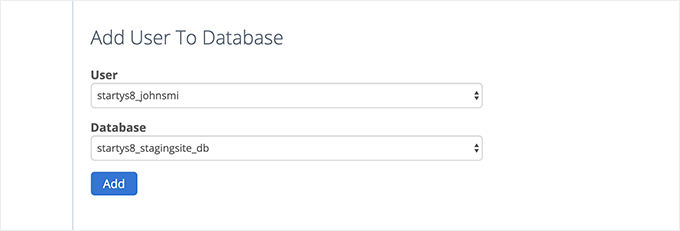
After that, click on the ‘Add’ button to continue.
You will be asked to select privileges for the user. Go ahead and select the ‘All Privileges’ checkbox and then click on the ‘Make changes’ button.
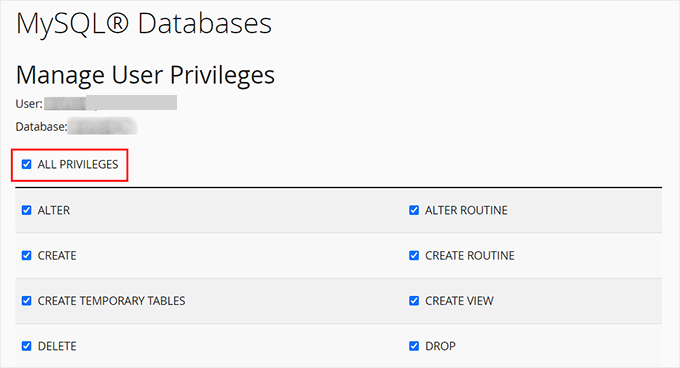
Now your database is ready to be used for your staging website.
Next, you need to open a new browser tab and enter the subdomain of your staging site like this:
https://yoursubdomain.example.com/installer.php
Don’t forget to replace yoursubdomain it with the actual subdomain and example.com with your own domain name.
This will launch the Duplicator installer wizard.
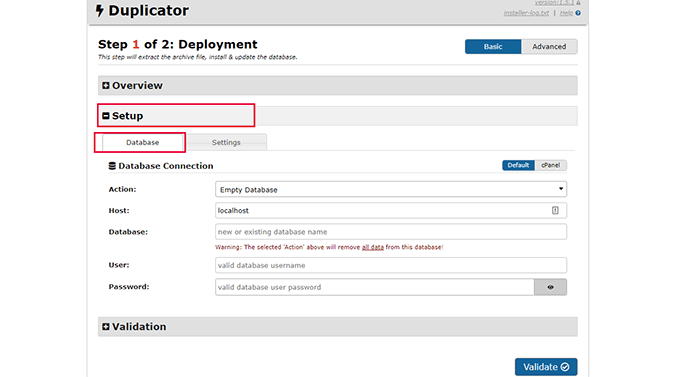
Under the ‘Setup’ section, the installer will ask you to enter your WordPress database information.
Your host will likely be localhost. After that, you will enter the details of the database you created for your new domain name in the earlier step.
Click on the ‘Validate’ button to make sure that Duplicator can connect to your database.
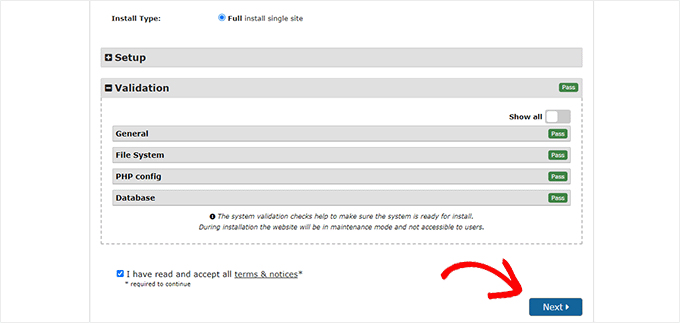
Once done, click on the ‘Next’ button to continue.
Duplicator will now unpack your WordPress database and files and import them to your staging site.
Once finished, you will see a success message.
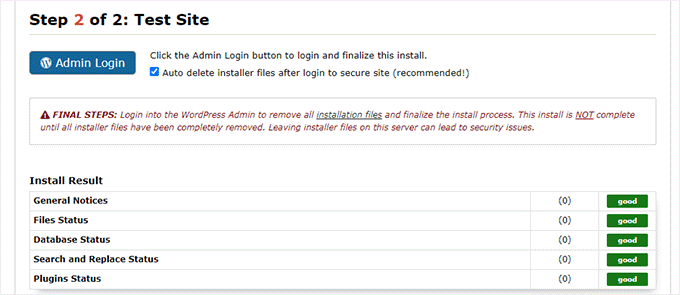
You can click on the ‘Admin Login’ button to enter the WordPress admin area of your website on the new staging site.
Now you have your staging site set up. You can protect it by adding password protection to the subdomain.
Head over to your hosting account’s dashboard and switch to the ‘Advanced’ tab.
After that, scroll down to the ‘cPanel’ section and click the ‘Manage’ button next to it.
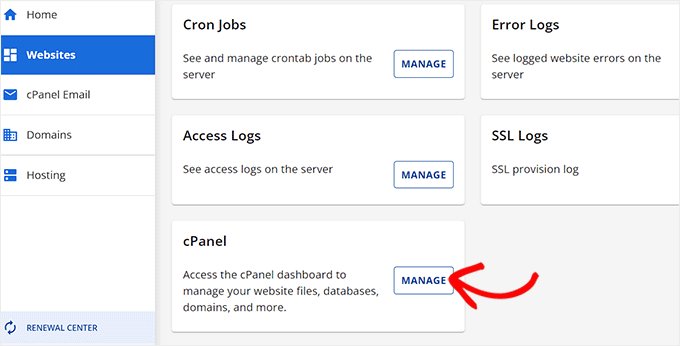
This will open the cPanel in a new window where you must scroll down to the ‘Files’ section.
From here, click on the ‘Directory Privacy’ icon.
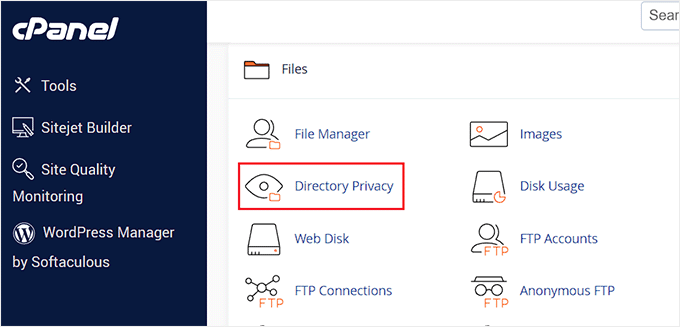
Next, you need to select your subdomain folder and then select the option to ‘password protect this directory’ checkbox.
You will be asked to provide a name for this setting, and then click the ‘Save’ button.
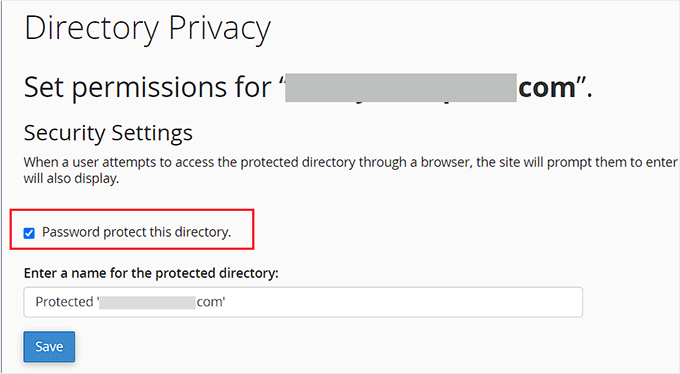
Your staging site will now be hidden behind password protection, keeping it out of search engines’ hands and the public’s eyes.
You can now work on your staging site and make any changes to it.
Manually Deploy Staging Site to Live
After you are ready to deploy changes from your staging site to the live server, you will follow the same steps described above.
Simply create a new Duplicator package on your staging site and download the Installer and Archive files to your computer (See instructions above).
Next, you need to head over to your live site and create a complete WordPress backup (you can use Duplicator to create a complete backup as well).
Once you are done, you will need to delete all WordPress files and folders from your live website. This means your WordPress site will be down for a while.
Finally, follow the instructions above to run the Duplicator installer wizard to import the staging site to the live server.
As you can see, the last method is not the best method at all. There are many things during the process that can damage your site.
We suggest avoiding this method at all costs unless you have no other choice. We recommend using a reliable hosting provider like Bluehost, SiteGround, or WP Engine with built-in staging site features.
We hope this article helped you learn how to easily create a staging environment for your WordPress site. If you run into any issues, check out our guide on how to test your site for updating to Gutenberg. You may also want to learn how to use WordPress Playground in your browser for testing.
If you liked this article, then please subscribe to our YouTube Channel for WordPress video tutorials. You can also find us on Twitter and Facebook.


Lynda Joy
Hi,
I just did the first five or so steps of this, and then got lost at “upload your Wordpress content to. So now I have completely messed up my site and I would like to know how to undo what I have done.
Thanks.
– Lynda
Rachel
Thanks so much for this – I am very much a beginner but trying to figure out how to do these things myself so I can launch a new design by first using a test site in order to get it right. I have managed to follow your instructions perfectly until this part:
“After copying your database, you need to copy your WordPress files, plugins, themes, and uploads. First download a fresh copy of WordPress from WordPress.org. Upload the contents of WordPress to your staging site. Note, do not run the WordPress install yet”
Can you please advise as to how this is done or direct me to another instruction article? I can’t seem to find out how to do it otherwise. Many many thanks in advance
Sanket D.
So I’ve managed to create my staging environment successfully — I’ve all my media, themes, plugins, everything else properly transferred. However, I’d made some changes to my theme (not through any codes, but through the theme’s inbuilt settings — basic stuff like a custom logo (which I can see in my media library), theme color, homepage layout, etc. These changes are the only thing that for some reason are missing from my staging site. Anybody knows why this might be?
byberkan
I’m hoping you can find the solution. Same problem exists for me.
Joe
It seems we have to do the steps in here after we have our theme, plugin etc.
Mark Park
Great article! Just one thing that isn’t clear to me.
If I have the current non-wordpress website on a domain name example.com and I want to build a new website using Wordpress and develop it on a staging environment on a sub-domain dev.example.com – is this possible?
Can I make a sub-domain dev.example.com and install WP on the same server used by the current non-WP website?
Later when the website is finished I want to connect my WP developed site with the domain name example.com.
Thank you for your help.
WPBeginner Support
Yes this is possible. Make sure you block search engines on your development subdomain.
Admin
Maria
Thanks for a Very helpful article! I am in a similar situation as Mark, however my current website is a Wordpress site. Can I still develop the redesigned website on a staging site within a sub domain? And if so do I have to create a new database?
byberkan
You really didn’t read the article, do you?
Benito
Hello, great article, but what if I don’t want to use XAMPP, and I just want to use a subdomain as a staging site and then push changes to live? What would be the best way to deploy the changes?
Raj
Will this process create a Database User and add it to the database we created while copying giving it all privileges by itself? or do we need to create a database user at some point?
Raj
Okay I tried it.. both ways.
Once I created the database user before installing wordpress on the staging site and it worked. The other time around, I didn’t and got the issue “We were able to connect to the database server (which means your username and password is okay) but not able to select the a*******_ata_d2db database.”
That to me means that one has to create a user manually, only copying database won’t do. Right?
Sanny
Raj, I see the same error (“Can’t select database”). How did you fix it ?
Scott
Hopefully you guys figured this out, but just to leave this here for others to find, you do indeed need to create a database user (which is not clear in this article). While using Bluehost, I had to do about three steps. First step is to use the MySQL Database cPanel to get access to the list of MySQL databases. Once there, I could see that the new staging database that I had copied using phpMyAdmin per the article, did not have a privileged user assigned to it. So, I created a user, but then discovered that the user I created had too many characters (16 is the max). Once I got that straightened out, I then had to Add this user to a database using the same MySQL page. As part of this assignment step, I was able to select “ALL PRIVILEGES” to make this user a privileged user for this new staging database. Once that was all setup, I was able to configure Wordpress to connect up to the staging database.
Gayle
Terrific resource! Reached a WP staging breaking point and then found this. Lifesaver! Thank you! Only things I’d add would be some meta information for newbies like me. : )
LizP
Yikes, too hard for me!
Deborah
Thanks for the tutorial. I seem to be stuck on one of the very first steps. When clicking go after changing the URL’s in SQL, I get a message of ‘# MySQL returned an empty result set (i.e. zero rows)’
This is how I’ve entered the data:
UPDATE wp_options SET option_value = REPLACE(option_value, ‘http://www.example.co.za/wp’, ‘http://staging.example.co.za’);
UPDATE wp_postmeta SET meta_value = REPLACE(meta_value, ‘http://www.example.co.za/wp’, ‘http://staging.example.co.za’);
UPDATE wp_posts SET guid = REPLACE(guid, ‘http://www.example.co.za/wp’, ‘http://staging.example.co.za’);
UPDATE wp_posts SET post_content = REPLACE(post_content, ‘http://www.example.co.za/wp’, ‘http://staging.example.co.za’);
Can anyone please help me with this?
Thanks
Andreas Kofoed
Hi,
First of all thanks for an amazing tut on this.
I’ve encountered one problem so far and that is when I try to enter my subdomain through
www.staging.example.com. I get this message: err_connection_timed_out ???Andreas Kofoed
Hi,
I figured this out as I was due to some table prefix.
Now my staging.mysite.com is up and running, but the styling and layout is totally different.
How do I do, so my files in my child theme applies to the current theme???
It seems like it is missing a lot of pictures, css and some basic settings?…
Patrick
Thanks for this great tutorial!
I’m finding that after setting everything up, comments on the live blog are now going to the sub-domain staging blog. I can’t find anything in the settings that explains this behavior. Do subdomains perhaps take precedence for some reason?
Any ideas?
Jennifer Filgate
Perhaps when you ran the operation to update the URLs in your database you performed it on your live site’s database instead of the new staging site’s database? You have to select the staging site’s database after you create it before you run the operation. Maybe you missed that selecting step.
Arjun Singhal
I got errors regarding SSL certificates. I am a newbie when it comes to using Git and the command prompt on my Mac. So I couldn’t get to syncing everything like I wanted.
Also, how it appears is that the steps are good to sync the local disks files to the server – changes in the theme folder etc.
However, there is no syncing mechanism highlighted for the MySQL server changes in the case of Wordpress.
Evan
I don’t know. This just seems really confusing.
So, a Git Bucket is like an intermediary between your local computer and the hosted dev server? For example, if I have website.com then I create dev.website.com then I create an account and empty repository in Git Bucket then I create an empty folder on my local computer, and I edit files locally and sync them to the Git Bucket repository and then how do I commit to the live site? Is there any connection and control to the live site? It seems like from here, you sync your Git Bucket repository to the dev.website.com
Then what? I wish this article had a diagram to understand how this all works. It might make sense to you guys because you do it all day, but for the first time, this is a dizzying experience. Especially since multiple points in this setup failed and I had to go about custom fixing each one. At this point, I have created dev.website.com, copied all files from the live site to it, copied the database, connected it in, logged into the dev.website.com wordpress site, made sure all is cool, but now … I am lost as to what I do next.
In your article, you ask us to INIT a local directory on our computer. Well, I’m trying out Git Bucket’s SOURCE TREE, which by the way looks great. But now what? Any help on what is the procedure from here? What’s the logic to all this?
I create a folder on my local drive, it syncs to a Git Bucket Repository so that people can develop collaboratively. But who uploads the changes to the dev.website.com server? Don’t users need to be able to do that to see live changes on the server? So how does that all connect?
And how do you update the final changes to the live website once you’re ready? Man I’m confused. I spent 3 days getting this setup and I can’t figure out this next step, because I don’t understand how that all works.
Any help?
Oscar
Hi Evan, although I am sure you figured it out by now as its months later, I figured it may help others with the same question. After you have committed your code to version control, you would move your changes over to the server of your choice (dev/staging/production) using the deploy feature. This is described in the section above titled, “Deploying Changes From BitBucket to Staging Site”. Hope this helps clarify!
vjohnson
I am truly a beginner at this, and I have read the article a couple of times. I think my environment is almost set up, the piece that appears to be missing is in the install step. The directions say copy the files but do not install “yet”, when in this process do I run an install of wp? I am unsure if some of the issues that i ran into are due to my host which is hostgator or something that I’ve done wrong. Any input would be great.
What is happening at this point is no errors but nothing is rendered on at the url for my staging area.
Martin
Nice article. Although, the whole way, you’re talking about setting up a development site on the server as a subdomain. But at the end your using a local Xammp server.
How would you setup a test environment on the server where the doomain is hosted? Do you use bitbucket for it as well?
Thanks, cheers.
Alberto Serrano
Hello , I made a staging site successfully but my live site already had a little problem with a plug in , I contacted the developer and he asked for my admin credentials , following your advice on other article I gave him log in credentials to my staging site and he fixed the issue , to make the changes on the live site he told me to import the database from the staging site to the live site , my concern is the sql changes I made to the staging database , if I copy the database isn’t my live site going to redirect to the staging site now ? I can’t find the SQL queries to delete them
Thanks
WPBeginner Support
See our tutorial on how to update URLS when moving WordPress site.
Admin
isagani
hey,
nice article, i followed all instructions and gave me a clean view process on using git and staging environment. hope all experienced people do what you did so many can step forward from beginner to advance.
Thanks a lot.
Isagani
Kristof Bernaert
Just a perfect article that helped me to setup the whole thing.
My staging environment is on the same shared linux hosting, just in another directory.
I used this also as the repo for git.
With Coda, I’m working online in that staging. As I save changed files (mainly css), I see instantly the updates.
So I don’t need the local files on my laptop.
But how to checkout those remote files under the staging folder, without fetching a local copy?
Thx!
Kristof
bcall
Thanks for the article!
I have one problem, though: I have two databases and am not sure which one (or maybe both) is connected to my live site. I checked the wp-config.php file and it’s linking to a database with a different name, one that does not appear in my database list (in phpMyAdmin). Is it possible that the database was renamed?
Nick Jubrey
Look in your wp-config.php file that’s where wp is directed to that particular database, the db your using will be listed there.
Tiffany Johnson
I’m having some issues with the dev site recognizing my theme and content. I copied over the following files prior to running my installation of wordpress, however the pages and content are still not being recognized. I checked the files and my media is in the uploads file, my themes are present, as are my plugins, but none of them are recognized in the actual wordpress site.
/wp-content/uploads
/wp-content/themes
/wp-content/plugins
Any suggestions on what else I can try? Thanks!
Nicole
I’m having this same problem. Any suggestions of what to try? I followed the instructions to copy those files from one folder to the other, and it is in the right place.
Brad Scott
@WPBeginner,
For my case.
Create subdomain: staging.example.com
Create Document Root: public_html/staging
Need to run the following SQL queries:
The NEW_URL should be http://example.com/staging not http://staging.example.com
Login: http://example.com/staging/wp-login.php
Cheers & Thanks
byberkan
Brad, so that means you are not using the subdomain. You are just using it as a subdirectory which you didn’t have to create a subdomain to use that..
Paula Lay
Thank you so much for this tutorial! The step-by-step instructions are perfect for someone who hasn’t done this before. I encountered a snag where I was getting an error message after creating a subdomain (something like a problem configuring the DNS). For anyone that encounters this problem – clear your browser cache and cookies, and then you will see the correct screen. Took me days to figure this out (I gave it a few days because I thought it would take 24hrs or so for the domain to propogate).
Random Dev
Whoa. Wouldn’t it be simpler, cutting down on quite a few steps and reducing the technical nature of this process, to just use a backup plugin with a migrator (search/replace the database) function… instead of copying the databases manually, *and* instead of using Git/Bitbucket? Or am I not understanding something?
Cannonpult
For smaller sites, maybe. But plugins like Duplicator start to fail or have significant diminishing returns on larger sites. For example, if you were working on a site with a lot of media, Duplicator will never be able to transfer everything. You will get warning messages and have to leave media behind in the transfer.
Yes, this tutorial would be overkill for a small blog. But it’s absolutely the way you should go for say, a woocommerce site with 3,000 products (including images and custom data).
The other big consideration is frequency of changes. Some sites are fairly hands-off after they go live. Maybe you just update core + plugins and perform a few minor changes per year. Other sites might require weekly or even more frequent changes. If this were the case, it would become a pain to wait for backups and then drop a backup on the new site (crossing your fingers that it works each time). By using the method described in the tutorial, you can commit smaller changes at a time right after testing them.
mgiulio
Excellent article.I was looking for info about best practices for wordpress staging sites. The additional section on the git-bitbucket workflow is very much appreciated.
nwesource
Fantastic tutorial, thank you! I know WPEngine.com has a staging site built into their hosting options which seems fantastic although I haven’t tried it just yet. Are there any other easier options you know of to setup and operate a staging site, with more of a plugin functionality like WPEngine? They literally have a clone to staging button and a clone to live button that makes this seem like a process from the 80’s LOL…
Amazing tutorial, thank you for enterprise level content!
WPBeginner Staff
No you first need to extract the zip folder and then upload the contents of wordpress directory to your staging site.
Tony Leary
Can someone elaborate on this one step:
“First download a fresh copy of WordPress from WordPress.org. Upload the contents of WordPress to your staging site. Note, do not run the WordPress install yet.”
I read that as “1) download WordPress zip file from WordPress.org and 2) upload .zip file to /staging folder via File Manager.” However, I don’t think that’s correct.
bcall
You can upload the .zip file and then extract the contents within file manager.
WPBeginner Staff
Most probably your subdomain is not configured correctly.
Julius
I actually found out the problem..and it’s been resolved…however, I am unable to add images to my library….anyone else experienced this challenge.
Hans Lindgren
Is the wordpress install running on Windows?
(If so, you need to grant Modify NTFS permissions to IUSR on C:WindowsTemp)
Julius
Awesome tutorial…however, after I attempt to log into the staging site I am taking to the “Opps! Google Chrome could not find http”. What am I doing wrong?
Julius
This is really a great tutorial and something I been wanting to do for quite sometime. My problem is that when I visit the WP login screen it appears that the styling from my theme isn’t applied. Is this normal? Also, when I enter my credentials from the live site into the fields for the staging site, it doesn’t log me in. It’s taking me to the “Oops! Google Chrome could not find http”. Am I doing something wrong?
Sloan Stewart
Very helpful article. Only issue I have is that when it begins discussing version control, it switches from focusing on the alternate wordpress installation on the server to a local installation on one’s machine.
I am assuming one would build your site locally (I am using WAMP) and then use Git/Bitbucket & Ftploy to update your dev/staging wordpress install? That would mean one would have three versions of the wordpress site at all times [Production, Dev/Staging, Local].
How does one ensure your local wordpress install remains compatible with the database and other configuration on the server? Or is there a way to utilize Git/Bitbucket/Ftploy on the server without having to involve a local copy of your wordpress site.
Karlis
Do you need to create user for your freshly created phpmyadmin database?
WPBeginner Staff
No this tutorial is not written for WordPress multisite.
Aathi
Hi,
Will the above process works for wordpress multisite ?
Cheryl S.
Because I typically develop in a staging area on my server and then move it to the clients server to go live, rolling back to previous versions is nearly impossible. This article has made me seriously consider implementing version control with Git and Bitbucket. Thank you so much for this tutorial.
WPBeginner Staff
Yes this would be a better approach.
Mimi Bondi
Thank you. Is it safe to simply copy all the files from the ”test” site and paste them over the current ”live” files via FTP? Or is there more to it?
Mimi Bondi
Would this be the best way to duplicate a website, set it up with a new theme/content then copy it over to the current live website?
I want to change theme but it’s quite a big job so instead of activating it then frantically trying to fix things for days, I’m looking for a way to copy my current site, change it all ”in the background” then make the new one live. Please let me know if it’s even possible?
Mimi Bondi
Once i have my site exacty how i want it in the staging environment,
is there a safeway to copy those files to the real live site?
My goal is to change themes but because this would involve quite a bit of
setting up, i am looking for a way to do this safely and only replace my
current content with the new content when it’s ready (without changing
permalinks and SEO hopefully). Is that possible?
Larry
Excellent article….I was able to follow the instructions step-by-step and complete the creation of development site on my hosting server. Kudos to the writter.
Mike
I’m having some issues when I try to run the SQL queries to change the references to the staging site. I am receiving the following error:
”
#1064 – You have an error in your SQL syntax; check the manual that corresponds to your MySQL server version for the right syntax to use near ‘1
UPDATE wp_options SET option_value = REPLACE(option_value, ‘http://example’ at line 1
”
My SQL query is as follows:
”
1
UPDATE wp_options SET option_value = REPLACE(option_value, ‘http://example.com’, ‘http://dev.example.com’);
2
UPDATE wp_postmeta SET meta_value = REPLACE(meta_value, ‘http://example.com’, ‘http://dev.example.com’);
3
UPDATE wp_posts SET guid = REPLACE(guid, ‘http://example.com’, ‘http://dev.example.com’);
4
UPDATE wp_posts SET post_content = REPLACE(post_content, ‘http://example.com’, ‘http://dev.example.com’);
”
As I missing a step or do I have something incorrect in query? Thanks for your help.
Mike
Never mind, I figured out my issue. Feel free to delete this comment.
djramc
i have the same problem. could i ask how did you solve this issue?
thanks by advance
#1064 – You have an error in your SQL syntax; check the manual that corresponds to your MySQL server version for the right syntax to use near ‘)’ at line 1
WPBeginner Support
You need to remove numbers from lines, replace example.com with your live site url and dev.example.com with your development or staging site URL.
Admin
Bevis Larsen
This article is most useful for the user who want to make advance wordpress application
Brad E
I followed the directions and am able to get the staging site to work. However, every link, page and even login revert to the live site not the staging site. How do I fix this?
WPBeginner Support
you need to change site address and wordpress address. To do that you need to run this SQL query in phpmyadmin for the database of your staging site:
UPDATE wp_options SET option_value = REPLACE(option_value, ‘ORIGINAL_URL’, ‘NEW_URL’);
UPDATE wp_postmeta SET meta_value = REPLACE(meta_value, ‘ORIGINAL_URL’, ‘NEW_URL’);
UPDATE wp_posts SET guid = REPLACE(guid, ‘ORIGINAL_URL’, ‘NEW_URL’);
UPDATE wp_posts SET post_content = REPLACE(post_content, ‘ORIGINAL_URL’, ‘NEW_URL’);
Don’t forget to replace the original url with the url of your live site and new url with the URL of your staging site.
Admin
Brad E
OK – it works now. I had to run the query several times, but got it to work. The problem I am having now, is that all of the theme settings are missing. The header, widgets, background, etc. are set to the theme’s defaults. I am not sure how to update the settings to what the live site has. I copied the 3 files from the wp-content directory. Thanks for the outstanding article and support.
ROHIT
Hi,
As usual, just read you well written article on staging. I’ve got only question in mind right now and is that if there is any changes made in database while working on any project then do I need to upload it seperately on server from local environment whereas files would automatically get deployed via ftploy.
Cheers and Thanks.
Keep your good work up.
Clive
If I make changes on my local WP project, I understand files in my theme are changed, and those are uploaded to staging via BitBucket/Ftploy. What about the database/tables from my local project? I don’t understand why those aren’t also included? Or would the database/tables in staging be updated based on theme changes that are uploaded? Thanks!!
WPBeginner Support
Clive, in your BitBucket repository you can only store your WordPress files. FTPloy simply syncs those files to your staging site.
Admin
Paul Sweany
What do you recommend for when database changes are made? Let’s say I create a new page; should I just re-import the database on the dev server after I make changes to it on my local copy? Also, moving it from dev to live, any recommendations other than manually importing it and running a search and replace to fix the URL?
Glen Clay
As usual, great article and right when I need it. Keep up the great work! On another note, I am on my iPhone and that annoying floating black ‘Trending’ bar keeps getting in the way of me commenting. This article benefited me so much that I went through the several tries it took for me to comment.
WPBeginner Support
Glen, thanks for your feedback. We will look into it.
Admin
Eben
I wasn’t really mentioned on what to do with the staging database and how to transfer the changes to the live database, especially if your client has been making changes to the live site while you’ve been making changes to the staging site and there are changes in both databases.
This is one area of staging environments with wordpress that I haven’t been able to get my head around.
WPBeginner Support
Staging is basically for development, when working on themes or plugins. We imported the database only so that we have actual data to test with. It is not supposed to be a synchronized mirror of your live site.
Admin
Juliana Maggioli
I don’t know if is the same as Eben’s question, but everything is going fine till…: upload/transfer the staging content to the live site. supposing everything is perfect in the staging, how do i make all this perfect structure/content be the live site, without risks?
Damien Carbery
I have started using WP Migrate DB (http://wordpress.org/plugins/wp-migrate-db/) to convert urls and paths in the DB. It will also convert urls and paths that are in serialised data.
So I copy the files to the staging server and create a database and then export the live db via WP Migrate DB and import it to the new database via phpMyAdmin.
The biggest issue is when the live site is updated before I bring the staging server db back.
Zimbrul
If you have Softaculous is even easier to deploy a staging site to the live site: you can clone the site to a location within the same server.
It’s what I’m doing: I create the staging environment and when done I just go the the list of my WordPress installs in Softaculous control panel and “clone” the site to the live location. The live location must be empty by other files for this to work.
WPBeginner Support
Thats another way to do it.
Admin
Giacomo Ardesi
Hey Zimbrul, can you give some more details about Softaculous and how you used it please?
Giacomo Ardesi
Hey Zimbrul, could you please give some more details on how you use Softaculous to clone your WP staging site? Thank you!
M Asif Rahman
Thanks Syed & The Team, that’s one of the most complete and understandable for normal readers Staging Guide for WP. Nicely done.