When it comes to making updates or significant changes to your WordPress site, doing so directly can be risky. This is where a staging site comes in.
It is a perfect clone of your live website where you can safely test changes, troubleshoot issues, and refine updates before deploying them to your main site.
At WPBeginner, we use staging sites to test website updates before publishing them on our live sites. This saves us from potential downtime, broken features, and other complications.
In this step-by-step guide, we will show you how to easily create a staging environment for your WordPress site. We will cover several different methods and most of them only require a few clicks.
What Is a Staging Site?
A staging site is a clone of your live website that is used for testing changes before making them live. Staging sites help you catch errors, so you don’t break your live website.
In the past, it used to be very difficult to set up a WordPress staging site, but now that has changed so even a non-technical person can do it.
A lot of users install WordPress locally on their Windows or Mac computers to test changes. Once they’re done with the updates, they simply upload those changes from localhost to the live server.
The biggest problem with this approach is what if something that worked on your localhost does not work on the live server?
Often the local sites and live WordPress hosting servers are not running in the same environment.
Since the staging site lives on your web hosting server, you can easily prevent all those errors because it runs the same server configuration as your live site.
With that said, let’s take a look at how to set up a staging site for WordPress.
How to Easily Create a WordPress Staging Site
There are multiple ways to create a staging site for WordPress. The easiest is using your hosting provider’s built-in staging site feature.
Some of the best WordPress hosting companies already offer 1-click staging websites. If your website is hosted with one of them, then you can easily create a staging site without any hassle.
If you do not have one of these popular hosting solutions, then we also have a solution to help you create a WordPress staging site using a plugin (and even manually).
For faster browsing, you can use the navigation below to jump to the section that’s most applicable to you:
Creating a Staging Site on Bluehost
Bluehost is one of the best WordPress hosting companies. They offer a quick 1-click staging site solution with all their plans.
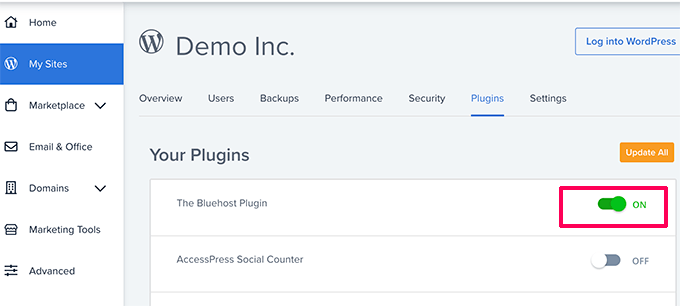
First, you must head over to your Bluehost dashboard and visit the ‘My Sites’ section.
Next, switch to the ‘Plugins’ tab and toggle the switch next to the ‘Bluehost Plugin’ option.
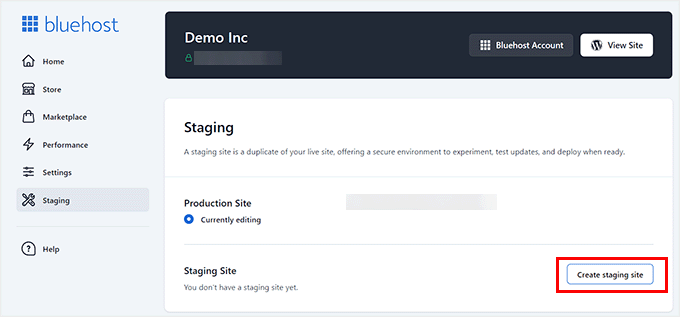
After that, head over to your WordPress site dashboard and visit the Bluehost » Staging page.
Now go ahead and click the ‘Create Staging Site’ button.
Bluehost will now prepare the staging environment for your website.
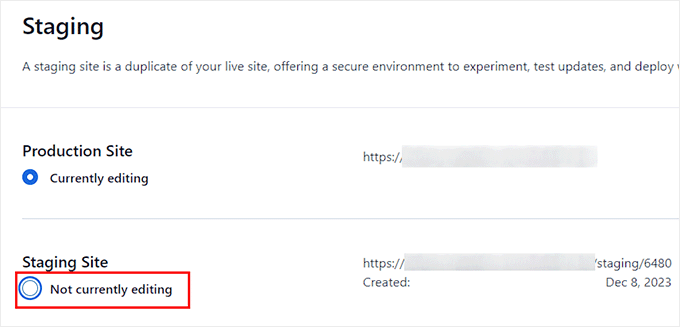
Once that’s done, it will display a Staging Site’ section where you must check the ‘Not currently editing’ box.
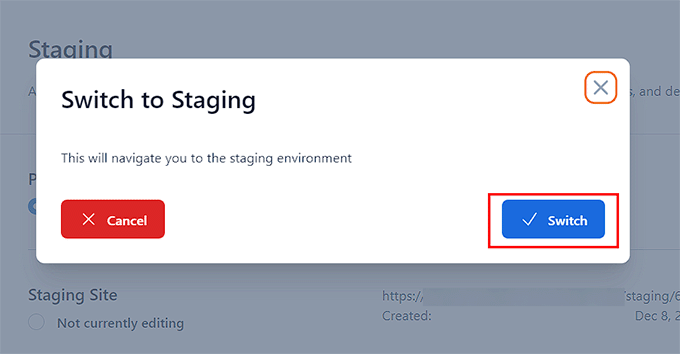
A prompt will now open up on your screen asking you to switch to the staging site.
From here, click the ‘Switch’ button.
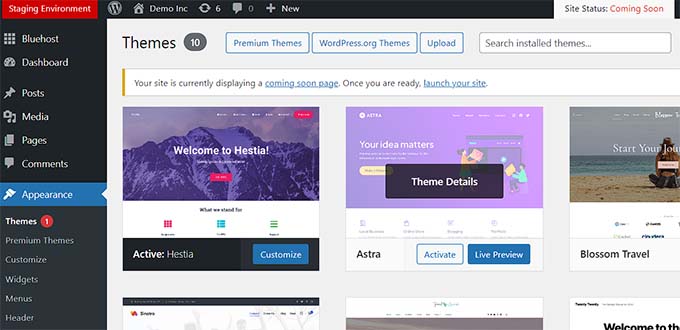
Once switched, you will see a button on the screen indicating that you are working on the staging website.
You can go ahead and work on your website without worrying about it affecting your live site.
Deploying Changes From Staging to Live Site on Bluehost
Once you are ready to push changes from staging to the live site, simply go to the Bluehost » Staging page from the WordPress admin sidebar.
From here, you’ll see the deployment options drop-down menu next to your staging website. You can deploy only the files, only the database, or deploy all changes.
If you’re not sure, then click on the ‘Deploy All Changes’ button to continue.
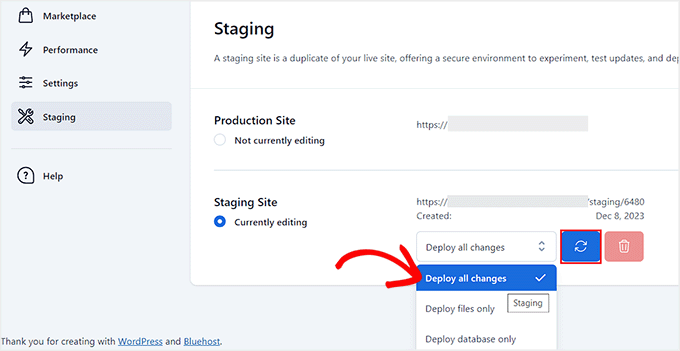
After that, click the ‘Deploy Site’ button next to the dropdown menu.
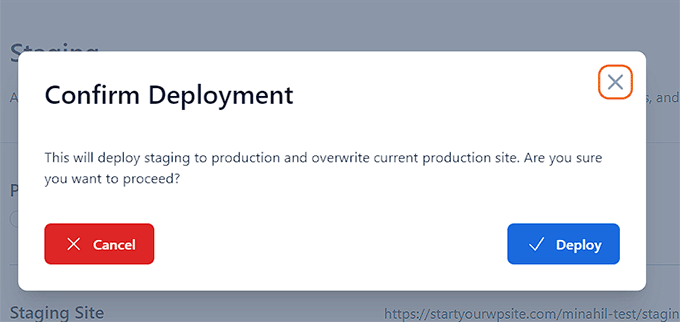
This will bring up a popup where you will be asked to confirm that you want to deploy the staging site to the production site. Click on the ‘Deploy’ button to continue.
Bluehost will now start deploying your staging site to the live site. Depending on the size of your website, this may take a while.
You can now switch back to your live website to see your changes in action by clicking on the Radio button under the Production site option.
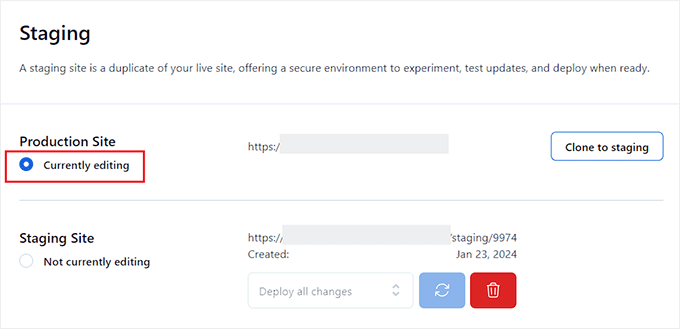
Cloning Production Site to Staging
Now, as you switch back to the production website any changes you make there are not automatically synced to your staging website.
In the future, if you want to test more things on your staging website you’ll need to duplicate your site.
To do this, you must visit the Bluehost » Staging page and click on the ‘Clone to staging’ button.
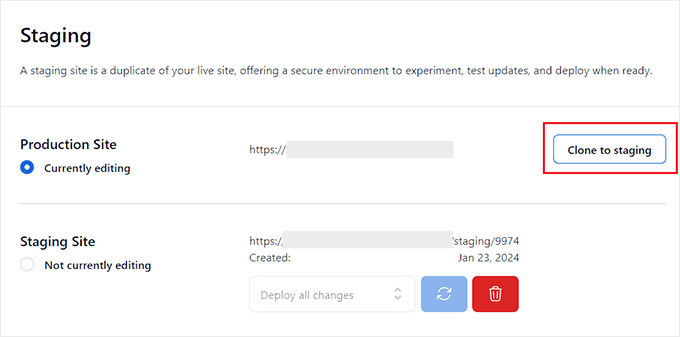
Bluehost will then clone the latest changes to your live website to your staging website. After that, you can switch to the staging website for testing and development.
Creating a Staging Site on SiteGround
SiteGround is another top WordPress hosting company offering a 1-click staging feature with their GrowBig and GoGeek plans.
We’ve been using this hosting at WPBeginner and have had a great experience with it. It’s been reliable, fast, and easy to manage, making it a solid choice for our website.
To learn more, see our SiteGround review.
If your website is hosted with SiteGround, then this is how you would set up a staging website.
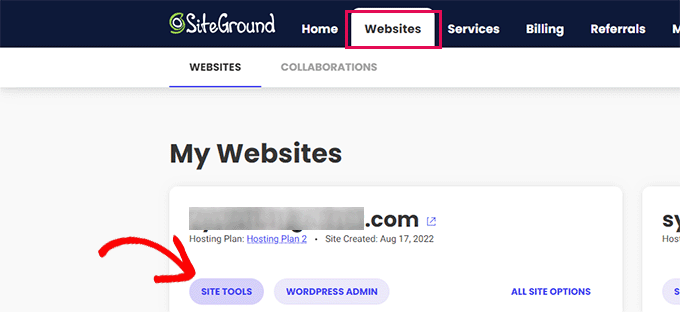
First, you need to log in to your SiteGround dashboard and switch to the Websites tab. From here you need to choose the Site Tools below your website.
On the next screen, you need to click on the WordPress » Staging menu from the left column.
From here, select your website and then provide a name for your staging copy.
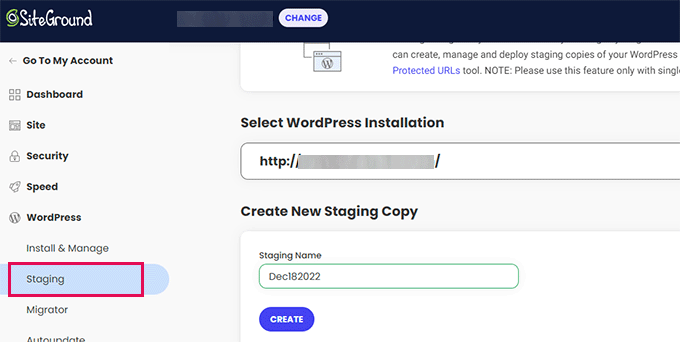
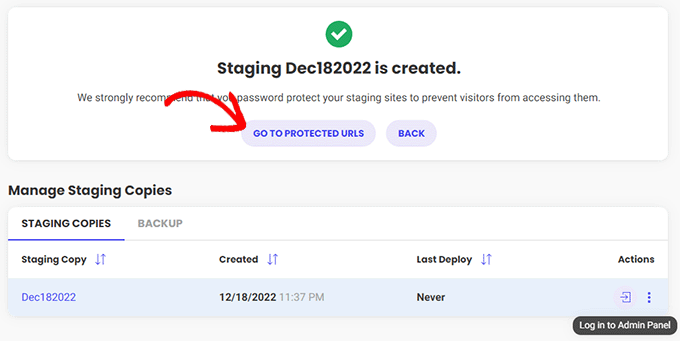
Click on the ‘Create’ button to continue and Siteground will create a staging copy of your website.
After that, you need to click on the ‘Go to protected URLs’ button so that you can password-protect your staging website and keep it private.
On the next screen, Siteground will automatically fill in the URL and path for your staging website.
You have to enter the username and password that you want to use to protect your staging site.
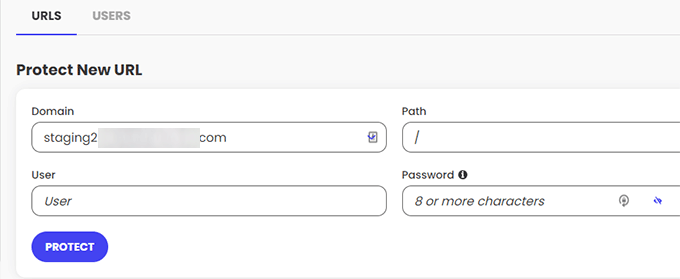
Click on the ‘Protect’ button to save your settings.
You can now go back to the WordPress » Staging page and click on the ‘Log in to Admin Panel’ button next to your staging website.

SiteGround will now open the WordPress admin area of your staging website. You can test your changes on this staging website.
Deploy Changes Back to Your Live Website
Once you have tried your changes on the staging website, you may want to merge them to your live website.
SiteGround makes this easy too.
Simply click on the WordPress » Staging menu from the left column. Then click on the three-dot menu next to your staging site under the ‘Manage Staging Copies’ section.

The menu will show you two deployment options. You can either choose the ‘Full Deploy’ or ‘Custom Deploy’ option.
The ‘Full Deploy’ option merges everything from the staging website to your live website. ‘Custom deploy’ allows you to select which files or data you want to merge.
If you are unsure, then choose the ‘Full Deploy’ option.
SiteGround will then copy the staging site to your live website.
Merging Live to Your Staging Website
Changes you make to your live website are not automatically copied to your staging website.
Each time you need to work on your staging website, repeat the process above to create a fresh staging website.
Creating a Staging Site on WP Engine
WP Engine is the best WordPress-managed hosting company in the world. Managed WordPress hosting is a concierge service for your WordPress site where the hosting provider takes care of updates, backups, security, and performance.
WP Engine offers a one-click staging solution with all their plans. If you are using WP Engine to host your website, then this is how you would set up a staging environment for your site.
First, you need to log in to your WP Engine dashboard. Next, go to the ‘Sites’ page and select your website by clicking on it.
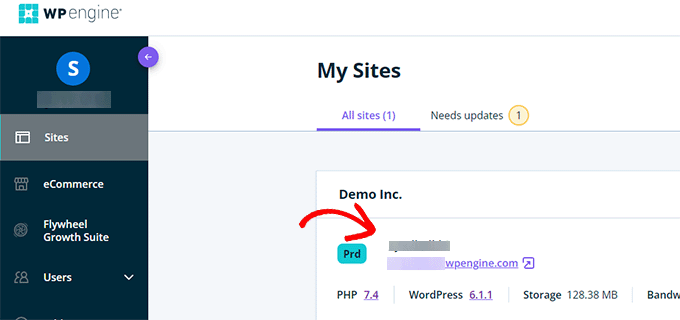
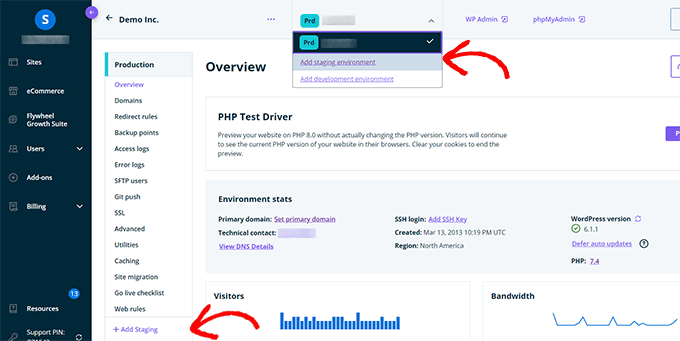
This will bring you to your website dashboard.
Now, you need to click on the ‘Add Staging’ link from the left column or select it under your site name at the top.
This will bring you to the ‘Add Environment’ screen.
You’ll be asked to choose how you wish to proceed with your staging environment.
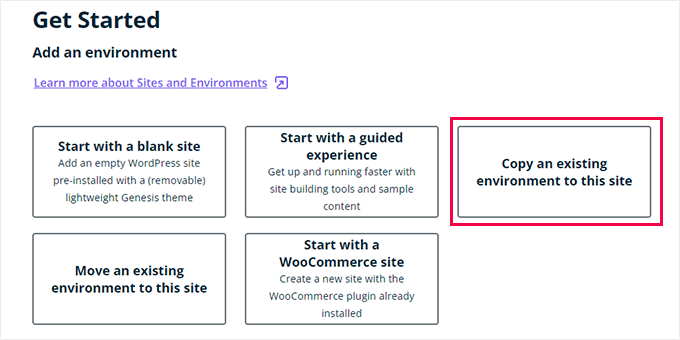
Here is what each of these options does:
- ‘Start with a new blank site’ creates a new empty site.
- ‘Start with a guided experience’ creates a new site with a guided experience and demo content.
- ‘Copy an existing environment to this site’ will copy your production or development environment to this site (e.g. copy your live site to this environment).
- ‘Move an existing environment’ moves an environment to this site (e.g. move the development environment to the Staging)
- ‘Start with a WooCommerce site’ creates a new WordPress site with WooCommerce pre-installed.
Since you want to create a staging copy of our live website, you’ll need to click on the ‘Copy an existing environment to this site’ option.
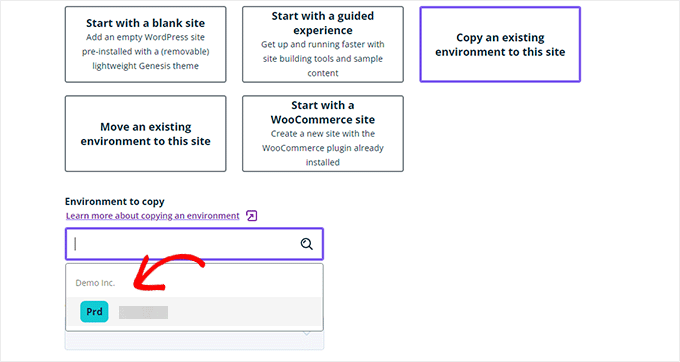
After choosing an environment choose the latest backup you want to copy from and then click on the ‘Next’ button to continue.
Now, you’ll need to provide a name for your staging site. This name will be used in your staging site URL. After that, choose STG (staging) as your environment type.
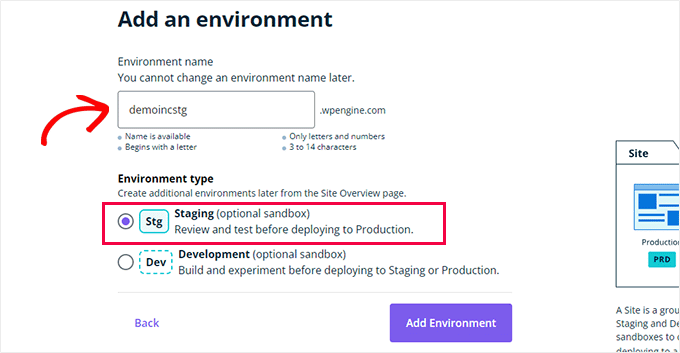
Click on the ‘Create Environment’ button to continue.
WP Engine will now create a staging site for you. After that, you will be redirected to your Staging environment dashboard.
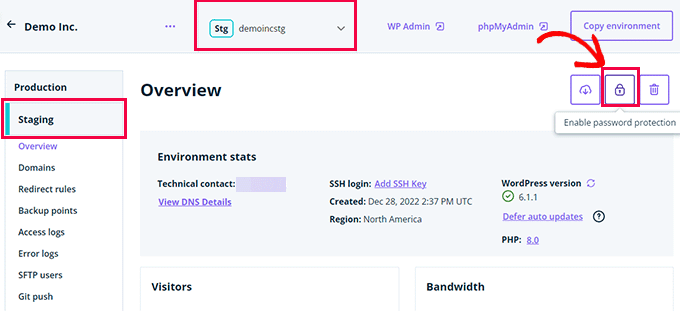
Next, you need to click on the Padlock button to enable password protection for your staging site.
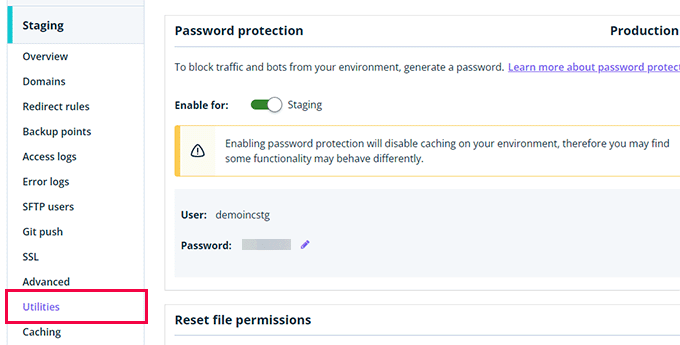
After that, you need to switch to the ‘Utilities’ tab to copy your staging site username and password.
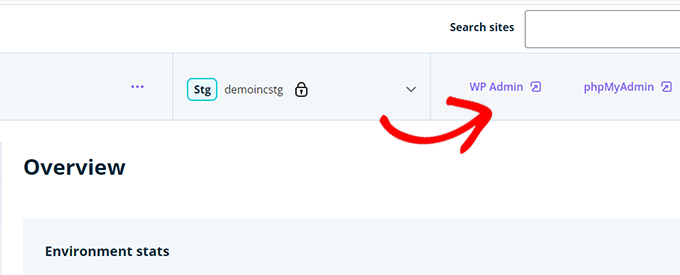
You can now click on the ‘WP Admin’ button at the top to log in to your staging website.
Feel free to make changes and try out features on the staging website just as you would in a typical WordPress site you install anywhere else.
Deploy Changes From Staging to Live Website on WP Engine
Want to merge changes you made on the staging website to your live website?
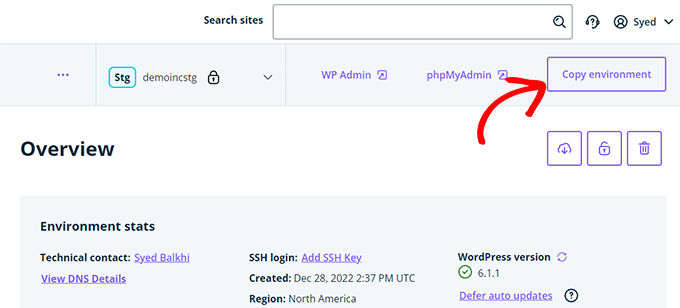
Simply click on the ‘Copy Environment’ button to begin deployment.
This will bring you to the options page. From here, you need to choose your source and destination environments for the copy.
Here you’ll select your staging website as the source environment and your production or live website as the destination environment.
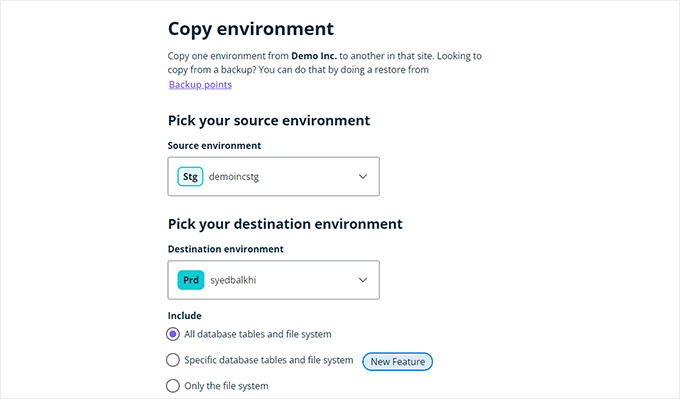
You can choose what you want to copy. For instance, you can copy all database tables and files, specific files and database tables, or only the file system.
Note: If you copy everything, you will lose any data stored on your live website after you use it to make the staging environment. This may include important data such as new posts, pages, customers, and orders. So it’s a good idea to run a backup of your live site before deploying from staging.
Next, click on the ‘Review and Confirm’ button to begin deployment. It will take a while to copy everything to your live website.
You will get an email notification when the process is complete.
Creating a Staging Site Using WordPress Plugin
If your WordPress hosting company does not provide a staging site feature, then you can still create a staging website using a WordPress plugin.
There are some disadvantages to using this method.
First, a plugin will have limited control over your hosting server. This is why it may not always give the best results.
Secondly, the plugin we will be using will store your staging site on its own servers. If you are concerned about privacy and data protection, this may not be ideal for you.
Lastly, the plugin has several known incompatibilities. Please check their incompatibilities page to make sure that your website is compatible.
That being said, let’s see how to create a staging WordPress site using a WordPress plugin.
The first thing that you need to do is install and activate the WP Stagecoach plugin. For more details, see our step-by-step guide on how to install a WordPress plugin.
Upon activation, the plugin will add a new menu item labeled WP Stagecoach to your admin bar. Clicking on it will take you to the plugin’s settings page.
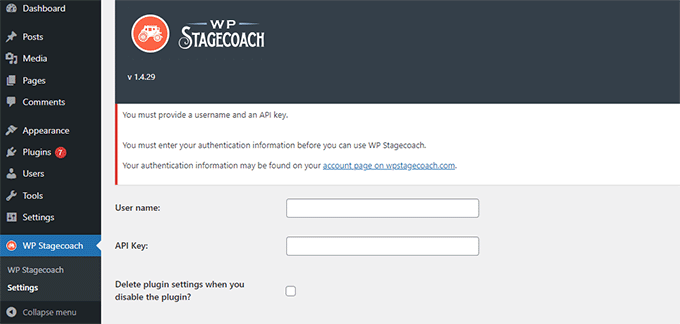
You will need to enter your WP Stagecoach username and the API key, which you can find in your account on the plugin website.
After that, you need to visit the WP Stagecoach » WP Stagecoach page and choose a name for your staging site. This name will also be used as the subdomain of your WordPress staging website.
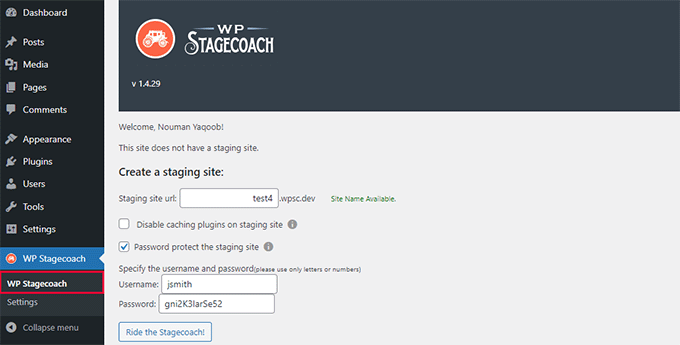
Don’t forget to check the box next to the ‘Password protect the staging site’ option. It will protect your staging website from public view and search engines.
Click on the ‘Ride the Stagecoach’ button to continue.
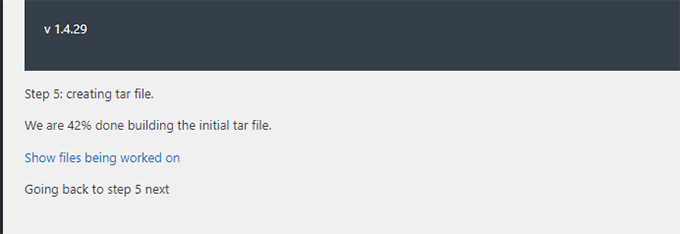
The plugin will now create a backup of your WordPress files and database to export them for your staging site.
It may take a while depending on the size of your WordPress website.
Once finished, you will see the link to your staging site and its admin area.
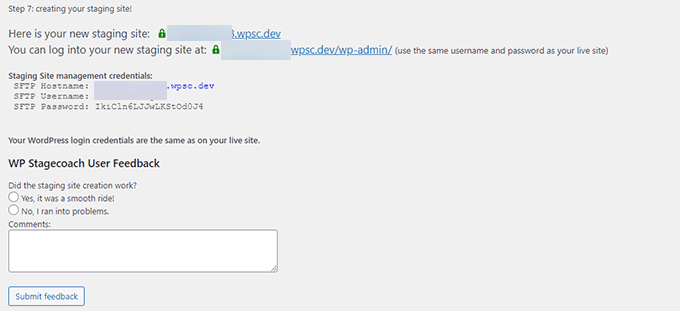
You can click the link to visit your staging site and start working on it.
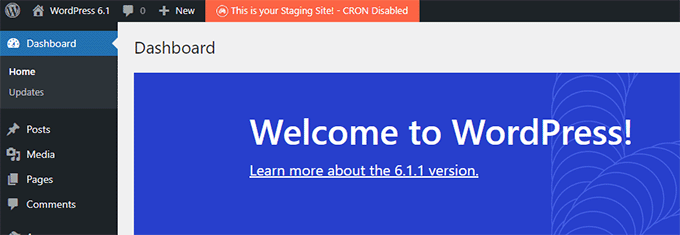
You’ll notice a bright orange message in the admin bar at the top indicating that you are working on your staging site.
Deploying Staging Site to Live Using WP Stagecoach
Once you are ready to import changes to your live site, head over to the WP Stagecoach » Import Changes page and click on the check for changes button.
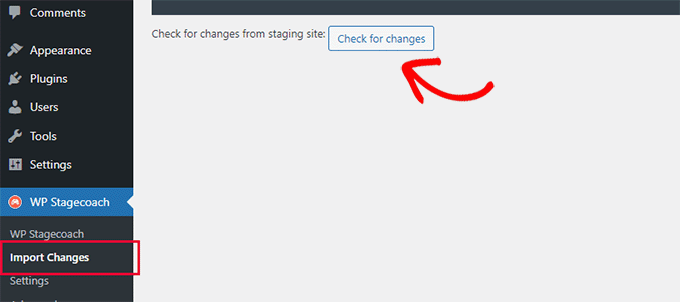
The plugin will now check for changes on your staging site and then show you options to import them.
You can choose from all changes, file changes, or database changes.
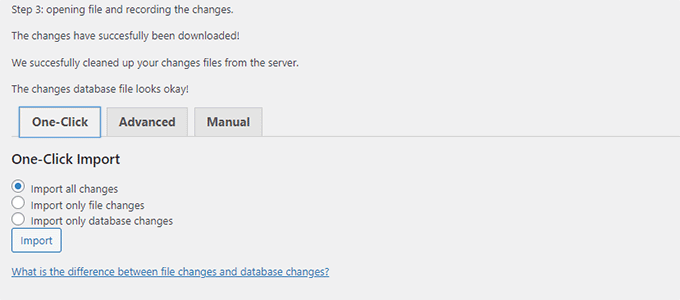
The plugin will show you the progress of the import and will notify you when it is done.
You can now test your live site to see if all changes were successfully imported.
Create a Staging Site for WordPress Manually
This method will teach you to manually create a staging site for your WordPress install. It is for advanced users and requires more work than other methods described above.
Another disadvantage of this method is that your website will be temporarily unavailable when deploying changes back from staging to the live server.
That being said, let’s see how to manually create a staging environment for your WordPress site.
First, you need to create a subdomain for your staging website. If you use Bluehost, then go to your hosting account’s dashboard and switch to the ‘Advanced’ tab.
Next, click the ‘Manage’ button next to the ‘cPanel’ option.
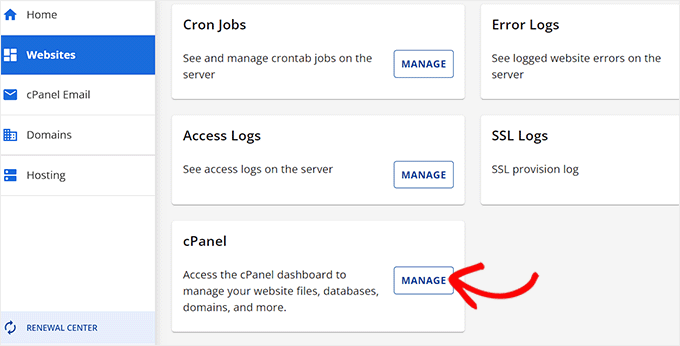
This will open the cPanel in a new tab where you must scroll down to the ‘Domain’ section.
From here, click the ‘Domains’ option.
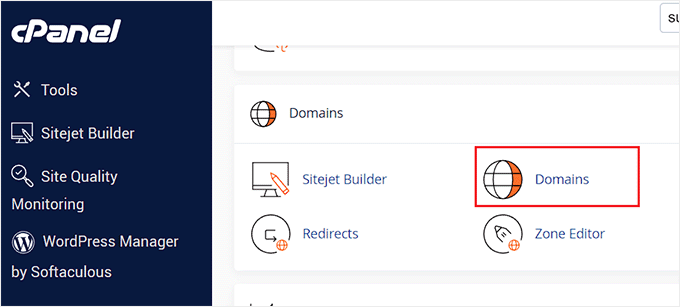
This will open a list of all the domains on your hosting account. Here, you must click the ‘Create a New Domain’ button.
Once you do that, a new page will open on the screen where you must write your subdomain followed by the domain name under the ‘Domain’ field like this:
subdomain.example.com
After that, simply click the ‘Submit’ button to store your settings.
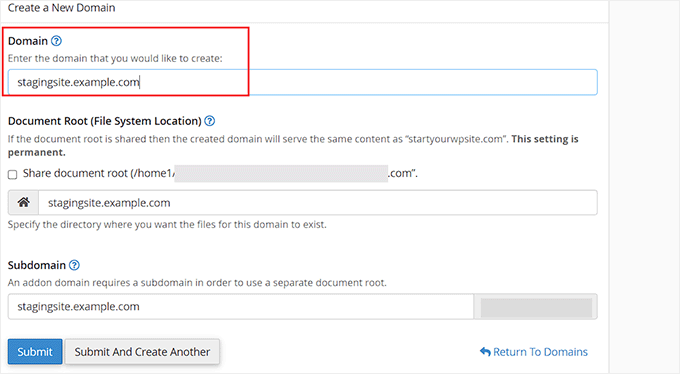
Note: We’re using Bluehost in our example screenshots, so your screen may look different.
Your hosting control panel will now add your subdomain, which you can use to import your live WordPress site.
Next, you need to install and activate the free Duplicator plugin on your live site. If you need full features, you can get the premium version of Duplicator here.
Several of our partner brands have also used this tool to create backups and have seen excellent results. To find out more, see our Duplicator review.
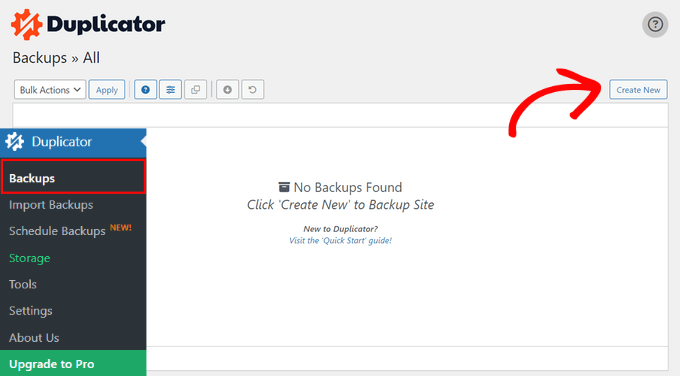
Upon activation, you need to click on the Duplicator menu in your WordPress admin sidebar and click on the ‘Create New’ button under Backups.
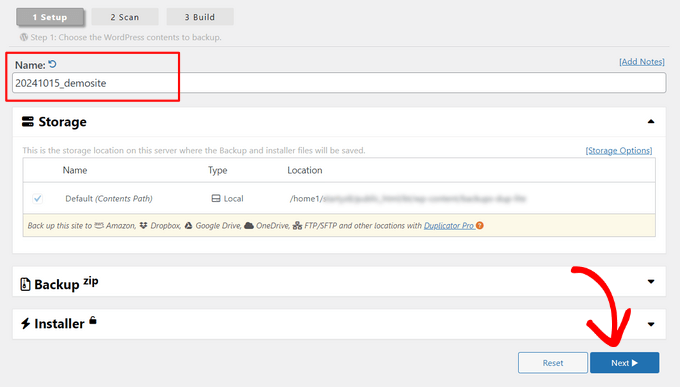
Next, you can enter a name for your backup and click on the ‘Next’ button to continue.
After that, Duplicator will now run the website duplicator wizard.
First, it will run some tests to see if everything is in order. If all items are marked ‘Good,’ then click on the ‘Build’ button.
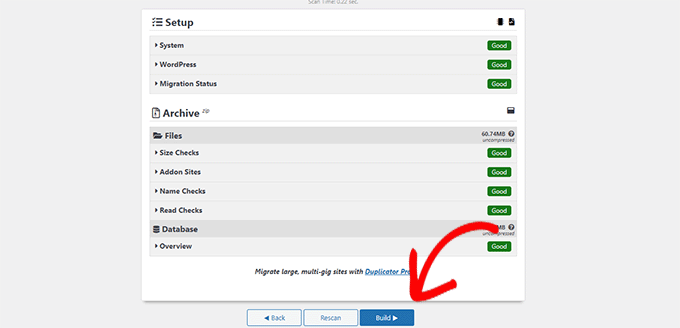
The plugin will now start creating a Duplicator backup package for your WordPress site. This process may take a few minutes depending on the size of your website.
Once finished, you’ll see download options for the Installer and the Archive package. You need to click on the ‘Download Both Files’ button to download both files on your computer.
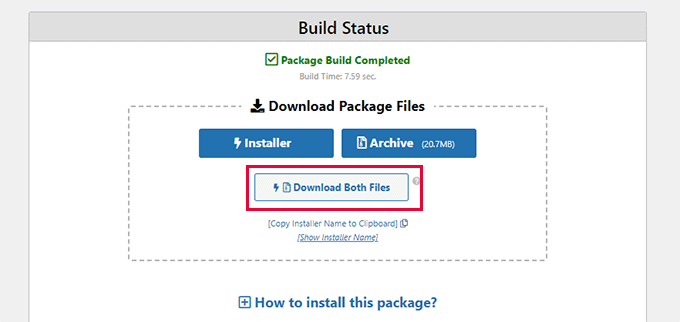
You’ll need to upload both of these files to the file directory of the subdomain you just created. For details, see our guide on how to use FTP to upload files to your WordPress website.
Next, your new staging WordPress site will need a new database. Let’s create one.
Head over to your WordPress hosting account’s control panel and switch to the ‘Advanced’ tab.
After that, scroll down to the ‘Databases’ section and click on the ‘Manage’ button next to it.
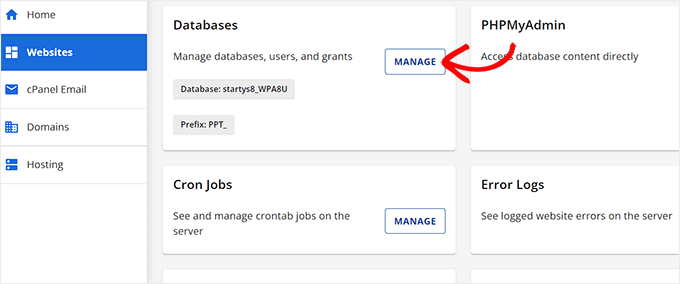
If you are not using Bluehost, then your WordPress hosting environment may look a bit different. Don’t worry, and just look for the Databases section.
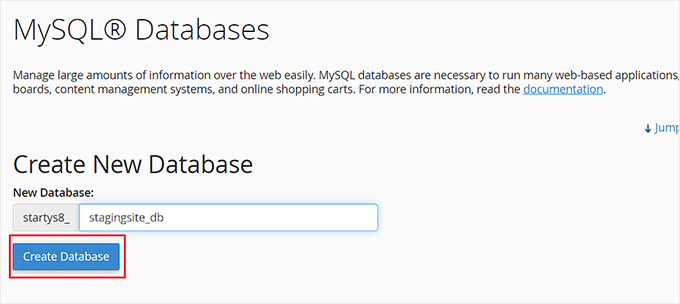
This will take you to the ‘MySQL Databases’ page where you can start by providing a name for your database.
Then, click the ‘Create Database’ button.
Next, you need to create a MySQL user for your database.
Scroll down to the MySQL Users section and provide a username and password for your new database user.
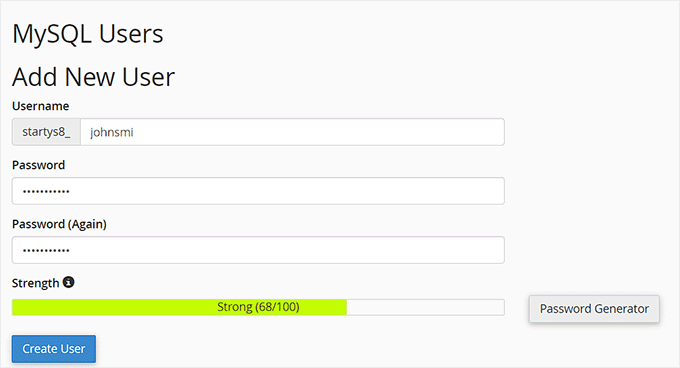
Now you must give this user permission to access and modify the database you created earlier.
Simply scroll down to the ‘Add user to database’ section and select your database and the user you just created.
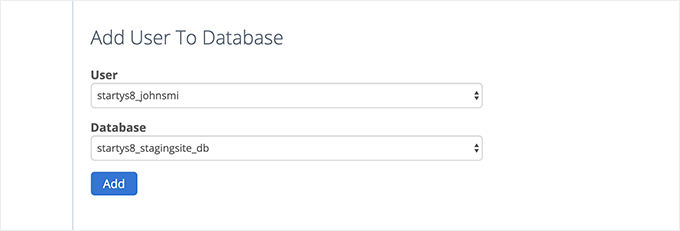
After that, click on the ‘Add’ button to continue.
You will be asked to select privileges for the user. Go ahead and select the ‘All Privileges’ checkbox and then click on the ‘Make changes’ button.
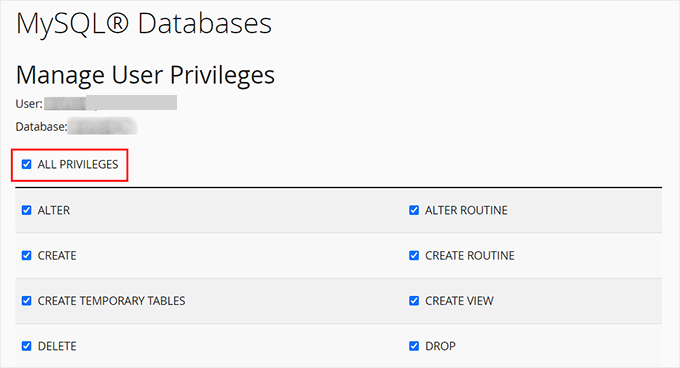
Now your database is ready to be used for your staging website.
Next, you need to open a new browser tab and enter the subdomain of your staging site like this:
https://yoursubdomain.example.com/installer.php
Don’t forget to replace yoursubdomain it with the actual subdomain and example.com with your own domain name.
This will launch the Duplicator installer wizard.
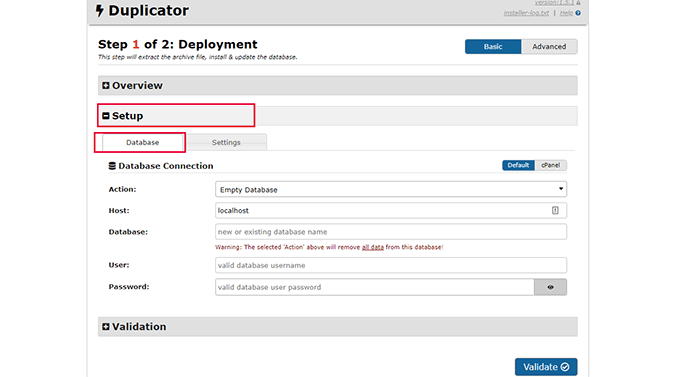
Under the ‘Setup’ section, the installer will ask you to enter your WordPress database information.
Your host will likely be localhost. After that, you will enter the details of the database you created for your new domain name in the earlier step.
Click on the ‘Validate’ button to make sure that Duplicator can connect to your database.
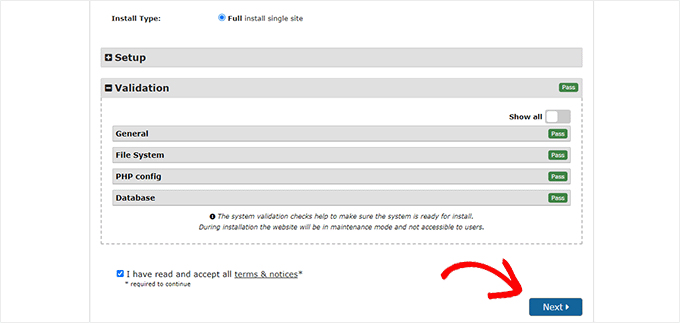
Once done, click on the ‘Next’ button to continue.
Duplicator will now unpack your WordPress database and files and import them to your staging site.
Once finished, you will see a success message.
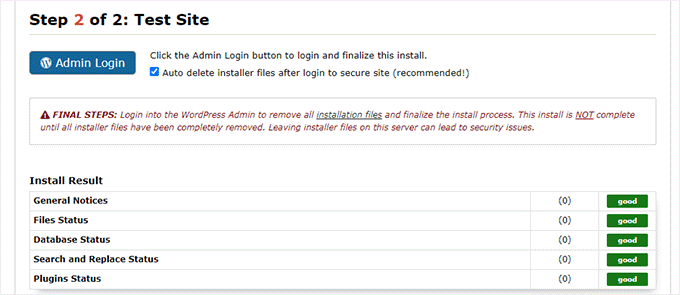
You can click on the ‘Admin Login’ button to enter the WordPress admin area of your website on the new staging site.
Now you have your staging site set up. You can protect it by adding password protection to the subdomain.
Head over to your hosting account’s dashboard and switch to the ‘Advanced’ tab.
After that, scroll down to the ‘cPanel’ section and click the ‘Manage’ button next to it.
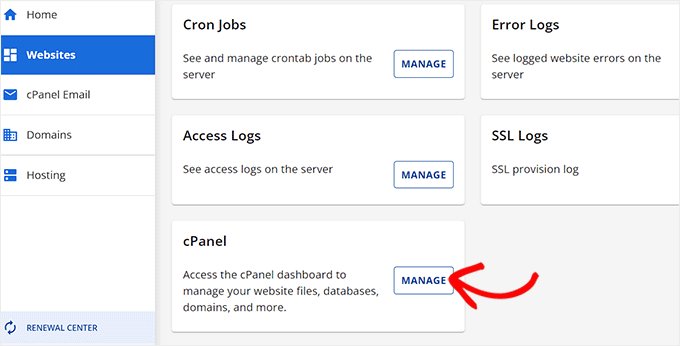
This will open the cPanel in a new window where you must scroll down to the ‘Files’ section.
From here, click on the ‘Directory Privacy’ icon.
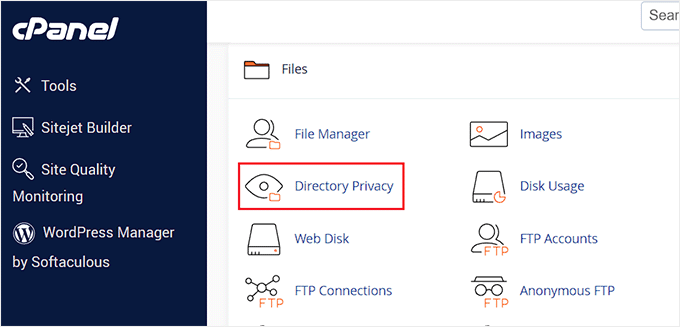
Next, you need to select your subdomain folder and then select the option to ‘password protect this directory’ checkbox.
You will be asked to provide a name for this setting, and then click the ‘Save’ button.
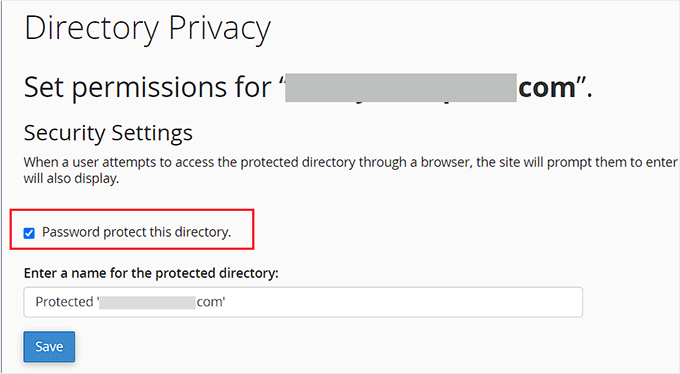
Your staging site will now be hidden behind password protection, keeping it out of search engines’ hands and the public’s eyes.
You can now work on your staging site and make any changes to it.
Manually Deploy Staging Site to Live
After you are ready to deploy changes from your staging site to the live server, you will follow the same steps described above.
Simply create a new Duplicator package on your staging site and download the Installer and Archive files to your computer (See instructions above).
Next, you need to head over to your live site and create a complete WordPress backup (you can use Duplicator to create a complete backup as well).
Once you are done, you will need to delete all WordPress files and folders from your live website. This means your WordPress site will be down for a while.
Finally, follow the instructions above to run the Duplicator installer wizard to import the staging site to the live server.
As you can see, the last method is not the best method at all. There are many things during the process that can damage your site.
We suggest avoiding this method at all costs unless you have no other choice. We recommend using a reliable hosting provider like Bluehost, SiteGround, or WP Engine with built-in staging site features.
We hope this article helped you learn how to easily create a staging environment for your WordPress site. If you run into any issues, check out our guide on how to test your site for updating to Gutenberg. You may also want to learn how to use WordPress Playground in your browser for testing.
If you liked this article, then please subscribe to our YouTube Channel for WordPress video tutorials. You can also find us on Twitter and Facebook.


Philip
I used the SiteGround Staging instructions and it worked well. Except that now, anyone visiting the site has to log in!!!??? Any solutions out there?
WPBeginner Support
If you mean your primary site then there may have been a hiccup on the setup of staging, if you reach out to SiteGround they can help move your primary site off of their staging password protection.
Admin
Jiří Vaněk
I recomend WP Staging plugin. This is really awesome plugin, with all feature you need for live website and copy as staging website. I use it for this purpose all the time and I must say, it is “must have” plugin.
Dayo Olobayo
I appreciate the WP Staging recommendation. My website is quite large with a lot of media files. Have you used WP Staging with a similar setup, and if so, did you find the cloning process smooth?
Moinuddin Waheed
Staging site is a must have feature for anyone who is working for clients and .asking websites and blogs for clients.
it is really helpful as there is always requirements for some tweak at the time of development of the website.
Plugin option and the other doing manually is the only option for my client as I am using hostinger and there is not showing any staging website feature there.
Does any of the hostinger plan not have built in staging feature like that of bluehost and siteground?
WPBeginner Support
You would want to check with the hosting provider’s support for what they have currently available.
Admin
Jiří Vaněk
You can use any hosting you want, becouse for staging purpose exist awesome plugin. Look on plugin with name WP Staging. This is all you need.
Moinuddin Waheed
Thank you for the suggestion, This will be very useful as it is needed very often.
I will explore this plugin and see to it for the functionality it has at its end.
Chip Bearden
There IS a downside. I followed all the steps for BlueHost and made a number of changes to my home page. Worked perfectly on the staging site.
When I pushed it to production, my home page was a disaster. A few changes made it through but most did not. Worse, much of the content on the production site was trashed or even missing.
Panicky, I put the production site into maintenance mode to prevent users from seeing it. Then BlueHost’s tech support did a great job of moving the staging site to production for me and cleaning up a bunch of other problems that resulted. It took a long, tense 90 minutes before everything was back, mostly, to what I wanted. I just had to change some internal links and menu items that still pointed to the staging site.
Start to finish I was only down a couple of hours. The BlueHost customer support rep was wonderful but didn’t have a good explanation of what went wrong. Suffice it to say I’ll NEVER use staging again!
WPBeginner Support
Thank you for your feedback, we’ll look to make it more clear in the article but unless you sync changes like posts, they will not go to your staging site and if you overwrite your live site with your staging it won’t include your new content. For your design it would heavily depend on what you’re using on your site as that should normally include any design changes.
Admin
Audra
Is this something that can be used to test out a new theme? Can I keep my current website live and work on a new theme at the same time?
WPBeginner Support
Yes that is one of the more common reasons to use a staging site.
Admin
Jiří Vaněk
It’s one of the reasons why I use staging. When there’s a request to change the website’s design, a copy of the website is created where all the necessary adjustments are fine-tuned, and then the changes are easily transferred to the live version. It’s much more practical than copying the website to a subdomain and performing subsequent migration, which can be quite complicated.
Sharlene
HI there. Is there a way to test the speed on a staging site please?
WPBeginner Support
Our guide below gives a few options for testing the speed of your WordPress site. Depending on how your staging site is set up, there is only so much that can be tested for how helpful the speed test will be.
https://www.wpbeginner.com/beginners-guide/how-to-properly-run-a-website-speed-test-best-tools/
Admin
Carol Henrichs
Should I use the staging site just for plugin updates and such? Can I update pages and posts in staging then push to live? Otherwise I have to create a new staging site prior to every plugin/update test.
WPBeginner Support
You would want to use a staging site for major plugin and design updates for your site. Updating pages and posts is normally something you would do on your primary site and you can do minor updates safely as long as you have a backup of your site from before the update.
Admin
Kevin
Do the Staging URLs (for posts and pages) automatically change once you hit deploy? I am worried that I am going to have a ton of 404 errors and ruin my SEO.
WPBeginner Support
Unless we hear otherwise, the URLs should update so they are not 404s.
Admin
Philippe
I want to create a sandbox, I’m using Wordpress on Bluehost, however I don’t have the Bluehost entries on my wordpress admin menu, and I can find no sandbox wizard directly on the Bluehost site. Where do I go from here?
WPBeginner Support
You may have removed the plugin that added that, if you reach out to your host they should be able to assist.
Admin
Jana Boswell
This worked like magic. I seriously could not live without wp beginner. My hosting service does not have a staging option, so I followed the instructions for manual set-up, no problems, everything went smoothly! Thanks for the great instructions!
WPBeginner Support
Glad our guide was able to help
Admin
Desmond Sim
after creating the staging site…how do you sync data between the staging and test site….the test site is used for updates and checking…whereas….the live site has new inputs from its users….
Is there a plugin you can recommend syncing databases when each database has two different pieces of new info,
WPBeginner Support
We do not have a recommendation for that at the moment as it is very difficult for a tool to know what specifically to sync or not.
Admin
Brandon
How does a person just delete a staging site? I believe I backed up the staging site with updraftplus, but if I back up the staging site with updraftplus, does it also back up the regular website too or vice versa?
WPBeginner Support
If you used a hosting provider’s method to create it then you would want to check with the host to see if there is a built-in method first, otherwise, you can follow step 2 in our guide below:
https://www.wpbeginner.com/wp-tutorials/how-to-permanently-delete-a-wordpress-site-from-internet/
You would only be backing up your staging unless you’ve also set up your backup service for your primary site.
Admin
S
so this manual staging does not work?
so how do users target ‘installer.php’ if the subdom URL is ‘staging.blahwebsite.com’, then.
WPBeginner Support
The method should still work, you would target the installer in the staging site’s subdomain. If you are having trouble with setting up or targeting the subdomain you may want to reach out to your hosting provider for their assistance.
Admin
Brandon
I used the manual method to set up a staging site for testing out updating plugins before they break something. Well, something broke in the staging site. How do I go back to the original configuration of the staging site?
WPBeginner Support
If you did not create a backup for the staging site then you would delete the staging site and recreate it as one option.
Admin
Ben
Looks like there’s a chunk missing for the manual staging site creation. No upload of files for Duplicator.
WPBeginner Support
Thank you for sharing that, we will look into updating the article when we are able
Admin
Ankur
I use bluehost hosting and they say they don’t recommend the beta version. So, the local host is the best option for me. Isn’t it?
WPBeginner Support
If they do not recommend beta for your site, you can use local as an alternative.
Admin
Jay
If I have new blog posts on the original production site, what will happen I push the staging site to the production site later in the future?
WPBeginner Support
The new content would be removed, we would recommend importing all new content to the staging site before overwriting the live site.
Admin
KIZITO
Hello friend.
Just today, I mistakenly activated the staging mode (I’m a newbie tho) and there wasn’t any more option.
Later I came on, I couldn’t login to my wordpress. It returns an error message that I can’t login to a site that’s on staging mode.
I contacted bluehost, that did all they can, yet my site still says it’s on staging mode and I can’t login my wordpress.
What do I do please?
WPBeginner Support
It sounds like you’re using a plugin to have that page appear when viewing your site, you would want to disable the plugin using the method in our guide below:
https://www.wpbeginner.com/plugins/how-to-deactivate-all-plugins-when-not-able-to-access-wp-admin/
Admin
Alice
Hi,
Thanks for this. I have WP engine and my Wordpress theme got d-registered because I am using it on the stage environment and dev.
What’s the workaround that?
thank you
WPBeginner Support
You would need to reach out to your specific theme’s support for their workaround for this situation
Admin
Jim Jones
Hi I made changes in my WP Production site but not in the staging area. I want to reset my staging area to look like my Production site, or failing that delete my Staging area and start again. How can i do this?
WPBeginner Support
It would depend on the method you used but if you made changes to the live site’s design then the simplest method would be to remove the current staging site and create it again.
Admin
Jeff
Great article. I really learned a lot.
I have a question, please, about the manual method:
Is it required to password protect the directory of the subdomain in cPanel, since the admin access to the website is already protected by a password?
Thank you very much.
WPBeginner Support
While not required, it helps prevent your users from trying to access the staging site
Admin
Mujeeb
In that staging site
I want to give someone details to do something on my staging site, but I don’t want him to know my live site password, but is the Same thing with my live site. How can I do that
WPBeginner Support
You would create a new user for them on your staging site for what it sounds like you want to do and you can remove that staging user later.
Admin
Beulah Wellington
If I download WAMP on my computer and use the localhost, couldn’t install the UpdraftPlus plugin and let that be my staging site? Isn’t this another alternative?
WPBeginner Support
Rather than UpdraftPlus, we would recommend taking a look at our guide here for using local for staging: https://www.wpbeginner.com/wp-tutorials/how-to-move-wordpress-from-local-server-to-live-site/
Admin
Jan Stetson
I’m trying to set up a staging environment on my WordPress site hosted by Bluehost. I’m stopped at step one! when I go to the WordPress admin area, I don’t see bluehost at the top of the page. The topmost option in the nav menu on the left is “Dashboard”. No sign of “Staging” anywhere. Help?
WPBeginner Support
You likely removed the BlueHost plugin, if you reach out to BlueHost’s support they should be able to let you know their current methods available
Admin
Shashank Sachan
Hello
I tried but did not succeed. Getting error ” this site can’t be reached”.
I am on Godaddy and using Cloudflare. And I have not created a separate FTP account.
WPBeginner Support
To start troubleshooting that you could try the steps in our article here: https://www.wpbeginner.com/wp-tutorials/how-to-fix-the-403-forbidden-error-in-wordpress/
or reach out to your hosting provider for them to take a look.
Admin
simona
thank you for the article. one question: If I update Wordpress ONLY on the staging site, will it affect also my live-site?
thank you for your answer. regards, s.
WPBeginner Support
No, if you update one site it should not affect the other.
Admin
oshibiko
Thank you for this article.
Do you know of a way to test membership (loginlogoff ) functionality without going live on the actual site. In the staging environment or developing. TIA
WPBeginner Support
You would likely need to create a test user for you to log in with to test that.
Admin
Mark E
Great article, with one step missing for the manual instructions.
After downloading the duplicator files to your computer, you then have to upload the installer file and archive file to your newly created subdomain directory.
Otherwise when you try to run the installer you get a 404 page.
Otherwise great guide!
Thanks….
WPBeginner Support
Thank you for pointing that out
Admin
Charlene Marsh
No option to try the staging feature on Bluehost yet. Message says “Please contact support to find out how to enable staging.” I was just on the phone with Bluehost about another issue and the rep I was speaking with never heard of this new feature.
WPBeginner Support
It would depend on what rep you were talking to as it is a new feature so not all reps may be knowledgeable yet
Admin
Matt Stephen
To be able to use the staging feature provided by Bluehost, you must install and activate the Blushost plugin.
Sean
Thank you for this great info, as always. Now is this something I could use to play around with a new page builder? I want to test out Thrive Architect but want to do so without messing anything up. Or, suppose I wanted to play around with a new theme. These may be 2 different questions.
WPBeginner Support
You could certainly test those changes with a staging environment without having to worry about what people see on the site.
Admin
Vanessa
Thanks for the info. I currently use Bluehost but don’t have the staging site option I would love to test it out for a new theme I’d like to try before purchasing it. I contacted BH tech support the rep told me the feature is in development. Thanks again for the info.
WPBeginner Support
Glad we could bring this feature to your attention even if it is currently being developed
Admin
Vanessa
I was able to access the feature today. I’m excited to use it. Thanks again for the info. I’m excited to try out the staging feature.
Ani Chijioke
this is a great information, I have two websites, but I don’t feel like having both look the same.
pls, I need help.
is there any code I can add on >dashboard >customize >additional css,,, for the font color of my site to be pure black in color..
I have this theme that I am using, it gives me everything I want. but the font color of my blog posts are light black. I will like to change the color to pure black
any solution?
thank you.
WPBeginner Support
For finding the CSS you need to change, you would want to take a look at our article on how to use inspect element here: https://www.wpbeginner.com/wp-tutorials/basics-of-inspect-element-with-your-wordpress-site/
Admin
alykhan
Great article but the push back to live is a little brief. I have a WooCommerce site that needs a theme change. I used Duplicator Pro to make a copy on a staging server. I’ve made all the changes to the site including adding a couple of new plugins.
Now I want to push the site back but I can’t do the same thing as there are new orders on the live site. How do I copy the site back without affecting the orders etc..?
WPBeginner Support
Sadly, the safest method for that would be to prevent orders while updating from staging.
Admin
Jennifer Verdin
I haven’t read the comments yet, but I’ve been at this all day. The reason why is because this page does not tell you how to create a database user and assign privileges to the said user.
Thankfully, I was able to figure it out, but that’s a KEY step that is missing to connect the site and database.
WPBeginner Support
Apologies about the confusion, we will certainly look into clarifying that. If you reach out to your hosting provider they normally have a user already created.
Admin
Max
Hi guys,
Thanks for your awesome post. I like the idea that the provider has the staging, productive and a test environment out of box.
But I have two questions:
1. Can write a little bit how it works by your suggested providers?
2. Have you also providers which are located in the EU or better in Germany? And offer staging environment out of box?
Kind regard
Chris
Thank you so much for this information! And if anyone’s wondering, yes, it’s still relevant 4.5 years later.
Jess
Hi there
I am in the process of setting up a new Wordpress site but I was planning to start building everything in my staging environment because I would like my live site to have a “under construction” landing page.
What I am not sure of is how to push my changes from the staging site to my live site when I am ready. Would you mind describing this process please?
Thank you
Jess
Johnny
If it’s simply a matter of wanting a “Under Construction” page while keeping the rest of the sight off limits to the public, there are plugins that will do that. Search “under construction.”
Russell
How does this process compare to using a plugin like wp-staging.
Fernando Lisboa
Hi, my question is, i created a staging environment, work there make some updates on structure of pages, layouts, new categories, new pluig-in.
Ok, but in real live, my site is growing with new posts, comments, images, videos, etc…
When i push stage back to life, i will lost thes new itens that were create in real live ??? I test this in sitegroud, and i loose ever with advanved “push to live”
tks
WPBeginner Support
Hi Fernando,
The solution described above only syncs your website files not the database.
Admin
Ravindra
Hi,
Thank you very much. This article was very helpful.
Chris
Hi, thanks for such a useful article,
I’m having a small issue when I give it a go,
I have got as far down as
“Once WordPress has connected to your staging database, it should detect that WordPress has been installed, and prompt you to login” and I am stuck – it autoredirected to the wp-login and gave me a blank page. Not a 404, just a clean white screen.
On the main page the login has been renamed so I try to navigate to that instead and again just a clean white screen.
Can anyone give me any pointers on where I’m going wrong?
WPBeginner Support
Please see our guide on how to fix white screen of death in WordPress.
Admin
Smitha
Hi,
Thanks for this article!
I followed all the steps but I think I have missed one
I created a staging environment and checked site url in wp-options and updated wp-config file but the staging site is being redirected to the primary site.
Do I need to change any other setting?
Ruth
Hi! Thanks for the useful article!
Question, is it necessary to create a new database for your subdomain? Can’t you just use your root domain’s database?
Same for the FTP account, is it necessary to create a new one? I can now access my subdomain easily through my main FTP.
Thanks!
Best,
Ruth
WPBeginner Support
Hi Ruth,
Yes, it is necessary to create a separate database and a separate FTP account.
Admin
Courtney
Hello!
Perhaps this was already covered. Do I need a child theme on my sub-domain serving as my staging site? I am adding custom code and modifications to the new theme on my subdomain with the intention of switching all of this over to the live site when finally ready. Would this complicate things when switching from the staging site to replacing what is currently the live site?
Thank You!
Lee Perry
Hi, this article is super helpful. I have encountered one problem though, when I go to visit my staging URL, I have the following message appear ‘server DNS address could not be found’. I have also cleared my cache and browser history as someone wrote this might help, but it hasn’t worked. I’m wondering what I am doing wrong. Any help would be great.
Lee
Georgia
I’m having the same problem – did you manage to resolve this issue?
Thanks, Georgia
Adrien
While I appreciate the detailed instructions (I don’t like installing plugins to accomplish such tasks), I don’t see any advice concerning keeping the staging and live sites in sync. Wordpress sites are generally edited live with respect to content—posts, products, media, etc. Once you follow these directions, the two content sets will diverge as users add content to the live site while the developer’s staging version remains an old copy. I don’t see a good solution for this save a cron rsync job. Any tips?
Jason
After you create the staging subdomain and ftp account.
Skip all the other copying and database junk.
Install duplicator on your live site. Make a duplicate backup, which includes a zipped copy and an install. Php file.
Upload both to your staging area. (Maybe go in and create a database and user for the staging site in cpanel while you wait for the two fingers to upload)
Point your browser to staging.domain.com/install.php and follow the prompts.
Then go back to the rest of this tutorial for locking it down.
Gus Reyes
Hi, I followed another tutorial before I found this one and I installed Wordpress BEFORE copying files over and running the SQL queries. My staging site does not populate with live site’s data. Any help you can offer about what to do at this point would be appreciated…
Martin
The staging site does not look exactly like my primary site. The default banner is there instead of my uploaded media (even though that file has transfered) and rather than a nav bar with drop down menus, I have a list of all of my site’s webpages. Is this normal? If not, could you point me where to sort it out?
Thanks for this article!
BLZ
I keep getting this error when I try to run SQL queries ” #2013 – Lost connection to MySQL server during query”