If you have a business website or online store, then you’re probably looking for new ways to encourage people to buy your products or services. One good way to do this is by using a coupon popup. This is a small window that pops up on your website with a special offer.
At WPBeginner, we use OptinMonster to display popups, slide-ins, inline popups, and header banners for special offers and deals. We find that these popups can be very effective at encouraging visitors to make a purchase or decision.
Adding a coupon popup is easy with the right tools and knowledge. In this article, we will show you how to create mobile popups for your WordPress website and display them at the right time so that you are more likely to convert visitors into paying customers.
Why Should You Offer Visitors a Coupon?
Often new business owners are concerned that coupons will eat into their profits. However, established business owners know that offering discounts is a powerful way to get visitors to make up their minds instead of sitting on the fence.
Offering coupon codes helps you recover abandoned cart sales, convert visitors into customers, and make more sales.
Most eCommerce platforms like WooCommerce allow you to easily create coupon codes. However, sharing these coupon codes with your customers makes all the difference.
That’s why, in this article, we will share two different ways to share coupons with your visitors. These include a coupon exit popup and a coupon spin-a-wheel optin.
Let’s take a look at how to create a coupon popup in WordPress or WooCommerce.
How to Create Your Coupon Popup in WordPress
The best way to create a coupon popup is by using OptinMonster. It is the best WordPress popup plugin and lead generation software on the market.
For more information, see our complete OptinMonster review.

First, you need to visit the OptinMonster website to create an account. Simply click the ‘Get OptinMonster Now’ button to get started.
You will need at least the Growth plan because it includes Coupon Wheel Campaigns and advanced targeting rules for your popups.
After that, you need to install and activate the OptinMonster plugin on your WordPress site. For more details, see our step-by-step guide on how to install a WordPress plugin.
The plugin acts as a connector between your OptinMonster account and your WordPress website.
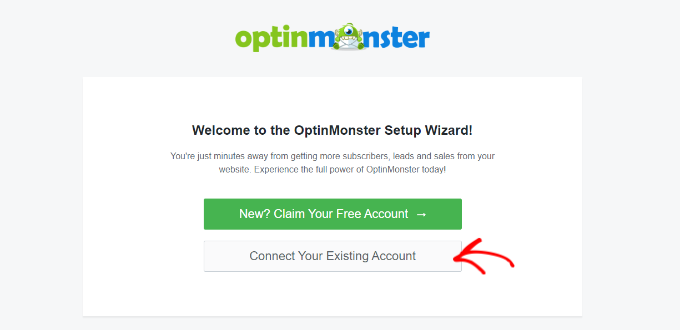
Upon activating the plugin, you will see the OptinMonster setup wizard. Go ahead and click on the ‘Connect Your Existing Account’ button.
A new window will now open where you will need to connect your WordPress site with OptinMonster.
Simply click the ‘Connect to WordPress’ button to continue.

You can also connect your WooCommerce store with OptinMonster. Just make sure that you have set up an eCommerce store in WordPress.
First, you will need to go to OptinMonster » Settings from your WordPress admin panel.
Afterward, head to the ‘General’ tab and click on the ‘Auto-Generate Keys + Connect WooCommerce’ button.
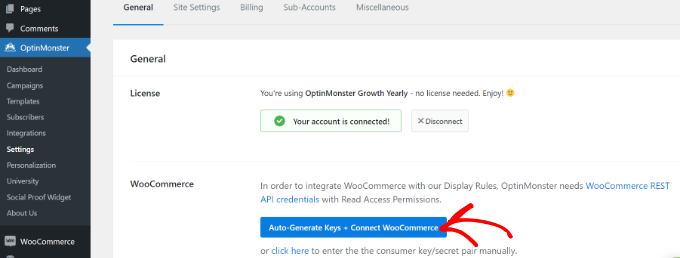
WooCommerce will now generate keys automatically and connect to your OptinMonster account.
Now, you are all set to create your first coupon popup campaign.
Creating Your Coupon Popup Campaign
To create a campaign, you can go to OptinMonster » Campaigns from your WordPress dashboard and then click the ‘Create Your First Campaign’ button.

On the next screen, OptinMonster will show different campaign types and templates.
First, you will need to choose a campaign type. We are going to use ‘Popup,’ which should be the default selection.
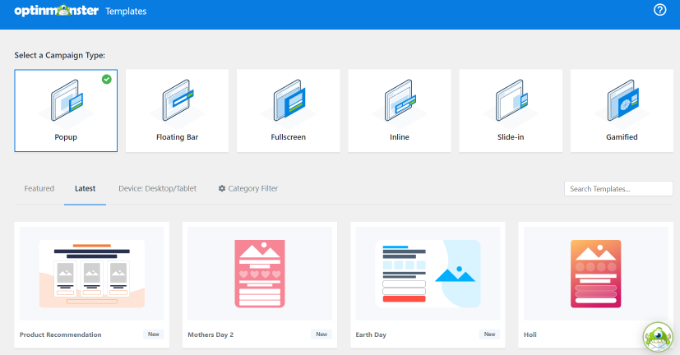
After that, you will be asked to select a template.
OptinMonster has a vast range of templates you can choose from, with lots of different layouts and color schemes. The ‘Coupon’ template is perfect for creating this popup. Although, you can select a different template if you prefer.
You can use the search box to find the Coupon template or scroll down the page.

Next, hover over the template and click the ‘Use Template’ button.
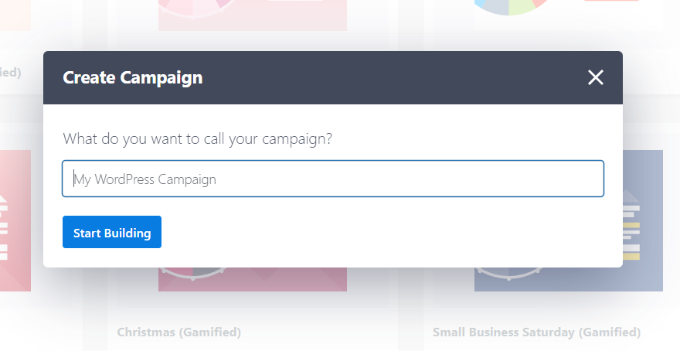
The final step before building your coupon popup is to name the campaign. After entering a name, click the ‘Start Building’ button.
Designing Your Coupon Popup
Once you’ve clicked ‘Start Building,’ you’ll see the drag-and-drop campaign builder.
You can use it to add different blocks to your template and change the text, colors, and design of the coupon in whatever way you like.
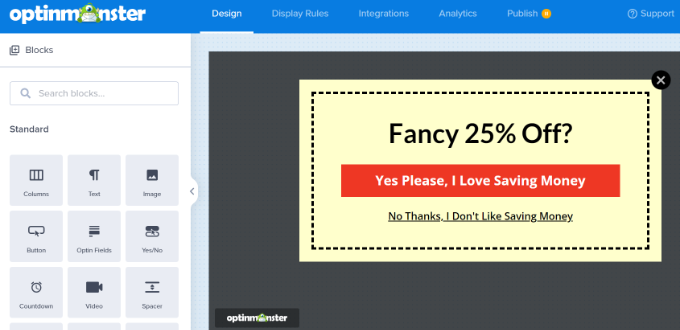
You can also click on any element of the design to change it further. Here, we have edited the text and made it a different color.
As soon as you make your changes, you will see real-time updates in the coupon popup template.
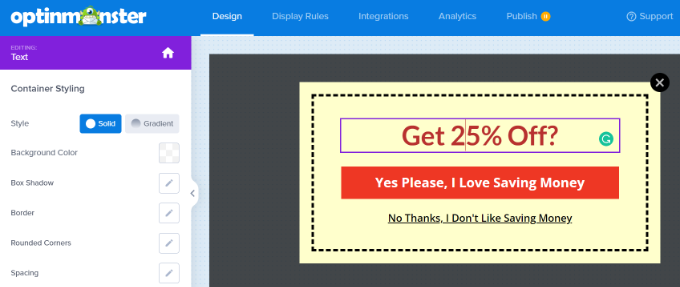
You might want to experiment with different fonts and colors to make your text stand out in the popup or match your brand.
Outside of the text and elements within the popup, you can also change the background color, add an image to your coupon, set the border color, change the border style, and more.
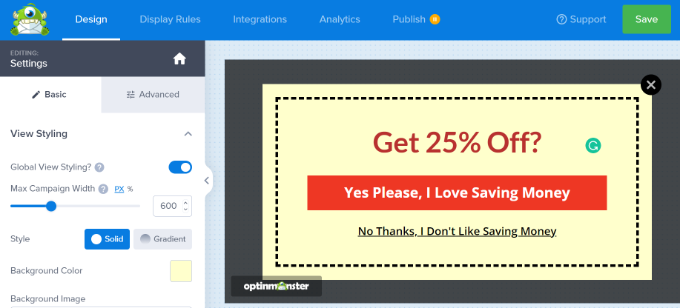
Once you are done with the changes, make sure to store your campaign by clicking the green ‘Save’ button at the top of the screen.
Decide How to Deliver Your Coupon Code
Now that you have set up your coupon popup, you need to decide how you will actually deliver the coupon code to your visitor.
There are several ways to do this in OptinMonster, but the best way is to deliver the coupon code straight away through OptinMonster’s Success view and send it by email newsletter.
That way, if the visitor isn’t ready to buy immediately, they have the coupon code in their email inbox for easy reference later.
By default, your coupon popup is already designed to use ‘the Success view’ as soon as the button is clicked. To check, you can click on the button and then see the ‘Go to View’ option on the left-hand side of your screen.
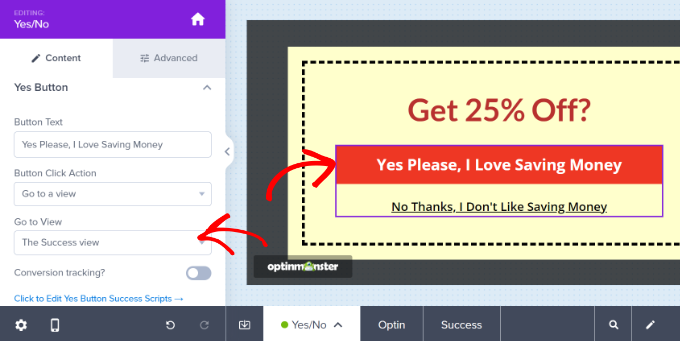
If you want a different button action, you can change that here. For your first coupon, though, we recommend sticking with the default.
Integrating OptinMonster With Your Email List
To send your coupon code out by email automatically and for the visitor to be added to your email list, you’ll need to integrate OptinMonster with an email marketing service.
Constant Contact is a great service to use with OptinMonster, and WPBeginner readers can get 20% off their first 3 months by using this coupon.
However, if you use a different email service, OptinMonster integrates with pretty much every major provider.
Simply go to the ‘Integration’ tab and click the ‘+ Add New Integration’ button to add your email marketing service.
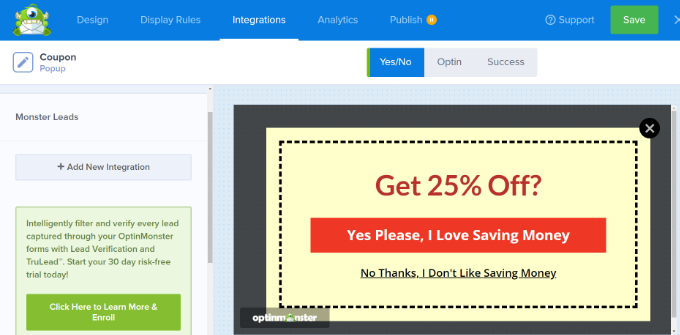
Once you have done that, you can set up an automated email to go out whenever someone signs up for the email list through your coupon popup.
Bonus Tip: Edit the Success View Template
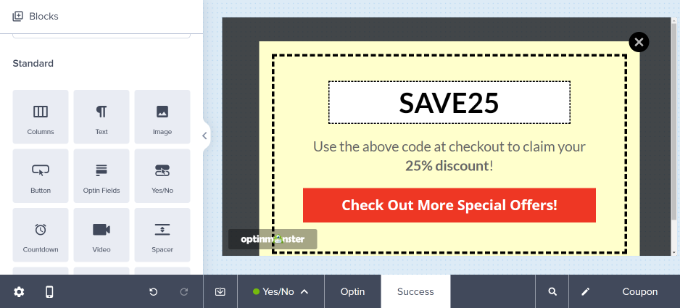
You can view and change the ‘Success View’ template by going back to the Design tab of your campaign and clicking the ‘Success’ option at the bottom of the screen.
The default looks like this, but you can edit it in any way you want, just like you edited your coupon popup.
Change Your Coupon Popup’s Display Rules
By default, your coupon popup will appear to visitors after they have been on any page of your site for 5 seconds.
If you want to change this, go to the ‘Display Rules’ tab.
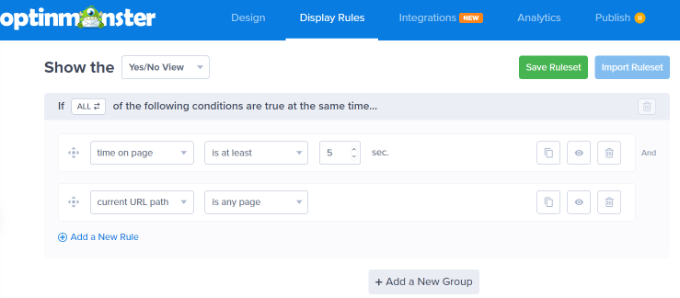
You can set whatever display rules you like, but a great one to try out is Exit-Intent®.
This special OptinMonster technology can tell when a visitor is about to leave your site and show them your coupon popup at just the right moment.
You can add exit intent by selecting the ‘exit detected’ from the dropdown menu and choosing which devices to show the campaign on. By default, it will be set to display on all devices.

There is also an option to control the sensitivity of exit intent.
After that, scroll down and choose the pages where you’d like to show your campaign.
For example, you can use the default setting of ‘current URL path’ and select the ‘is any page’ option. This way, your campaign will appear on your entire website.
Next, OptinMonster also offers options to play a sound effect and show animation when the coupon popup appears.
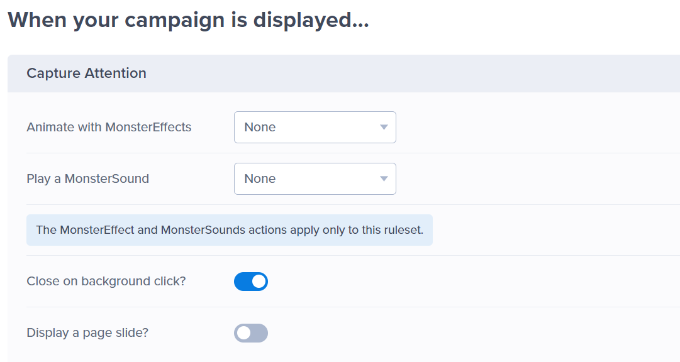
There are more settings as well.
OptinMonster lets you configure the cookies for your campaign and set the number of days after which the campaign will be shown to different users.
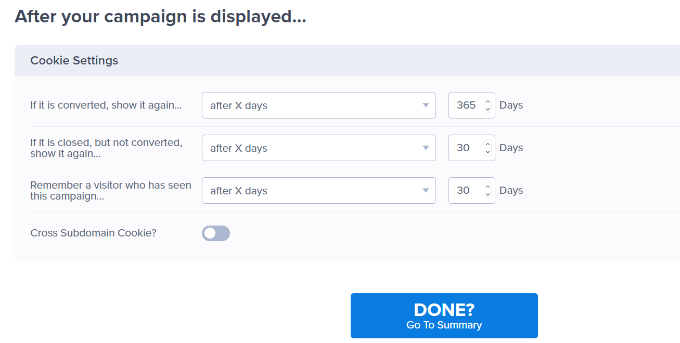
Once you are happy with your coupon popup, you can go to the ‘Publish’ tab at the top.
After that, simply make sure that ‘Publish’ is checked under the ‘Publish Status’ section.
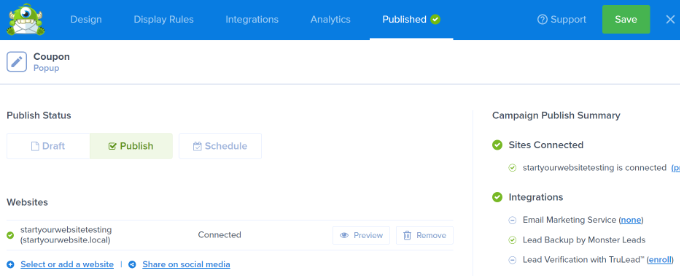
Don’t forget to click the ‘Save’ button at the top and close the campaign builder.
You can now visit your website to see the coupon popup in action.

Creating a Spin-to-Win Coupon Wheel
A spin-to-win coupon wheel is a great way to make your coupons more interesting and fun for your site’s visitors. It’s like a mini-game that visitors can play to win a discount or another bonus.
Your spin-to-win options could include things like 10% off, 20% off, free shipping, a free trial, or whatever you want to offer.
OptinMonster offers a ‘Gamified’ campaign type that lets you create spin-the-wheel popups.

After that, scroll down and select one of the Wheel templates.
The plugin has different spin-to-win templates. Simply hover over a template and click the ‘Use Template’ button.
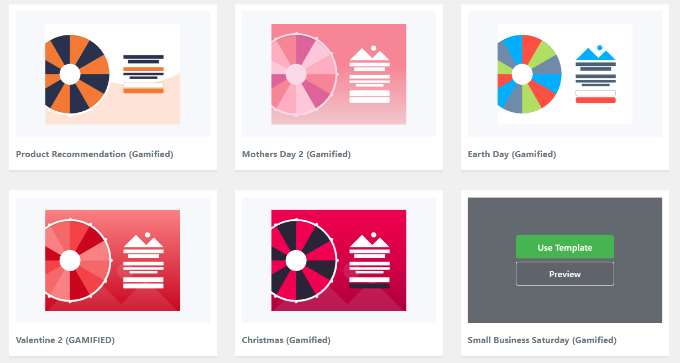
Next, go ahead and edit any aspect of your coupon wheel.
To edit the options on the coupon wheel itself, you will need to click on the ‘Customize Wheel Sections’ button on the left-hand side.
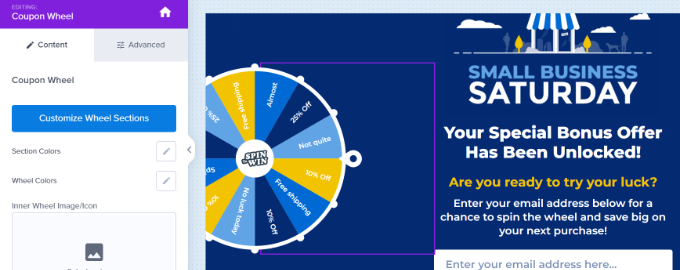
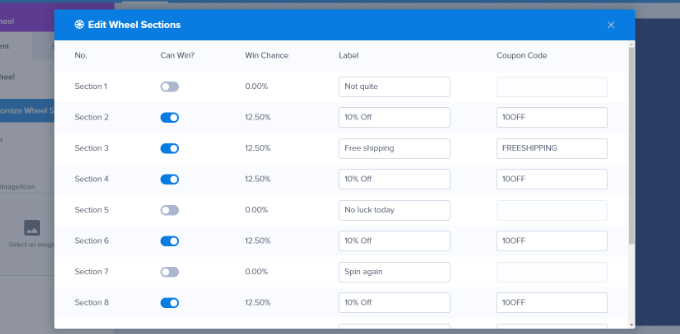
You can then type in any text as the Label for each option and add the coupon code for each winning option.
Note that the ‘Win Chance’ is automatically determined. If you change the toggle on one or more of the ‘Can Win’ options, OpinMonster will recalculate the winning chances.
If you need more help creating your coupon wheel and adding it to your site, check out our post on how to add spin-to-win optins in WordPress and WooCommerce, which goes through the process in more detail.
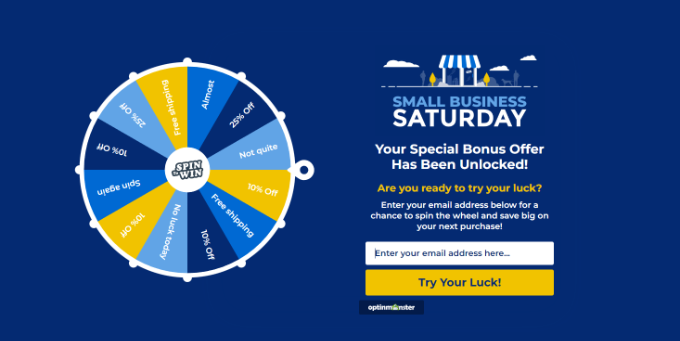
You can then visit your website to see the spin-to-win coupon popup in action.
Additional Resources for Creating High Converting Popups
You can also check out some of other helpful guides on creating popups to boost conversions on your site:
- How to Create a Yes/No Optin for Your WordPress Site
- How to Create a Welcome Mat for Your WordPress Site (+ Examples)
- How to Use the Psychology of Popups to Boost Signups by 250%
- How to Create a Welcome Gate in WordPress
- Are Popups Still Relevant? The Future of Popup Marketing Explored
We hope this article helped you learn how to create a coupon popup in WordPress. You might also want to look at our pick of the best WooCommerce plugins or our guide on how to add push notifications to your WordPress site.
If you liked this article, then please subscribe to our YouTube Channel for WordPress video tutorials. You can also find us on Twitter and Facebook.


Dennis Muthomi
I’ve had success using exit-intent popups on desktop to reduce cart abandonment
I’m interested in trying exit-intent on mobile as well. how does exit intent work on mobile? how is it even triggered?
WPBeginner Support
It is most commonly triggered by scrolling up.
Admin
Dennis Muthomi
triggering by detecting scrolling up is clever – Now I have a better grasp of how to utilize this on my woocommerce store.
Appreciate you taking the time to answer my question
Jiří Vaněk
I have this trigger set up on one of the campaigns. It works brilliantly on desktop, but unfortunately, it only works occasionally on mobile. I must say that there are much better triggers for mobile than this one. Sometimes it works, sometimes it doesn’t. It probably depends on the mobile device’s operating system and browser, but personally, this trigger doesn’t work well for me.