If you’ve ever tried collecting RSVPs through regular email, you know how quickly it can turn into complete chaos.
Duplicate responses, missed messages, and zero organization; it’s enough to make anyone want to cancel their event before it even starts. You end up spending more time managing the guest list than actually planning the fun stuff.
We totally get it. 🙌
At WPBeginner, we’ve looked into the easiest ways to create and manage RSVP forms in WordPress – no coding needed. One of the most reliable solutions we’ve found is WPForms. It turns event planning from a stressful juggling act into a smooth, organized process.
In this guide, we’ll show you how to create an RSVP form in WordPress using WPForms. You’ll be able to collect responses, track attendance, manage special requests, and keep everything in one place.
Why Create an RSVP Form in WordPress?
An RSVP form helps you collect responses in one place, stay organized, and avoid the chaos of tracking replies from different channels.
Without a form, guests might respond by email, text, phone call, or in person. This makes it hard to track who’s actually attending and easy to overlook someone’s reply.
A WordPress RSVP form ensures everyone replies the same way, and all responses are saved directly in your admin dashboard. Even better, the RSVPs will be saved in your WordPress database.
This saves you hours of back-and-forth and makes it easier to manage your guest list, special requests, and even follow-ups.
That being said, let’s go over the steps for how to create an RSVP form in WordPress. Here’s a quick overlook of all the things we’ll cover in this guide:
- Creating Your RSVP Form in WordPress
- Adding Your RSVP Form to a Page in WordPress
- Checking Your Guest List in WordPress
- Bonus Tip: Making an Event Timeline in WordPress
- FAQs: Creating an RSVP Form in WordPress
- Expert Guides on Using WordPress to Organize Events
Creating Your RSVP Form in WordPress
To create a custom RSVP form with ease, you’ll need a form builder. We recommend using WPForms, as it’s the best WordPress contact form on the market. Plus, it’s beginner-friendly and comes with all the features you need.
At WPBeginner, we’re big fans of WPForms. We use it to build a lot of forms, including our contact form and annual readers’ survey. Check out our complete WPForms review to learn more about the plugin.

First, let’s install and activate the WPForms plugin for WordPress. If you need help, you can see our step-by-step guide on how to install a WordPress plugin.
🧑💻 Tip: We recommend using WPForms Pro or higher so you can use useful form templates to speed up the process of creating your RSVP form. However, you can also opt for the free WPForms Lite version, though this is more work.
Upon activation, go to WPForms » Addons in your WordPress dashboard.
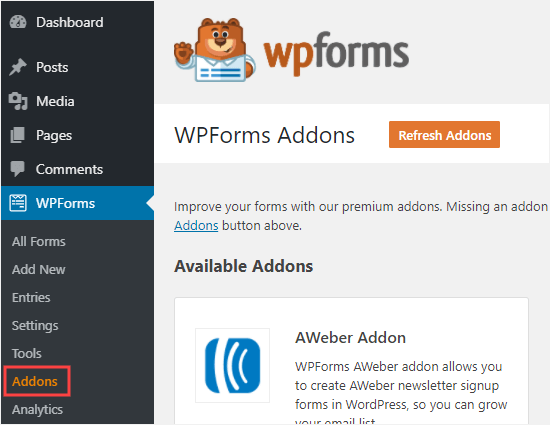
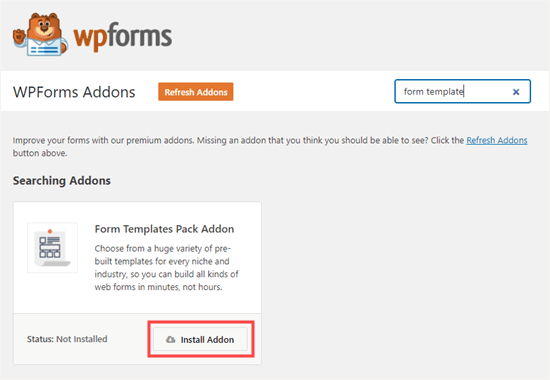
Next, search for the Form Templates addon.
Go ahead and click the ‘Install Addon’ button to install it.
💡 Note: If you’re using WPForms Lite, you won’t have access to the Form Templates Pack addon. Instead, you can use the built-in AI form builder. Just enter a simple prompt, and the AI will automatically generate a custom form for you.
Upon activation, you can start creating your RSVP form.
Head over to WPForms » Add New in your WordPress dashboard, then enter a name for your form to get started.
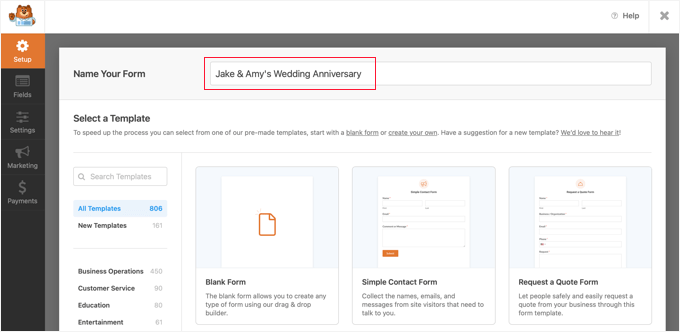
Below this on the page, you will see the Additional Templates section. Go ahead and type in ‘RSVP’ to see all the RSVP form templates.
We are going to use the Party Invitation RSVP Form, which is suitable for any type of party.
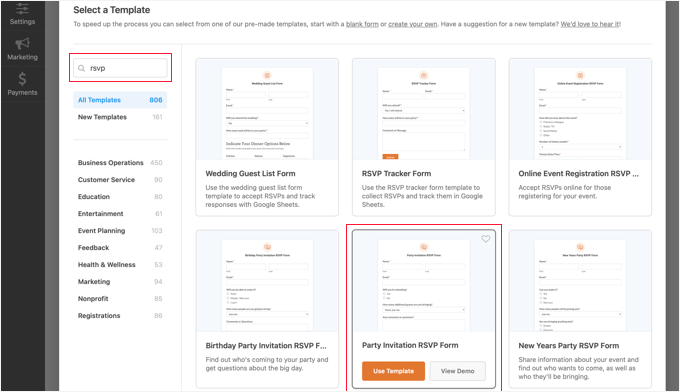
Once you have selected your template, you need to click the ‘Use Template’ button.
WPForms will open it in the drag-and-drop form builder.
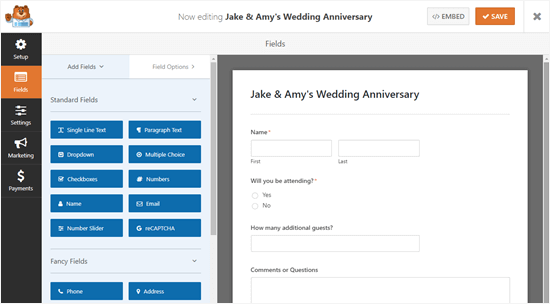
Here, you can change anything you like about the form.
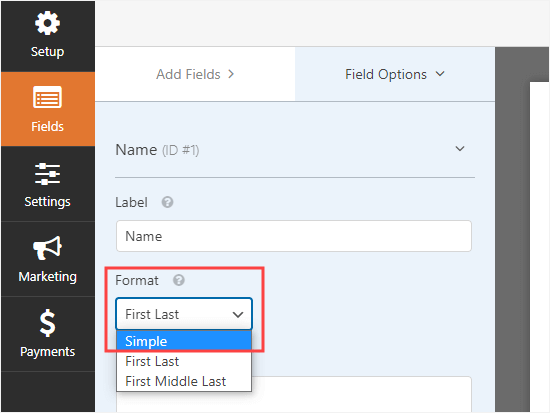
Simply click on the part of the form you want to change and then edit it on the left-hand side.
For instance, we are going to click on the ‘Name’ field and change it to the ‘Simple’ format.
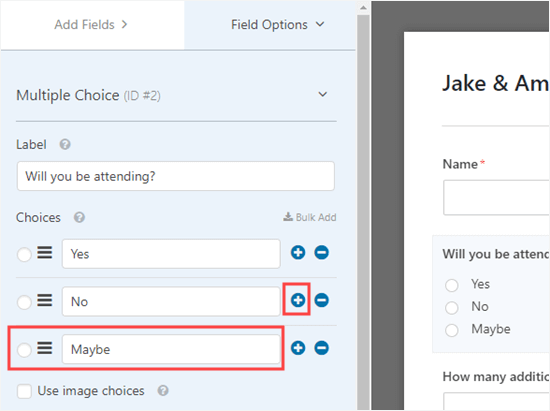
What if you want to add extra options to the ‘Will you be attending’ field?
Just click on it, then use the (+) button to add more choices.
💡 Note: There’s also an AI Choices feature that can help you generate choices for fields like dropdowns, multiple choice, or checkboxes whenever you’re stuck or need inspiration.
It’s also easy to add more fields to the form.
Simply use the ‘Add Fields’ tab to drag and drop more fields onto your form.
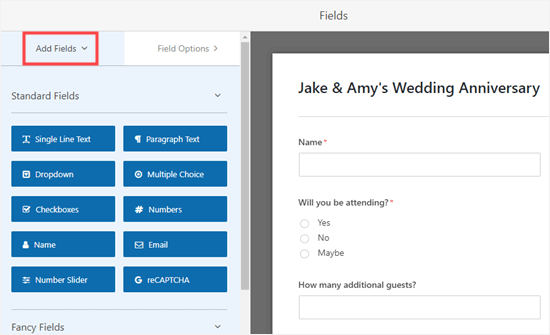
We have added a ‘Single Line Text’ field.
We will use this to ask about allergies and dietary requirements.

Once you’re happy with how your WordPress form looks, you can move on to configure the form’s notifications.
But don’t forget to click the Save button at the top of the screen first.

Now, you can go to the Settings » Notifications page for your form.
This lets you control where the RSVPs are sent.
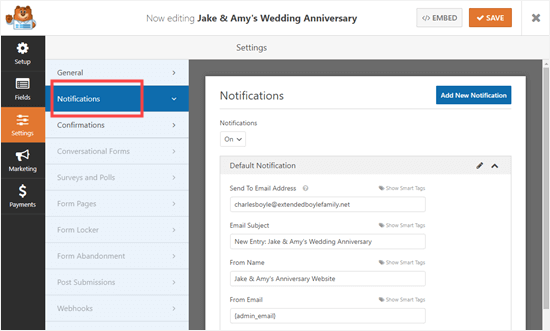
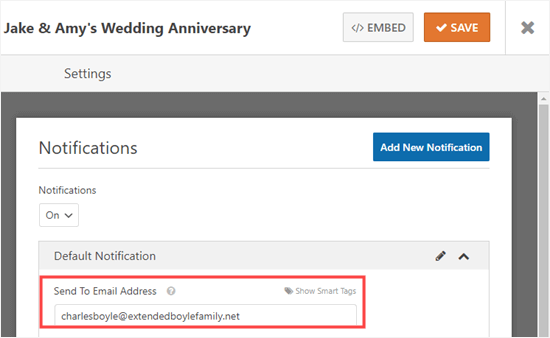
Simply change the ‘Send To Email Address’ to the email address you want to use.
By default, it goes to {admin_email}, which is normally the email address of whoever set up the WordPress site.
If you want RSVPs to go to more than one person, follow our instructions to create a form with multiple recipients.
You can also change other settings here, such as the subject line of the emails.
Next, you may want to change the message that guests will see after submitting the form. To do this, click on the Confirmations tab. Simply delete the existing message and type in the message you want to use instead.

If you prefer, you can also choose to redirect guests to a different page instead of showing a message. This is useful if you’ve created a custom thank-you page or want to send them to another resource, like an event schedule or location map.
Again, don’t forget to click the Save button before exiting your form.
Adding Your RSVP Form to a Page in WordPress
It’s easy to embed your RSVP form into any post or page on your website. You can even add it to your sidebar using the WPForms widget.
To add the form to your WordPress site, go ahead and click the ‘Embed’ button next to ‘Save.’ On the popup that appears, you can select to add it to an existing page or a new one.
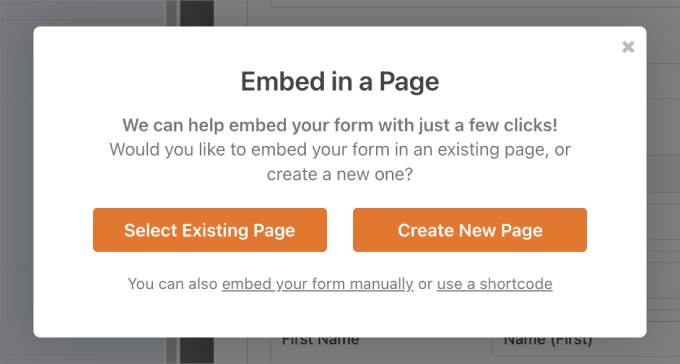
For this tutorial, let’s create a new page for the form.
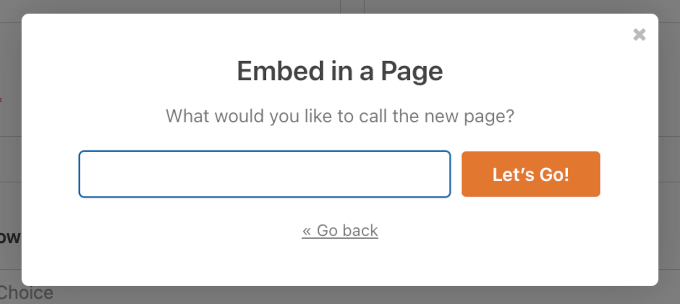
On the next popup, you can enter the new page name and then click the ‘Let’s Go!’ button.
This will open the WordPress block editor.
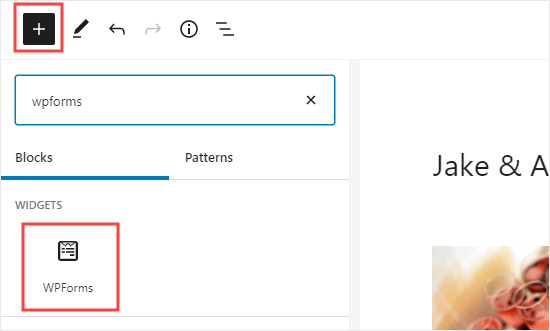
To add your form, simply click the + icon to add a new block. Then, search for the WPForms block.
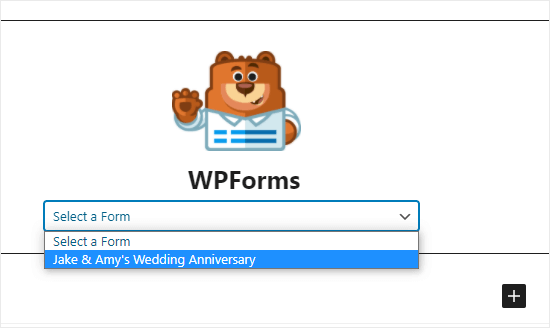
Once you have added that block to your page, you need to select your RSVP form.
Simply click on ‘Select a Form’, then select your form from the dropdown list.
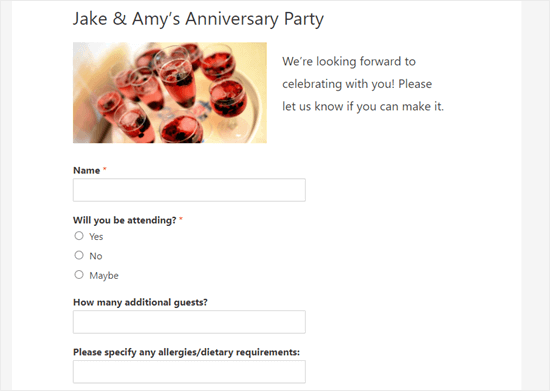
Finally, go ahead and publish or preview your page to see your form on your website.
This is how it looks on our demo website:
For more details, you can see our guide on how to embed WordPress forms.
Checking Your Guest List in WordPress
Once people have had a chance to RSVP, you will want to construct a guest list.
Luckily, WPForms makes this process quick and easy for you. Instead of going through all the notification emails, it’s easy to download the guest list from WordPress.
To access form entries, go to WPForms » All Forms in your WordPress admin area.
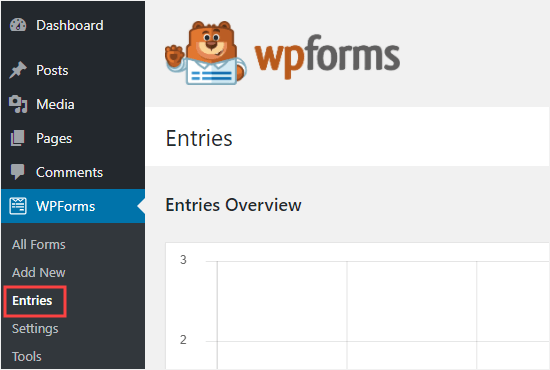
💡 Note: This feature is only available in the WPForms Pro version.
You will see a list of all the forms on your WordPress website.
Then, click on the name of your form at the bottom of this page.
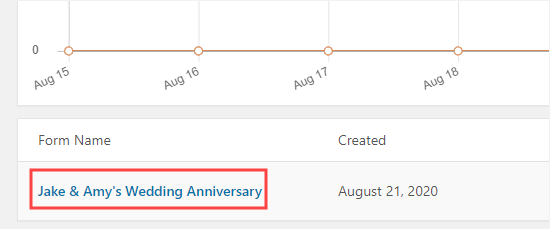
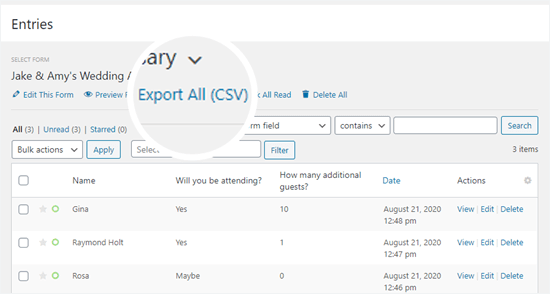
You will now see a table that summarizes the RSVPs.
Just click ‘View’ next to any of these to see the full details. And to download the whole guest list, simply click the ‘Export All (CSV)’ button.
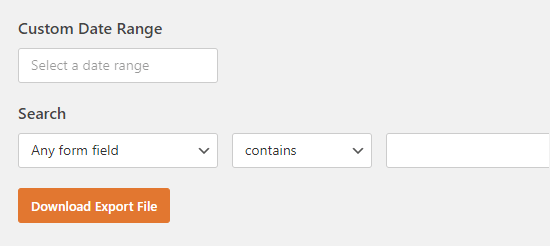
WPForms will then prompt you to confirm which fields you want to include.
By default, all will be checked.
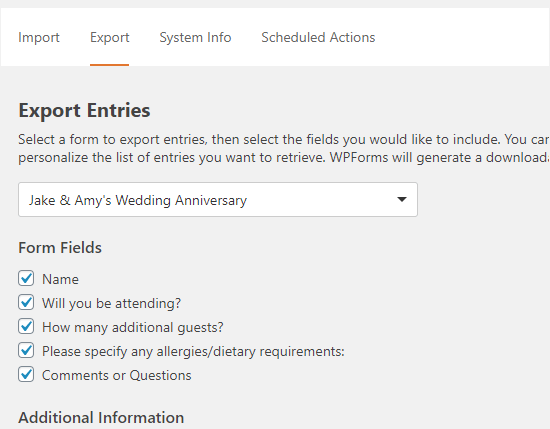
Simply scroll down and click the ‘Download Export File’ button.
It will now download the form entries to your computer as a CSV file. You can open it in Excel or any spreadsheet program like Google Spreadsheet.
Bonus Tip: Making an Event Timeline in WordPress
Want to make your event RSVP page even more engaging? Try adding an event timeline.
A timeline helps visitors see what’s happening and when – all in a clean, chronological layout. It’s perfect for events like conferences, weddings, product launches, or even casual get-togethers.
More than just a list of times and activities, timelines make your content easier to scan and more visually appealing. They also help you tell a story by highlighting phases, progress, and how everything fits together.
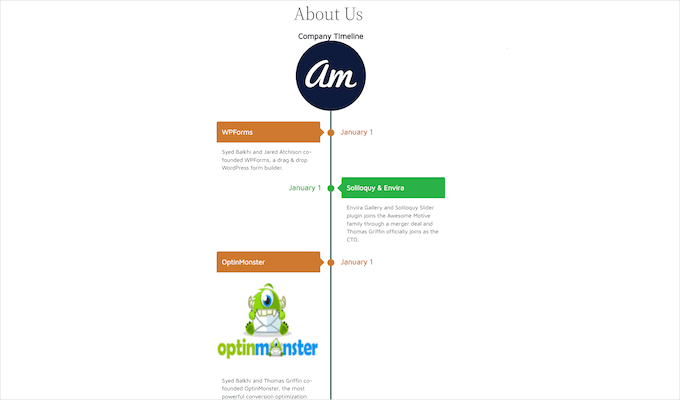
Here are some common ways to use event timelines in WordPress:
- Event Schedules – Show sessions, keynotes, and breaks to help attendees plan their day.
- Portfolios – Creatives and photographers can use vertical timelines to share their journey or projects over time.
- Project Milestones – Outline launch phases or delivery dates for clients and stakeholders.
- Company History – Display major moments in your brand’s growth in a way that’s more dynamic than plain text.
For step-by-step instructions, you can refer to our guide on how to add a beautiful event timeline in WordPress.
FAQs: Creating an RSVP Form in WordPress
Let’s explore some of the most common questions we hear about creating RSVP forms.
What is the best WordPress RSVP form plugin?
We recommend WPForms as the best plugin for creating RSVP forms. The Pro version includes ready-made templates that make setup quick and easy. It also lets you manage all your guest responses directly in the WordPress dashboard.
Can I create an RSVP form in WordPress for free?
Yes, you can. The free version, WPForms Lite, allows you to build a basic RSVP form from scratch. However, you’ll miss out on the pre-built templates and advanced features like exporting your guest list, which saves a lot of time.
How do I close RSVPs after a certain date or number of guests?
With WPForms Pro, you can easily set form restrictions. In the form settings, you can schedule a closing date for your form or limit the total number of entries to cap your guest list automatically.
Can I collect payments with my RSVP form?
Absolutely. WPForms Pro integrates with popular payment gateways like Stripe, PayPal, and Square. You can add a payment field to your form to sell tickets or collect registration fees for your event.
Expert Guides on Using WordPress to Organize Events
We hope this article helped you learn how to create an RSVP form in WordPress. You might also want to see some other guides related to using WordPress to organize events:
- How to Host a Virtual Event in WordPress
- How to Create an Event Registration Page in WordPress
- How to Create a Simple Event Calendar with Sugar Calendar
- How to Create a User-Submitted Events Calendar in WordPress
- How to Add a Facebook Event Calendar in WordPress
- How to Add Google Calendar Events From Your WordPress Contact Form
- Best WordPress Event Plugins Compared
- Best WordPress Themes for Events and Conferences
- Best Webinar Software Platform for Small Businesses (Compared)
If you liked this article, then please subscribe to our YouTube Channel for WordPress video tutorials. You can also find us on Twitter and Facebook.


Jiří Vaněk
So it’s very similar to creating a survey in google docs and then sending the link. That’s great that I can use the same thing with WP Forms right on my website and not have to use apps on third party servers :).