We remember the days when restaurant websites were nothing more than scanned PDF menus that you couldn’t read on your phone. After helping dozens of restaurants modernize their websites, we’ve learned that creating an effective online menu doesn’t have to be complicated or expensive.
These days, having your menu online isn’t optional – it’s essential for success. Think about it: before someone decides to eat at your place, they’re almost definitely going to check you out online. An old-fashioned or hard-to-read menu is a surefire way to send them clicking over to your competitors.
That’s why we’ve put together this step-by-step guide to share everything we’ve learned about creating restaurant menus in WordPress. You’ll discover the exact tools and techniques we recommend to build menus that not only look delicious but are also super easy to update – even if you’re completely new to WordPress.
What Do You Need to Start a Restaurant Website?
Before you can create an online restaurant menu, you’ll need to set up a website. If you don’t have a website yet, then don’t worry.
You can easily start a website using WordPress, which is the best website builder in the world used by millions of small businesses, restaurants, bars, and cafes. Over 43% of all websites on the internet use WordPress.
Best of all, you can start building your website without a large upfront investment.
The first thing you need is a domain name and web hosting. We’ve worked out a deal with Bluehost, one of WordPress’s recommended hosting providers, to offer our readers a great deal.
You get a free domain name, a free SSL certificate, and a huge discount on web hosting.
Alternative: We also recommend Hostinger. Their plans also include a free domain name and SSL with a generous discount.
Beyond hosting and a domain name, you’ll also need a WordPress theme. A theme is like a template for your website.
There are tons of great WordPress restaurant themes to help you create a professional website that will encourage your customers to place an order.
If you need help, then you can see our step-by-step guide on how to easily create a restaurant website with WordPress.
Why Create an Online Menu in WordPress?
Want to make your restaurant website even tastier for your visitors? One of the best ways to do that is by adding a beautiful and easy-to-use online menu right on your WordPress site.
Think about it – when someone lands on your restaurant’s website, what’s usually the first thing they’re looking for? The menu!
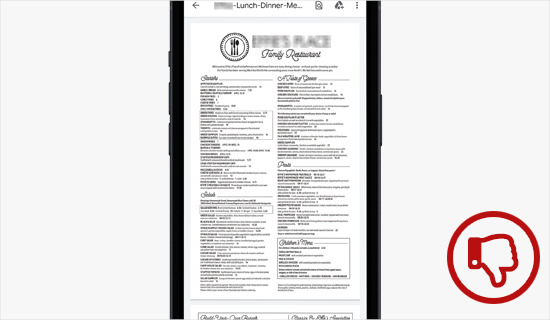
Now, you might be thinking, “I already have a menu, it’s a PDF!” And while that’s a start, it’s not the best experience for your hungry customers. Here’s why:
- PDFs can be a pain: Downloading PDFs can be tricky, especially if someone isn’t super tech-savvy or has a slow internet connection or limited data. You want to make it as easy as possible for them to see your menu.
- Not mobile-friendly: According to our internet usage statistics, mobile traffic makes up almost 55% of all web traffic. The problem is that PDF menus can be a nightmare to read on smaller screens, forcing users to constantly zoom in and out. Not a great look!
But here’s the good news: creating an online menu on your WordPress site solves all these problems. Here’s why:
- No more downloads: Your visitors can see your delicious dishes instantly, right on the page.
- Looks great on any device: You can design your online menu so it automatically adjusts to fit any screen size, making it super easy to read on phones, tablets, and computers.
- Easy to update: Need to change a price or add a new special? With an online menu, you can make those changes quickly and easily. Forget about messing with PDFs and re-uploading them. You can even add online ordering further down the line.
With that in mind, we will share 2 different WordPress plugins that can help you add an online restaurant menu to WordPress. You can use the quick links below to choose the plugin you want to use:
Ready? Let’s get started.
Method 1: Add a Restaurant Menu to WordPress With SeedProd
Let’s talk about the easiest way to whip up a fantastic online menu in WordPress: SeedProd. It’s a popular drag-and-drop WordPress page builder that’s used by over 1 million sites, including many restaurant websites.

With SeedProd, you can create a mouthwatering restaurant menu without needing any fancy coding skills. Just drag and drop elements onto the page, and you’ve got a beautiful menu. Plus, when you need to tweak your menu (maybe adding a new dish or adjusting a price) SeedProd makes it super simple to make those changes.
We’ve been using SeedProd for years. In fact, we’ve built a bunch of websites for our partners using SeedProd – think of awesome sites like WPForms, Duplicator, and WP Charitable. That’s how much we trust it.
We’ve got so much experience with this fantastic plugin that we even put together a complete SeedProd review. It goes into all the nitty-gritty details and shares our honest thoughts. So, if you’re curious to learn even more about what SeedProd can do and why we love it, be sure check out our full SeedProd review.
For this tutorial, you can use the free version of SeedProd to create your menu. However, a pro version of SeedProd is available that has 320+ templates, color schemes, email marketing integrations, image carousels, social media blocks, and much more.
The first thing you need to do is install and activate the SeedProd plugin. If you need help, feel free to go through our step-by-step guide on how to install a WordPress plugin.
Upon activation, let’s navigate to SeedProd » Pages and click the ‘Add New Landing Page’ button.
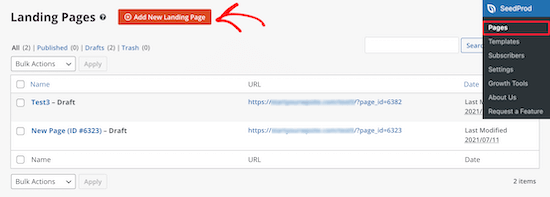
This brings you to the template screen, where you can select a page template.
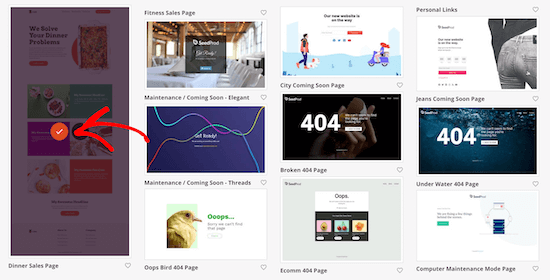
There are dozens of templates for different niches and purposes, including for restaurant websites.
To choose a template, hover over it and click the ‘Checkmark’ icon. You can choose whichever template you like, but we will use the ‘Dinner Sales Page’ template for this tutorial.
This will open a popup where you can name your new menu page and edit its URL. For example, we simply call our page ‘Menu’.
Then, you can click the ‘Save and Start Editing the Page’ button.
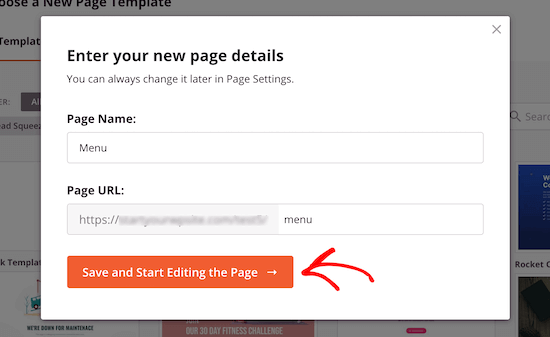
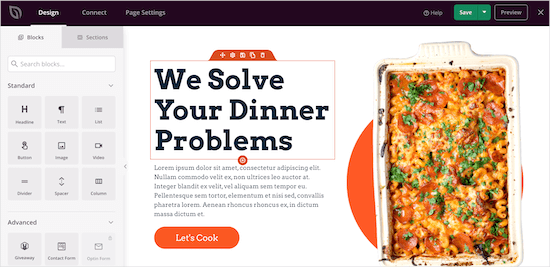
Once you’ve done that, you’ll be taken to the page editor screen.
The right-hand side of the page is the preview and can be fully customized. The left-hand side of the page has different blocks and sections you can add to the page.
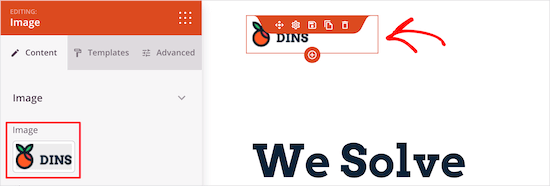
Let’s start with customizing the logo, so you’ll want to click on the page logo. The left-hand panel will then show you the customization options, where you can upload your restaurant logo.
To add a new logo, you can follow the same process as adding an image to WordPress.
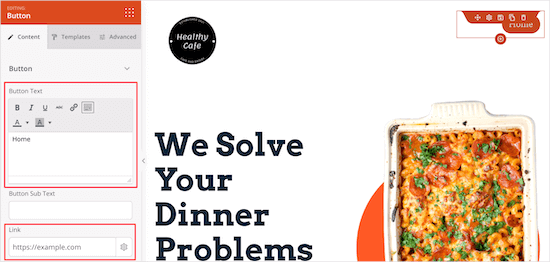
Next, you can change the navigation menu button to return to your homepage. That way, when your visitors are done viewing the menu, they can return to your website.
You can change the text and link in the left-hand menu by simply clicking on the navigation menu button.
After that, you can delete the main content section.
Simply hover over the page headline and click the ‘Delete Block’ icon.
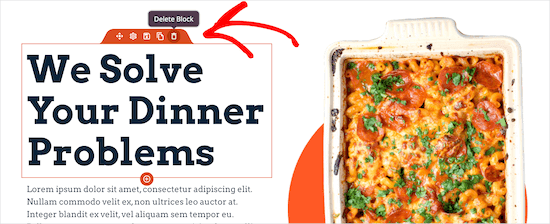
Then, you can do the same for the image, text, and button elements.
Next, you can add a headline for your menu’s title by dragging the ‘Headline’ block to your page. Like the other elements, the menu on the left will show you the customization options.

After that, you can edit the existing food items and replace them with your own text and images.
To do this, you can first click on the image and upload your own image using the menu on the left.
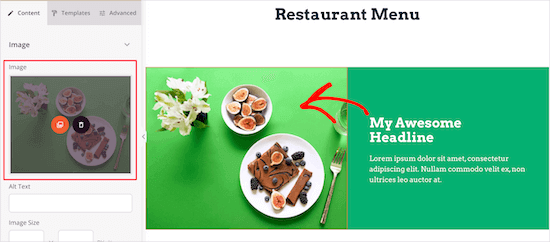
Next, let’s click on the current headline to write your menu description.
You can change the text by clicking on it.
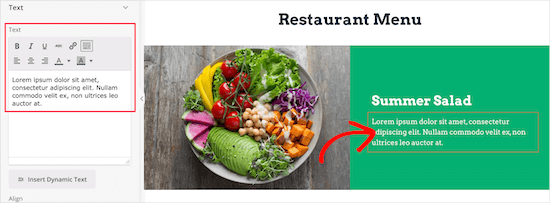
Once you’ve changed the headline and text, you can add a price for the item.
Simply drag the ‘Text’ element to your page and then customize the text with the left-hand menu.
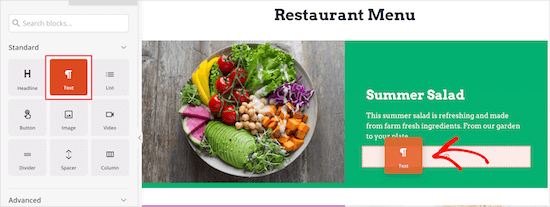
Then, simply follow the same steps as above for the rest of the items on your restaurant menu.
If you want to add another menu section with the same style, then hover over the element and click ‘Duplicate Row.’
This will make a copy of the same row and add it directly beneath.
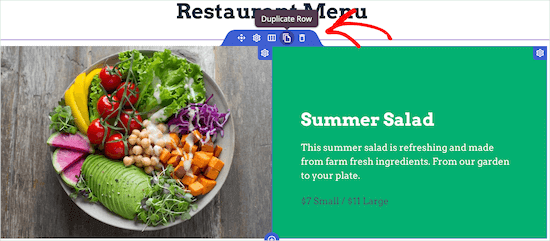
Feel free to continue customizing your restaurant menu. You can fully customize every part of the page, including colors, sizing, fonts, and more.
If you don’t want to add a photo for every item, you can easily add menu items using a list block.
Alternatively, SeedProd has an AI builder that can create a restaurant menu in just a few seconds. For details on how to use it, just see our guide on how to make a WordPress website using AI.
Once you’re done creating your online restaurant menu, you can click the dropdown arrow next to the ‘Save’ button and select ‘Publish.’
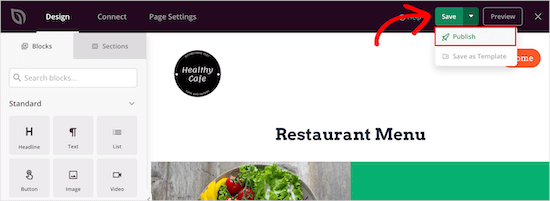
Your new restaurant menu is now live for your visitors to see.
Now, you can add your restaurant menu to your navigation menu and other areas of your website.

Method 2: Add a Restaurant Menu to WordPress With Food Menu
This method uses the Food Menu – Restaurant Menu & Online Ordering plugin. This plugin lets you quickly create an online menu in WordPress.
It also integrates with WooCommerce, so you can give your visitors the option to place an online order.

The first thing you need to do is install and activate the Food Menu – Restaurant Menu & Online Ordering plugin. For detailed instructions, you can see our beginner’s guide on how to install a WordPress plugin.
Upon activation, you’ll want to navigate to Food Menu » Add Food.
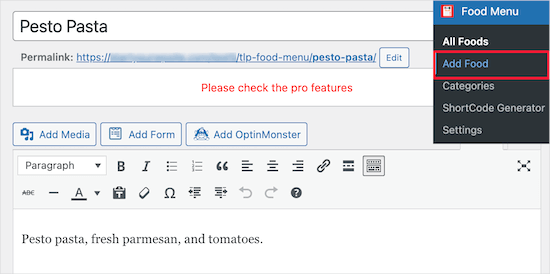
On this screen, you can enter your menu item’s name, description, and image.
After that, go ahead and click the ‘Update’ or ‘Publish’ button to save your menu item.
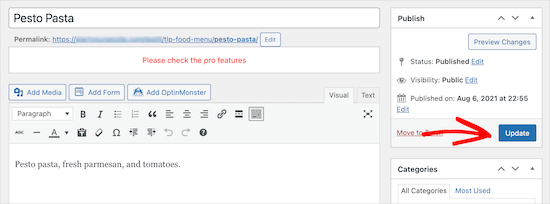
To add more items to your menu, simply follow the steps above.
Once you’ve finished adding items to your food menu, it’s time to add it to your site.
First, let’s head over to Food Menu » ShortCode Generator and then click the ‘Add New’ button.
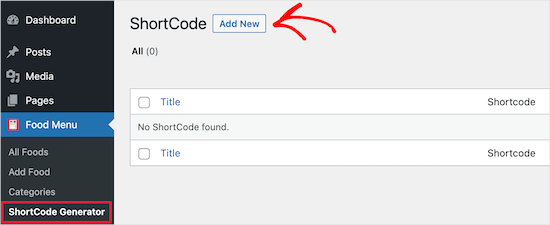
Next, you’ll want to give your shortcode a title to help you remember the type of menu items you added.
Then, you can customize how you want your menu to display.
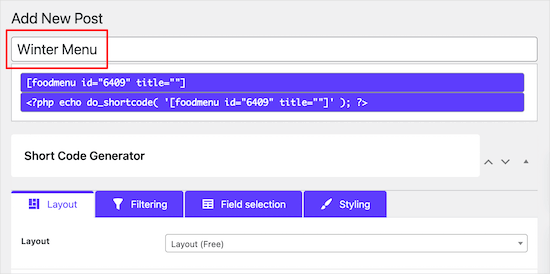
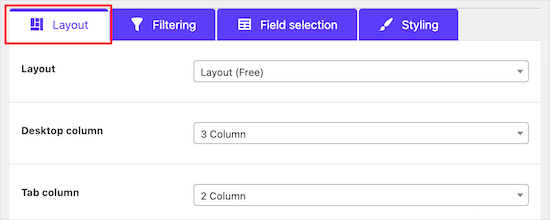
We will keep the default options, but you can customize how the menu displays with the settings in the ‘Layout’ section.
Here, you can select the number of items to display per row.
In the ‘Filtering’ tab, you can choose whether to display a simple menu or enable online ordering.
To turn on online ordering, simply select the ‘WooCommerce’ radio button. You can also control which items you want to display.
If you plan to let customers add food items to their carts and checkout, you need to add your menu items as products in your WooCommerce store.
For more details on adding products, see our step-by-step guide on how to start an online store.
Next, you can customize the information that displays for each item by clicking on the ‘Field selection’ tab.
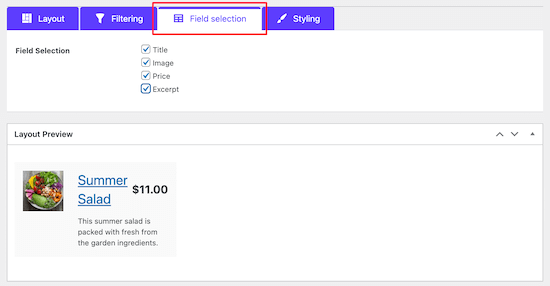
As you check or uncheck the boxes, you can see a real-time preview of the changes.
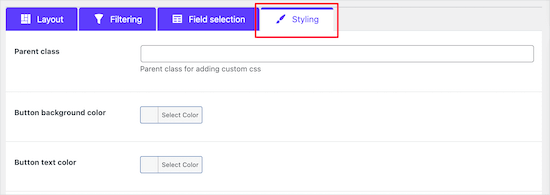
If you want to change the appearance of your menu items, you can switch to the ‘Styling’ tab.

Once finished, make sure to click the ‘Publish’ button.
This will not make your menu live on your site yet, but it will save the shortcode that we will add to it below.
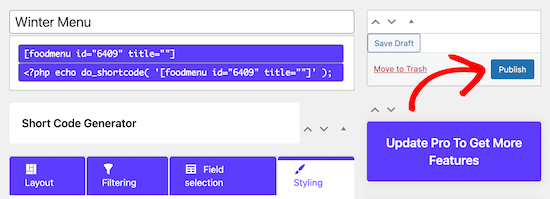
Now, you need to create a page where your menu will display.
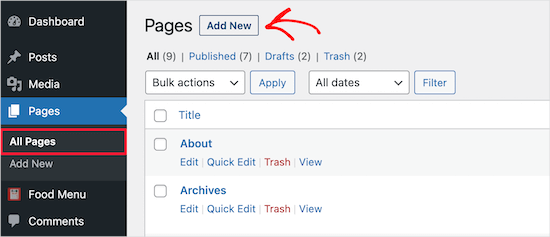
To do this, you can start by navigating to Pages » All Pages and then click ‘Add New.’
After that, you can give your page a title. This will appear to your visitors, so you’ll want to name it something obvious, like ‘Menu.’
Then, go ahead and click the ‘+’ icon to add a new block.
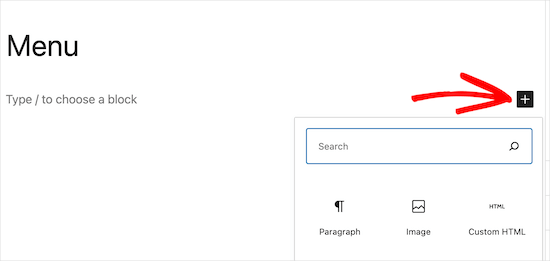
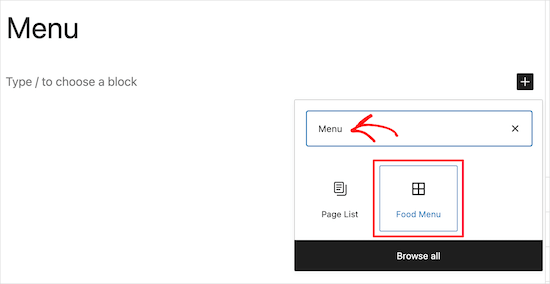
In the search bar, let’s type ‘Menu’ to quickly find the ‘Food Menu’ block.
You can then select the ‘Food Menu’ block when it appears.
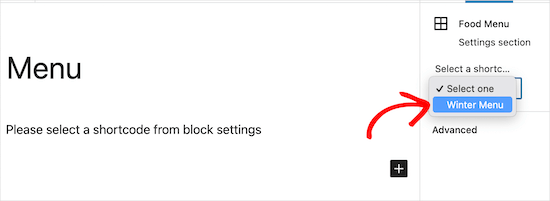
The next step is selecting the shortcode you created from the dropdown menu.
This will insert your menu into your page.
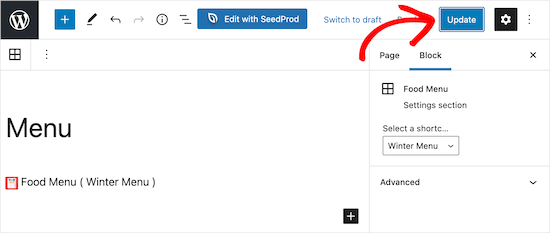
Then, simply click the ‘Publish’ or ‘Update’ button to make your menu live.
You can also add other elements to this page, like text, a contact form, your Instagram feed, and more.
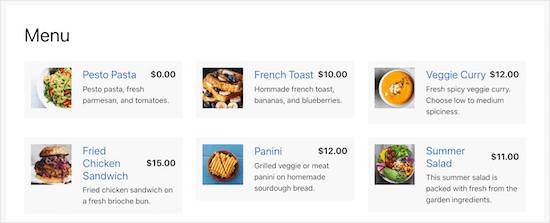
Now, when your visitors view your menu, they can view items and even place an order if you add WooCommerce functionality.
No matter the screen size on which your menu is being viewed, it will display your menu items perfectly.
Bonus Tip: Tools to Promote Your Restaurant Website
Now that you have set up your restaurant website with a menu page, you may want to promote it to grow your business.
The following are some of the best tools to help you promote and grow your restaurant business:
- All in One SEO for WordPress -The best WordPress SEO plugin that helps you optimize your website SEO to get more search traffic. Its ‘Local SEO’ feature helps people find your restaurant in Google Maps and local search results.
- WPForms – It’s the best form builder plugin for WordPress, allowing you to create any forms for your website. These include contact forms, feedback forms, customer survey forms, and more.
- OptinMonster – It helps you convert website visitors into subscribers and customers. You can use it to grow your email list and social media following, show targeted messages to customers, and more.
- PushEngage – This helps you send push notifications to your website visitors regardless of their device type. It also helps you send targeted messages to customers and bring them back to your website.
- MonsterInsights – The best Google Analytics plugin for WordPress. It allows you to track where your website visitors are coming from and what they do on your website.
For more plugin recommendations, you can check out our expert picks of must-have WordPress plugins for business websites.
We hope this post helped you learn how to create an online restaurant menu in WordPress. Next, you may also want to see our guides on how to start a food blog and how to make recipe cards.
If you liked this article, then please subscribe to our YouTube Channel for WordPress video tutorials. You can also find us on Twitter and Facebook.


Dennis Muthomi
As someone who’s helped friends set up their websites, I can’t stress enough how important a well-designed online menu is. The method using SeedProd is incredibly helpful and easy to follow. I found the tip about making the menu mobile-responsive especially valuable – it’s crucial in today’s smartphone world.
One additional suggestion I’d make is to consider adding high-quality photos of your most popular dishes. In my experience, appetizing images can significantly boost customer interest and orders.
Thanks, WPBeginner, for another fantastic resource.