Do you want to add an alert bar to your WordPress site?
An alert bar or notification bar is a great way to let visitors know about important updates, special offers, new product launches, and more.
In this article, we will show you how to create an alert bar in WordPress with 3 easy solutions.
Why Create an Alert Bar in WordPress?
An alert bar is a great way to let your visitors know about something important on your website. That could be an ongoing sales event, an update to your opening times, or changes to your services.
You can also use an alert bar to tell visitors about a special deal, such as a buy one get one free offer. This is a great option if you run an online store.
Using an alert bar is better than just putting an announcement on your homepage. Your alert bar can appear prominently right at the top of every page across your entire site.
It’s easy to create an alert bar in WordPress. We will look at methods using the best notification bar plugins and a manual method using HTML and CSS code. Simply click the links below to jump straight to each option:
Method 1: Creating an Alert Bar Using OptinMonster
OptinMonster is the best conversion optimization and lead generation software on the market. It helps you convert more website visitors into subscribers and customers.
OptinMonster offers a drag-and-drop campaign builder. It comes with beautiful lightbox popups, welcome mats, countdown timers, and other dynamic overlays that help you increase subscribers and sales on your website.
You can also use OptinMonster to make an alert bar for your website. Their pre-built templates make it really easy to create an alert bar that looks great within minutes.
First, you need to visit the OptinMonster website and sign up for an account. You will need at least the Basic plan because it includes the Floating Bar campaign type.
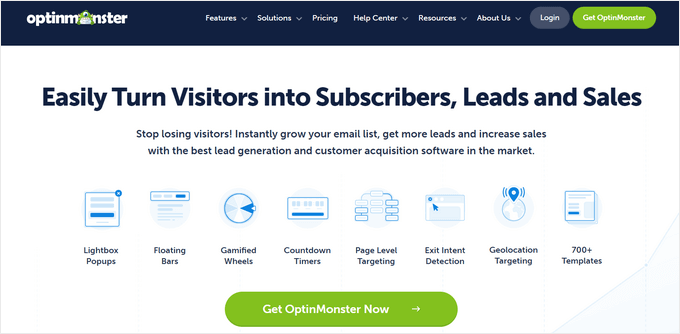
Next, you need to install and activate the OptinMonster WordPress plugin. For more details, see our step-by-step guide on how to install a WordPress plugin.
This plugin lets you connect your WordPress site to the OptinMonster software.
Upon activation, you will see the welcome screen and the setup wizard. Go ahead and click the ‘Connect Your Existing Account’ button.
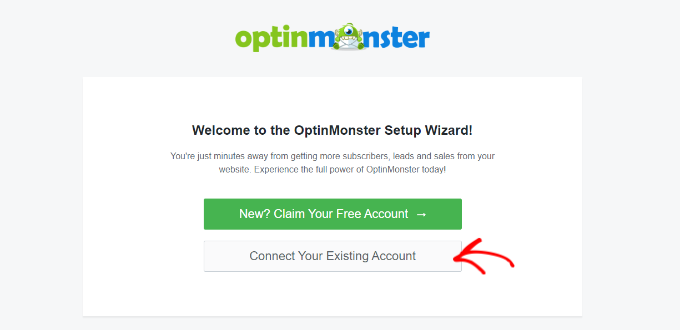
Next, a new window will open where you will need to connect your WordPress site to OptinMonster.
Simply click the ‘Connect to WordPress’ button to move ahead.

You can now follow the on-screen prompts to connect your OptinMonster account.
Then, simply go to OptinMonster » Campaigns in your WordPress dashboard. Go ahead and click the ‘Create Your First Campaign’ button.
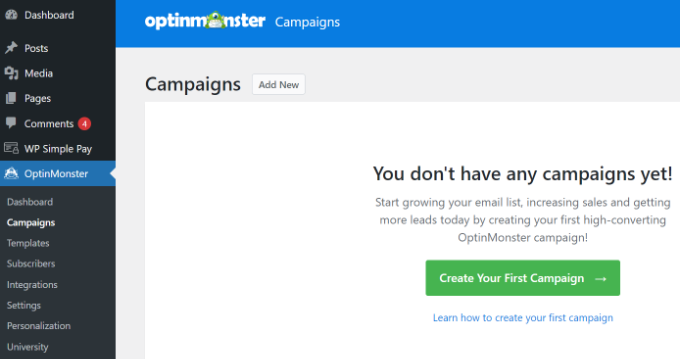
This will open the OptinMonster campaign builder.
From here, you need to select the ‘Floating Bar’ as your Campaign Type to create an alert bar.
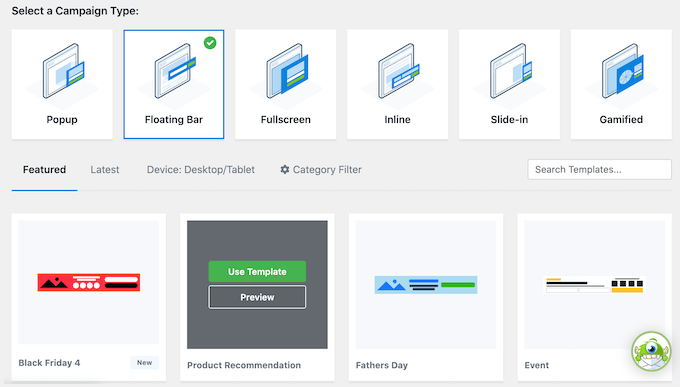
Next, you will see a choice of campaign templates. Pick a template that you want to use.
You just need to bring your mouse over it and click the ‘Use Template’ button to select it. We are going to use the Coupon Code Promo template for our alert bar.
Next, you will be asked to give your template a name. Once you have named your campaign, just click the ‘Start Building’ button.

Now, you will see the campaign editor. This is where you can design your alert bar.
OptinMonster offers different blocks that you can simply drag and drop onto the template. For instance, you can add an image, text, button, and more to your alert bar.
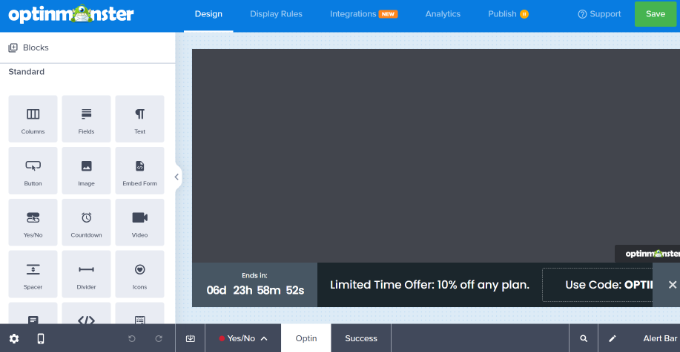
You will see that your alert bar appears at the bottom of your screen by default.
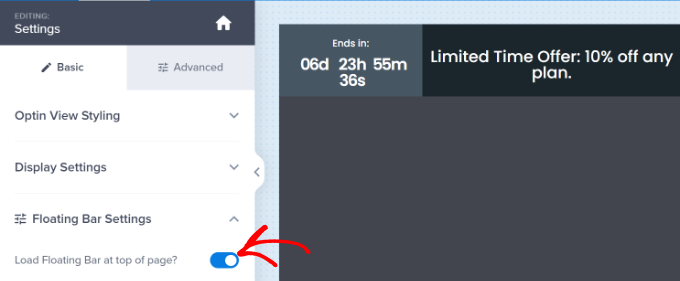
To move it to the top of the screen, you need to click ‘Floating Bar Settings’ on the left-hand side. Next, just click the slider to move the floating bar to the top of the page.
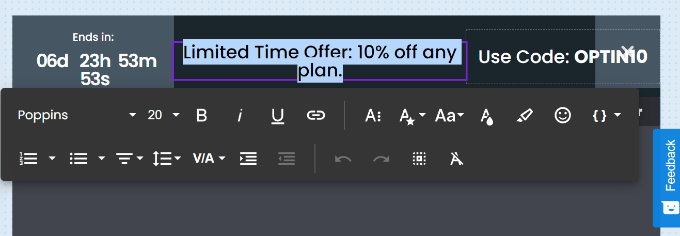
To change the text on the floating bar, simply click on the area you want to change and type in any text you want.
You can also change the font, the size and color of the text, and more.
To change the countdown settings, simply select the timer.
Then go ahead and enter your desired end date and time. OptinMonster also lets you choose the countdown type. You can select the ‘Static’ type if you’d like to show a standard timer with your specified end date and time.
On the other hand, there is a ‘Dynamic’ countdown type. The timer will work based on each user’s behavior on your site. The countdown is set separately for each visitor to your website.
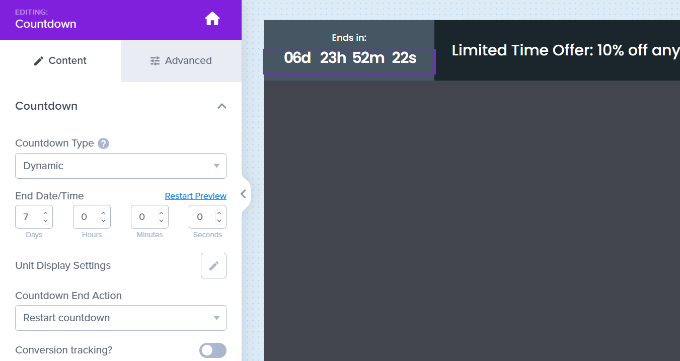
Once you are happy with the design of your alert bar, don’t forget to click the ‘Save’ button at the top of your screen.
Next, you need to go to the ‘Display Rules’ tab to select when and where your alert bar will display on your site. The default rule is for your alert bar to display after the visitor has been on the page for 5 seconds.
We are going to change this to 0 seconds so that the alert bar appears instantly. To do that, just change the ‘sec’ value to 0.
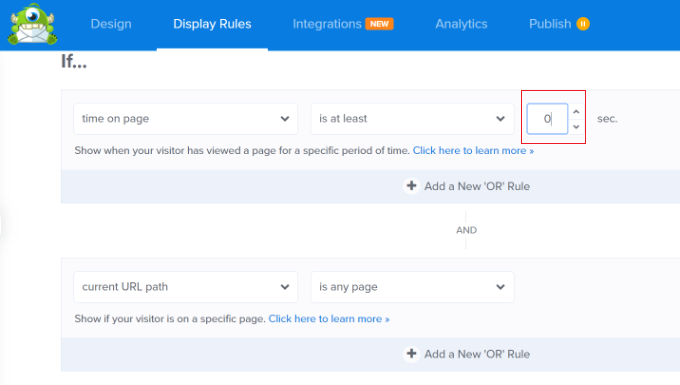
Besides that, you can also select where the alert bar will appear. You can use the default setting, which is the ‘current URL path is any page’. This way, your alert bar will appear on all the pages of your WordPress website.
Then, click the ‘Next Step’ button to change the Action settings. You can leave the ‘show the campaign view’ settings as Optin and select whether you’d like to play a sound effect when the alert bar appears.
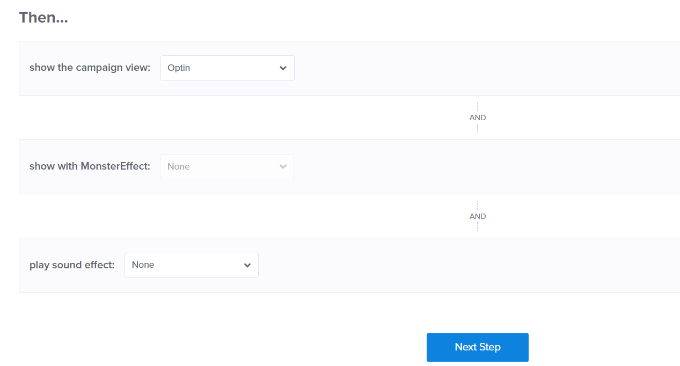
After you have made your changes, go ahead and click the ‘Next Step’ button once more.
Here, you will see a summary of your display rules. You can make final edits and changes to your alert bar campaign.
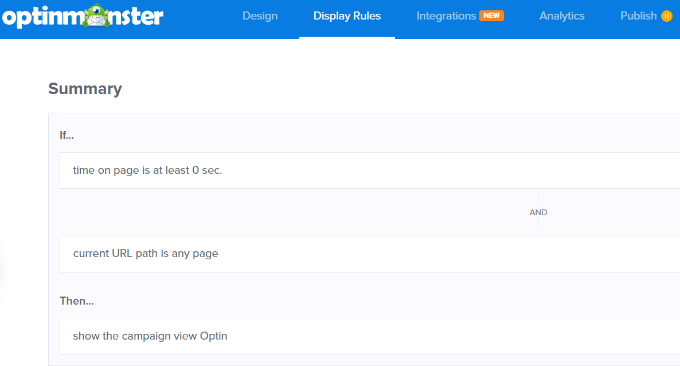
Once you are happy, simply click the ‘Save’ button at the top of the screen.
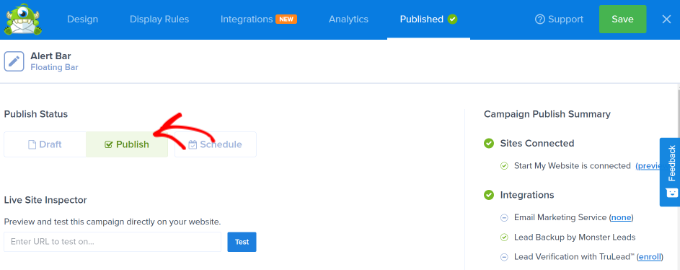
After that, you can go to the Publish tab at the top and change the Publish Status to ‘Publish’. Once that’s done, you will need to click the ‘Save’ button and close the campaign builder.
Next, you will see the Campaign Output Settings.
The final step is to activate the campaign on your website itself. Simply change the Status from ‘Pending’ to ‘Published’.
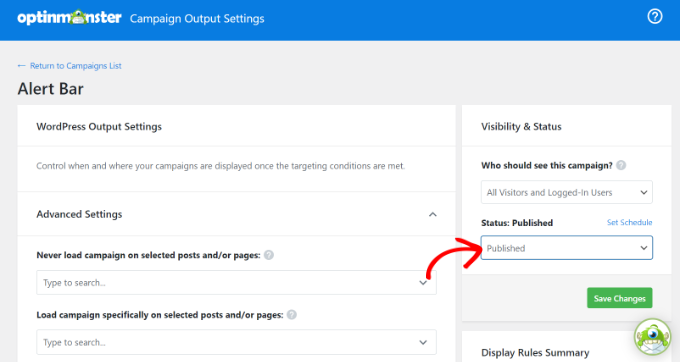
Don’t forget to click the ‘Save Changes’ button when you are done.
Now, simply visit any page on your website, and you will see your campaign in action.

Method 2: Creating an Alert Bar Using Thrive Leads
Another way you can add alert bars to your WordPress website is by using Thrive Leads. It is part of the Thrive Themes suite and helps you generate leads through alert bars, lightboxes, slide-in popups, and more.
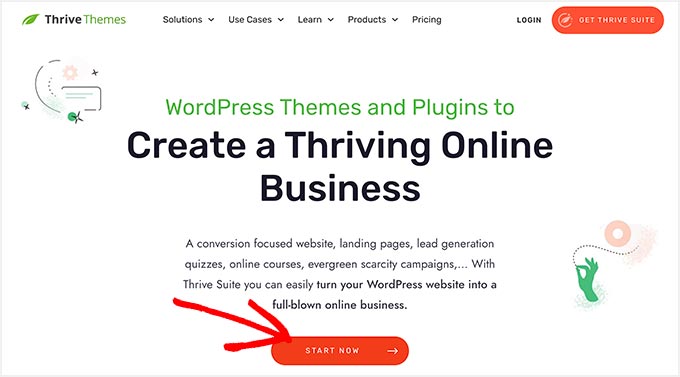
First, you will need to visit the Thrive Themes website and sign up for an account. Simply click the ‘Start Now’ button to get started.
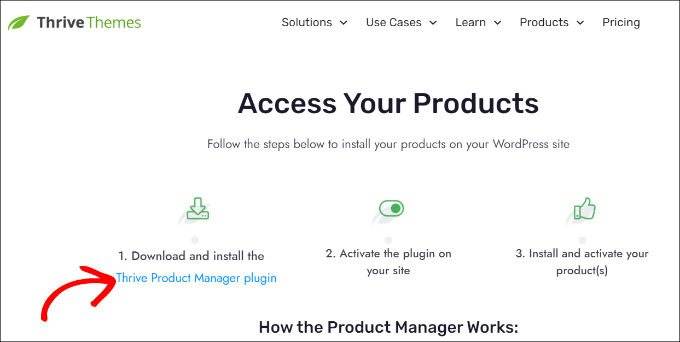
Next, you will need to install and activate the Thrive Product Manager plugin on your website. For more details, please see our guide on how to install a WordPress plugin.
You can find the Thrive Product Manager plugin in your account area.
Once you have installed the plugin, simply go to the Product Manager page from your WordPress admin area.
From here, go ahead and click the ‘Log into my account’ button.

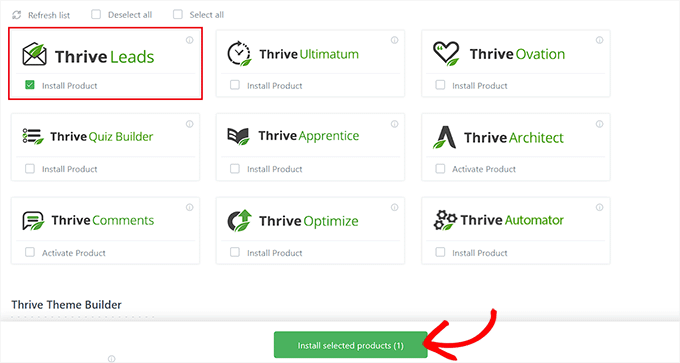
After logging in to your account, you will see different plugins and tools offered by Thrive Themes.
Simply select the Thrive Leads plugin and then click the ‘Install selected products’ button at the bottom.
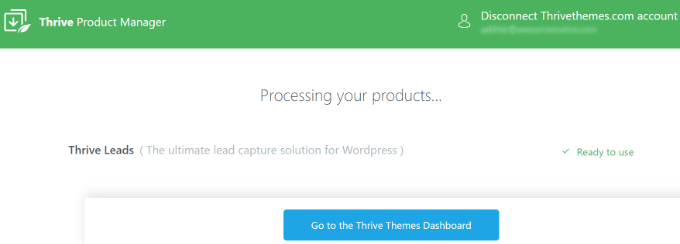
When Thrive Leads is ready to use, you will see a success message.
You can then click the ‘Go to the Thrive Themes Dashboard’ button.
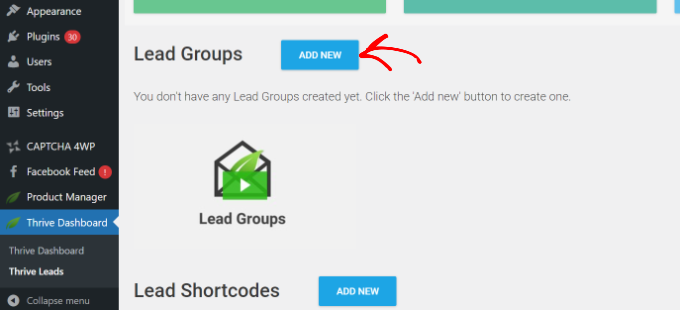
Next, you will need to go to Thrive Dashboard » Thrive Leads from the WordPress admin panel.
Next to the Lead Groups heading, simply click the ‘Add New’ button.
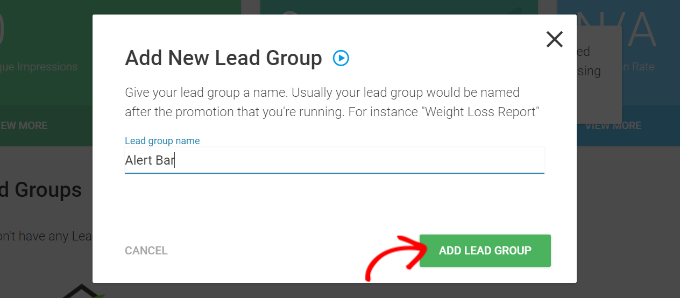
After that, a popup window will now open.
You can enter a name for your new lead group and click the ‘Add Lead Group’ button.
Next, you will need to create a new opt-in form.
Go ahead and click the ‘Add New Type of Opt-in Form’ button.
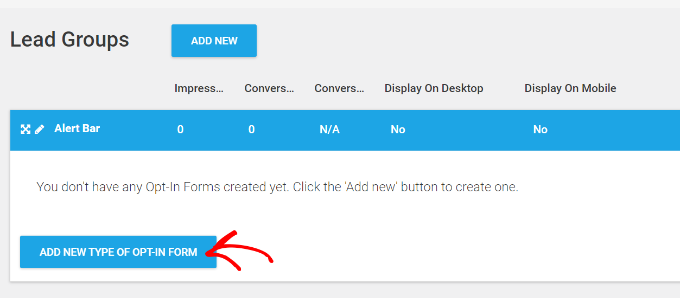
After that, Thrive Leads will ask you to select a form type.
You can select the ‘Ribbon’ type to add an alert bar to your website.
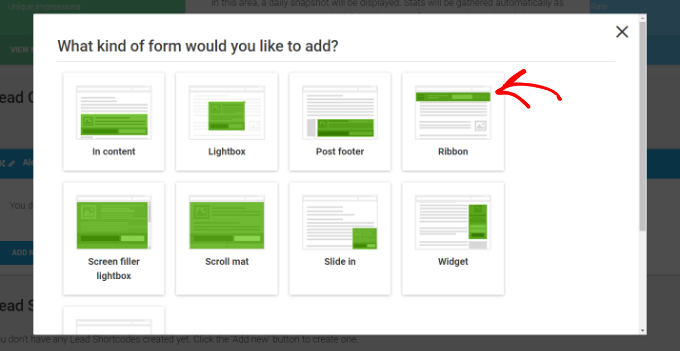
After adding the Ribbon opt-in form type, you will now need to add a form.
Simply click the ‘Add a form’ option under Lead Groups.
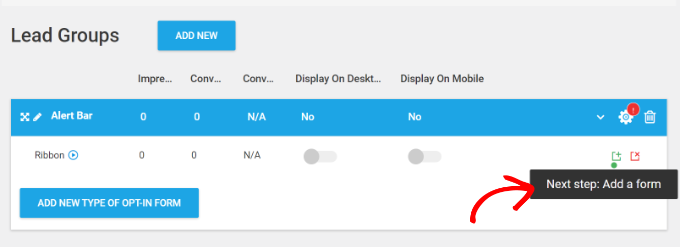
On the next screen, you can choose from any of your existing forms.
Since this is your first time making a form, go ahead and click the ‘Create Form’ button.
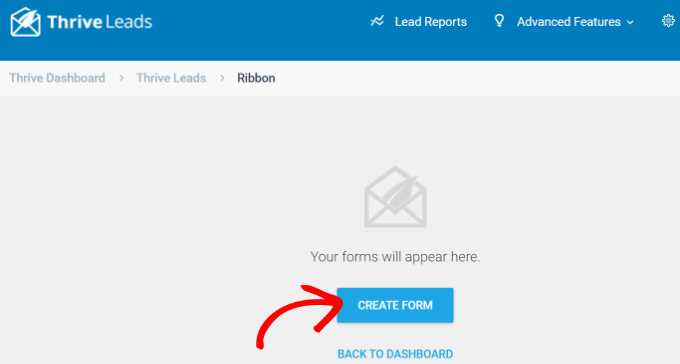
Now, you will see a popup window appear on your screen.
You can enter a name for your form and click the ‘Create Form’ button.
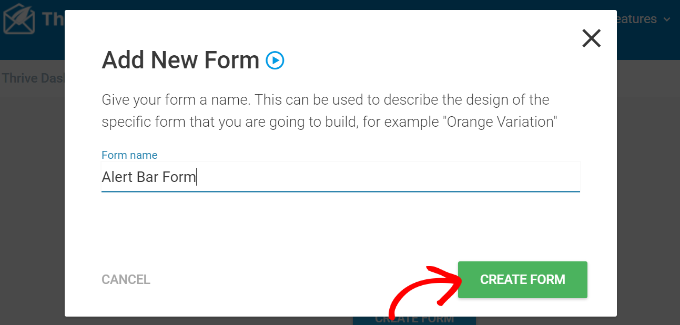
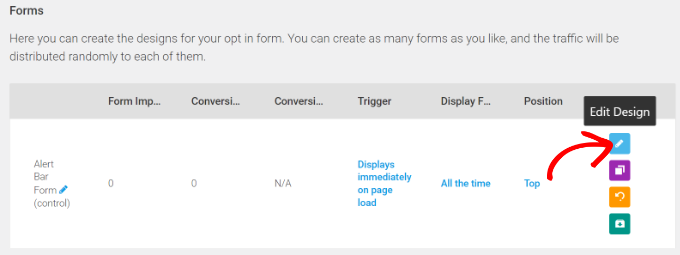
Your form will be added to the Ribbon lead group.
To edit the design of the form, just click the pencil icon.
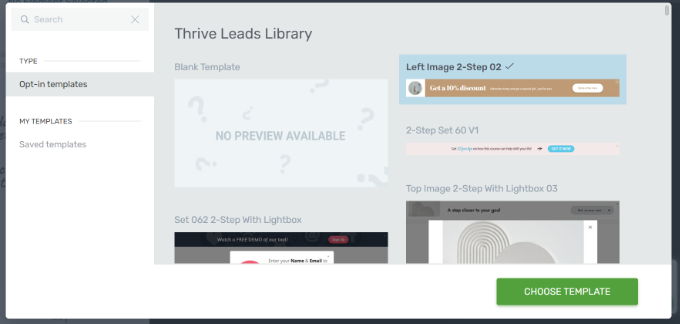
Next, Thrive Leads will show multiple templates to choose from.
Simply select a template and click the ‘Choose Template’ button at the bottom.
This will launch the visual builder with a live preview, where you can customize your alert bar.
For instance, you can select the text in the template and change it according to your needs. Or click on the image in the alert bar and change it.
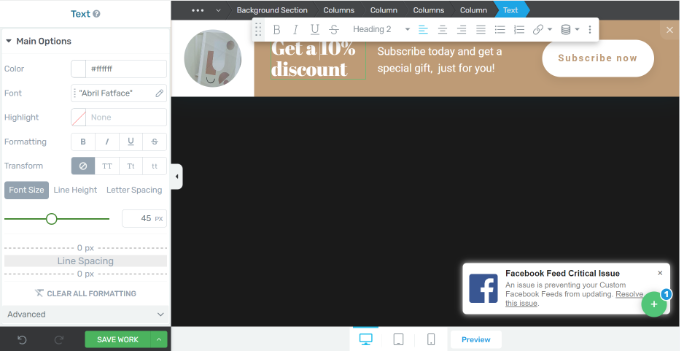
Once you are done editing, click the ‘Save Work’ button at the bottom.
You can now close the visual editor and head back to the form settings. Here, you will see options for settings the alert bar trigger, display frequency, and position.
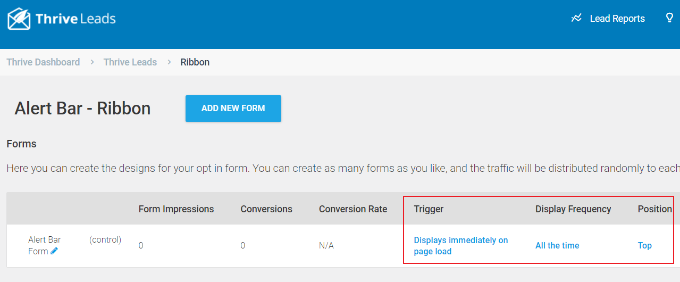
By default, the alert bar will appear at the top when a page loads. However, you can change these settings.
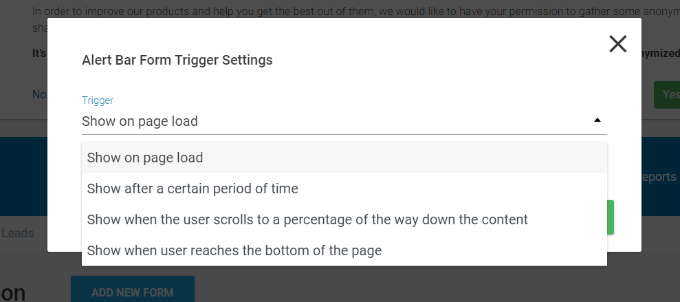
For instance, if you click the Trigger option, you’ll see more options, like showing the alert bar after a certain time, when a user scrolls down a certain amount, or when a user reaches the bottom of the page.
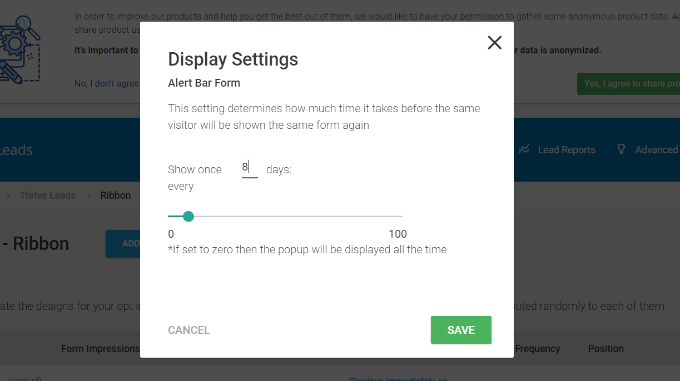
Besides that, you can also change the display frequency. The alert bar will appear all the time by default to all the users.
However, you can edit this and display your alert bar to the same visitor after a certain number of days.
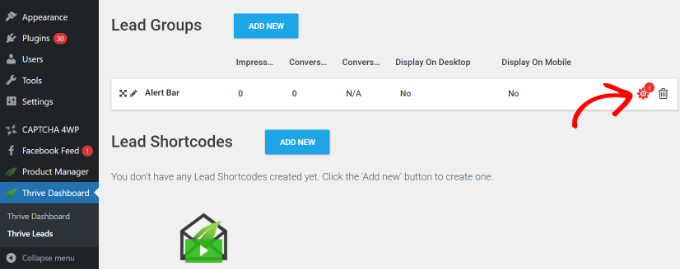
Next, you can head back to the Thrive Leads page from your WordPress dashboard.
After that, simply click the cog icon to open the Display Settings.
From here, you can choose which posts and pages the alert bar will appear on.
For instance, you can show it only on the front page or choose all posts and pages. There is also an option to exclude some pages and posts from showing your alert message.
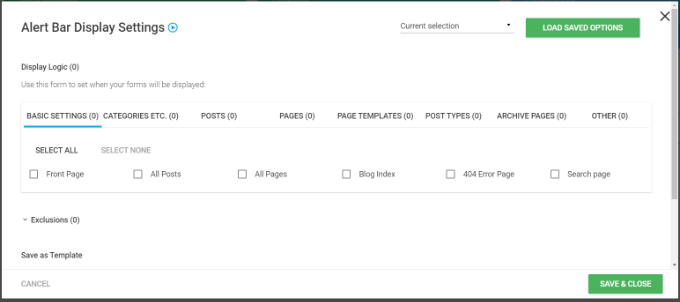
When you are done, simply click the ‘Save & Close’ button.
The last step is to click the toggles to display your alert bar on desktop and mobile devices.
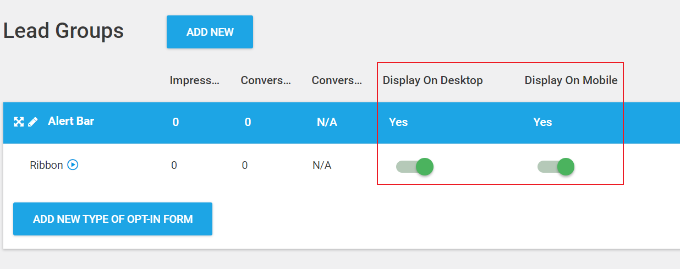
Once that’s done, your alert bar is now ready to collect user email addresses and build your email list.
You can visit your website to see it in action.
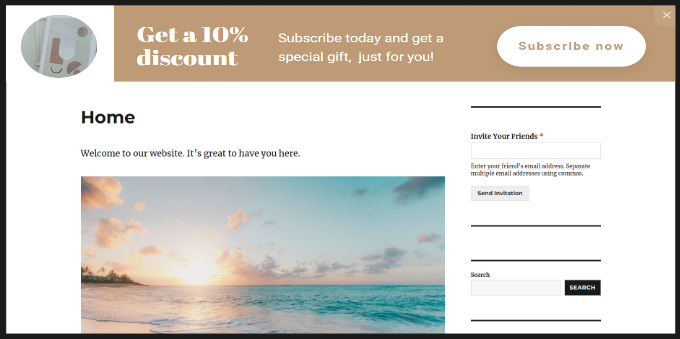
You can see our complete Thrive Themes review for more details.
Method 3: Manually Create an Alert Bar Using Custom HTML/CSS
What if you don’t want to use OptinMonster or Thrive Leads? In this method, we will show you how to create a notification bar using HTML and CSS code.
Note: We don’t recommend this method for beginners. If you are new to WordPress or don’t feel confident adding code to your site, then we suggest using either of the methods above instead.
First, you will need to copy the following custom CSS code for the alert bar:
<pre class="wp-block-syntaxhighlighter-code">
.alertbar {
    background-color: #ff0000;
    color: #FFFFFF;
    display: block;
    line-height: 45px;
    height: 50px;
    position: relative;
    text-align: center;
    text-decoration: none;
    top: 0px;
    width: 100%;
    z-index: 100;
}
</pre>
An easy way to add CSS code to your website is by using WPCode. It is the best code snippet plugin for WordPress that helps you add custom code to your website.
Note: WPCode is one of WPBeginner’s own plugins. We created it to make it really easy to add scripts, HTML code, and more to your website pages. It comes with features like a built-in code snippets library, conditional logic, conversion pixels, and more.
First, you will need to install and activate the free WPCode plugin. For more details, please see our guide on how to install a WordPress plugin.
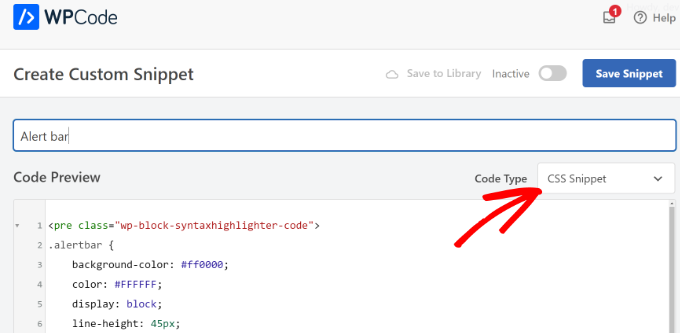
Upon activation, you need to head to Code Snippets » + Add Snippet from the WordPress dashboard and select the ‘Add Your Custom Code (New Snippet)’ option.
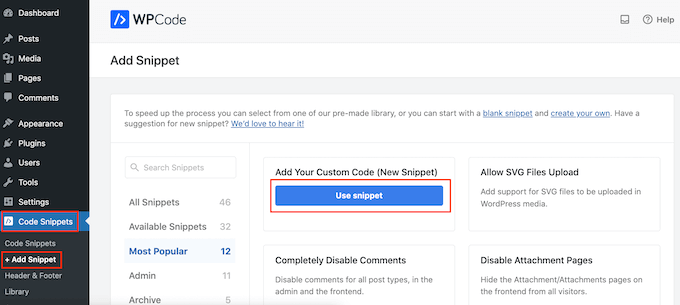
After that, enter a title for your snippet at the top and paste the CSS code into the Code Preview area.
You will also need to change the Code Type to the ‘CSS Snippet’ option.
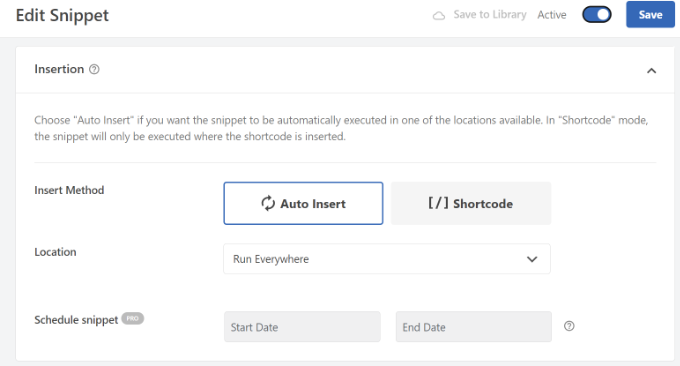
Next, you can scroll down to the Insertion section. This is where you can choose where the code will run.
Since we want the alert bar to appear across the entire website, you can use the default ‘Auto Insert’ method. You can also keep the ‘Run Everywhere’ setting.
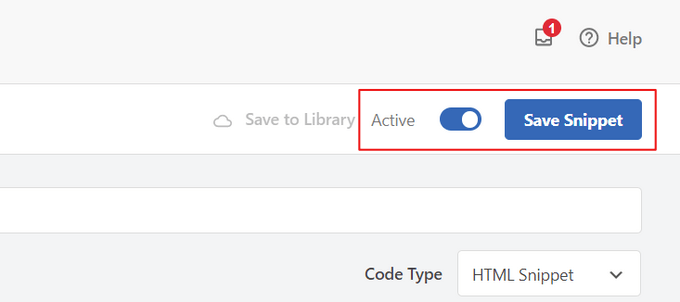
Once that’s done, you can click the ‘Save Snippet’ button at the top.
You will also need to click the toggle on to activate the code.
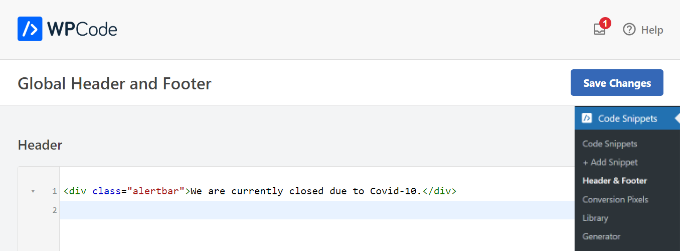
After that, go to Code Snippets » Headers & Footer in your WordPress admin dashboard.
Just copy and paste the following line of HTML code into the ‘Header’ box:
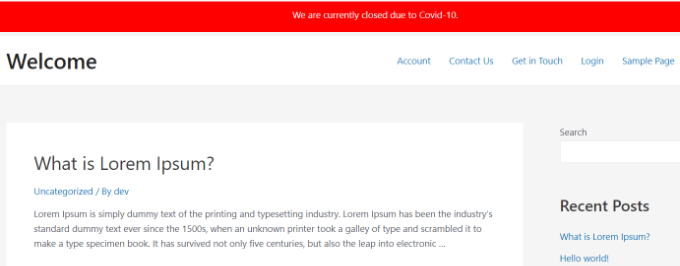
<div class="alertbar">We are currently closed due to Covid-10.</div>
Here’s how that code should look in the ‘Header’ box in WPCode:
You can change the alert text to anything else you like. Don’t forget to click the ‘Save Changes’ button at the top of the page once you are done.
Now, you can visit your WordPress blog to see the alert bar. It should appear at the top of every page like this:
Tip: In a few WordPress themes, your alert bar may overlap your menu. You can alter the height of the bar to 40px or 30px to avoid this. You will also need to reduce the line height accordingly so that your text stays centered vertically in the bar.
Bonus: Add Custom Alert Messages to WordPress Pages
If you want to add custom alert messages to different parts of your website, such as product pages, checkout pages, and shop pages, then you can use SeedProd. It is the best website builder and landing page builder for WordPress.
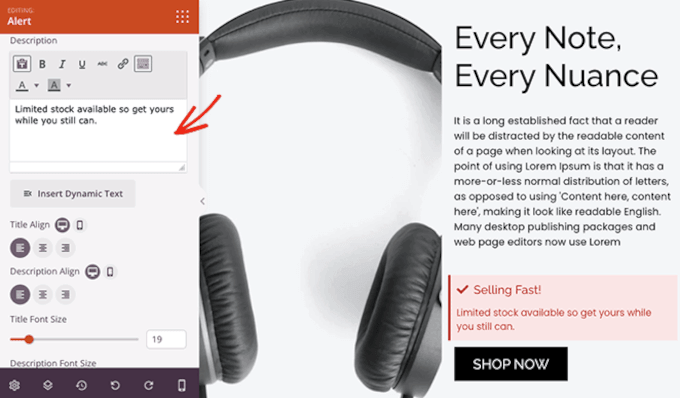
The plugin offers a drag-and-drop builder to create a custom theme and website pages without editing code. It also offers an Alert block that you can place anywhere on your site.
This Alert block can warn customers that your stock is running low, particular items are on sale, or other time-sensitive warnings.
You can simply add the Alert block to your page and then add a title and description. The plugin also lets you add dynamic content, which allows you to insert dates and other query parameters.
There are also more customization options for the Alert block. For instance, you can change its alignment, adjust the font size, and edit the icon.
To learn more about using SeedProd, you can see this guide on how to create custom pages in WordPress.
We hope this article helped you learn how to create an alert bar in WordPress. You may also want to see our guide on the best WordPress drag and drop page builders to help you further customize your site and the best WooCommerce plugins to grow your store sales.
If you liked this article, then please subscribe to our YouTube Channel for WordPress video tutorials. You can also find us on Twitter and Facebook.


Jiří Vaněk
The alert bar can be a great way to show people some time-limited offers. After all, the recent Black Friday and Cyber Monday showed exactly how well it works, as I myself was browsing your alert bar with offers on plugins in your range, and I kept considering whether I should get AIOSEO as a Christmas gift for myself :
Ralph
Great idea for another form of promotion on blog, during sale in our shops. I’m going to use it this christmast to boost my sales. Thanks!
WPBeginner Support
You’re welcome, glad we could share the idea
Admin
Richard Longworth
Great idea. I will be implementing in my website. Thanks a million!
WPBeginner Support
You’re welcome
Admin