Starting an online T-shirt shop is an excellent way to turn your creative designs into a thriving eCommerce business.
However, we’ve heard from countless website owners who feel intimidated by the thought of navigating all the complexities of printing, shipping, and customer service.
Wouldn’t it be nice if you could simply upload your t-shirt design to a third-party platform, and have someone handle everything else?
In this article, we will show you how to do exactly that. Whether you’re an artist looking to showcase your designs or a business owner aiming to tap into the apparel market, this guide will show you how to create a t-shirt shop in WordPress with Spreadshirt and add it to your blog.
Why Build Your T-Shirt Shop in WordPress With Spreadshirt?
Why combine WordPress and Spreadshirt for your online t-shirt shop? Simply put, Spreadshirt handles all the heavy lifting – inventory, printing, shipping, payments, and more.
With Spreadshirt, anyone can upload their custom designs and print them on t-shirts as well as other products. You get paid for the design and commission on each product you sell. So, this allows you to make money from your blog by selling your custom-designed t-shirts and accessories.
Using this Print-On-Demand (POD) approach for your t-shirt business lowers your upfront costs because you won’t have to buy any printing equipment, it reduces the risk for unsold inventory, and it’s super scalable.
After creating your shop, you can embed it in your WordPress website. This gives you more control over your brand and the customer experience. For example, you can customize your shop with themes and plugins, add features like dedicated landing pages, marketing tools, and customer engagement features. It’s the best of both worlds!
In addition, embedding Spreadshirt content can boost your SEO, driving organic traffic directly to your WordPress blog or website. Unlike relying solely on a marketplace, you’re building an asset that can help grow your brand.
Getting Started With WordPress and Spreadshirt
Spreadshirt allows you to create your own Spreadshop (a shop page on the Spreadshirt website) with a unique web address. You can then display your designs and products on this page.
However, keep in mind that you won’t have the same design flexibility on a Spreadshop page that you get with a website builder. Plus, you won’t have full control over optimizing your content to get more traffic from search engines. That’s why we’re showing you how to embed your Spreadshop content in WordPress.
If you don’t have a website already, then we recommend using self-hosted WordPress.org as your blogging platform. There are many website builders out there, but WordPress stands out for anyone seeking a user-friendly, secure, and budget-friendly solution.
Firstly, WordPress is open source so it’s free to download and use. By removing unnecessary expenses in this way, you get to keep more of your profits. WordPress lets you install add-ons called plugins. These are pieces of software that add extra functionality to WordPress, including many that are perfect for eCommerce stores.
For more details, you can check out our post on WordPress.com vs. WordPress.org.
To start a self-hosted WordPress.org website, you must get a domain name and a web hosting account. We recommend using Bluehost because they are an officially recommended WordPress hosting provider.

More importantly, they are offering WPBeginner users a generous discount with a free domain name and an SSL certificate. To get started, just click the button below.
Once you have purchased hosting, you can follow our step-by-step guide on how to make a website. This way, you will be up and running in no time.
That being said, let’s take a look at how to create your t-shirt shop with Spreadshirt and add it to your WordPress site.
How to Create a T-shirt Shop in WordPress With Spreadshirt
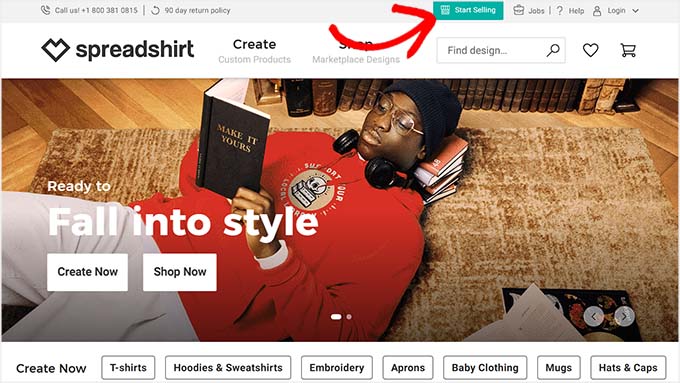
To create a t-shirt shop, you must first visit the Spreadshirt website.
Once you are there, click the ‘Start Selling’ button at the top.
This will take you to another screen, where you have to select if you want to open a Spreadshop or sell your t-shirts in the marketplace.
We recommend clicking the ‘Open Your Own Spreadshop’ button because it will be like an online store where you can earn commissions and set your prices. However, keep in mind that you will also be responsible for attracting visitors and improving your search engine rankings.

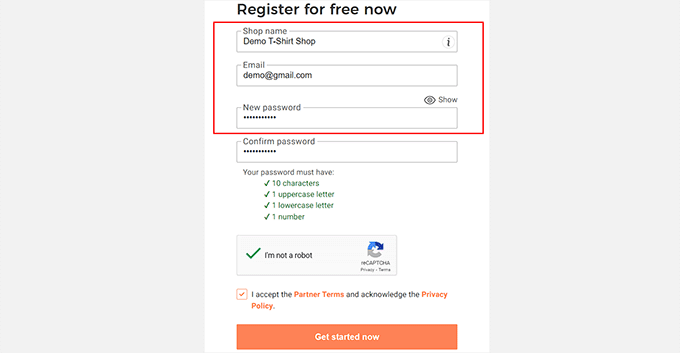
You will now be directed to a new page. Here, you can start by typing in a name for your t-shirt business.
Tip: If you haven’t decided on a name for your shop yet, then you can use our Free Business Name Generator tool to find some great ideas.
After that, add your email address and password, and then click the ‘Get started now’ button.
With that done, you will be taken to your Spreadshop dashboard.
Here, simply click the ‘Create products’ option in the ‘Your Checklist’ section to get started.
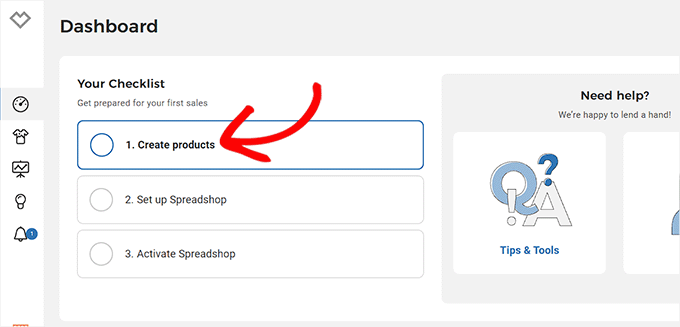
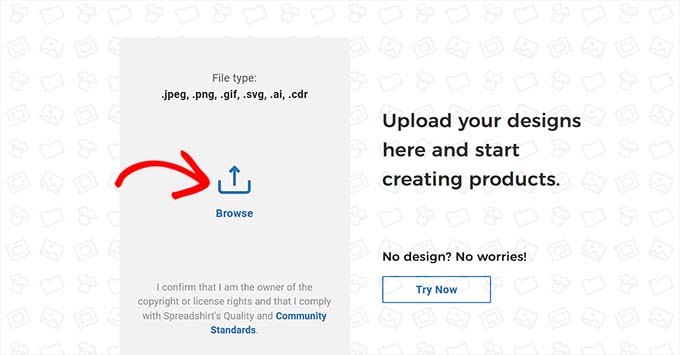
Next, you’ll be prompted to upload your design image from your computer.
If you haven’t chosen an image yet, then you can click the ‘Try Now’ button. For this tutorial, we will be uploading a graphic image for our t-shirt from the computer.
Expert Tip: If you want to put your company’s logo on the clothing, then you may want to see our guide on how to get a custom logo for your business.
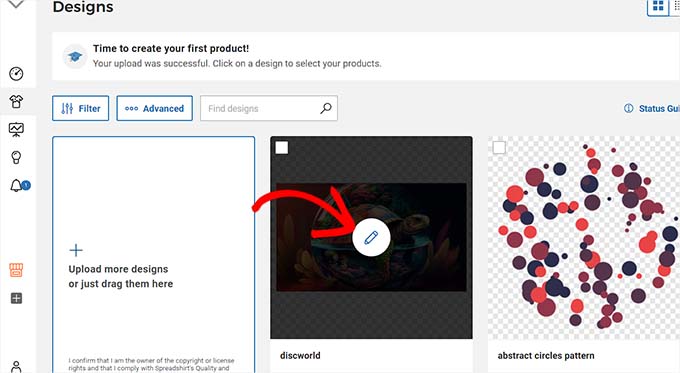
Once you do that, you will be taken to the ‘Designs’ page, where you will see the image that you just uploaded.
Here, click the pencil icon on the image to be directed to the next step.
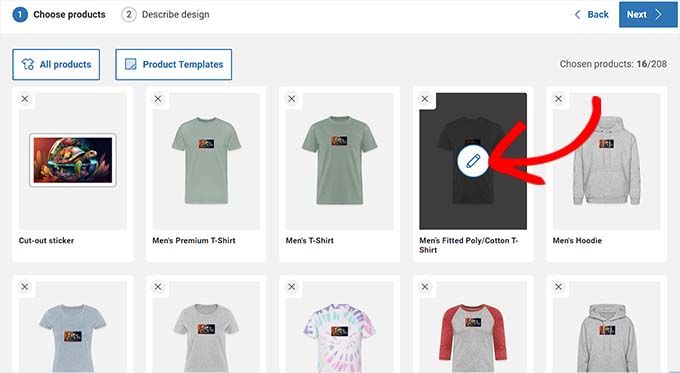
Now, you will be asked to choose the products where you want to add your graphic or design.
You can add the image to a t-shirt, hoodie, sweatshirt, mug, tote bag, apron, or water bottle. Simply click the pencil icon on top of the product where you want to add the image.
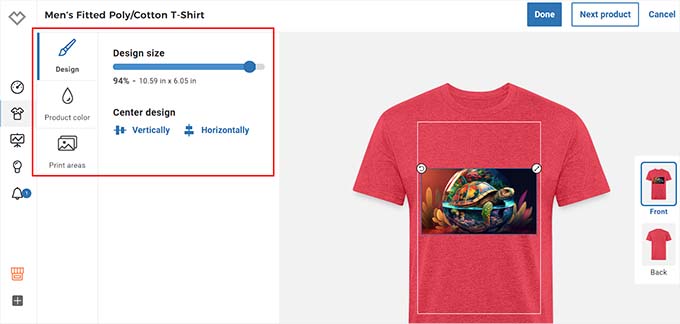
This will open the Spreadshirt editor, where you can change the design’s size and position according to your liking.
You can also switch to the ‘Product Color’ tab if you want to change your t-shirt color. After that, click the ‘Done’ button at the top.
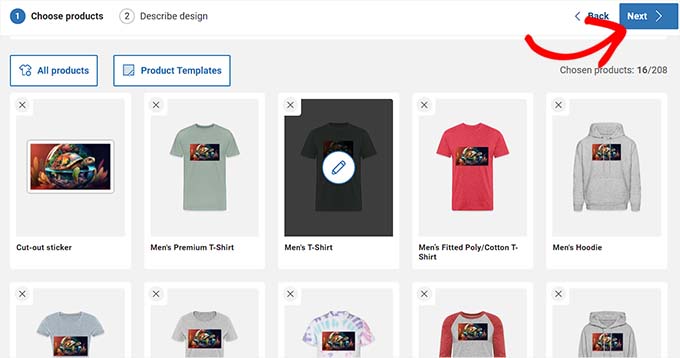
You’ll be redirected to the ‘Choose and design products’ page, where you can select additional products and customize them using the editor. If you want to remove some of the products, then you can click the ‘X’ icon on top of their cards.
For instance, if you don’t want to sell the cutout stickers for your design, you can click the ‘X’ icon, and it will be removed from your list of products.
After that, you just have to click the ‘Next’ button at the top.
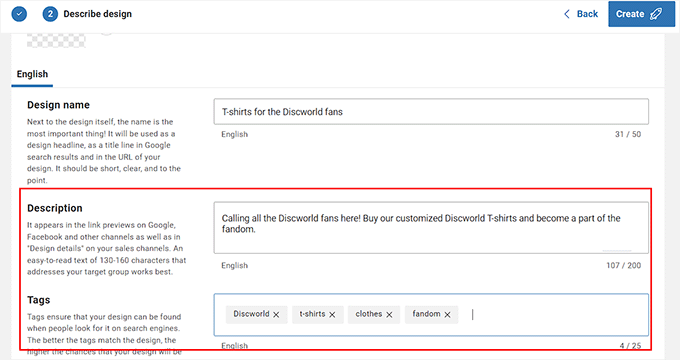
This will direct you to the ‘Describe your design’ screen, where you can add a name, tags, and description for the design. This description will appear in the link previews on Google while the tags will help improve your SEO.
Once you are done, simply click the ‘Create’ button.
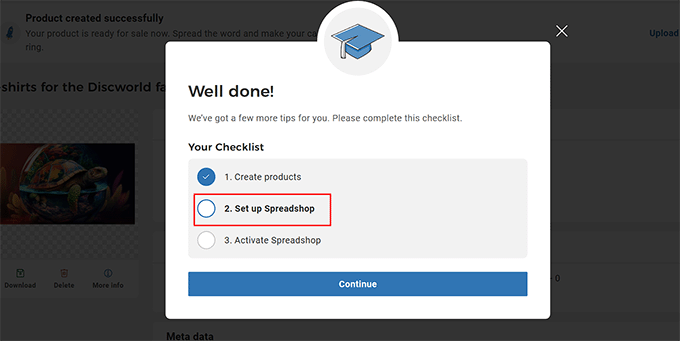
Now you’ve successfully created your t-shirts, it’s time for you to set up your Spreadshop.
To do this, you must click the ‘Set up Spreadshop’ option in the prompt on your screen.
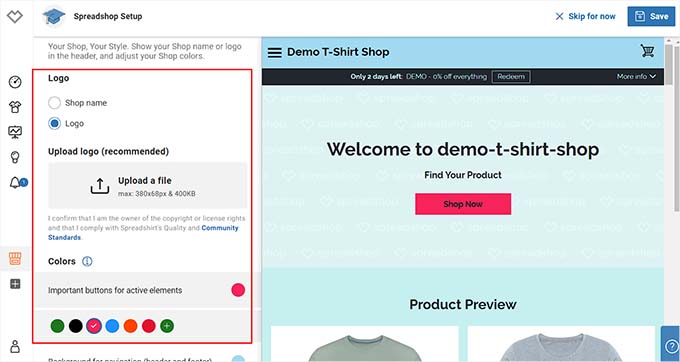
This will open the Spreadshop editor, where you will see a shop preview on the right with some settings on the left.
From here, you can add a shop logo and change the colors for the shop background, buttons, navigation menu, text, and more. Once you have customized your shop, simply click the ‘Save’ button to store your settings.
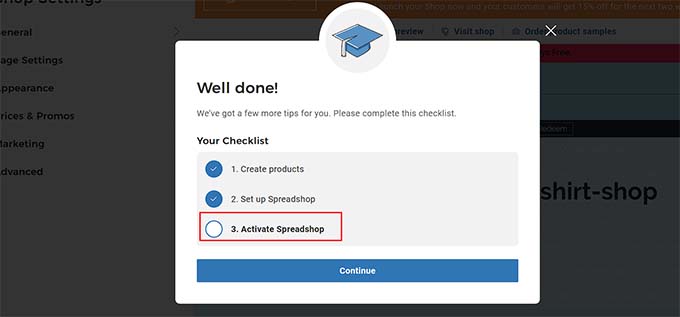
When the next prompt appears, click ‘Activate Spreadshop.’
Then, select ‘Continue.’
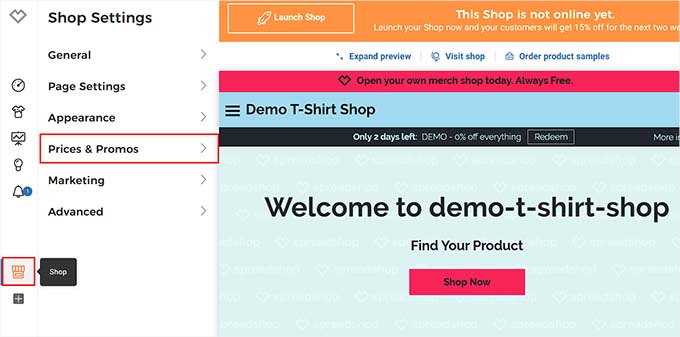
You will now be taken to a new screen, where you have to click the shop icon in the left corner.
This will open the ‘Shop Settings’ column. Now, go ahead and expand the ‘Prices & Promos’ tab.
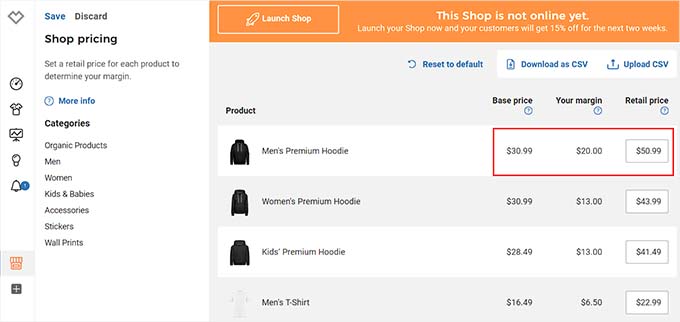
You’ll now see some new settings. Here, simply choose ‘Shop pricing’ to view and adjust the prices and commission for each product.
Remember to click ‘Save’ after making your changes.
After that, click the shop icon again to open the ‘Shop Settings’ column. This time, you have to expand the ‘General’ tab.
With that done, click the ‘De/activate Shop’ option.
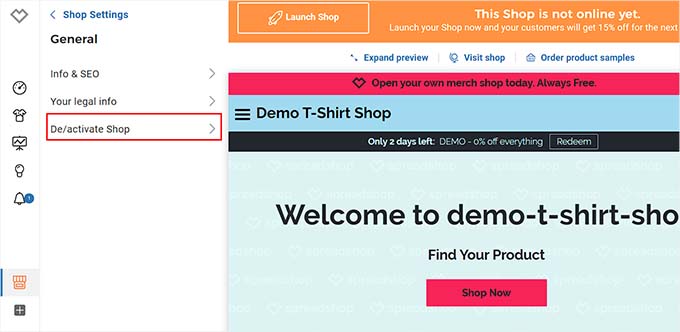
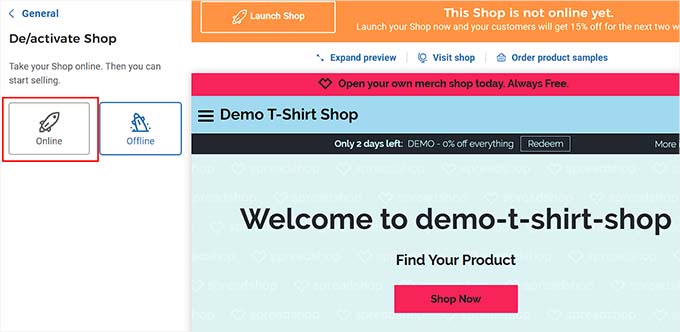
To launch your Spreadshop, open the new settings and click ‘Online.’ You’ll be prompted to provide your company name, address, and zip code.
Once entered, your Spreadshop will be live and ready to start selling t-shirts!
How to Add Your Spreadshirt Shop in WordPress
Now that you have designed your t-shirts and created your Spreadshirt shop, it is time to add it to your WordPress site.
To do this, you must install and activate the Spreadshop plugin. For details, see our beginner’s guide on how to install a WordPress plugin.
Upon activation, visit the ‘Spreadshop’ menu tab from the WordPress dashboard and enter your shop ID. Once you do that, you need to click the ‘Connect’ button.
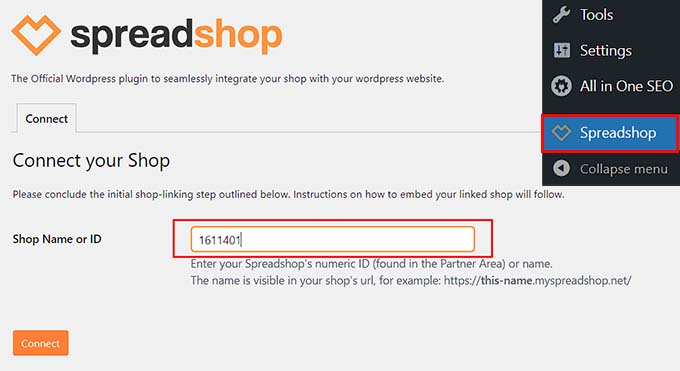
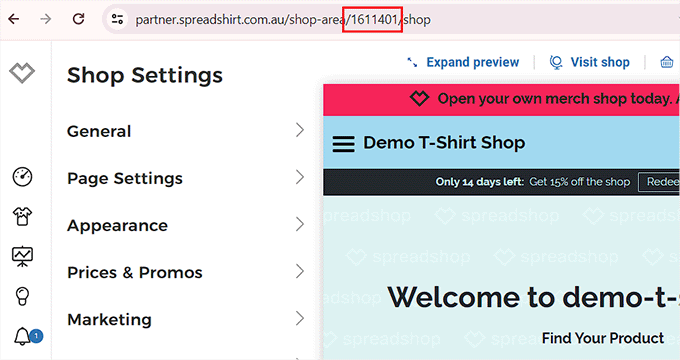
If you don’t know your Spreadshop’s ID, then you can visit your Spreadshirt dashboard and click the shop icon on the left. This will take you to the ‘Shop Settings’ page.
Here, the numbers that you see in the page’s URL are your shop’s ID. Simply copy these numbers and paste them into the ‘Shop Name or ID’ field in your WordPress dashboard.
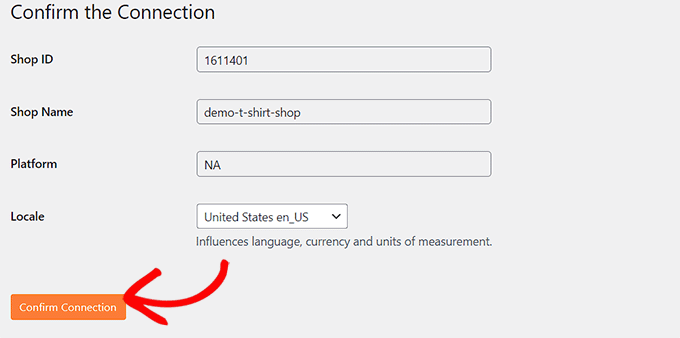
Once the Spreadshop plugin connects your website with the platform, it will automatically fetch some of your shop’s details and display them on the page.
From here, go through those details and then click the ‘Confirm Connection’ button.
Now, go to the page where you want to display your Spreadshop and open it in the WordPress content editor. You can then click the add block ‘+’ button in the top left corner.
From here, drag and drop the Shortcode block onto the page. Then, copy and paste the following shortcode.
[spreadshop]
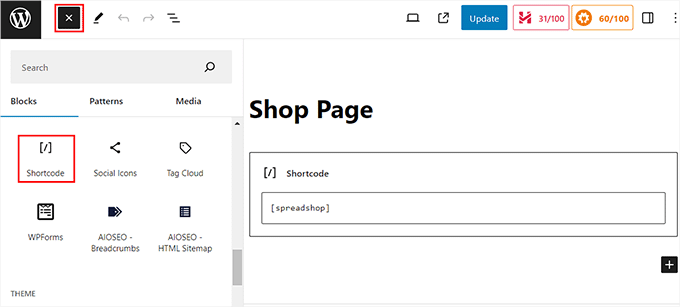
Once you are done, simply click the ‘Update’ or ‘Publish’ button to store your settings.
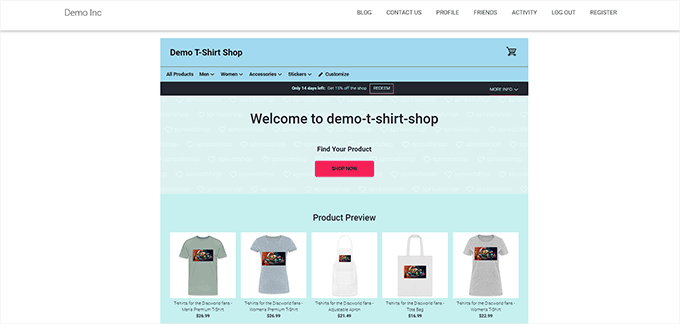
Now, you can visit your WordPress site to view the Spreadshop in action. Visitors will be able to preview your products, and clicking on the images or ‘Shop Now’ button will take them to your Spreadshop page.

Bonus: Boost Website Traffic to Your T-Shirt Shop
Driving traffic to your Spreadshop can be challenging, especially for small businesses or blogs.
For that reason, you should get started with search engine optimization (SEO) straight away. We recommend using a plugin like All in One SEO (AIOSEO) to optimize your content and improve your search engine rankings. This will help you get more visitors, which means more sales.
To learn more, check out our complete AIOSEO review.

Then, once people are on your website, you will want to direct them towards your Spreadshop store. For example, you can use OptinMonster to create popups and banners promoting your t-shirt shop.
You can add CTAs and discount offers that will motivate users to check out your Spreadshop and place an order. For more information, you can see our tutorial on how to make a website banner.

Similarly, you might host giveaways where visitors can win a free t-shirt. This will increase awareness among your visitors and convince them to visit your store.
To do this, we recommend RafflePress, which is the best giveaway plugin on the market. It comes with a drag-and-drop builder, pre-made templates, and fraud entry protection, making it a great choice.

Want to learn more? We’ve created a comprehensive RafflePress review that has all the information you need.
Additionally, you can send newsletters, promote your store on social media accounts, run ads, and even create an affiliate program so other people will promote your products for you.
For more tips, you can see our guide on ways to increase average order value with WordPress.
We hope this article helped you learn how to create a t-shirt shop in WordPress with Spreadshirt. You may also want to see our step-by-step guide on how much eCommerce websites cost and our list of reasons why you should use WordPress for your website.
If you liked this article, then please subscribe to our YouTube Channel for WordPress video tutorials. You can also find us on Twitter and Facebook.


Dennis Muthomi
I just got a client who started a small t-shirt business and I am helping her getting around the online store. I found out that creating content around your designs can drive traffic too. For example she Youtube shorts for shortform videos to show the inspiration behind each design and sometimes hosts giveaways too. This content driven approach goes hand in hand with the marketing strategies you mentioned in the article.
Thanks for this awesome guide on creating a t-shirt shop in WordPress with Spreadshirt.