Ever wondered how top publishers turn their WordPress content into a steady revenue stream?
The secret often lies in a paywall – offering readers a glimpse of premium content and inviting them to subscribe for full access. Major publishers like The New York Times and The Washington Post have mastered this model, proving that quality content is worth paying for.
With the right setup, you can do the same! 💡
Whether it’s on a news site, blog, or online magazine, we’ve seen how a paywall can help site owners monetize their content without relying solely on ads.
In this guide, we’ll walk you through the step-by-step process of creating a paywall in WordPress.
What Is a Paywall, and Why Use One?
A paywall hides or locks your content until the reader pays to access it.
News sites like The Daily Telegraph often use a paywall to help them fund quality journalism and cover operational costs.
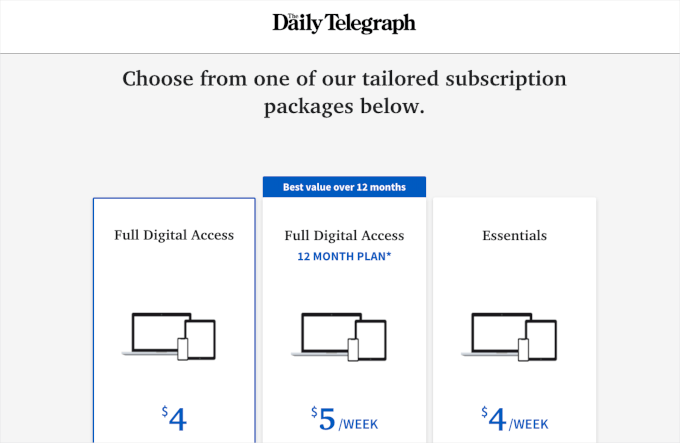
If you have lots of high-quality content, then this is a great way to monetize your site, particularly if you don’t want to sell ads on your WordPress blog.
Paywalls usually ask the visitor to buy an ongoing subscription so you can make money online blogging with WordPress over the long term. However, you can also charge a one-time fee for lifetime access.
Despite the name, not all paywalls ask for payment.
Some websites use a paywall to grow their email list by asking users to subscribe to their email newsletter or register for a free account, like The New York Times.

Then, you can also give readers the option to either join your email list or pay for a subscription.
Here’s the paywall example from the Washington Post:

In many cases, paywalls offer a trial so visitors can access a limited amount of content for free. For example, readers might get 5 free articles before they need to buy a membership.
With that in mind, we’ll show you how to create a paywall in WordPress. Here’s a quick overview of all the methods we’ll share in this guide:
Ready? Let’s get started!
Method 1: Creating a Paywall on Your WordPress Site Using MemberPress
A great way to create a paywall is to use MemberPress. It is the best membership and paywall plugin for WordPress that allows you to easily sell subscription-based products on your website, including access to premium content.
📌 A quick note: We use MemberPress to power our free video tutorials platform. It’s a powerful tool for managing memberships and subscriptions. Check out our full MemberPress review for an in-depth look at its features and benefits!
First, you need to install and activate the MemberPress plugin. For more details, see our step-by-step guide on how to install a WordPress plugin.
Upon activation, go to MemberPress » Settings and enter your license key into the ‘License Key’ field.
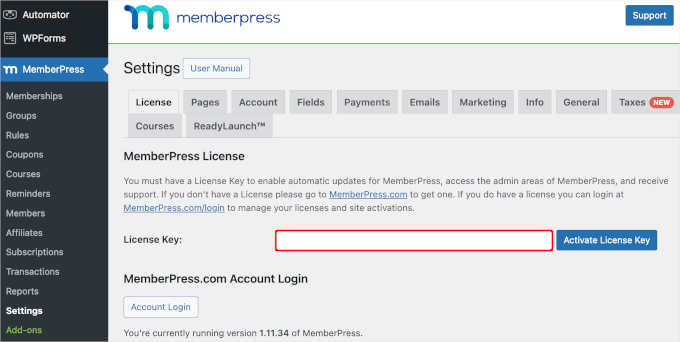
You can find the key by logging in to your account on the MemberPress website. It’s also in the email you got when you purchased MemberPress.
After entering this information, click on ‘Activate License Key.’
Next, you’ll need to set up a way to easily accept credit card payments in WordPress.
The good news is that MemberPress supports several popular payment gateways. You can add a payment method by going to the MemberPress » Settings page and switching to the ‘Payments’ tab.
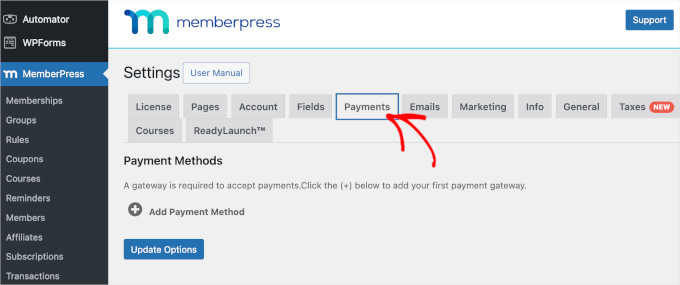
Here, click on ‘Add Payment Method’ and open the ‘Gateway’ dropdown.
You’ll see that MemberPress supports PayPal and Stripe payments. If you’ve purchased a MemberPress Pro plan, then you’ll also be able to use Authorize.net.
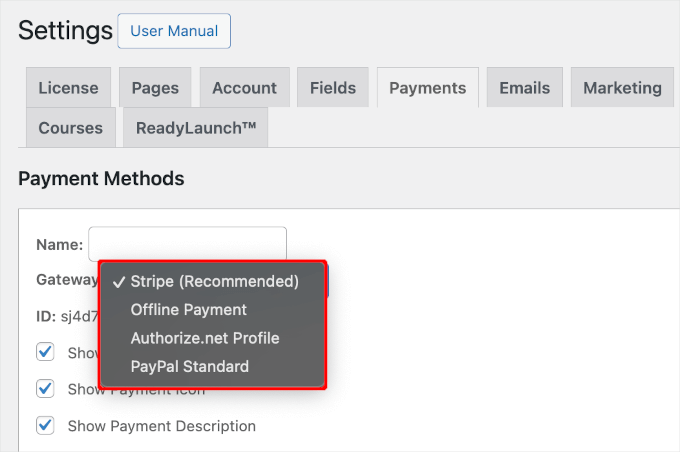
After choosing a gateway, MemberPress will show all the settings you need to configure this payment method.
For example, if you are adding PayPal payments to WordPress, then you’ll need to enter your PayPal email address.
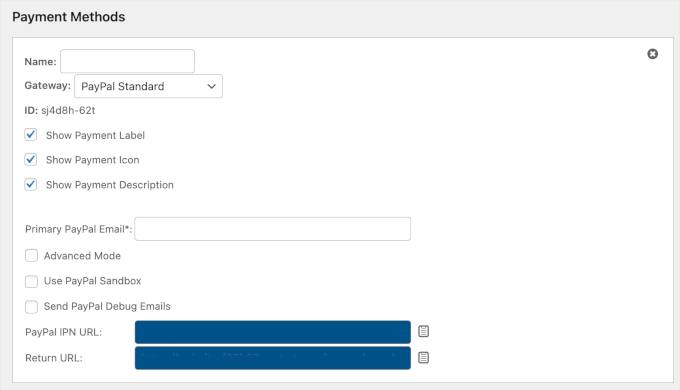
When you are happy with how the payment method is set up, don’t forget to click on the ‘Update Options’ button to store your changes.
You may be able to get more sales and improve the customer experience by allowing users to choose a payment method. To add more gateways, simply click on ‘Add Payment Method’ and repeat the same process described above.
Creating a Subscription Plan for Your Paywall
Now you’ve completed the initial setup, it’s time to create the paywall. To do that, you’ll need to create a membership level in MemberPress.
Simply visit the MemberPress » Memberships page and then click the ‘Add New’ button.
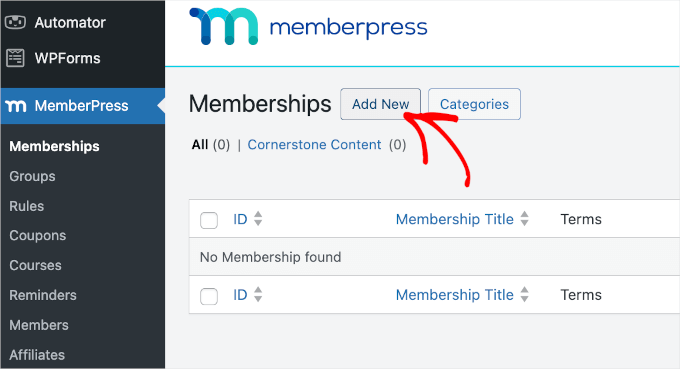
On the next screen, you need to give the membership plan a title. This will appear in your admin area and will also be visible to the people who visit your WordPress website.
Next, type how much this membership will cost into the ‘Price’ field. In the following image, we’re creating a ‘Premium Subscription’ plan and set the price to $5.
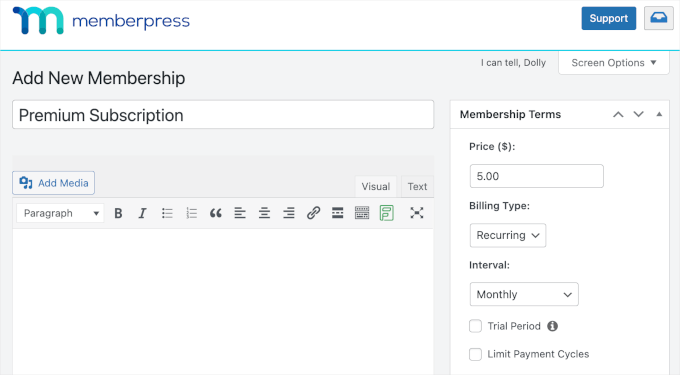
If you want to create a free membership, then you can leave the price at 0.00. For example, your goal might be to do lead generation by collecting email addresses.
You can also choose between ‘Recurring’ and ‘One-time’ payments using the ‘Billing Type’ dropdown menu.
By accepting recurring payments in WordPress, you can automate the billing process and save a lot of time. It also means you don’t have to send invoices manually.
One-time payments don’t renew automatically, which may help put your audience at ease and make them more likely to sign up. Every site is different, so you may want to try different settings to see what works best for you.
If you do select recurring payments, then you can choose from monthly, yearly, weekly, quarterly, or set a custom interval.
If you select ‘One-Time,’ then you can choose ‘Lifetime’ or set an expiration date, which can either be a calendar date or a length of time, such as one month since the person purchased their membership.
Optionally, you can provide a description for your membership plan in the text editor and customize it further in the ‘Membership Options’ box.
For example, you can create a custom thank you message or a custom welcome email.
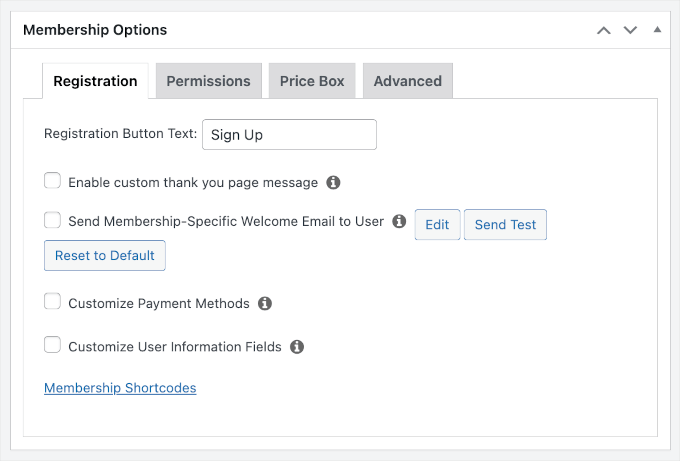
💡 Expert Tip: If you create a membership welcome email, then it’s a good idea to test that this email is sent properly. If the email doesn’t arrive in your inbox, then we recommend using an SMTP service provider to improve your email delivery rates.
When you are happy with the membership settings, just click on the ‘Publish’ button to make the membership level live.
You can create multiple membership plans with different settings. For example, you might also create a VIP plan that gives users access to additional content and features.
To create more membership levels, simply follow the same process described above.
Creating a Pricing Page
MemberPress makes it easy to display information about all the plans visitors can buy.
To create a pricing page, go to the MemberPress » Groups page and click ‘Add New.’
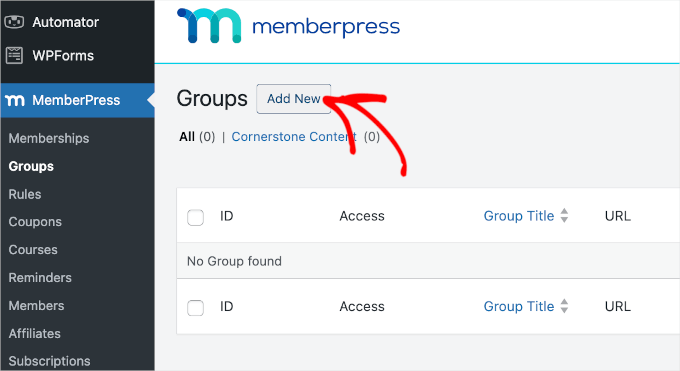
First, you need to type in a title for the group plan page, which will be visible to visitors.
After that, scroll down to the ‘Group Options’ box. You can add the memberships you want to display on the pricing page.
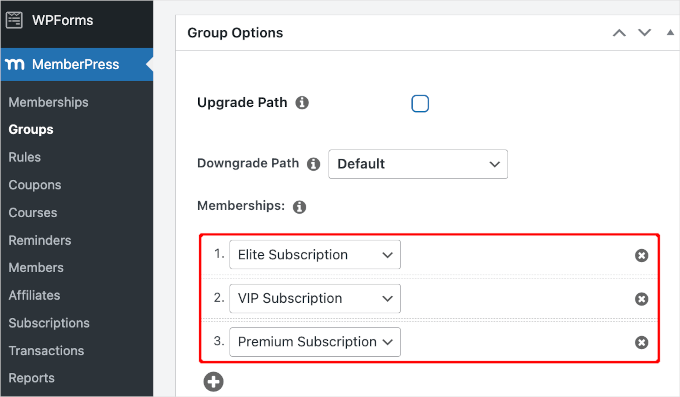
You can also select a theme for the pricing table. MemberPress comes with a few ready-made designs to choose from.
When you are happy with how the page is set up, just click the ‘Publish’ button to make it live. If you click on the ‘View Group’ link after publishing it, you’ll see the pricing and plan page.

Adding Content Behind the Paywall
Once you’ve created one or more membership plans, it’s time to choose the content that you’ll hide behind the paywall.
MemberPress is a powerful plugin that lets you restrict access to your content in lots of different ways. For example, you can restrict WordPress pages by user role or even create a private client portal.
To place content behind a paywall, go to MemberPress » Rules and click on the ‘Add New’ button at the top.
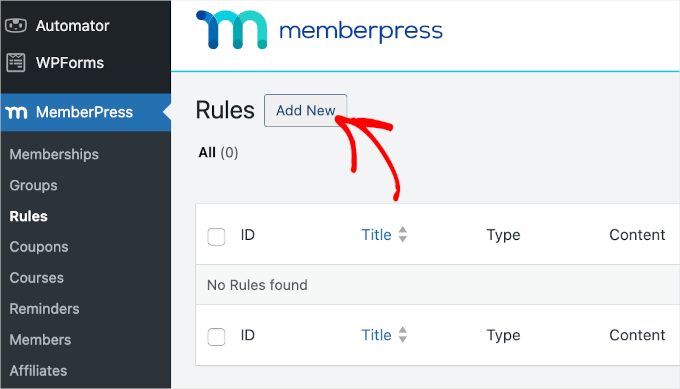
Next, you need to select the content that you want to restrict.
MemberPress lets you restrict access to specific pages and posts. For example, you might lock the latest post on your WordPress blog so only registered members can access it.
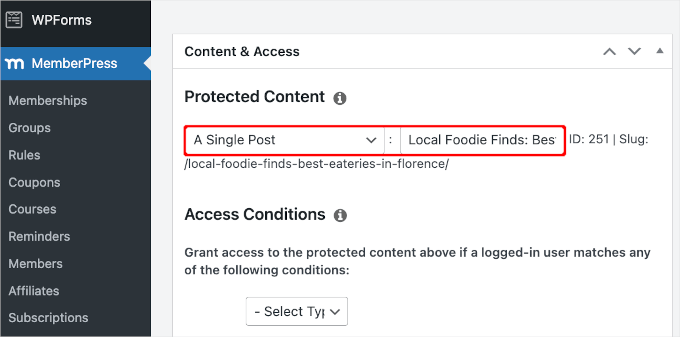
However, restricting access to each post or page separately can take a lot of time.
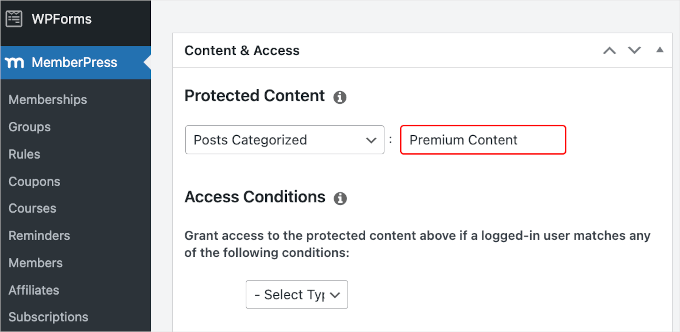
If you have lots of content to restrict, then MemberPress also lets you create rules for entire categories and tags. This lets you restrict access to sets of related content.
For example, you might add content locking to all posts tagged ‘Premium Content.’
For more information about categories and tags, please see our guide on how to add categories and tags in WordPress.
When you are ready, open the ‘Protected content’ dropdown and choose the type of content that you want to restrict, such as ‘A Single Post,’ ‘Posts Categorized,’ or ‘Child Pages Of.’
Depending on the option you choose, you’ll get access to some extra settings. For example, if you select ‘Posts Categorized’, then you can type in the category name.
After that, scroll to the ‘Access Conditions’ section and select ‘Members.’
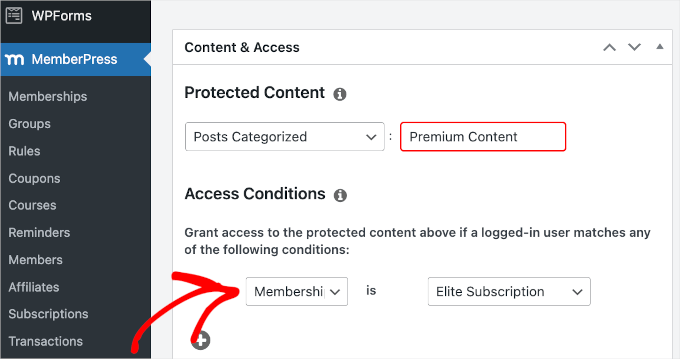
You can then choose the membership to which this rule will apply.
By default, if a non-member tries to view the restricted content, then they’ll see a ‘You are unauthorized to view this page’ message, as you can see in the following image.
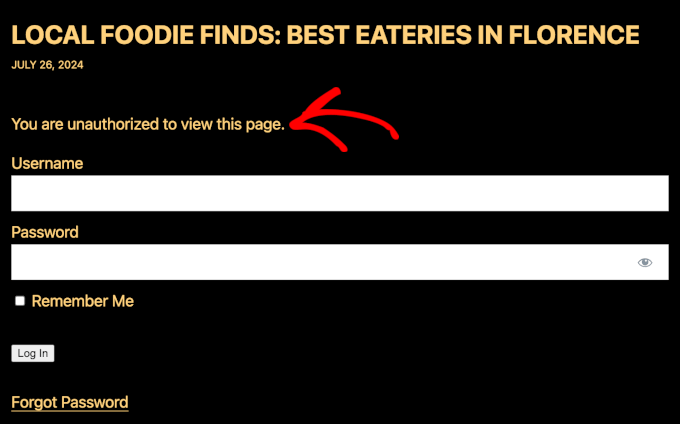
It’s a good idea to customize this message so visitors know this content is behind a paywall rather than simply unavailable.
To do this, scroll to the ‘Unauthorized Access’ section and then open the ‘Unauthorized Message’ dropdown.
You can now choose ‘Custom’ and type a message into the post editor.
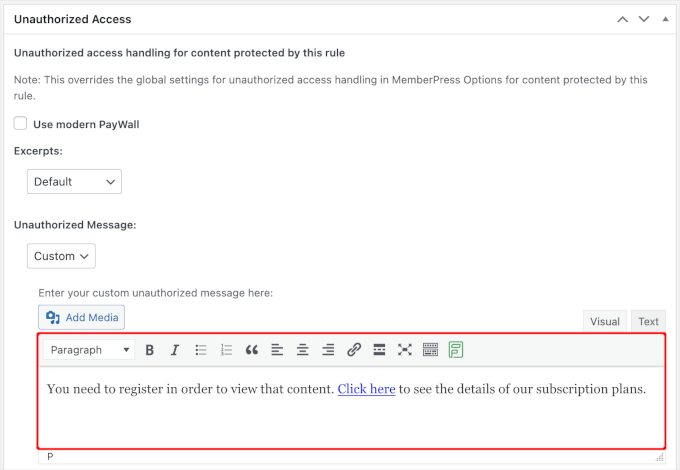
It’s also smart to add a link so people can easily buy a membership and unlock the paywall.
After that, you may want to show an excerpt of the locked content, as this will make visitors want to read more.
To create a paywall teaser, open the ‘Excerpts’ dropdown and choose how much of the post you want to show, such as the first 100 characters or the post excerpt.
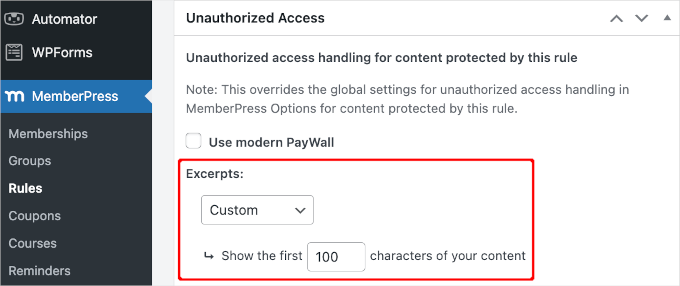
When you are happy with how the rule is set up, scroll to the top of the page and click ‘Save Rule’ to make the paywall live.
Here’s what it might look like on your website:

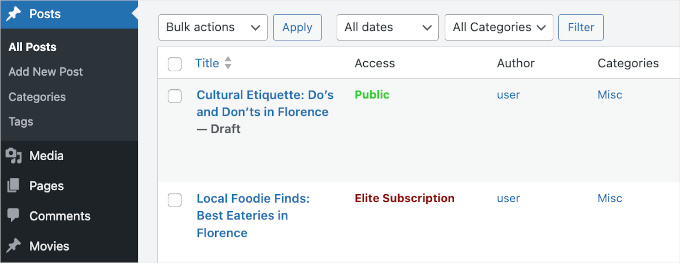
Now, you can go back to Posts » All Posts in your dashboard.
From here, you should see that some or all of your posts are now marked as subscription-only based on the rule you created earlier.
For a more detailed look at the MemberPress settings and features, check out our ultimate guide to creating a membership site.
Giving Non-Members a Limited Number of Free Views
You may want to let non-members see a certain amount of your content for free. This is a great way to promote your premium content and get more members.
You can create a free trial in MemberPress by going to MemberPress » Settings and then clicking on the ‘General’ tab.
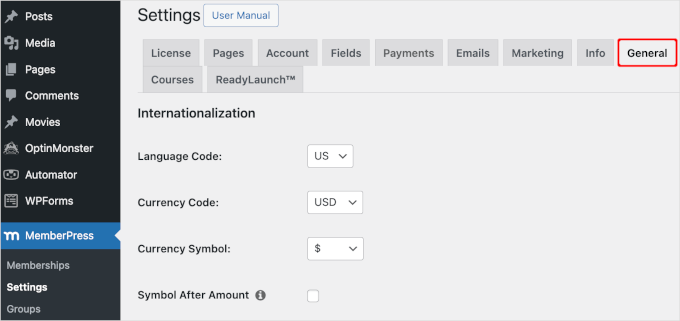
Here, you’ll need to scroll to the ‘SEO & PayWall’ section and check the ‘Enable PayWall’ box.
This adds a new section where you can type in the number of paywall-protected pages and posts that non-members can see before it triggers the paywall.
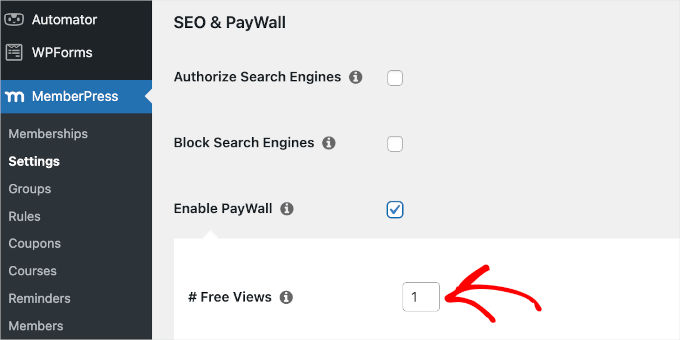
📝 Note: On this screen, you can also give search engines access to your protected content by checking the ‘Authorize Search Engines’ box. This helps your paywalled content rank in the search results, which can get you more visitors. However, this setting doesn’t work if you enable a caching plugin.
When you are happy with the changes you’ve made, simply scroll to the bottom of the page and click on ‘Update Options.’
Method 2: Creating a Paywall on Your WordPress Site Using OptinMonster
The easiest way to create a paywall is by using OptinMonster, the best lead-generation tool on the market. With OptinMonster, you can boost your site’s traffic, grow your contact list, and increase sales.
📌 A quick note: At WPBeginner, we actually use OptinMonster to display promotional popups, slide-ins, and header banners. We’ve seen how this powerful tool boosts conversions and grows our audience. Check out our extensive OptinMonster review to see how it works.
To get started, you’ll need to create an OptinMonster account on its website. From the homepage, simply click the ‘Get OptinMonster Now’ button.

Creating a Content Lock Campaign
Content locking stops users from seeing your content until they sign up for your contact list. It’s not like a traditional paywall since users don’t have to pay anything. They just need to give their email address.
So, why use this method? The more emails you collect, the higher your chances of making more money through email marketing.
To get started, let’s navigate to OptinMonster » Campaigns » Add New from your WordPress dashboard.
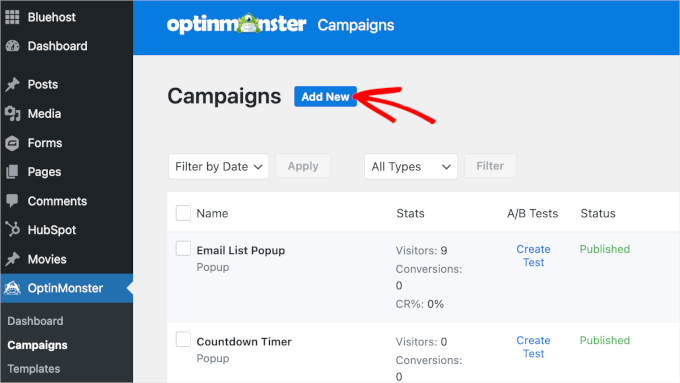
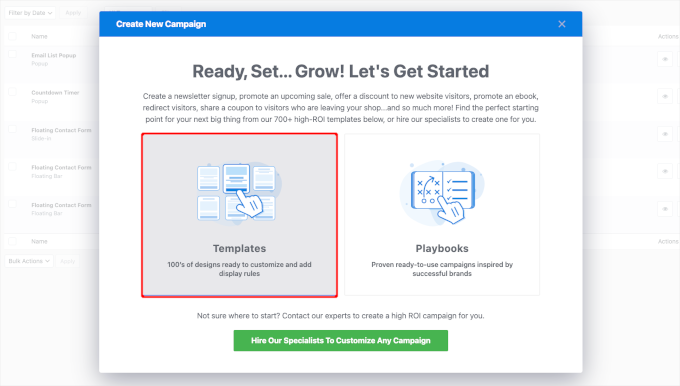
This will open a pop-up window where you’ll need to choose between using a template and a playbook.
Templates are ready-made designs for your forms and pop-ups that you can customize to match your website. On the other hand, playbooks have pre-set strategies that help you achieve specific goals like gaining more email sign-ups or reducing cart abandonment.
For an easier customization, let’s choose ‘Templates.’
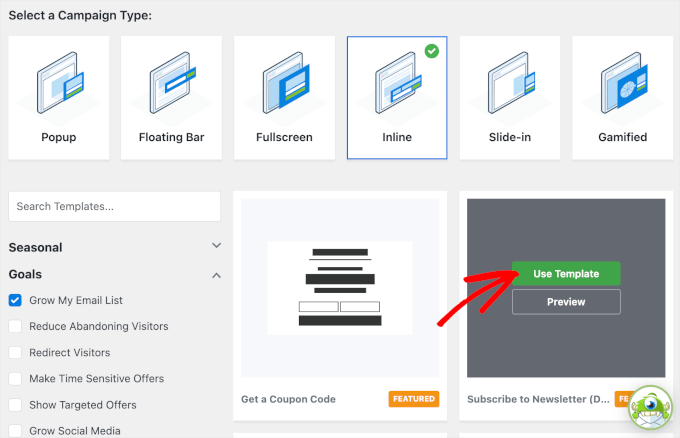
On the next screen, you’ll be prompted to select a campaign type and a template.
Since we’re creating a paywall, we’ll want something that will cover our content.
While ‘Fullscreen’ seems like a good option, we’ll go with ‘Inline’ as it allows us to give a little sneak peek to the readers.
For the template, you can use the filter on the left side to narrow your choices. When you see a template you like, simply hover over it and click the ‘Use Template’ button.
Next, you’ll see the ‘Create Campaign’ pop-up window.
Here, you’ll name your campaign.
This is for your reference only, but be sure to use a name that’s easy to refer to. For example, we call our campaign ‘Paywall.’
Go ahead and click the ‘Start Building’ button.

This will redirect you to the campaign builder.
The first thing to do here is to edit the copy. To do this, you can simply click on a text element and replace the existing text with anything you like.

Once you’re done editing your copy, let’s switch to the ‘Display Rules’ tab to adjust the campaign’s settings.
Activating the Content Lock Campaign
From the ‘Display Rules’ tab, you’ll want to focus on the tabs on the footer.
When you locate it, let’s click the ‘Actions’ tab to open the panel.
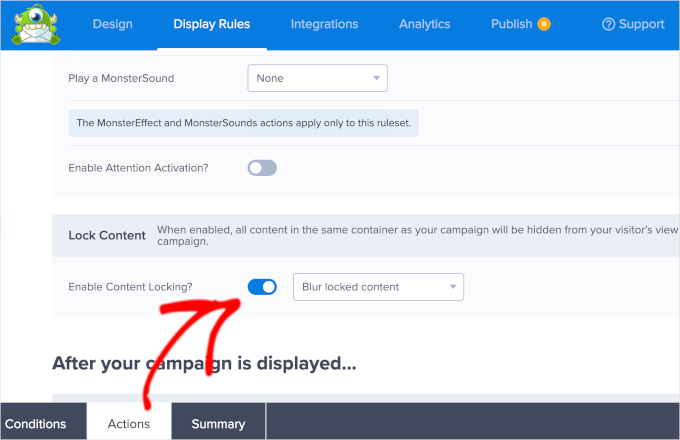
Here, you can scroll down to the ‘Lock Content’ section and toggle on the switch next to ‘Enable Content Locking?’
You might notice a dropdown menu next to the toggle. This is where you can customize how you lock your content.
There are 2 methods. The default setting is ‘Blur locked content,’ which will make everything blurry, and the other one is ‘Remove locked content,’ which will completely remove the content from users’ screens.
For reference, we’ll stay with the default settings.
Go ahead and click the ‘Save’ button.
Publishing and Embedding the Campaign
Now that you’ve created your paywall campaign and set up content locking, it’s time for publication.
So, let’s move on to the ‘Publish’ tab.
After that, you can simply change the ‘Publish Status’ from ‘Draft’ to ‘Publish.’
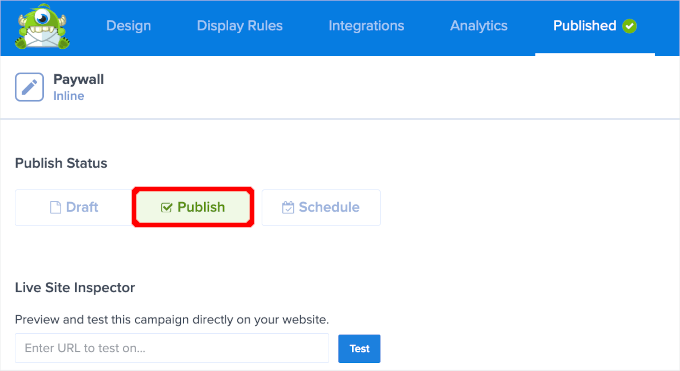
You might then notice that the ‘Publish’ tab now shows ‘Published’ with a check mark.
From here, you can close the campaign builder and navigate to OptinMonster » Campaigns.
Next, you’ll want to click on ‘Pending’ to change the Paywall campaign’s status. In the dropdown menu, let’s click ‘Publish.’
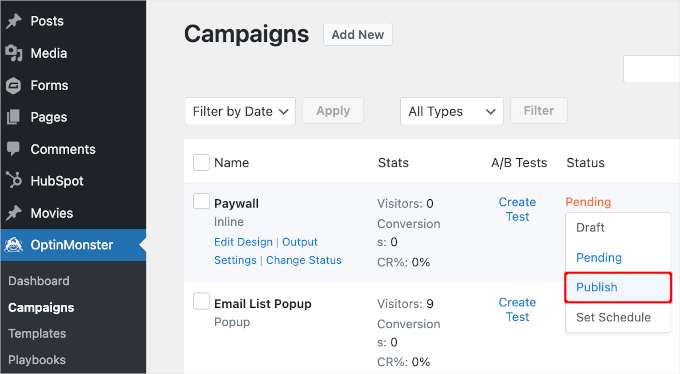
Now, all that’s left to do is embed the paywall campaign to your post or page.
To do this, you’ll want to hover over your campaign from the list and click the ‘Output Settings’ link.
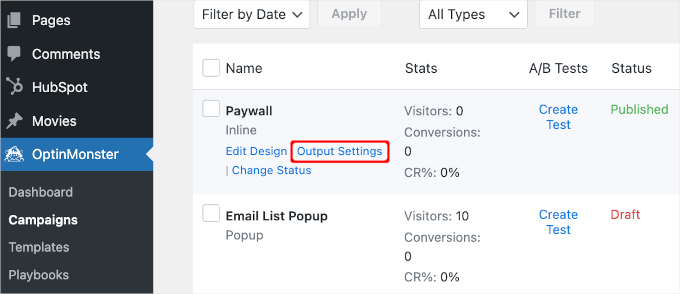
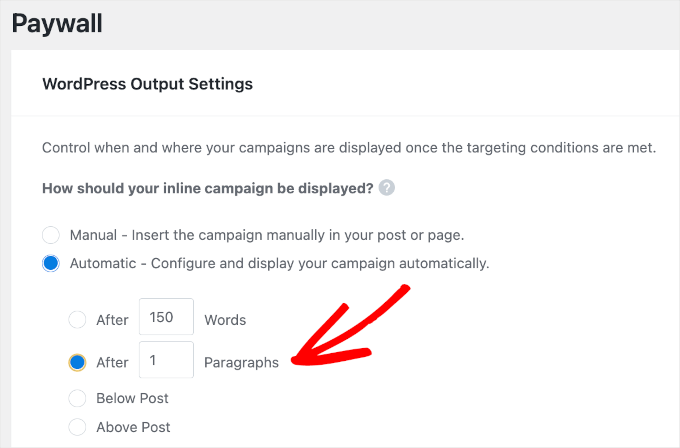
In the customization area, you’ll want to select the ‘Automatic – Configure and display your campaign automatically.’
The other option is good, too. But you’ll need to add it to your post or page one by one, which can be more time-consuming.
After choosing ‘Automatic,’ you’ll see more options. We’ll adjust the setting to ‘After 1 Paragraph.’
This means that after a single paragraph, the paywall will appear.
Then, you’ll want to scroll down and click the ‘Save Changes’ button.
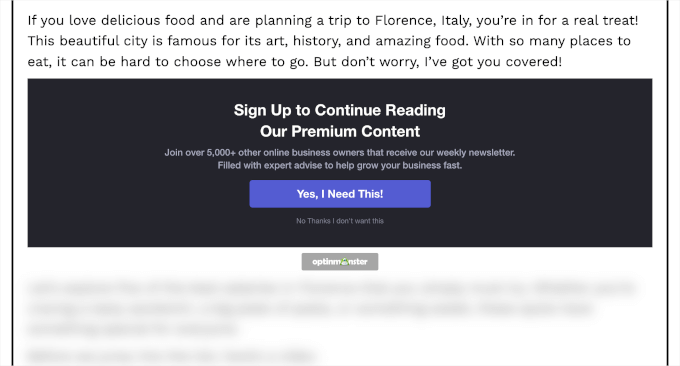
And there you have it! You should now have a paywall protecting your content. Here’s what it might look like on your blog:
📝 Note: If you use Thrive, then we have good news! You can also use Thrive Leads to create a paywall on your WordPress site. For more detailed instructions, you can refer to their guide on how to create gated content in WordPress.
Bonus Tip: Adding Free Trial Subscriptions in WordPress
Adding subscriptions to your website means steady money coming in, fewer payment mistakes, and fewer delays. But often, customers want to try before they buy, especially for longer or more expensive subscriptions.
So, it’s a good idea to offer a free trial.
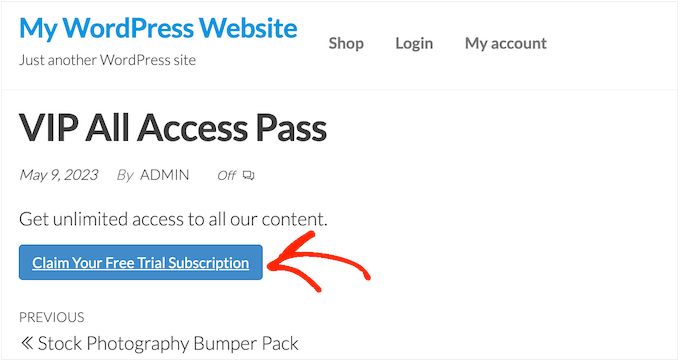
If your potential subscribers like the free trial, they might decide to pay for a full subscription. Even if they don’t sign up right away, you can use their contact details to keep in touch. You could send them special offers or notify them of updates.
To learn more, you can read our guide on how to add free trial subscriptions in WordPress.
We hope this article helped you learn how to create a paywall on your WordPress site. Next up, you might also want to see our guides on how to track customer journeys and our expert picks of the best WordPress membership plugins.
If you liked this article, then please subscribe to our YouTube Channel for WordPress video tutorials. You can also find us on Twitter and Facebook.


Mrteesurez
This is well understood, thanks, but need to ask these:
1. Isn’t paywall also the same as pay per view and which is the better approach concerning membership site ?
2. Doesn’t giving search engines access to protected content by checking the ‘Authorize Search Engines’ box exposed contents to public ?
WPBeginner Support
Depending on your implementation they can be the same or at least similar. It would depend on your content for which is the best method.
It would not give access to your all of your content to the public.
Admin
Mrteesurez
I offer educational contents, that are arranged in order in a site and offer videos and ebooks in another site. Glad to hear it wouldn’t give access to your all of my content to the public. Thanks for your support.
Jiří Vaněk
Thanks for the tutorial. I have previously considered the concept of a free website and paid content on hero hero or patreon. However, after watching this tutorial, I am really starting to realistically think about the fact that even paid content will be part of my website on one platform. Great, thanks for your work.
Chris
Is there a way of turning off ads if the content is premium? Or does this need to be done manually?
WPBeginner Support
It would depend on what tools you are using to display ads on your site and where the ads are as there are different possible tools that can be used.
Admin
Chris
Google Adsense would be the one for now.
One last question. Do Subscribers have to actually login to a Wordpress account to view the restriced or paid content?
WPBeginner Support
You could use widgets that hide for logged-in users to allow for what you’re wanting and yes, users would need to log in to their account to see your content.
Isabelle
Does it concern wordpress.com only or wordpress.org only or both ?
WPBeginner Support
Our content is for WordPress.org sites, you can see our guide on the difference between the two platforms below:
https://www.wpbeginner.com/beginners-guide/self-hosted-wordpress-org-vs-free-wordpress-com-infograph/
Admin
Divakar
Good content, can I use this in custom registration form.
WPBeginner Support
Thank you, glad you like our content
Admin