Are you tired of relying on platforms like Substack to run your paid newsletter?
As website owners who have built dozens of subscription-based sites ourselves, we’ve discovered that creating your own paid newsletter system gives you complete control and helps you keep more of your earnings. Plus, you won’t have to worry about platform changes affecting your business.
Setting up a paid newsletter in WordPress might seem complicated at first, but it’s actually quite straightforward with the right tools.
In this tutorial, we’ll show you how to create your own paid newsletter system that you fully own and control without the hefty platform fees.

Why Create a Paid Newsletter in WordPress?
Paid email newsletters like Substack are becoming a very popular and easy way to make money online. Think of them like regular email newsletters, but with extra special content that only subscribers who pay get to see.
A paid newsletter can be a whole online business on its own, or it can be another way to bring in income for your existing WordPress website. By starting your own paid email newsletter, you can directly earn money from your writing while building a really strong connection with your readers.
However, using a service like Substack can get expensive. Substack takes 10% of all your profits, so you pay more and more over time.
Many users have asked us to recommend a better Substack alternative. We’ve looked into other similar options like Gumroad and Patreon, but they often have the same kind of pricing structure.
That’s why we can confidently say that WordPress is the absolute best way to run a paid newsletter, especially since you get to keep 100% of your profits.
The best thing about using WordPress is that it grows with you and you can customize it exactly how you want. You can choose to only pay for the features you actually need. For example, you could easily expand your offerings to include online courses, digital products, or anything else you can imagine.
Plus, using WordPress will give you more control over how your newsletter looks, the subscriber experience, and much more. For the full scoop, please see our detailed comparison of Substack vs WordPress.
That being said, let’s show you how to create a paid newsletter in WordPress:
- Step 1: Create a WordPress Site
- Step 2: Sign Up for an Email Service Provider
- Step 3: Add Membership Functionality to Your Email Newsletter
- Step 4: Create a Paid Email Subscription Plan and Sign Up Page
- Step 5: Connect Kit with MemberPress in WordPress
- Final Thoughts: Creating a Profitable Premium Newsletter in WordPress
Step 1: Create a WordPress Site
If you don’t already have a WordPress site, you’ll need to set that up first. Don’t worry, it’s not as scary as it sounds (although you can skip this step entirely by signing up for our stress-free website design services).
To get started, you’re going to need a few things: WordPress hosting (this is where your website files live), a domain name (your website’s address, like wpbeginner.com), and an SSL certificate (this makes your website more secure).
Usually, a domain name costs around $14.99 per year, web hosting around $7.99 per month, and SSL certificates cost around $69.99 each year.
Since you’re just getting started, that’s a big upfront investment.
Thankfully, we have a better solution.
Bluehost, an official WordPress-recommended hosting provider, is offering our users a free domain name, a free SSL certificate, and a discount on web hosting.
That means you can get all the above for $1.99 per month.

Another option is using Hostinger, who are also offering WPBeginner an exclusive discount with free domain and SSL.
Note: At WPBeginner, we believe in full transparency. If you sign up with Bluehost or Hostinger using our referral link, then we will earn a small commission at no extra cost to you (in fact, you’ll actually save money and get that free domain and SSL!) We would get this commission for recommending just about any WordPress hosting service, but we only recommend products that we use personally and believe will add value to our readers.
Once you’ve signed up for hosting, the next step is to install WordPress. The great thing is that Bluehost installs WordPress for you, so you can skip straight to the next step.
Step 2: Sign Up for an Email Service Provider
Next, the most important thing you’ll need to start your paid newsletter is an email marketing service provider.
These services are experts at sending out lots of emails the right way. This is super important because it helps make sure your newsletter emails actually land in your subscribers’ inboxes and don’t get lost in the spam folder.
We recommend using Kit (formerly ConvertKit) to create a paid newsletter. It’s a robust email marketing platform for bloggers, authors, and marketers. It’s easy to use and has all the features you need to create a paid email newsletter.

Plus, we’ve got a special Kit coupon for WPBeginner readers that gets you a 14-day free trial, and you don’t even need to put in your credit card details to try it out.
First, you need to go to the Kit website and click the ‘Start free trial’ button to sign up for a plan.
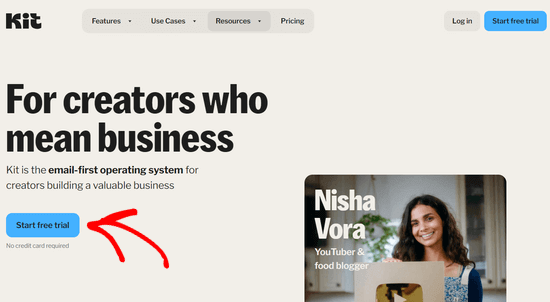
This will bring you to a screen where you’ll answer a few questions about your business.
After that, you’ll need to enter your name, an email address, and a password. Then, click the ‘Get started’ button.
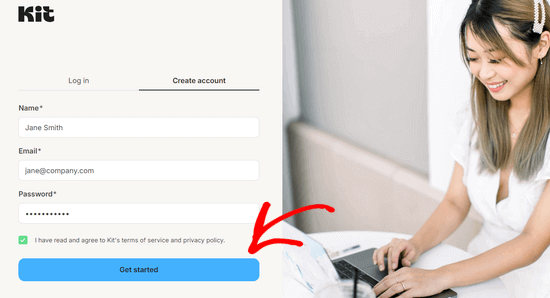
Make sure you keep this screen open, as you’ll need your account information in the next step.
Note: This tutorial will work with other email marketing platforms as well, including Constant Contact, Drip, and MailChimp. But we will be using Kit for our example, since it has good email deliverability rates and some really powerful automation tools.
Step 3: Add Membership Functionality to Your Email Newsletter
After you’ve signed up for an email marketing provider, you’ll need a way to handle payments and add that special “premium access” to your email newsletter.
While Kit has a built-in way to create a premium newsletter and accept payments, it’s only available on the Creator Pro plan, which costs 3x more than the regular plan. And while the price does come down a bit as you get more subscribers, you’ll still be paying a higher transaction fee.
This is why we recommend using a separate WordPress membership plugin. This way, you can avoid those extra transaction fees and also have the option to sell other cool digital stuff like online courses and eBooks, further down the line.
For setting up memberships in WordPress, we recommend using MemberPress. It’s the best WordPress membership plugin on the market.
It lets you easily sell subscriptions on your website. We use it to power our subscriber-only video courses and have always been happy with the results.
Want to learn more? We’ve written a detailed MemberPress review, based on our experiences with this plugin.
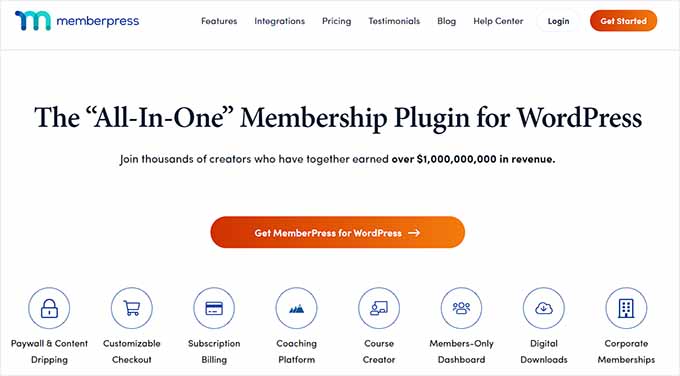
The first thing you need to do is install and activate the MemberPress plugin. For more details, see our step-by-step guide on how to install a WordPress plugin.
Once you’ve activated the plugin, go to MemberPress » Settings and click on the ‘License’ menu option to enter your license key. You can find this information in your account on the MemberPress website.
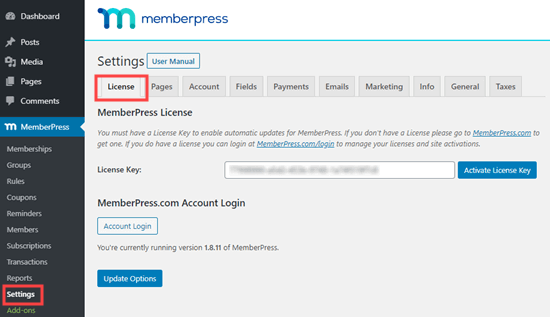
Simply copy and paste your license key, and then click on the ‘Activate License Key’ button.
Once you’ve done that, you need to set up a way to receive payments.
Unlike Substack, MemberPress doesn’t force you to use a specific payment method. It works with several popular payment gateways like PayPal, Stripe, Authorize.net, and more.
To add a payment method, go to MemberPress » Settings, click on the ‘Payments’ tab, and then click the ‘Plus’ button.
You must enter a name for the payment method and then select your payment gateway from the drop-down menu.
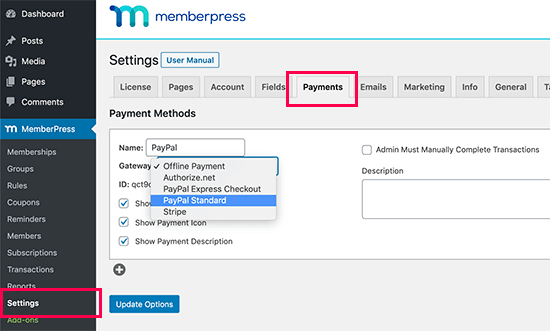
MemberPress will now ask you to fill in the details for that payment method.
For example, for standard PayPal payments, you need to enter your PayPal email address.
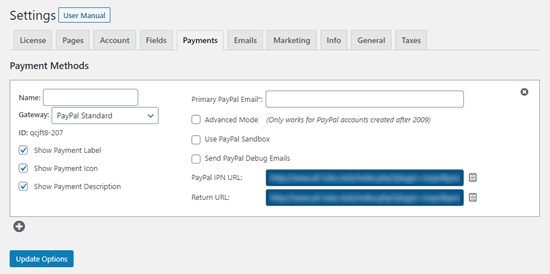
If you want to add multiple payment methods for your subscribers, then simply click the ‘Plus’ icon and follow the same process as above.
Once you’re finished adding payment options, click the ‘Update Options’ button to save your settings.
Step 4: Create a Paid Email Subscription Plan and Sign Up Page
Now that you’ve got the plugin all set up, it’s time to create the actual paid subscription plan that people can sign up for. To do this, you’ll need to create a “membership level” in MemberPress.
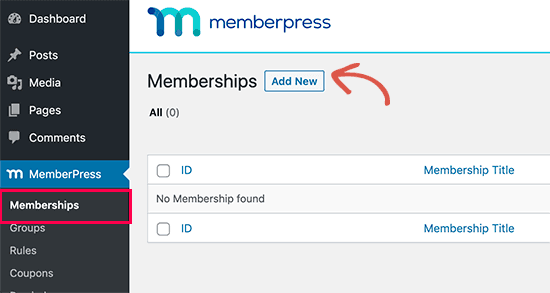
Simply navigate to MemberPress » Memberships and click the ‘Add New’ button.
This brings you to a screen where you need to give your membership plan a name and set the price in the ‘Membership Terms’ meta box.
When you create a membership level, MemberPress automatically creates a sign-up page for it. So, the text you add to this page will appear when your users are about to sign up.
For this tutorial, we’ve named the plan ‘Premium Subscription’ and set the price to $5 per month.
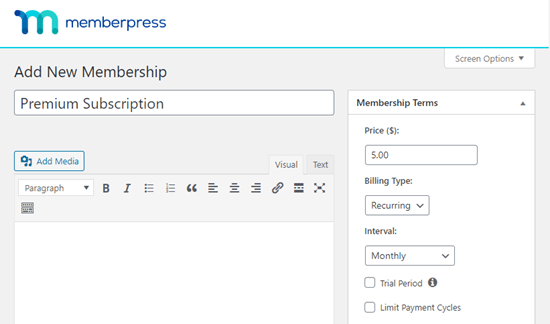
With MemberPress, you have complete control over the membership details. You can set the price, duration, payment terms, and more.
Most paid email newsletters charge a monthly fee, but you can also choose ‘Recurring’ or ‘One-time’ billing. If you go with recurring payments, you can choose from weekly, monthly, quarterly, yearly, or even set up a custom time period.
You can also offer a free trial period so potential subscribers can check out your newsletter before they decide to pay. This is a great way to let people see what they’re getting.
The ‘Membership Options’ box below the post editor offers even more options to customize your membership plan.
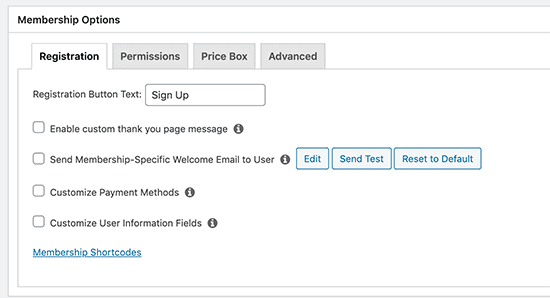
The default settings will work well for most people, but it’s worth taking a look through them to see if you want to make any changes.
One thing we recommend checking is the ‘Enable custom thank you page message’ box. Then, select the ‘Enable custom thank you message’ radio button.
This brings up a drop-down where you can enter a custom thank you message for your new subscribers. You can also choose to redirect subscribers to a custom thank you page as well.
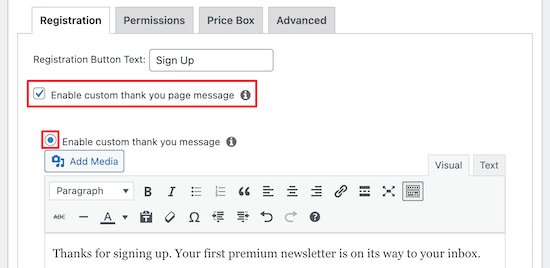
Once you are done, click on the ‘Publish’ button to save your membership plan.
Now, some of you might want to create a completely custom registration page for your email subscribers. This lets you design a really attractive page that can help convince more visitors to become paying customers.
The easiest way to create a custom signup page, is by using a drag-and-drop page builder.
We recommend SeedProd because it’s really easy to use, and has everything you need to create beautiful landing pages and even entire websites.

We used SeedProd to design many of our partner websites such as Duplicator Pro, WP Charitable, and WPForms.
Even the SeedProd website was designed using SeedProd!

There’s also a free version available, which is a good choice if you want to get your newsletter up and running, before investing in premium software.
For more details, see our guide on how to create a landing page with WordPress.
Note: To add your registration form to a custom SeedProd landing page, you need to use the following shortcode to display your sign-up form.
[mepr-membership-registration-form id="6492"]
Simply replace the ID with the ID for your membership page. You can find this in the URL for your page.
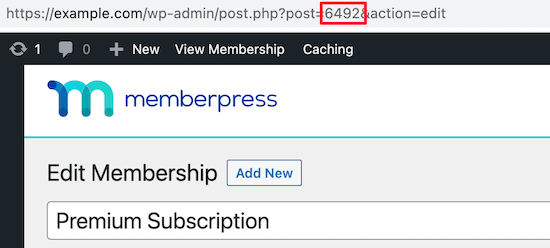
Another option is making the signup page your website’s homepage. This is a great idea if your site’s main goal is getting people to sign up to your paid newsletter.
To do this, simply go to Settings » Reading. Then, click the ‘A static page’ radio button.
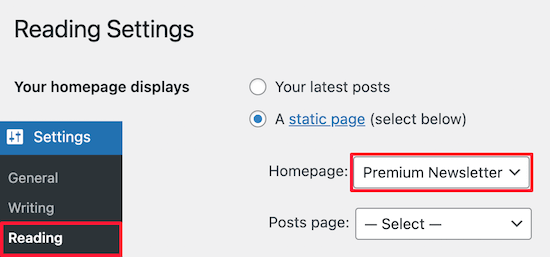
After that, choose your page from the ‘Homepage:’ drop-down list.
Once you’ve done that, click the ‘Save Changes’ button at the bottom of the page. Now, your premium newsletter sign-up form is the first thing visitors see when they arrive at your website.
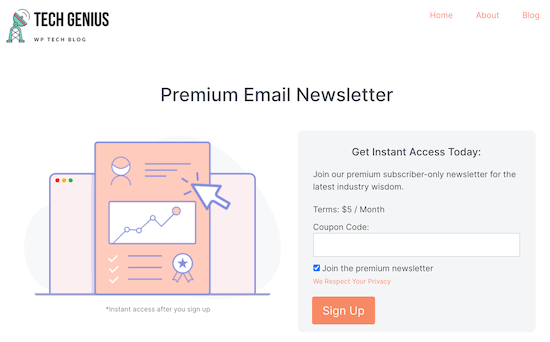
Alternatively, you can add your registration page to your navigation menu. For more details, see our beginner’s guide on how to add a navigation menu in WordPress.
Step 5: Connect Kit with MemberPress in WordPress
Now that you’ve created a membership plan and registration page, it’s time to connect Kit (ConvertKit) to MemberPress so that whenever someone signs up, they’re automatically added to your email list.
To do this, you’ll need the ConvertKit addon. You can download this from your account on the MemberPress website by logging in to your account and clicking the ‘Downloads’ tab.
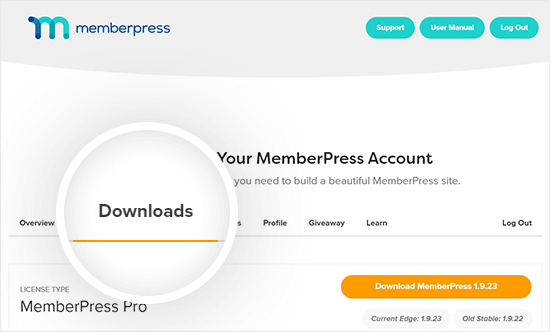
From here, you can find the available downloads for your MemberPress account.
Simply find ‘ConvertKit’ and then click to download this addon.
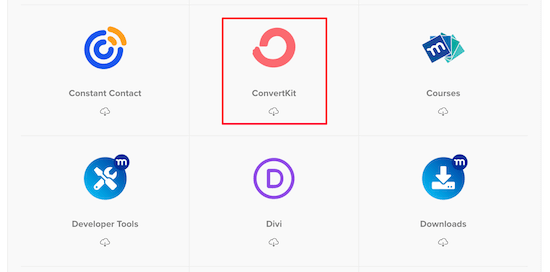
After that, you can install and activate the addon the same way you installed the MemberPress plugin above.
Once that’s installed, simply go to the MemberPress » Settings page and click on the ‘Marketing’ tab, and then check the box that says ‘Enable ConvertKit’.
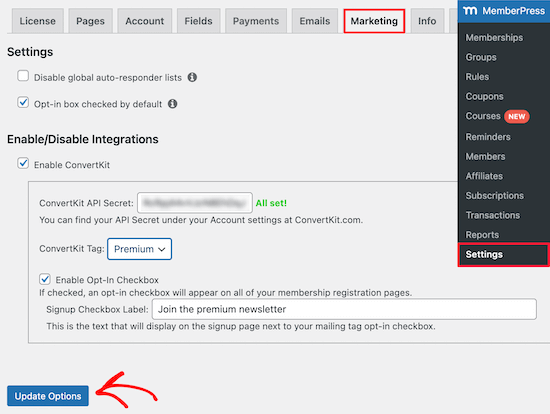
This brings up a drop-down where you need to enter your API key. You can find this under your account settings on the Kit website.
You can also select a tag from the ‘ConvertKit Tag’ drop-down. This will automatically tag new subscribers who sign up for your premium newsletter, making it easier to manage your list in Kit.
Once you’ve entered your API key and selected a tag (if you’re using one), just click the ‘Update Options’ button.
And that’s it! Now, when someone signs up for your premium email newsletter through your MemberPress registration page, they’ll get added to your list in Kit, ready to receive your premium newsletter.
Final Thoughts: Creating a Profitable Premium Newsletter in WordPress
Now, here’s one of the best things about using WordPress and MemberPress to create your premium newsletter: you’re not stuck using just one email marketing service.
We recommended Kit because it has powerful automation features and a great track record for getting emails delivered to inboxes (and not the spam folder).
However, this tutorial will work with any email marketing platform that integrates with MemberPress, including Constant Contact, AWeber, Drip, GetResponse, Keap, MailChimp, Active Campaign, and more.
This flexibility is where the real power of WordPress shines through. You get to enjoy the freedom of WordPress without being tied down to a single email marketing platform. You can switch things up if you need to, without having to rebuild everything.
We hope this article helped you learn how to create a paid newsletter in WordPress. You may also want to see our expert picks of the best web push notification software and our guide on how to get a free email domain.
If you liked this article, then please subscribe to our YouTube Channel for WordPress video tutorials. You can also find us on Twitter and Facebook.


Dennis Muthomi
Thank you this guide! Especially the step by step on setting up MemberPress for membership. I just switched from Substack to self hosted and can attest to the cost savings and control. One more tip: offer an annual subscription at a slight discount to get your readers to commit long term. Helps with cash flow and subscriber retention.
I am sharing this guide to my clients who are interested in starting a paid newsletter.
Jiří Vaněk
I’ve been using Member Press, and I monetize my website through memberships on Patreon. However, this method isn’t suitable for everyone, and Patreon also takes a relatively large fee from the income users send through subscriptions. A paid newsletter could be a great alternative to Patreon for people who don’t prefer that platform, and it could save me some money on fees. I’ll definitely consider this method of monetization now, and thanks for the great step-by-step guide. With your help, many ideas and tasks on WordPress become much easier.
William Laughlin
Where would I get the content for the newsletter? Thanks.
Andrew Scherer
Your brain – the best content is unique and original.