Unlocking the power of exclusivity can transform your WooCommerce store. 🔑
A members-only store isn’t just a trend. Instead, it’s a proven way to boost loyalty, increase revenue, and create a VIP shopping experience.
So, instead of letting anyone browse and buy, you can control access, offer exclusive products, and build a thriving community. 🌟
At WPBeginner, we run a free video membership site. We’ve also worked with many businesses to set up one, so we understand what goes into building and managing a successful members-only program.
In this guide, we’ll take you through the entire process of how to create a members-only WooCommerce store. It’s easier than you might think, so let’s get started!

Why Create a Members-Only WooCommerce Store?
A members-only WooCommerce store is an online store where users must become members to view and purchase products. Then, you can make your entire store private or create VIP products specifically for your members.
There are all kinds of reasons you’d want to create a members-only online store:
- You need a private area of your store to sell wholesale goods.
- You only want to sell products to paying members.
- You want to offer special discounts and perks that are only available to members.
- You want to offer different products to different membership levels.
- You want to offer additional exclusive products to your members.
- You can better manage your inventory and ensure that high-demand products are available to your most loyal customers.
Creating a member-only WooCommerce store can be done through a paid subscription or simply by requiring users to sign up before accessing the store.
With that in mind, we’re going to show you step-by-step how to create your own member-only WooCommerce store. Below are the steps that we’ll cover:
- Getting Started with a Members-Only WooCommerce Store
- Choosing a WooCommerce Membership Plugin
- Setting Up Your Members-Only Online Store
- Adding Payment Methods to Your Membership Store
- Creating a Subscription Plan for Your WooCommerce Store
- Making Your WooCommerce Store Private
- Add Sign-Up and Login Forms to Your Store
- Growing Your Members-Only Online Store
Ready? Let’s get started.
Step 1. Getting Started with a Members-Only WooCommerce Store

To create a private, members-only WooCommerce store from scratch, here’s what you need:
- A domain name. This will be the address of your online store (e.g., wpbeginner.com).
- A WordPress hosting account. This is where your website files will be stored.
- An SSL certificate. This allows you to accept payments online securely.
- An eCommerce plugin. This is what you will use to sell products and create a store.
- A membership plugin. This lets you control privacy settings in your online store.
Normally, web hosting costs $7.99 per month, a domain name starts at $14.99 per year, and an SSL certificate costs around $69.99 per year.
This can be a big investment when you’re just starting a new online store.
Luckily, Bluehost has agreed to offer our readers a big discount on web hosting, plus a free domain name and SSL certificate.

Basically, you can get started for as low as $1.99 per month.
Simply click the Bluehost button below, and the discount will automatically apply.
Once you’ve purchased hosting, make sure you check out our step-by-step guide on how to start an online store.
It will show you how to build your WooCommerce store from scratch, choose a WooCommerce theme, add products, and more.
Step 2. Choosing a WooCommerce Membership Plugin
Once your WooCommerce store is set up, you need a way to restrict access based on membership levels. You can make your entire store private or only make specific products and product categories available to members.
If you want to create a members-only online store with access control, subscription plans, multi-level subscriptions, built-in payment options, and more, then you’ll need a feature-rich membership plugin like MemberPress.

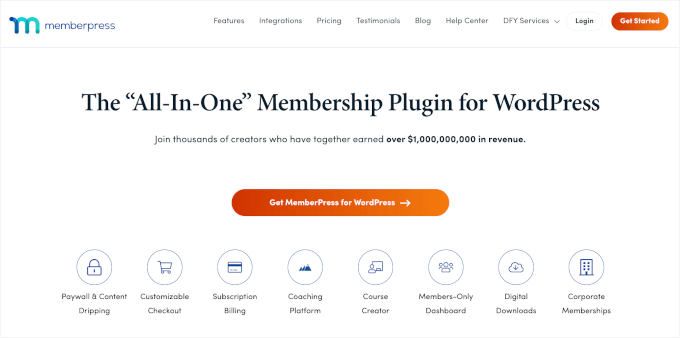
MemberPress is the best WordPress membership plugin on the market. It makes it easier to create a private store, accept payments, and restrict access to products based on levels.
We actually use MemberPress to power our free video site, and it’s been running smoothly. If you’re curious, check out our complete MemberPress review for all the details!
Above all, it has all the features you need to create a members-only online store and integrates with all the tools you need to grow your online store.
Step 3. Setting Up Your Members-Only Online Store
We’ll be using MemberPress to set up a members-only WooCommerce store.
The first thing you need to do is install and activate the MemberPress plugin. For detailed instructions, you can see our step-by-step guide on how to install a WordPress plugin.
Upon activation, let’s navigate to MemberPress » Settings. Then, you’ll want to click the ‘License’ menu option and enter your license key.
Then, go ahead and click the ‘Activate License Key’ button.

This information can be found under your account on the MemberPress website. You can configure the plugin settings on this screen, too.
Step 4. Adding Payment Methods to Your Membership Store
Next, you’ll want to add a payment gateway to accept payments on your membership site. You can also create a free membership level if you don’t want to charge all your members to sign up.
To do this, you can select the ‘Payments’ tab and then click the ‘Add Payment Method’ button.

This will bring up a drop-down where you can choose your preferred payment method and connect to different payment processors.
Simply select a payment method from the ‘Gateway’ drop-down and provide the required credentials.
MemberPress supports popular WooCommerce payment gateways like PayPal (Standard, Express, and Pro), Stripe, and Authorize.net out of the box.

If you want to add another payment method, then click the ‘Add Payment Method’ button again and follow the same steps.
Once you’re finished, go ahead and click the ‘Update Options’ button at the bottom of the screen to save your payment settings.
Step 5. Creating a Subscription Plan for Your WooCommerce Store
The next step is to create a subscription plan so new members can subscribe and access your store.
For example, you can create plans with different pricing options, access to different products, and more. You can even create a free membership level where users can browse products but not check out unless they sign up.
To create a new membership plan, you can navigate to MemberPress » Memberships and click the ‘Add New’ button.

Next, you’ll need to name your membership plan and enter the plan details.
In the ‘Membership Terms’ section, you can set the plan’s price, type of billing, billing interval, and expiration.

In the example above, we’ve created a lifetime membership plan. This means that members will only need to pay once and get access to our store forever.
Below the post editor, you’ll find a membership options meta box where you can customize permissions and membership options for this plan.

Once you’re satisfied with your plan, simply click the ‘Publish’ button to make it live.
If you need to create multiple subscription plans, then you’ll want to repeat the process above.
Step 6. Making Your WooCommerce Store Private
Now that your membership plugin and subscription plans are set up, it’s time to make your WooCommerce store private.
MemberPress has powerful features that let you restrict access to your WooCommerce store based on membership level.
For example, you can make your entire store private to members, create members-only products, and even restrict access to entire product categories.
To set up rules, let’s head over to MemberPress » Rules and then click the ‘Add New’ button.

This page lets you set different conditions for each membership plan.
In this example, we’ve made all of the products in the store private unless a user is subscribed to the ‘Premium’ plan.

You can also create more specific rules to restrict individual products, products with specific categories and tags, and more.
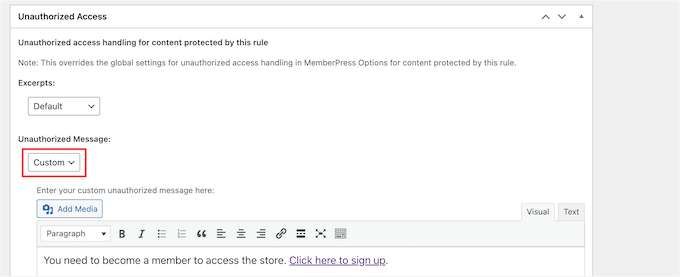
Next, you’ll want to scroll down to the ‘Unauthorized Access’ meta box. Here, you’ll choose what your visitors will see when trying to view your products without a membership.
To do this, let’s click the ‘Custom’ from the ‘Unauthorized Message’ drop-down, then enter your message into the box.

You can also display a login form so users can log in if they already have an account.
Simply select the ‘Show’ option from the ‘Login Form’ drop-down.
Once you’re finished, click the ‘Save Rule’ button to save your settings.
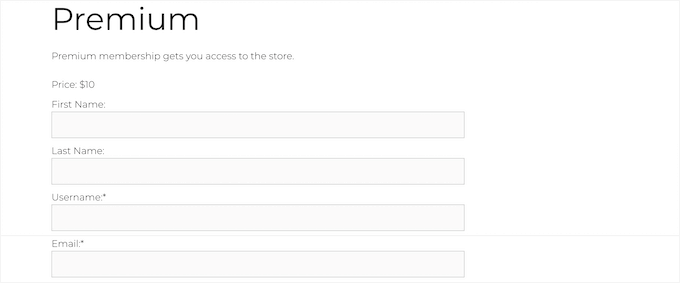
In the example above, when users click the signup link, they’ll be taken to a registration page for the ‘Premium’ plan.

If you need to create more rules, simply follow the same process.
Making Your WooCommerce Shop Page Private
Now, your WooCommerce products will be private, but your shop page will still be visible. If you don’t make the shop page private, your users will see a shop page with no products. So you’ll want to make this members-only as well.
To do this, you’ll create a new rule, just like above.
In the ‘Content & Access’ meta box, you can select ‘A Single Page’ from the drop-down and enter your shop page title into the box.

Then, go ahead and click the ‘Save Rule’ button to save your settings.
Now, when visitors try to access your products or shop page, they’ll be asked to either sign up or log in if they’re already members.
For more details, see our complete guide on how to create a membership website in WordPress.
Step 7. Add Sign-Up and Login Forms to Your Store
Now that your membership store is set up, you can give users an additional way to log in to their accounts to access the store.
The easiest way to do this is to add a login form to a WordPress widget area. Let’s navigate to Appearance » Widgets and click the ‘Plus’ add block icon.

Then, you can search for ‘MemberPress login’ and click the block.
This will automatically add the membership login form to your sidebar widget.

To make your login form live, go ahead and click the ‘Update’ button.
You can add the membership login block to any widget area of your WordPress site.

To learn more, you can see our guide on how to add and use widgets in WordPress.
To see your login form live, you’ll want to log out of the WordPress admin area and visit your online store.

Step 8. Growing Your Members-Only Online Store
Congratulations! You’ve successfully set up a members-only WooCommerce store.
Now, it’s time to look at a few ways to get more traffic to your store and grow your business.
Luckily, since you’re using WooCommerce and MemberPress, there are all kinds of powerful tools you can use to get more traffic, optimize your store, and more.
- MonsterInsights — It’s the best WordPress analytics solution that allows you to set up WooCommerce conversion tracking to see what’s working in your online store.
- SeedProd — It’s the best WordPress page builder plugin you can use to create custom product pages, cart pages, checkout pages, thank you pages, and more.
- OptinMonster — It’s one of the best conversion optimization and lead generation plugins and lets you easily create WooCommerce popups to turn visitors into paid customers.
- All in One SEO — It’s the best WordPress SEO plugin that allows you to optimize your website and online store for search engines without any technical skills.
- FunnelKit Automations – It’s one of the best marketing automation plugins that allows you to nurture leads, recover abandoned carts, and engage with your members through targeted email sequences.
If you’re looking for even more plugins, then take a look at our picks of the best WooCommerce plugins for your store.
We hope this article helped you learn how to create a members-only WooCommerce store. You may also want to see our guides on how to create a loyalty program and how to easily create post-purchase surveys in WooCommerce.
If you liked this article, then please subscribe to our YouTube Channel for WordPress video tutorials. You can also find us on Twitter and Facebook.


Andy G
Hi, this is exactly what I was looking for to create a store with a membership for free delivery to members.
Would this guide also apply to have integration for buddypress and woocommerce for members using a single registered account?
WPBeginner Support
For what you want with BuddyPress, we would recommend taking a look at Uncanny Automator and that would allow you to make that connection:
https://www.wpbeginner.com/plugins/how-to-create-automated-workflows-in-wordpress-with-uncanny-automator/
Admin