Remember the days of sorting through endless email attachments and trying to keep track of job applications in various folders? We’ve been there. After dealing with this headache in our own WordPress businesses, we knew there had to be a better way to handle job applications.
The good news is that creating a professional job application form in WordPress is much easier than most people think. We’ve spent a lot of time testing different methods and helping other business owners simplify their hiring process using WordPress.
In this guide, we’ll share our step-by-step method for creating job application forms that will help you collect, organize, and manage applications efficiently – all without leaving your WordPress dashboard. Whether you’re a small business owner or running an HR department, you’ll find everything you need to get started.

Why Add a Job Application Form to Your WordPress Site?
If you have a growing small business website, chances are you’ll need to hire new team members.
A ‘Careers’ or ‘Jobs’ page on your website is a great way to attract talent. But just listing open positions isn’t enough. You also need a simple way for candidates to apply. 💡
The problem is that relying on email applications can quickly become messy. Resumes pile up, important details get lost, and sorting through unqualified applicants takes way too much time.
A job application form keeps everything organized. It collects the exact information you need, such as resumes, cover letters, and experience, without the endless back-and-forth.
Plus, with the right form builder, you can even automate responses, filter applicants, and make hiring way smoother.
In the following sections, we’ll show you how to create a job application form in WordPress. Here’s a quick look at all the steps you’ll take:
Let’s get started!
Step 1. Install the Best WordPress Form Plugin
To add a job application form to your WordPress website, we recommend using the WPForms plugin.
WPForms isn’t just the best WordPress contact form plugin. It’s your all-in-one solution for building powerful forms without the hassle.
🙋 At WPBeginner, for example, we use WPForms for many of our forms, including our annual user surveys and site migration requests. Want to know why we love it? Check out our complete WPForms review!
So, let’s install and activate the WPForms plugin. If you need help, you can see our step-by-step guide on how to install a WordPress plugin.
Note: There’s a free plugin version called WPForms Lite that you can use for free. But upgrading to the paid plan unlocks many more features. For example, the pro version comes with 2,000 form templates, additional third-party integrations, and conditional logic.
Upon activation, you’ll want to visit the WPForms » Settings page in your WordPress dashboard to enter your license key. You can find your license in your account on the WPForms website.
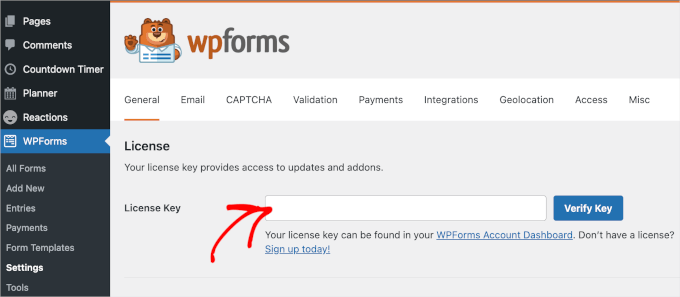
Once verified, it’s time to create your WordPress form.
Step 2. Create Your Job Application Form
To start, you need to visit WPForms » Add New in your WordPress admin area.
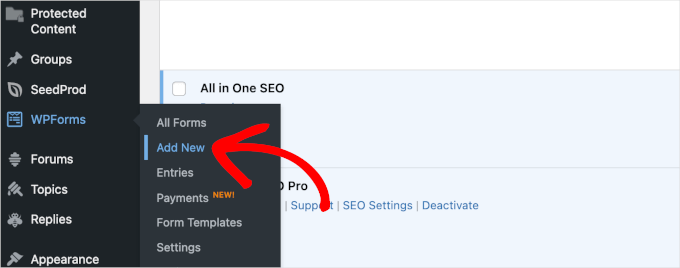
You will then be prompted to name your form and choose a template.
✏️ Quick note: With WPForms, you can use AI to build your forms. You’ll just need to write a brief, specific description, and the AI will generate the form for you.
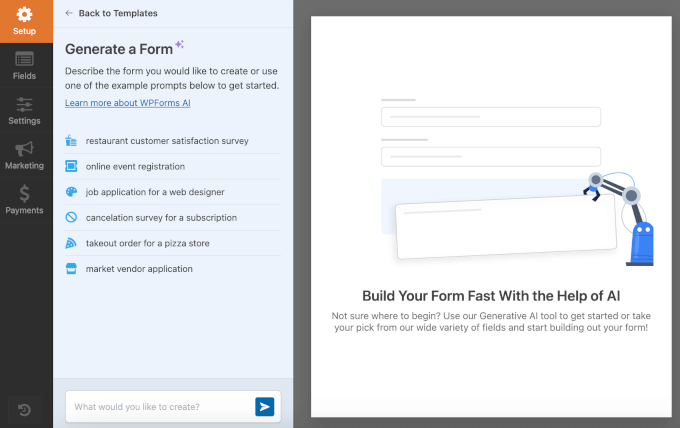
In this tutorial, though, we’ll use a ready-made template.
So, let’s first name the form. For example, we’re going to create a ‘Content Writer Application’ form.
After that, you can scroll down to choose a template. Since WPForms has more than 2,000 templates, it’s easier to use the search feature to narrow down the choice.
Simply type in ‘job application’ to the search field and hover over the ‘Job Application Upload Form’ template. Click ‘Use Template’ when it appears.
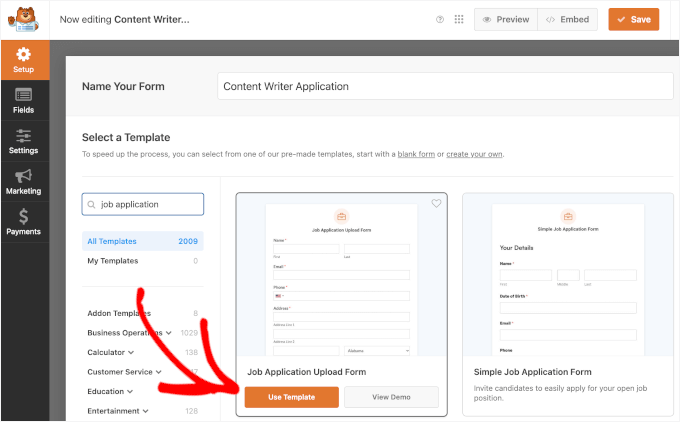
This will take you to the WPForms drag-and-drop editor.
Here, you will see the default job application upload form template, like this:
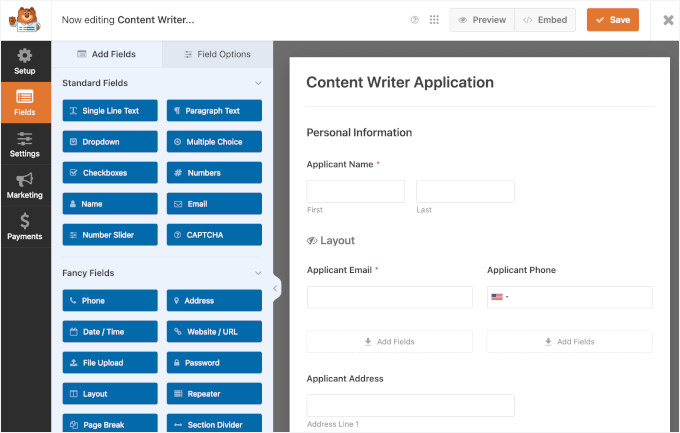
If you’re happy with the form, you can save it and publish it immediately.
However, we recommend personalizing it to better match your goal.
Don’t worry. This will be very easy as you have everything you need: the customization options on the left and the form preview on the right.
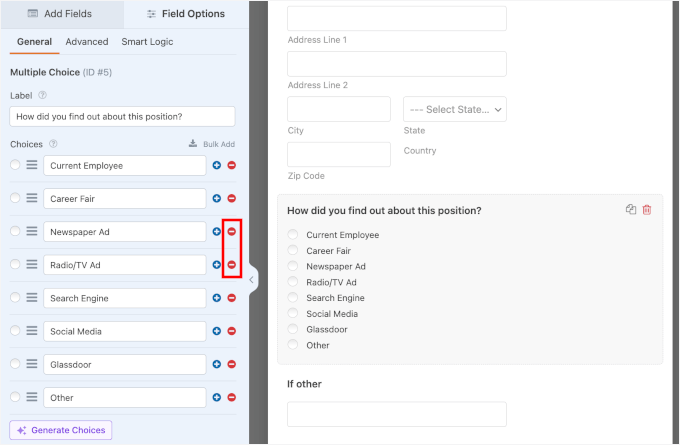
Now, let’s try to edit the ‘How did you find out about this position?’ question on the job application form.
To edit a field, you’ll first need to click on it. Then, you will see the options for the field open up in the left-hand editing panel.
We’re going to delete the ‘Newspaper Ad’ and ‘Radio/TV Ad’ options by clicking the (-) button next to the option to remove it.
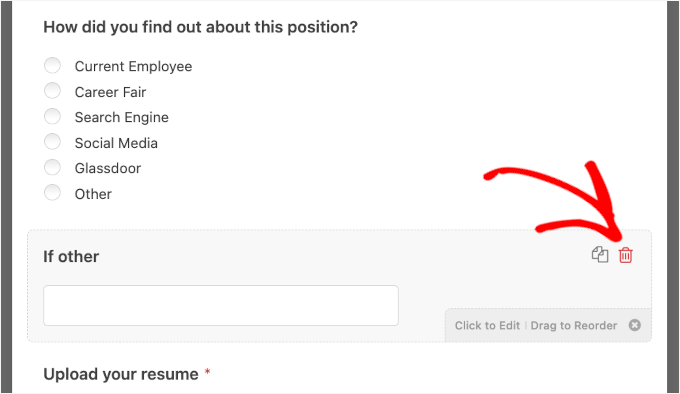
Next, let’s remove the ‘If other’ field immediately below this.
To delete a field, move your mouse cursor over it and click the red trash can icon that appears.
We’re also going to add a field just before the resume upload. This is where our prospective content writers can share links to their previously published work.
First, click the ‘Add Fields’ tab on the left-hand side if it’s not already selected. Then, simply drag and drop your chosen field onto the form.
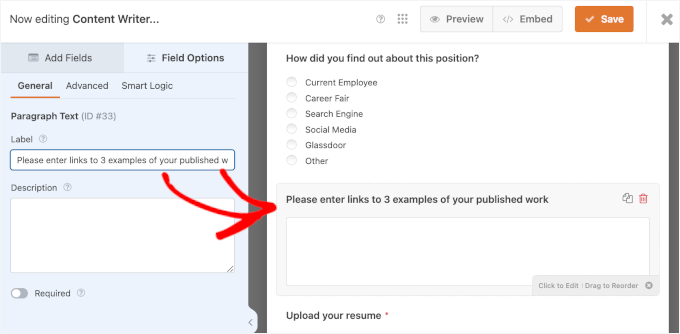
For example, we’re going to use the ‘Paragraph Text’ field.

Once the field is on the form, you can click on it to change its label and provide a description.
Here, we added ‘Please enter links to 3 examples of your published work’ in the field’s label so candidates know what to do.
You can make as many changes and additions to the form as you like.
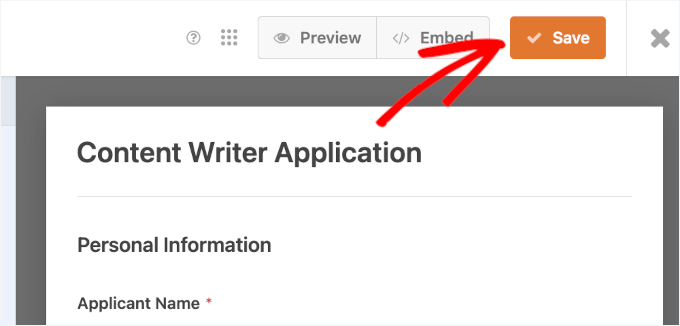
After doing so, make sure you click the ‘Save’ button.
📍 Expert Tip: No need to get everything perfect on the first try! With WPForms, you can edit your job application form anytime. So, feel free to revisit to add new fields, update descriptions, tweak notifications, or rearrange sections whenever needed.
Step 3. Set Up Job Application Form Notifications and Confirmations
By default, job applications go to your site’s admin email. But sometimes, the person handling them isn’t an admin.
This is why WPForms makes it easy to send form submissions via email to anyone without giving them admin access. You can also view all applications right inside WordPress (more on this later).
✏️ Quick note: If you’re unfamiliar with user roles, you can learn more about them in our beginner’s guide to WordPress user roles and permissions.
To edit the notification settings, simply edit your job application form and switch to the Settings » Notifications tab.
In the ‘Send To Email Address’ box, type in the email address to which you want the form submissions to be sent. If you want to send them to multiple people or departments, that’s possible, too.

For details, simply follow our instructions on creating a form with multiple recipients.
If you’re using an applicant tracking system or payroll software, you can also use the WPForms Zapier addon to integrate with them and automatically receive every job application.
You can also change other aspects of the notification, such as the email subject line. Simply edit the pre-made copy to do this.
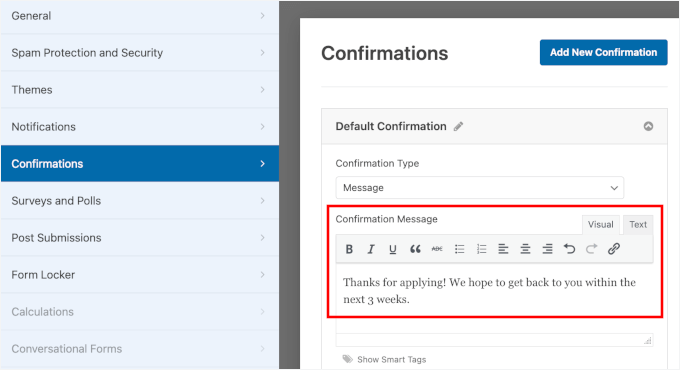
You may also want to change the default confirmation message that the applicant sees after submitting the form. You can edit this under the Settings » Confirmations tab.
Then, you can type the message you want into the text box.
Step 4. Publish Your Job Application Form
Next, you’ll need to add the form to your website. You can embed it in a post or page, or you could even add it to your sidebar.
With WPForms, there are several ways you can embed your forms – using a shortcode, displaying it on an existing page, and adding it to a new page.
For this tutorial, we’ll add the job application form to an existing ‘Career’ page using the embed feature within the editor.
First, go ahead and click the ‘Embed’ button next to ‘Save.’
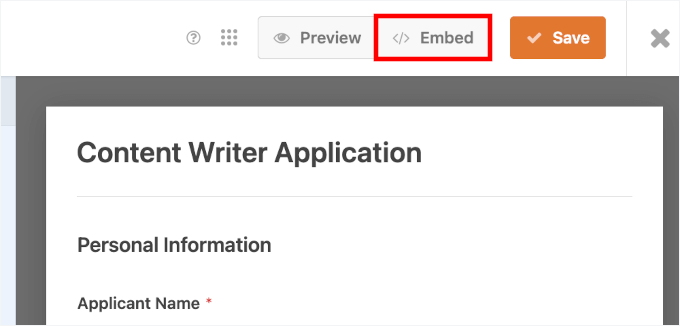
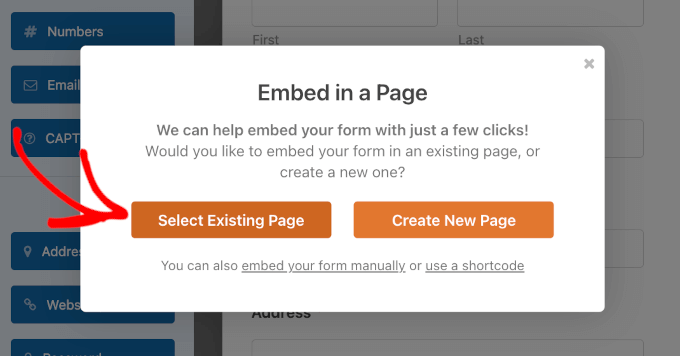
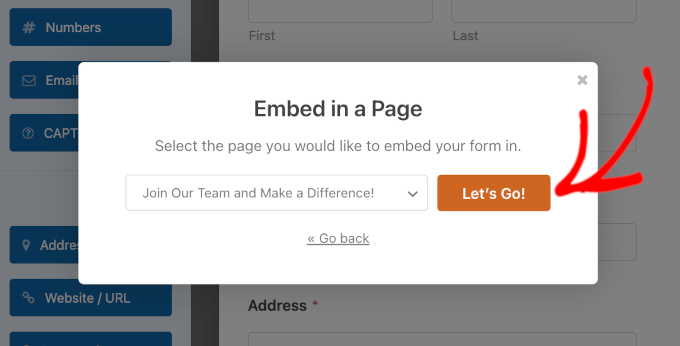
This will open a pop-up where you can select where to embed the form.
Let’s click on ‘Select Existing Page.’
On the next screen, WPForms will prompt you to choose a page from the dropdown list.
Simply click to expand and click again to choose a page. With that done, you can click ‘Let’s Go!’
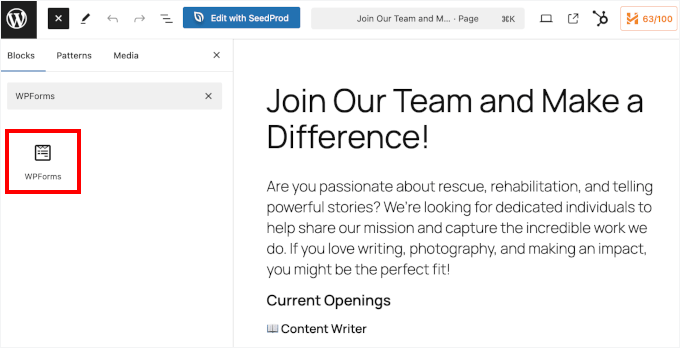
This will open the WordPress block editor.
From here, simply click on the (+) to add a new block and then look for the WPForms block. You can find it in the ‘Widgets’ section of blocks, or you can use the search bar.
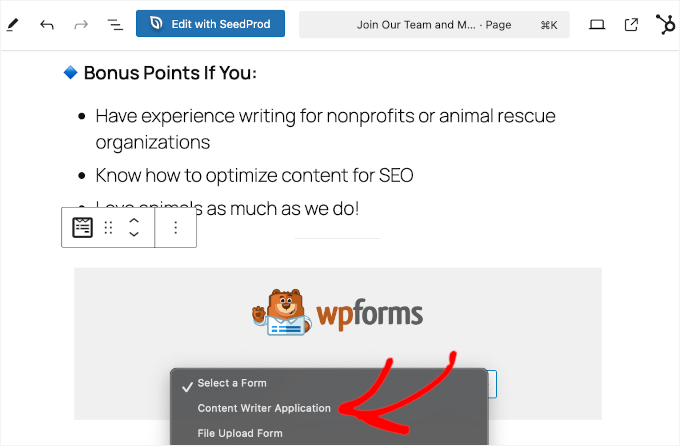
Once you’ve added that block, you’ll see that it has a dropdown menu.
Go ahead and click on it to select your job application form from the list.
WPForms will load your form preview in the content editor.
Here, you might want to switch on the ‘Show Title’ toggle to give applicants better context.

You can also pick one from various themes available to make your form match your brand better. For more information about customization, you can see our guide on how to style WordPress forms.
When you’re happy with how everything looks, you can save or publish your page.
After that, you can visit your website to see the live form in action. On our page, we have a title, a short call-to-action, an image, and then the job application form:

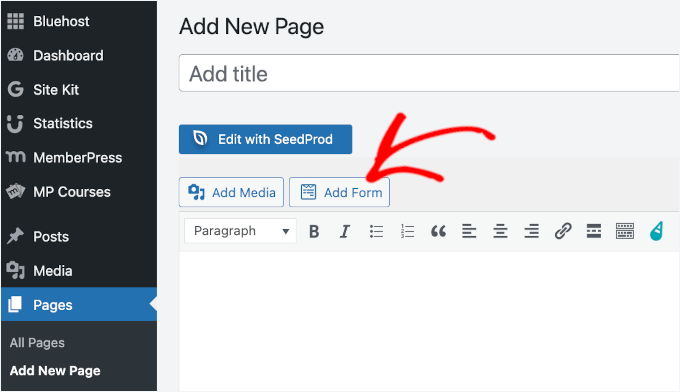
✏️ Quick note: If you’re using the old classic WordPress editor, then you can click the ‘Add Form’ button to add a form to your page.
Here’s what it might look like from the WordPress admin area:
Step 5. Access Submitted Applications Inside WordPress
Each job application will come to the admin email address of your WordPress site or the addresses you entered under the notifications tab.
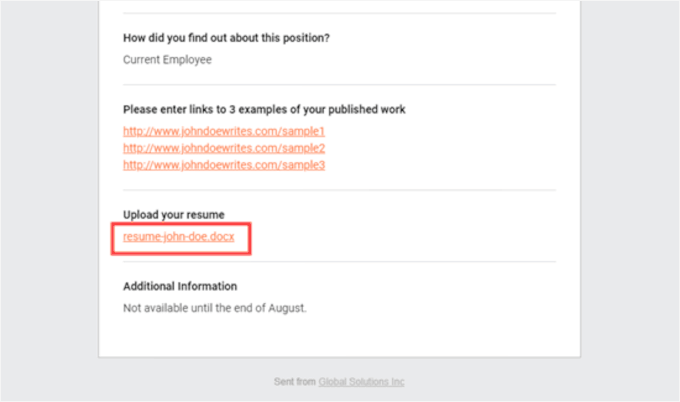
The email will include all the details submitted, plus a link to download the resume or any other files uploaded.
📍 Expert Tip: Make sure you test email notifications when submitting a dummy form submission. If you don’t receive notifications, then see our guide on how to fix the WordPress not sending email issue.
WPForms also saves all applications within WordPress itself. This makes it easy for other team members to review and even comment on applications.
To see the submitted job applications, you can go to WPForms » Entries in your WordPress dashboard. Then, you’ll want to scroll down to below the graph and click on the name of your form.
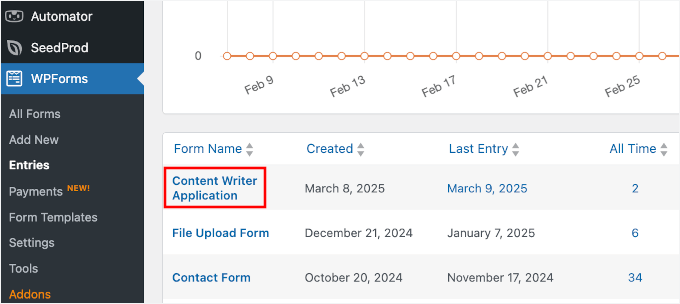
This will open the form’s submission list.
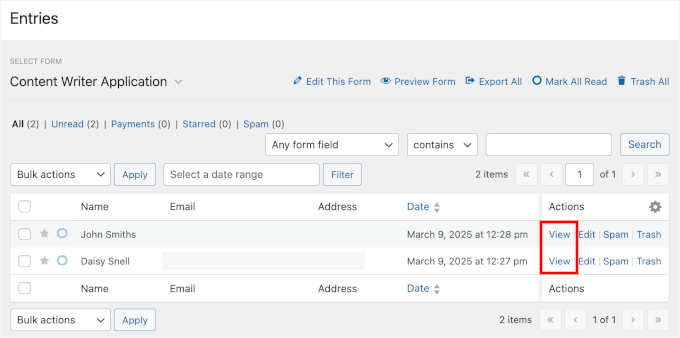
Now, simply click the ‘View’ link next to any application to see its details.
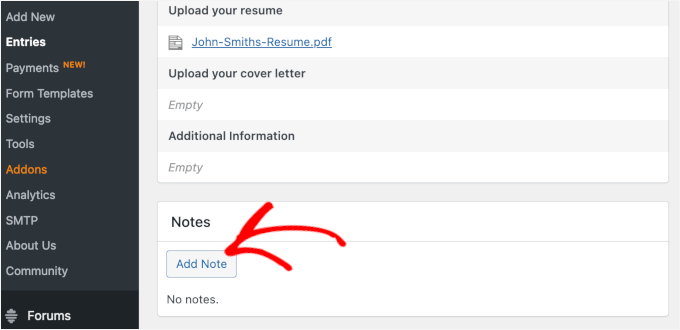
You will then be able to see the application form. You can download the candidate’s resume here. You can use the ‘Star’ feature in WPForms to highlight your favorite candidates.
It’s also easy to add a note by clicking the ‘Add Note’ button. This is a very useful feature if several people view and comment on applications.
That’s it. You have successfully created a job application form on your WordPress site that lets you easily gather and sort through applications.
Video Tutorial
Before you go, make sure you check our video tutorial for how to create a job application in WordPress.
We hope this tutorial helped you learn how to create a job application form in WordPress. You might also like our article on how to block form spam in WordPress and our expert picks of the best contact form plugins for WordPress.
If you liked this article, then please subscribe to our YouTube Channel for WordPress video tutorials. You can also find us on Twitter and Facebook.


Have a question or suggestion? Please leave a comment to start the discussion.