Do you want to connect Salesforce to your WordPress forms?
Salesforce is one of the most popular customer management software on the market. Connecting it to your WordPress forms allows you to automatically add leads, customers, and other contacts to your CRM.
In this article, we’ll show you how to easily connect Salesforce to your WordPress forms.

Why Connect Salesforce to Your WordPress Forms?
Salesforce is one of the best CRM (customer relationship management) software on the market. Many of the world’s largest businesses use it to manage customers, leads, and business contacts from one single dashboard. The best thing is that Salesforce integrates with WordPress easily.
Most business websites use contact forms to generate leads and then manually add them to their CRM software. This takes time, and you may still forget to follow up with a potential customer.
Connecting Salesforce to your WordPress contact form allows you to remove this hurdle. As soon as a user submits their information, it will automatically be added to your Salesforce contacts.
From there, you can follow up with customers to boost conversions and sales from your WordPress website.
That being said, let’s take a look at how to easily integrate Salesforce with WordPress using forms.
Setting Up WPForms to Connect With Salesforce
For this tutorial, you’ll need WPForms. It is the best WordPress contact form plugin used by over 6 million website owners.
You can use it to easily create any type of form using a simple drag-and-drop form builder.
WPForms is a premium WordPress plugin, and you’ll need their Elite plan to use the Salesforce addon. There is also a WPForms Lite version which is available for free.
First, you need to install and activate the WPForms plugin. For more details, see our step-by-step guide on how to install a WordPress plugin.
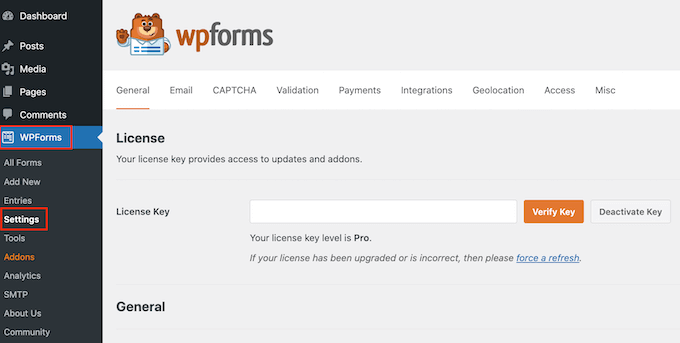
Upon activation, you need to visit the WPForms » Settings page to enter your license key. You can find this key under your account on the WPForms website.
Setting Up the Connection Between WPForms and Salesforce
Now, you need to set up a connection between WPForms and Salesforce. WPForms comes with the Salesforce addon which lets you easily connect the two apps together.
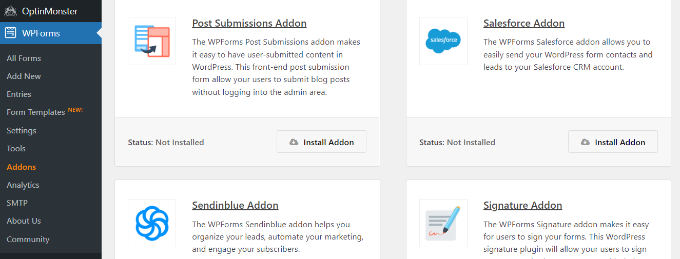
Simply go to the WPForms » Addons page and locate the Salesforce addon. You can then click on the ‘Install’ button, and it will be installed and activated automatically.
After that, you can go to the WPForms » Settings » Integrations page from your WordPress dashboard.
Here, you need to click on the Salesforce integration to open it up.
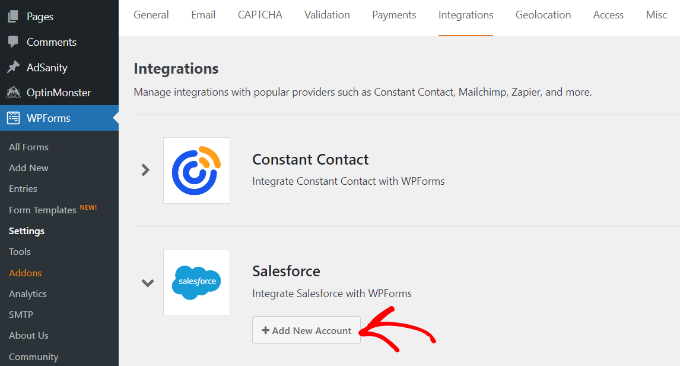
Under Salesforce settings, go ahead and click on the ‘Add New Account’ button.
WPForms will show you Salesforce settings with a Callback URL.
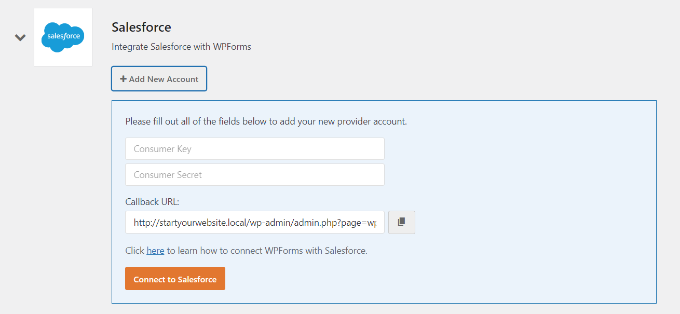
Simply keep the tab open in your browser or copy the Callback URL to a safe place. You’ll need it in a later step.
Now, you need to create an app in your Salesforce account. We’ll walk you through the process step by step.
Important Note: You need to have an Enterprise, Unlimited, Performance, or Developer edition of Salesforce. Otherwise, you will not be able to connect your WordPress forms. However, there is a free trial you can use to get started.
If you don’t already have an account, then you can create one by going to the Salesforce website and clicking the ‘Start My Free Trial’ button.

On the next screen, you can enter your details like name, work email, job title, company, phone number, and more to create an account.
After entering the data, go ahead and click the ‘Start My Free Trial’ button.

After completing the signup, you’ll reach your Salesforce account dashboard.
From here, you need to switch to the Salesforce Classic dashboard by clicking your profile icon on the top and then clicking the ‘Switch to Salesforce Classic’ option.
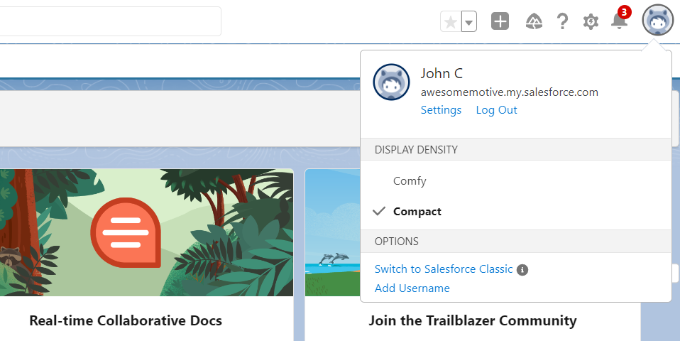
Next, you’ll see the classic Salesforce dashboard.
After that, you need to click the Setup link at the top to access the Salesforce dashboard settings.

On the next screen, navigate to the Build » Create menu from the column on the left.
From here, simply click the ‘Apps’ option in the menu.
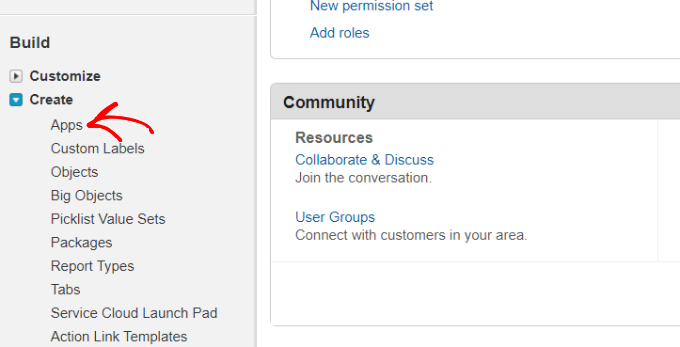
This will bring you to the Apps section.
From here, click on the New button under the Connected Apps section.

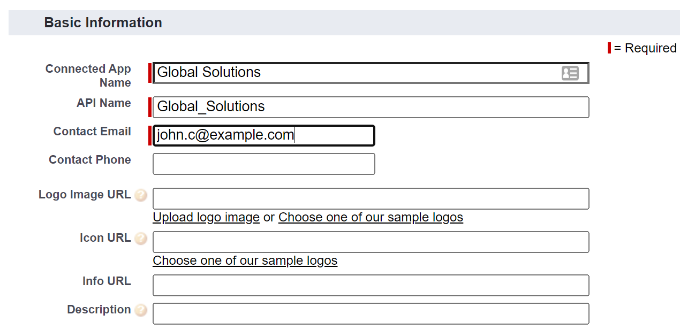
Next, you now need to fill in the details for your app.
For the ‘Connected App Name,’ enter the name you want to use so other users for your Salesforce account can see it.
The API name will default to the Connected App Name. You don’t need to enter or change it. For the contact email, enter your email address.
You don’t need to enter the logo image, icon, info URL, or description. These fields are for Salesforce users who will be publishing their apps.
Below this, you need to check the ‘Enable OAuth Settings’ box.
Once you check the box, you will see the OAuth settings.
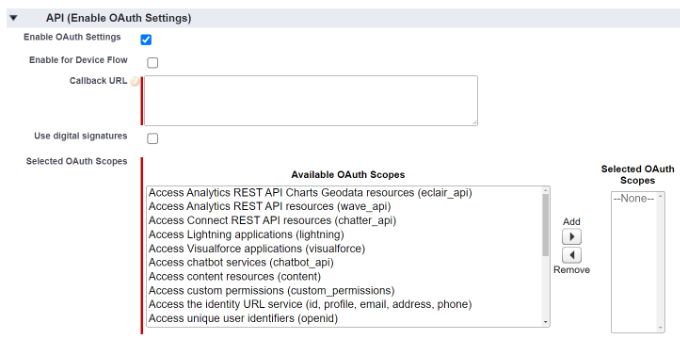
First, you need to enter the Callback URL that you found earlier in your WPForms account.
Simply paste the link in the Callback URL field.

After that, scroll to the ‘Available OAuth Scopes’ section. The selected OAuth Scopes let Salesforce know what permissions your app should have.
Next, you need to enable 2 permissions here. They are ‘Manage user data via APIS (api)’ and ‘Perform requests at any time (refresh_token, offline_access).’
Simply select these and then click the ‘Add’ button to add those permissions.

There’s nothing else you need to change on this page. After adding the permissions, simply click the ‘Save’ button at the bottom of the page.
You should then see a message telling you to allow up to 10 minutes for your changes to take effect.

Then, just click on the ‘Continue’ button. On the next screen, you’ll see your API information.
We recommend that you wait 10 minutes before using your app. That way, you can be sure that your app will be ready. After the 10 minutes is up, you need to copy your ‘Consumer Key’ and ‘Consumer Secret’ to WPForms.
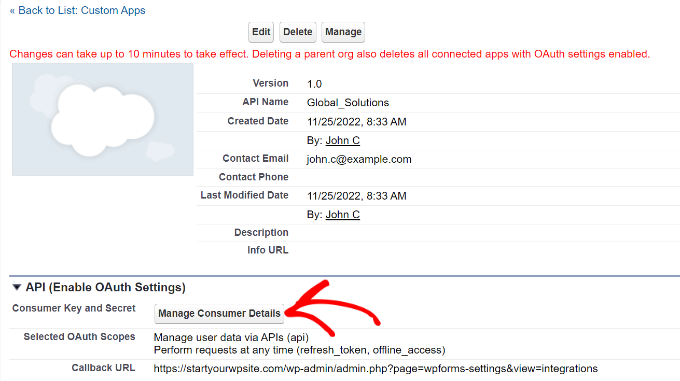
Simply click the ‘Manage Consumer Details’ button to continue.
Next, Salesforce will ask you to enter a verification to move ahead. You’ll receive the code in your email.
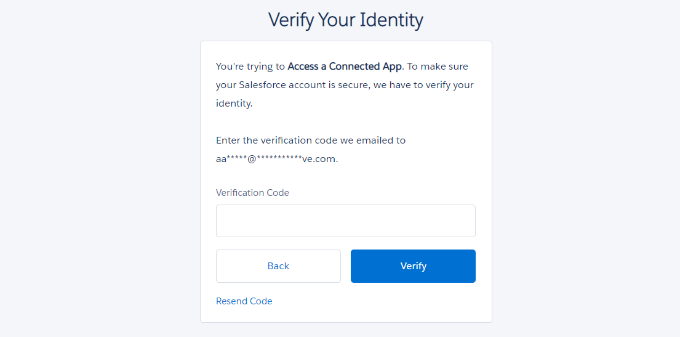
After entering the code, go ahead and click the ‘Verify’ button.
Next, you’ll see the ‘Consumer Key’ and ‘Consumer Secret’ codes. Go ahead and copy them.

Now, simply switch back to the tab with your WPForms Salesforce settings.
If you have closed this tab, then it’s easy to find it again in your WordPress admin. Just go to the WPForms » Settings » Integrations page.
Simply paste the Consumer Key and Consumer Secret into the Salesforce settings for WPForms.
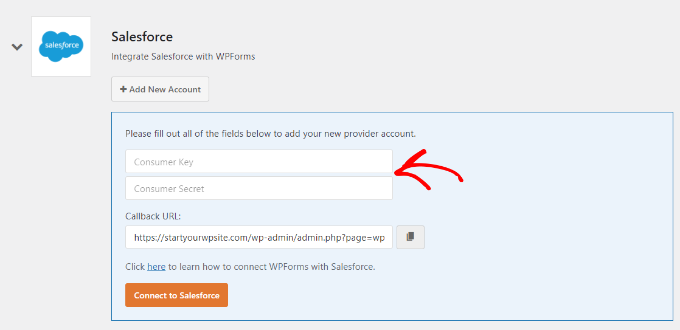
Then, go ahead and click the ‘Connect to Salesforce’ button.
You will then be prompted to log in to your Salesforce. Simply log in to your account using your username and password.
Next, you need to click the ‘Allow’ button to give WPForms access to your Salesforce account.
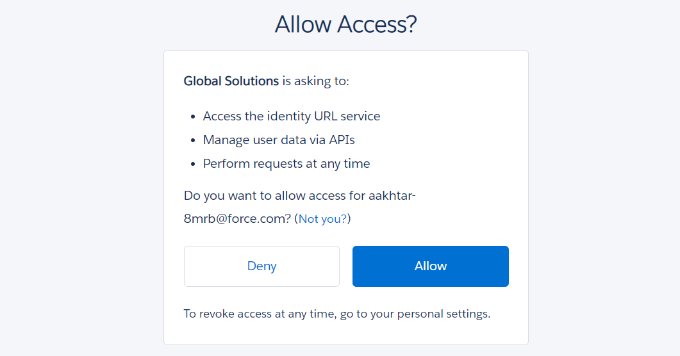
After this, you will see your Integrations page again.
There should be a message at the top of the screen to let you know that the connection was successful.
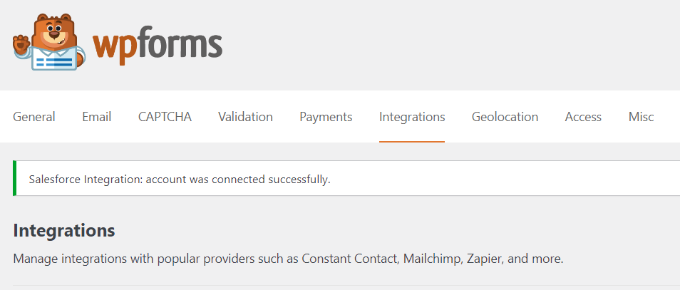
Now that you have connected WPForms to your Salesforce account. You can start creating forms and send entries directly to your Salesforce account.
Creating a WordPress Form with Salesforce Integration
The next step is to create your form. You can connect any type of form to Salesforce.
Simply go to the WPForms » Add New page. This will launch the WPForms drag-and-drop form builder.
First, you can enter a name for your form at the top and then click on a template. We’ll use the ‘Simply Contact Form’ template for this tutorial.
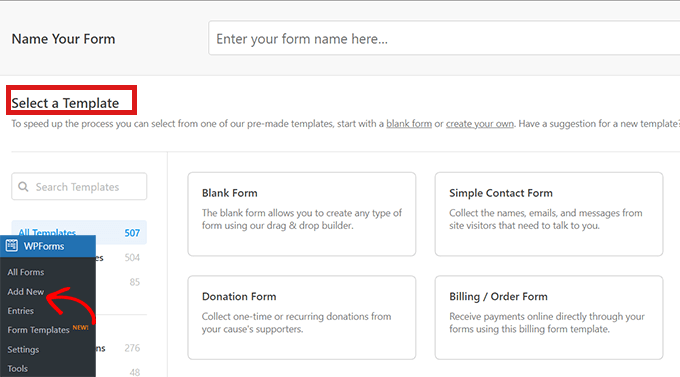
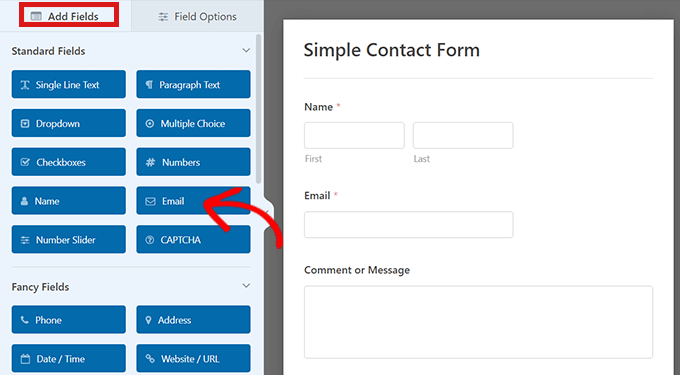
In the form builder, you can drag and drop different fields from the left menu onto the template. For instance, you could add a phone number field.
Plus, you can rearrange their order and further customize each field in the form.
Once you are satisfied with the form, go to the Marketing » Salesforce tab to connect it to your Salesforce account.
Go ahead and click the ‘Add New Connection’ button.
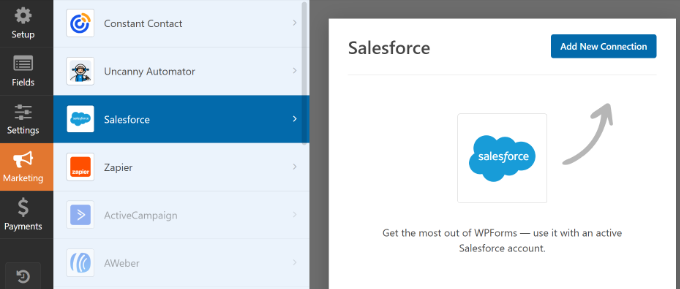
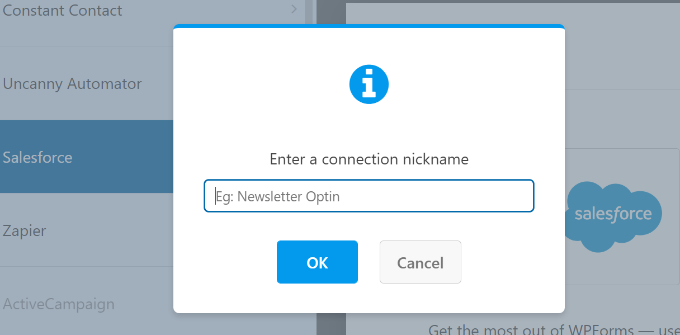
You will then see a popup where you need to name your connection. Your site’s visitors will not see this. It’s just for your own use.
Just enter the name you want to use. Then, click the ‘OK’ button.
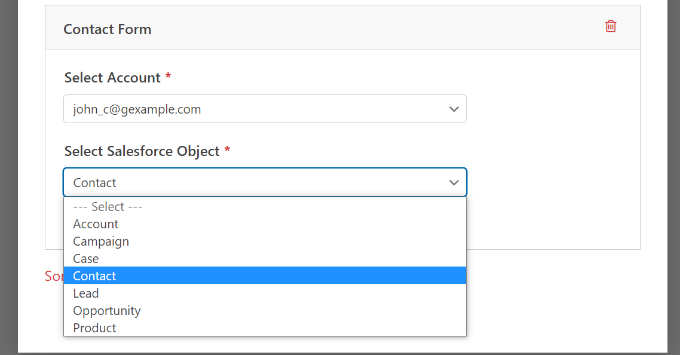
Now, you need to select your Salesforce account and Salesforce Object.
The object is the type of data you are sending to Salesforce, such as a contact or a lead.
Once you’ve chosen your Salesforce Object, you will see some new dropdowns.
Here, the ‘Custom Field Name’ column is the name of the field in your Salesforce account. The ‘Form Field Value’ is the name of the field on your form.
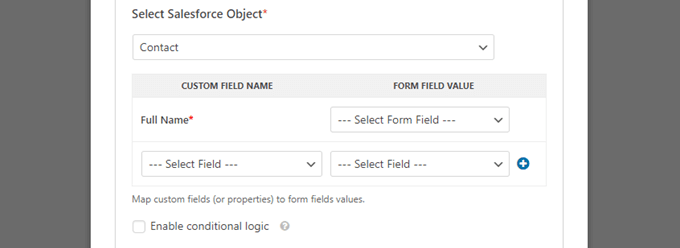
You need to select a ‘Form Field Value’ for each custom field you want to use. This means your form data will be entered into the correct field in Salesforce.
The only required field in Salesforce is the Full Name field. For this, select ‘Name’ as the Form Field value.
Next, go ahead and select a different field from the dropdown below this. Simply choose which WPForms field you want to map it to. To add more fields, click the blue + button.
We have included the email and phone fields from our form here:

Don’t forget to click the Save button at the top of the screen after adding your Salesforce connection.
Adding Your Form to a WordPress Page or Post
WPForms makes it super easy to add forms anywhere on your WordPress website.
Simply edit the post or page where you want to add the form or create a new one. On the content editor screen, click on the (+) add new block button and then add a WPForms block to your page.
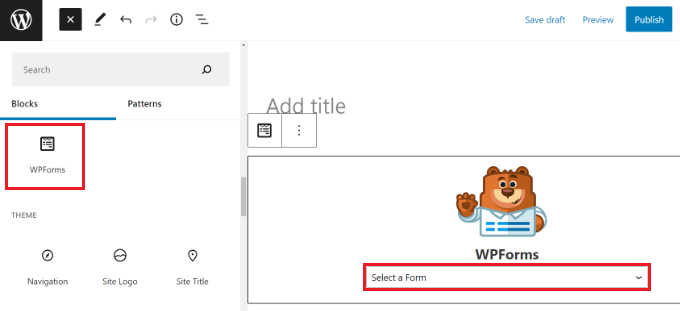
Next, you need to choose your contact form from the dropdown list within the block.
Finally, go ahead and publish your page to see your form live on your site.
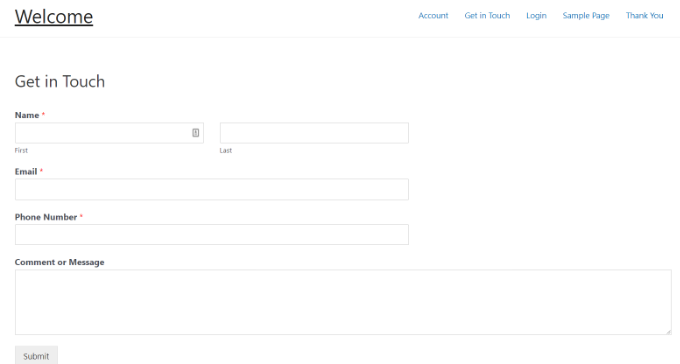
For more detailed instructions, check out our step-by-step guide to creating a contact form in WPForms.
It’s best practice to test your form to make sure that you’ve correctly connected Salesforce.
Simply fill in some test data and click Submit.
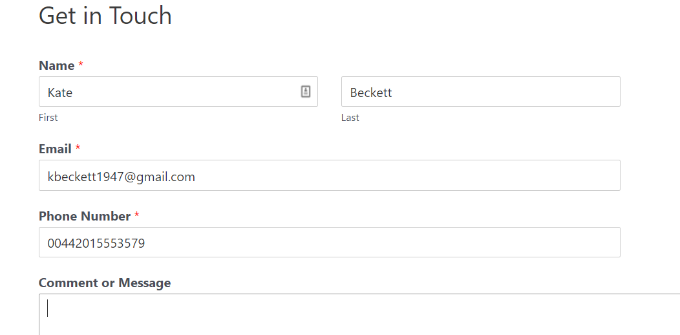
After that, switch to your Salesforce account dashboard.
You should see a new item listed on your homepage.
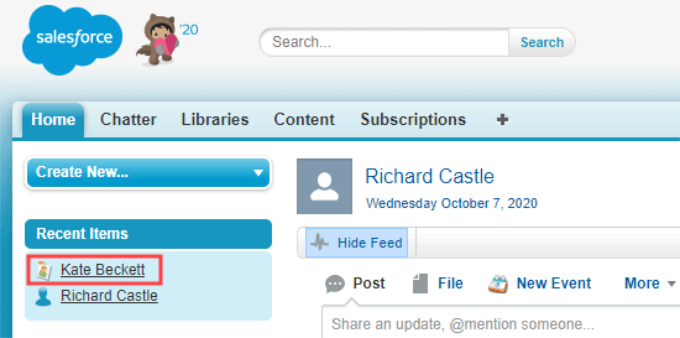
You can click on the name to see the information for that contact.
You’ve successfully connected Salesforce to WPForms. Now, all your new contacts will be automatically added to Salesforce for you.
Additional Resources for Creating WordPress Forms
You can also go through our other guides on creating different types of WordPress forms:
- How to Add CAPTCHA in WordPress Login and Registration Form
- 6 Tips to Create More Interactive Forms in WordPress and Increase Conversions
- How to Add Slide Out Contact Form in WordPress (Easy Tutorial)
- How to Create a Recurring Donation Form in WordPress (Step by Step)
- How to Build a WordPress AJAX Form (in 4 Easy Steps)
We hope this article helped you learn how to connect Salesforce to your WordPress forms. You might also like our article on how to send contact form details to multiple recipients, and our pick of best business phone services for online businesses.
If you liked this article, then please subscribe to our YouTube Channel for WordPress video tutorials. You can also find us on Twitter and Facebook.


Ikram
Is Salesforce free?
WPBeginner Support
Not at the moment
Admin