Are you tired of manually copying data from WooCommerce into spreadsheets?
When I was testing different automation tools, I found a super quick way to connect WooCommerce directly to Google Sheets – and it only takes 10 minutes to set up.
I’ve thoroughly tested this integration method in my demo stores, verifying that it’s both reliable and easy to implement. The best part? You don’t need any technical skills or special knowledge to get it working. 🛠️
In this guide, I’ll share the fastest way to connect WooCommerce with Google Sheets.
You’ll learn how to set up an automated data sync in just 10 minutes. This will eliminate the need for manual data entry and give you instant access to your store’s data in spreadsheet format.
💡Quick Answer: Connect WooCommerce & Google Sheets
The easiest and most reliable method is to use the Uncanny Automator plugin. It works by creating a simple automation “recipe” with a trigger (like a new customer order) and an action (adding that order data to a new row in Google Sheets).
Here’s a quick look at the steps you have to follow:
- Install Uncanny Automator: Add both the free and pro versions of the plugin to your site.
- Connect Your Google Account: Authorize Uncanny Automator to securely access your Google Sheets.
- Build the Recipe: Set up the WooCommerce trigger and the Google Sheets action.
- Activate the Automation: Finally, set the recipe to ‘Live’ to start the automatic data sync.
Why Connect Google Sheets With WooCommerce in WordPress?
Connecting WooCommerce to Google Sheets saves you time and reduces errors by automating your data entry.
Instead of manually exporting order information, your store data syncs in real time. This gives you instant access to powerful reporting tools in a familiar spreadsheet format.
Here are the key benefits of connecting WooCommerce to Google Sheets:
- Automate Data Entry: Eliminate the need to manually export CSV files. New order information is sent directly to your spreadsheet as it happens, saving you hours of work.
- Improve Accuracy: Manual data entry often leads to costly mistakes. An automated connection ensures your data is always accurate and reliable.
- Get Real-Time Insights: Instantly see and analyze your sales data. Use Google Sheets’ powerful sorting and filtering tools to track performance by product, location, coupons used, and more.
- Better Reporting: Easily turn your store data into charts and graphs. This helps you visualize trends and make smarter decisions about your marketing, pricing, and inventory.
That being said, let’s take a look at how to connect Google Sheets with WooCommerce:
- Step 0: Set Up Your WooCommerce Store and Google Sheets 📦
- Step 1: Install and Activate the Uncanny Automator Plugin 🔄
- Step 2: Connect Uncanny Automator to Google Sheets 📄
- Step 3: Set Up the WooCommerce Trigger in Uncanny Automator 🛒
- Step 4: Set Up the Google Sheets Action in Uncanny Automator ✨
- Step 5: Save and Activate Your Recipe ✅
- Frequently Asked Questions About Connecting WooCommerce to Google Sheets
Step 0: Set Up Your WooCommerce Store and Google Sheets 📦
Before we dive into the automation setup, let’s make sure the basics are covered. To connect WooCommerce with Google Sheets, you’ll need two things in place:
- A working WooCommerce store on your WordPress site.
- A Google Sheet ready to receive your store data.
If you haven’t set up your online store yet, then you can follow our step-by-step guide to setting up WooCommerce. It covers everything from choosing a domain and hosting to installing the WooCommerce plugin and adding products.
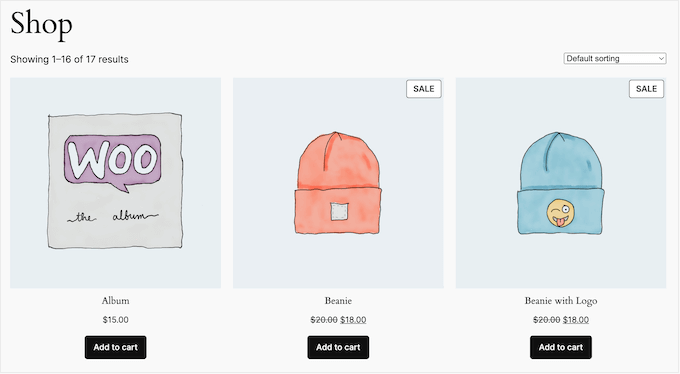
Once your store is live, the next step is to prepare the spreadsheet where your WooCommerce data will be sent.
For this, head over to the Google Sheets website and click ‘Blank’ to create a new spreadsheet. You can also choose a premade template if you like.
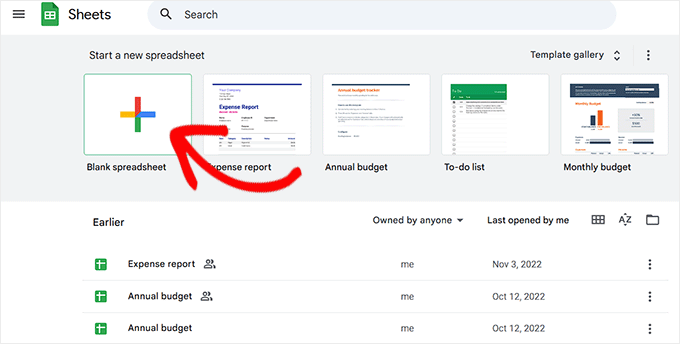
This will take you to a new screen, where you can start by naming your sheet. Then, add columns for the different data you want to collect.
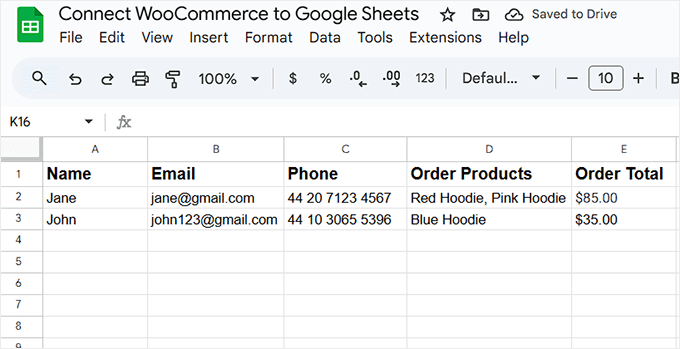
For the sake of example, I have created a column for the customer’s name, email address, phone number, the products they ordered, and the order total.
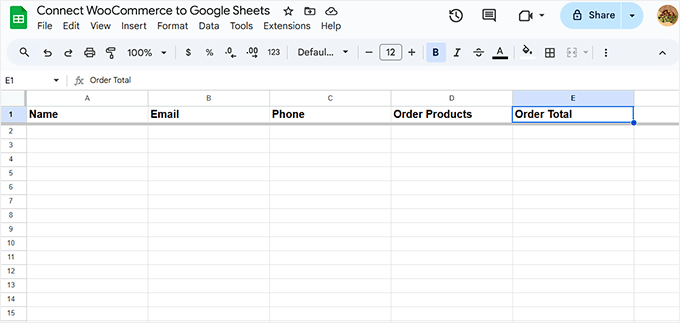
However, you can also import any other kind of WooCommerce data, including location, coupons, order status, time of the order, and much more.
Once your Google Sheet is ready, I recommend keeping it open. In the next step, you’ll need to select it when setting up the integration.
Step 1: Install and Activate the Uncanny Automator Plugin 🔄
Now that your WooCommerce store is up and running, and your Google Sheet is ready, it’s time to connect everything — and the easiest way to do this is with Uncanny Automator.
It is hands down the best automation plugin for WordPress. It’s intuitive, flexible, and works effortlessly with both WooCommerce and Google Sheets.

Uncanny Automator acts like a smart bridge between different plugins and services on your site. For example, when a customer places an order in WooCommerce, it can automatically trigger an action in Google Sheets (like adding that order’s details).
You just create a simple automation workflow, which the tool calls a ‘recipe,’ and it will take care of the rest.
I’ve tested a variety of automation tools over the years, and I keep coming back to Uncanny Automator because it’s so reliable.
In just a few minutes, you can set up automations, and once they’re live, they run in the background smoothly. To learn more about it, see our Uncanny Automator review.
First, you need to install and activate the Uncanny Automator plugin. For more details, see our step-by-step guide on how to install a WordPress plugin.
📌Note: Since Google Sheets is a premium integration, you’ll need the pro version of Uncanny Automator.
The pro version works as an addon, so you must install the free core plugin first before adding the premium plugin for the integration to work.
Upon activation, head over to the Automator » Settings and enter your license key.
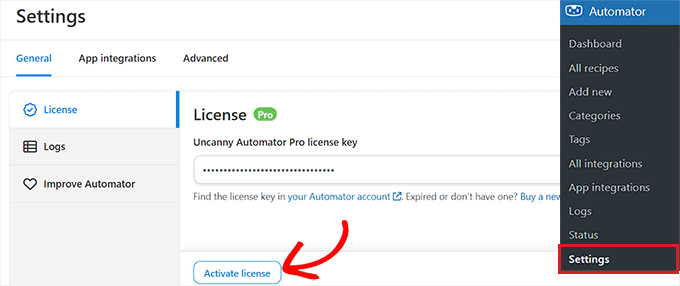
You can find this information in your account on the Uncanny Automator website.
After that, click on the ‘Activate license’ button
Step 2: Connect Uncanny Automator to Google Sheets 📄
Now that you have Uncanny Automator set up, it’s time to connect it to your Google account. This allows the plugin to securely send WooCommerce data straight into your Google Sheets.
You only need to do this once. After you connect your Google account, the plugin will be able to access your spreadsheets and update them automatically whenever a new order comes in.
To get started, click on the ‘App Integrations’ tab and select ‘Google Sheets’ from the left column. Then, click on the ‘Sign in with Google’ button.
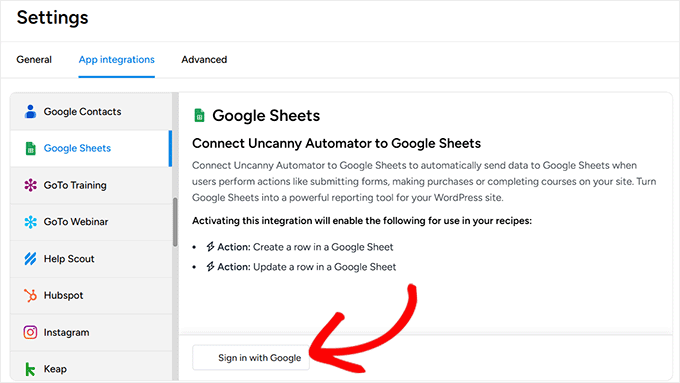
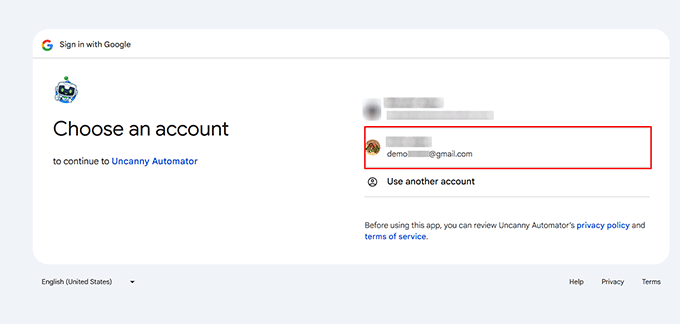
This will take you to another page, where Uncanny Automator will ask for access to your Google account.
Simply click on the email address you want to link to the plugin. If you don’t see the account you want to use, click the ‘Use Another Account’ option and add your details.
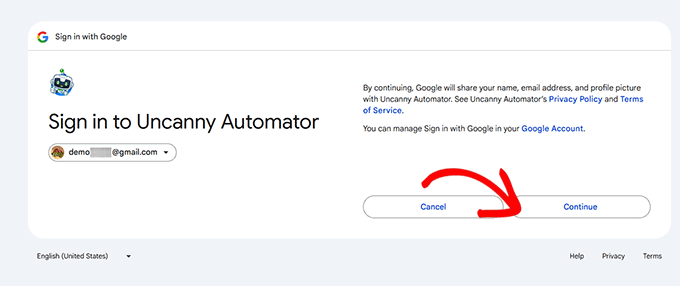
In the next step, you’ll see a prompt from Google letting you know that Uncanny Automator will have access to your name, email address, and profile picture.
This is completely normal and part of the secure integration process. If you’re comfortable with this, just go ahead and click the ‘Continue’ button to move forward.
After that, you will see the permissions Uncanny Automator needs. Google’s wording here can sound a bit alarming, as it asks for permission to ‘See, edit, create, and delete all your Google Drive files’ and ‘spreadsheets’.
This is standard for any app that needs to add data to a Google Sheet.
Rest assured, Uncanny Automator will only use this permission to add new rows to the specific spreadsheet you select. Check the boxes to continue.
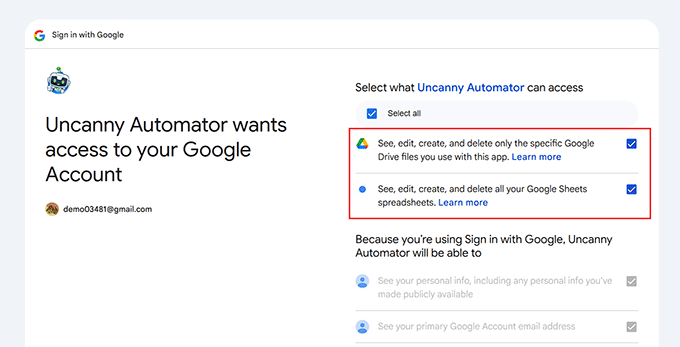
Once you do that, click on the ‘Continue’ button.
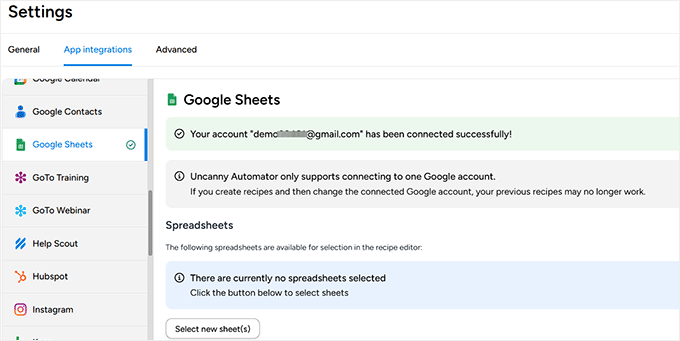
After a few moments, you’ll be redirected back to your WordPress dashboard, where you should see a confirmation message that says ‘Your account has been connected successfully.’
However, you’ll also see a message saying that no spreadsheet is currently selected. To fix this, simply click the ‘Select new sheet (s)’ button.
This will open a popup showing all the spreadsheets connected to your Google account.
From here, just choose the spreadsheet you created earlier for your WooCommerce store and click the ‘Select’ button to confirm your choice.
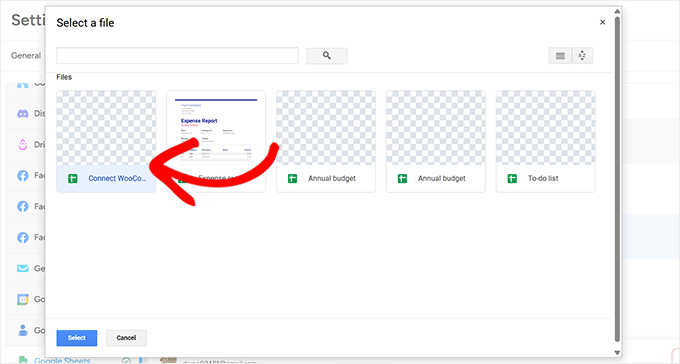
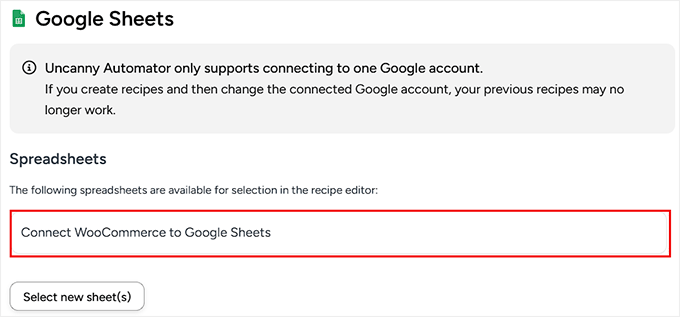
You can repeat this process to add as many Google Sheets as you like to Uncanny Automator.
Once added, all of your connected spreadsheets will appear in the recipe editor, making it easy to select the right one for each automation you create.
Step 3: Set Up the WooCommerce Trigger in Uncanny Automator 🛒
Now that Uncanny Automator is connected to your Google account, it’s time to set up the actual automation, or what Automator calls a ‘recipe.’
In this step, you’ll create an automated workflow that sends new WooCommerce order details straight to your Google Sheet every time someone makes a purchase.
Keep in mind that each recipe has two parts: the trigger and the action. The trigger is the event that starts the recipe, and the action is the task that runs based on the trigger.
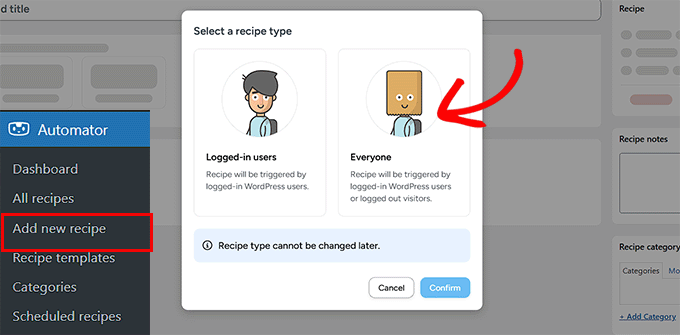
To create your first recipe, head over to the Automator » Add new recipe page from the WordPress dashboard.
You will be asked whether you want to create a ‘Logged-in’ recipe or an ‘Everyone’ recipe.
Logged-in recipes can only be triggered by logged-in users, but anyone can trigger ‘Everyone’ recipes. To create a recipe that runs every time someone makes an order, select ‘Everyone’ and click the ‘Confirm’ button.
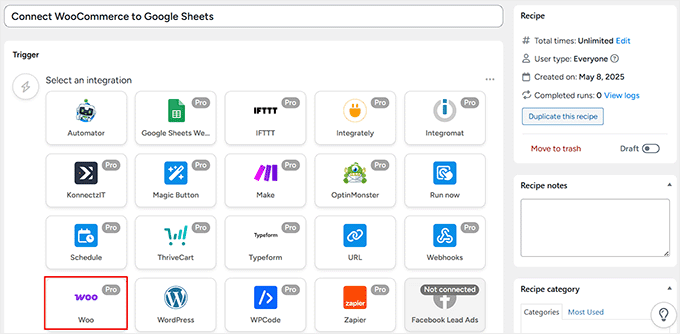
Next, give the recipe a name by typing it into the ‘Title’ field. This is just for your reference, so you can use anything you want.
Uncanny Automator will now show all the integrations you have already installed on your WordPress website. Go ahead and select ‘WooCommerce’ from here.
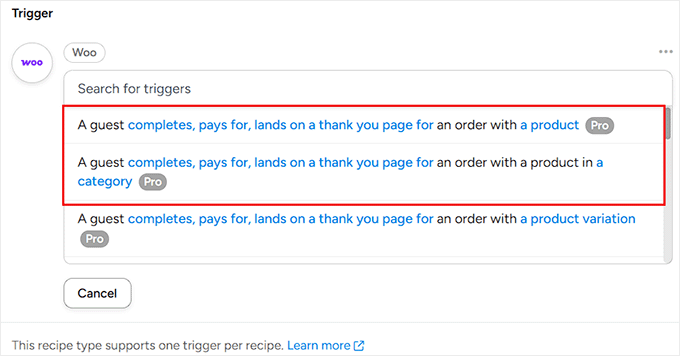
Next, you need to choose the trigger. This will be the action that will activate the recipe on your site.
For this recipe, I’ll select ‘A guest completes, pays for, lands on a thank you page for an order with a product.’
However, if you want to create separate spreadsheets for each product category in your store, then I recommend going with the second option.
Next, you will need to set a trigger condition. This is the event that will kick off your automation. There are a few options, so let’s look at what they mean:
- Completes: This triggers the automation as soon as an order is marked ‘complete’ in WooCommerce. It’s the most reliable option and the one I recommend for this tutorial.
- Pays for: This runs the automation right after a payment is received. However, it may not work for all orders, like those using ‘cash on delivery.’
- Lands on thank you page for: This triggers when a customer reaches the thank you page after checkout. It’s a good option but can be less reliable if a customer closes their browser before the page fully loads.
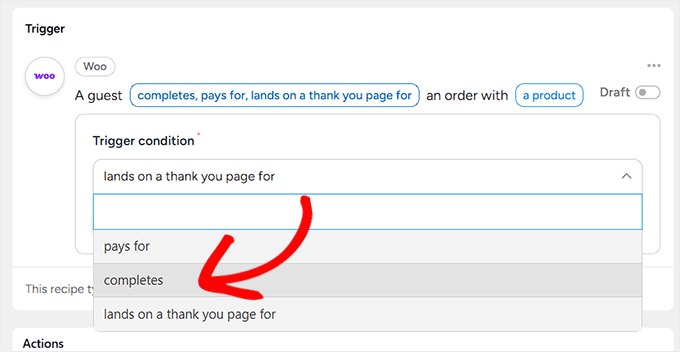
Once you’ve made your selection, click the ‘Save’ button.
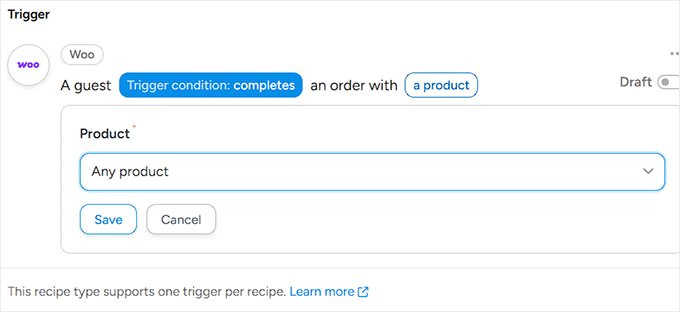
Next, you need to choose whether the Uncanny Automator workflow should run when a customer buys a particular product or any product. To record information about every single order, select ‘Any product.’
This ensures all sales are tracked, but you could also select a specific item if you only wanted to track its sales. Then, go ahead and click ‘Save.’
Step 4: Set Up the Google Sheets Action in Uncanny Automator ✨
Once you’ve created the WooCommerce trigger, it’s time to tell Uncanny Automator what to do next. In this case, send the order data to your Google Sheet.
To do this, click the ‘Add Action’ button.
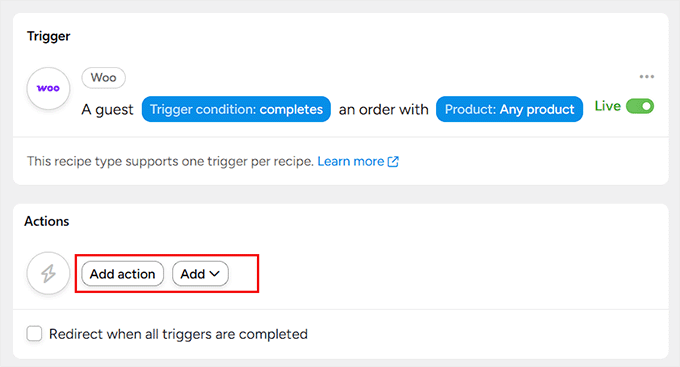
You will now be able to see a list of all the integrations available on your website.
From here, simply select ‘Google Sheets.’

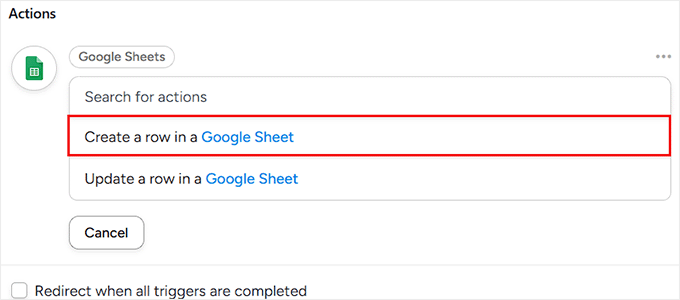
You’ll now see a list of actions that Google Sheets can perform in response to the trigger you just set up.
From this list, go ahead and select ‘Create a row in a Google Sheet’ as the action type.
This tells Uncanny Automator to add a new row to your spreadsheet every time the trigger condition is met, such as when a customer completes a purchase.
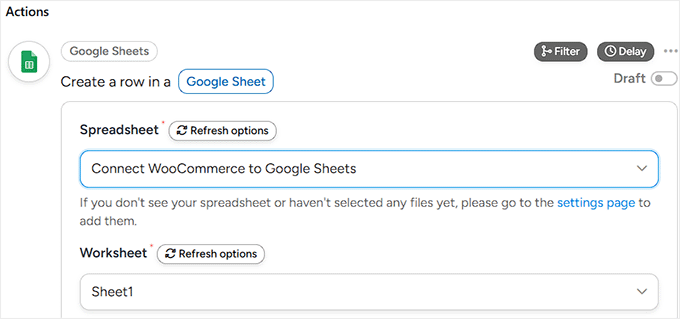
Once you do that, a new dropdown will appear on the screen where you can select the Google Spreadsheet you added earlier to Uncanny Automator.
Next, open the Worksheet dropdown and choose the specific sheet where you want to store your WooCommerce data.
If your spreadsheet only has one sheet, this setting won’t matter. But if you’ve created multiple sheets within the same Google Sheets file, make sure to pick the one you want to use for this automation.
Next, scroll down to the Rows section. Uncanny Automator will now display all the columns from your selected Google Sheet. Your job here is to map each column to a type of WooCommerce data.
Mapping might sound technical, but it’s a simple idea. Think of your Google Sheet columns as mailboxes and the WooCommerce order data as the letters. You’re just telling Uncanny Automator which letter goes into which mailbox.
To get started, click the ‘*’ icon next to the first field, which opens a dropdown menu.
Now, under the ‘Triggers’ section, you’ll see a list of dynamic data options that Uncanny Automator can pull from your WooCommerce store.
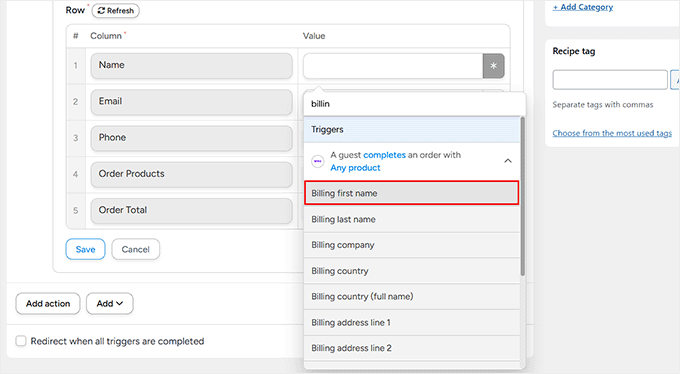
Simply click on the value you want to use for each column. For example:
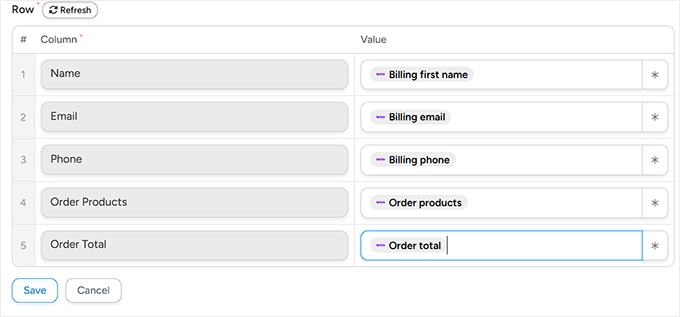
- For the Name field, select Billing first name
- For Email, choose Billing email
- For Phone, pick Billing phone
- For Order Products, select Order products
- For Order Total, map it to Order total
Repeat this process for each column in your spreadsheet. Once everything is mapped correctly, click ‘Save’ to store your action
Step 5: Save and Activate Your Recipe ✅
Once you’ve finished mapping all your WooCommerce data to the correct Google Sheets columns, it’s time to save everything.
To do this, make sure both the Trigger and Action toggles are switched to Live. After that, go to the right-hand column and toggle the Recipe switch from ‘Draft’ to ‘Live’ as well.
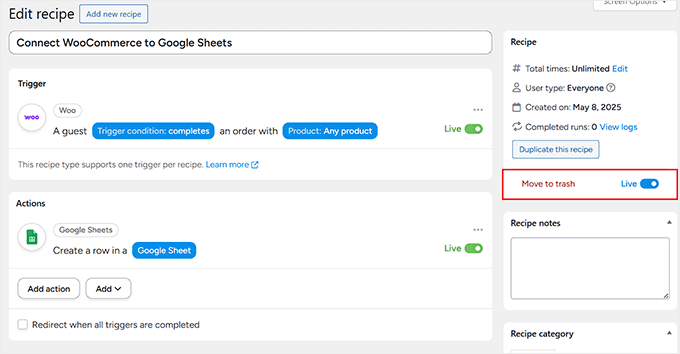
Now, whenever someone completes a purchase on your WooCommerce store, all the data you selected will be automatically added to the Google Sheet you connected.
Here is a preview of how your spreadsheet will look once it starts storing data.
Frequently Asked Questions About Connecting WooCommerce to Google Sheets
Here are some questions that our readers have asked before connecting their WooCommerce stores to Google Sheets:
Do I need to pay to connect WooCommerce and Google Sheets?
Yes, because the Google Sheets integration is a premium feature, you will need a paid plan for Uncanny Automator. The core Uncanny Automator plugin is free, but the Pro version is required to connect to external services like Google Sheets.
Can I send custom field data from WooCommerce to Google Sheets?
Absolutely. Uncanny Automator is able to pull data from custom fields. When you are mapping your data in Step 4, you can find and select your custom field information from the dropdown menu, just like you did for the standard fields like name and email.
Will this automation add my past WooCommerce orders to Google Sheets?
No, the automation recipe you create will only run for new orders that are placed after you set the recipe to ‘Live’. It does not work retroactively to sync your past order history.
What happens if I change the column names in my Google Sheet later?
If you change the column names in your Google Sheet after setting up the recipe, the connection will break and data will stop syncing.
You must go back into your Uncanny Automator recipe editor, refresh the connection to your sheet, and map the WooCommerce data to the new column names again.
Learn More Ways to Optimize Your WooCommerce Store 💡
Connecting Google Sheets with WooCommerce is just one way to improve your store’s efficiency. To help you further optimize your WooCommerce store, we’ve compiled a list of useful resources:
- Best WooCommerce Automations to Increase Sales – Explore various automation techniques, including automated marketing with push notifications, transactional emails, and invoicing, to boost your store’s performance.
- How to Send a Coupon After a WooCommerce Product Review – Encourage customer feedback and boost sales by automatically sending coupons to customers who leave product reviews.
- How to Set Up WooCommerce Abandoned Cart Emails – Recover potentially lost sales by setting up automated emails for customers who abandon their shopping carts.
- How to Import & Export WooCommerce Products with Images – Save time and maintain consistency by efficiently managing your product catalog, including images, through bulk import and export.
- How to Optimize the Customer Journey for Your WooCommerce Store – Improve user experience and increase conversions by streamlining your customers’ path from browsing to purchasing.
- How to Show Product Recommendations in WordPress – Increase average order value and improve customer satisfaction by displaying personalized product recommendations on your store.
We hope this article helped you learn how to connect Google Sheets with WooCommerce. You may also want to see our expert picks for the best WooCommerce plugins and learn how to create a WooCommerce popup to increase sales.
If you liked this article, then please subscribe to our YouTube Channel for WordPress video tutorials. You can also find us on Twitter and Facebook.


Jonathan
With this plugin it’s possible to updates the store products?
WPBeginner Support
You would still want to make those changes through WooCommerce as the Google sheet would only be for keeping track of sales and not making changes to WooCommerce.
Admin