One of the first things we do when we want to revamp a website is cloning that site to a staging or local environment. This way, we can create an exact replica of the site we’re working on without affecting the live version.
If you’re a website owner with little to no technical skills, you’re probably tired of seeing the changes you make lead to unexpected errors. You want to try cloning your WordPress site for testing purposes, but you’re afraid that the process is too difficult.
It’s actually quite the opposite. With the Duplicator plugin, cloning a WordPress site is super easy, and we will show you how in this article.
What Is WordPress Website Cloning, and Why Use It?
The idea behind cloning a WordPress website is that you make an exact copy of one site and apply it to another site.
There are many reasons why you might need to clone a website. For example, you might be moving a site to a new host or a new domain name. By cloning a website, you can save a ton of time and effort and complete the migration process much faster.
Another example is developing a website for a client on your own localhost. Once the work is complete, you can simply clone the site and move it to the client’s live server.
You can also clone a live WordPress site and set up a staging site to test changes before making them live.
With that said, let’s show you how you can clone a WordPress site in a few easy steps. You can use the quick links below to navigate through the tutorial:
- Step 1: Set Up the Duplicator WordPress Plugin for Easy Cloning
- Step 2: Create a Duplicator Package of Your WordPress Site
- Step 3: Upload Your WordPress Site Archive and Installer to a New Location
- Step 4: Create a New WordPress Database for Your Website
- Step 5: Run the WordPress Website Importer Script
- Step 6: Test Your Cloned Website and Delete Temporary Files
Step 1: Set Up the Duplicator WordPress Plugin for Easy Cloning
The best way to clone a WordPress website is by using the Duplicator plugin. It’s a powerful WordPress cloning and duplication plugin that’s still very easy to use.
The plugin backs up everything from your website into a single file, which you can simply move to the new location.
The first thing you need to do is activate and install the plugin on the website you want to clone. For more details, see our step-by-step guide on how to install a WordPress plugin.
Note: There’s a pro version of Duplicator that has additional features like scheduled backups, multisite migration, and more. However, we will use the free version for this guide as it has everything you need to clone a WordPress website.
Step 2: Create a Duplicator Package of Your WordPress Site
Upon activation, go to Duplicator » Backups and then click on the ‘Create New’ button at the top of the page.
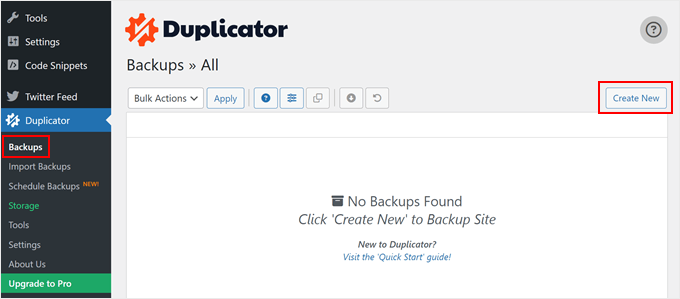
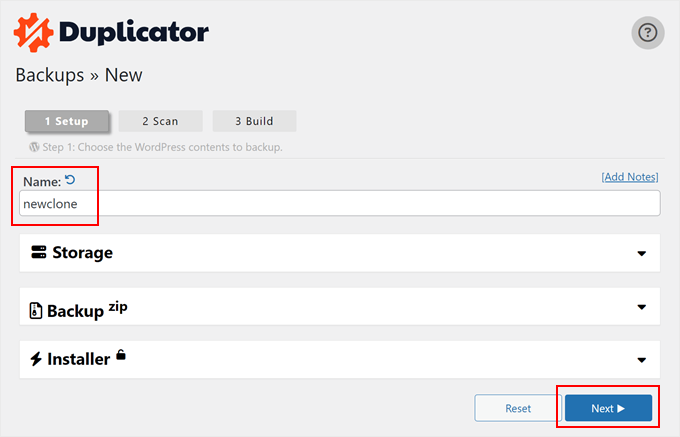
After that, you will be taken to a screen where you can type in a name for the duplicate file. This is just for your reference, so you can use anything you want.
Then, click the ‘Continue’ button.
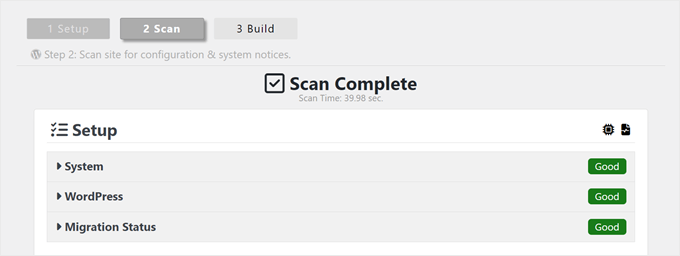
Duplicator will now scan your site.
If it finds an issue with any part of your WordPress website, then you will see a warning with information on how to fix the problem. Otherwise, it will simply say ‘Good.’
Now, scroll down the page.
Then, click ‘Build’ to create the backup file.
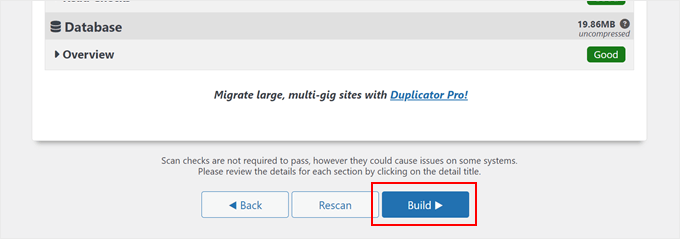
The plugin will now back up your WordPress database, images, templates, plugins, and all other files in a single downloadable package.
Depending on your website’s size, the process might take a couple of minutes.
Once the backup process is finished, it’s time to download your files.
You need to download both the archive file, which contains your backup, and the installer that will unpack the archive.
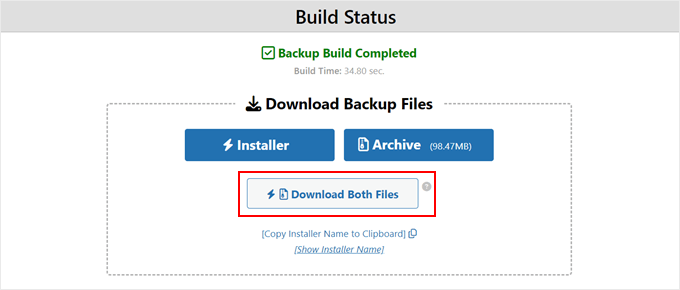
To do this, go ahead and click on the ‘Download Both Files’ button.
Pro Tip: Technically, you can skip the rest of these steps and just follow our tutorial on how to restore a WordPress site backup, where we show you how to import your backup file with Duplicator.
That being said, feel free to follow the rest of these steps if you want to restore the cloned site in an empty environment.
Step 3: Upload Your WordPress Site Archive and Installer to a New Location
Now you have a complete backup of your site and the installer file, the next step is uploading them to the new location.
This new location can be a live WordPress blog or a site on your local server. If the site is on a local server, then you will need to create a new folder in your local server’s root folder. This is the file where your local server stores all websites.
For example, if you are using MAMP, then it will be the ‘/Applications/MAMP/htdocs/’ folder.
Alternatively, if you are using WAMP, then it would be the ‘C:\wamp\www \’ folder.
After that, you need to open the folder you created for your cloned website and copy both the archive file and installer into that folder.

If you want to clone your website to a different WordPress hosting platform, then you can create an empty website first and upload the files to it using the provider’s file manager.
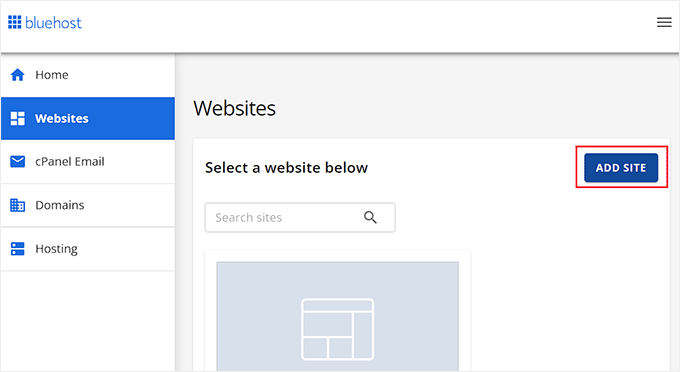
If you use Bluehost, just log in to your hosting account dashboard and navigate to the ‘Websites’ tab. After that, click ‘Add Site.’
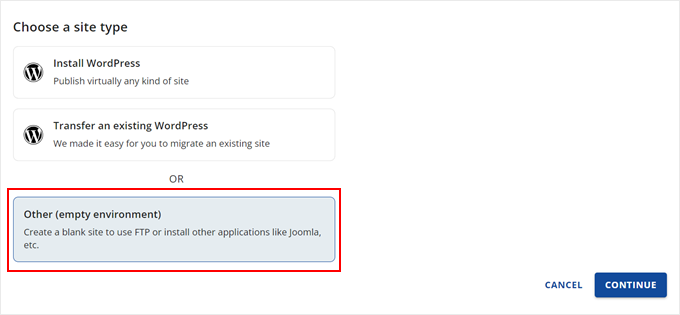
On the next screen, you will see some site type options.
Just select ‘Other (empty environment)’ and click ‘Continue.’
Next, insert the title of your website.
You can also skip this step if needed and just click ‘Continue.’

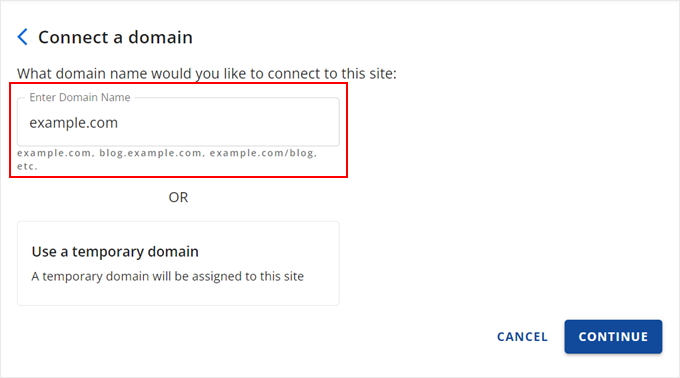
At this stage, you can connect your website with a domain name.
Or, you can use a temporary domain in the meantime if you don’t have a domain name yet.
Click ‘Continue’ to proceed.
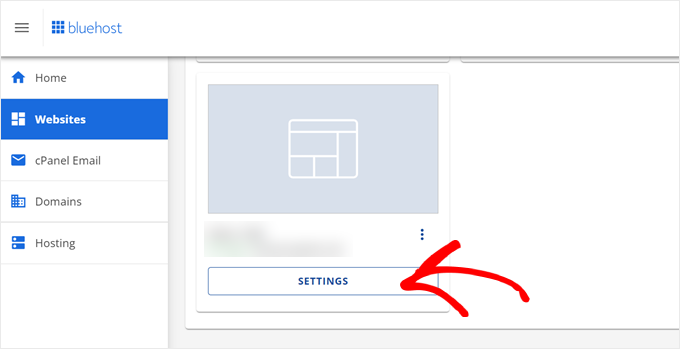
Once your empty website is ready, you will go back to the ‘Websites’ tab.
On your newly created website, click the ‘Settings’ button.
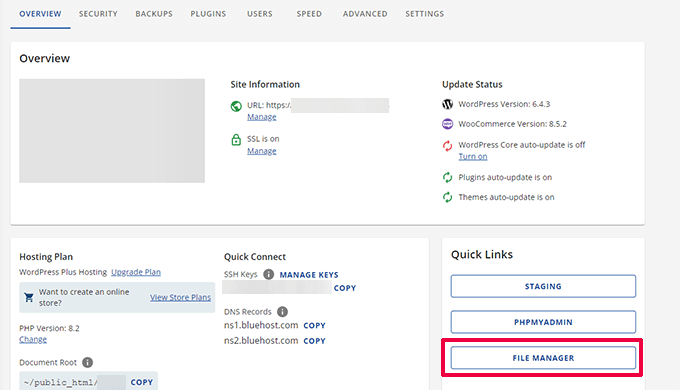
Now, scroll down to the ‘Quick Links’ section.
Once there, just click the ‘File Manager’ button.
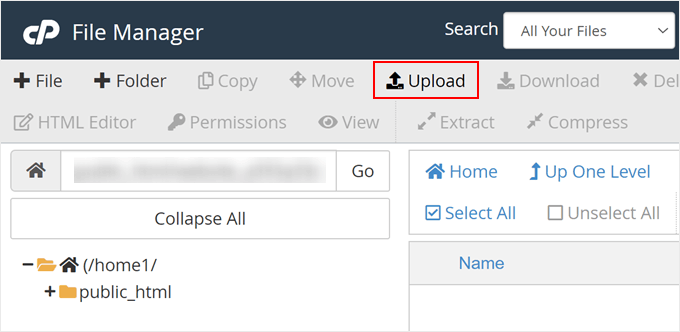
Bluehost will now bring you to the File Manager of your website.
Go ahead and click the ‘Upload’ button to upload your files.
Now, select the files you want to upload to the empty website.
Once done, just click ‘Go Back to …’
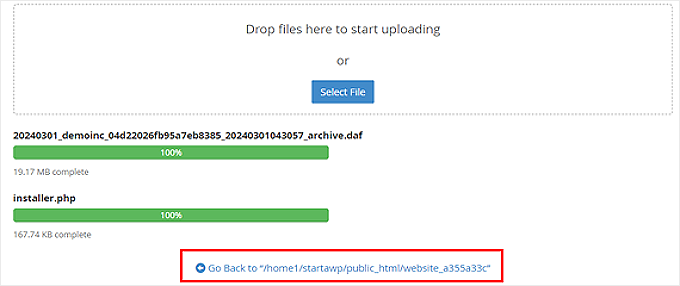
You should now see your archive and installer files in the file manager.
Go ahead and remove the other files that are in this directory to make sure the installation goes well later on.

Alternatively, you can upload the installer and archive to the root directory using an FTP client.
If you haven’t done this before, then see our beginner’s guide on how to use FTP to upload files to WordPress.
No matter where you upload the files, you need to make sure that the folder only contains your installer.php and archive zip files.

Step 4: Create a New WordPress Database for Your Website
Next, you need to create a new WordPress database to unpack your cloned version of WordPress. If you have already created a database, then you can skip this step.
There are a few ways to create a database, depending on whether the new location is a live site or a site on your local server.
If you are using a live site, then simply log in to your WordPress hosting account dashboard.
For Bluehost users, you need to go to your empty website’s ‘Settings’ tab like before. Then, switch to the ‘Advanced’ tab and click ‘Manage’ next to cPanel.
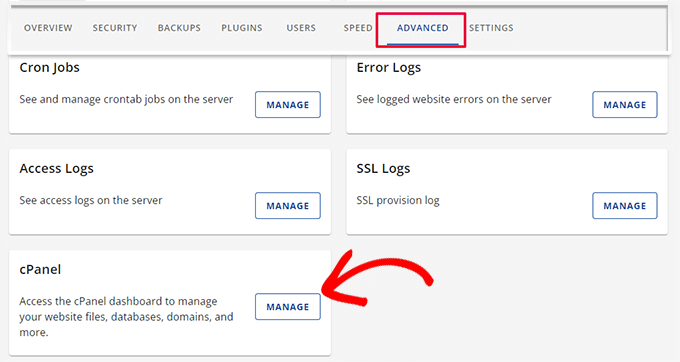
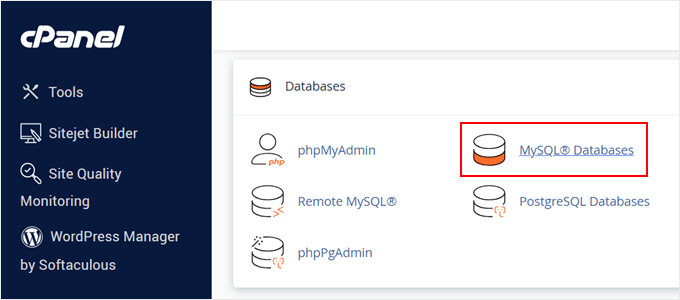
Inside cPanel, scroll to the ‘Databases’ section.
After that, select ‘MySQL Databases.’
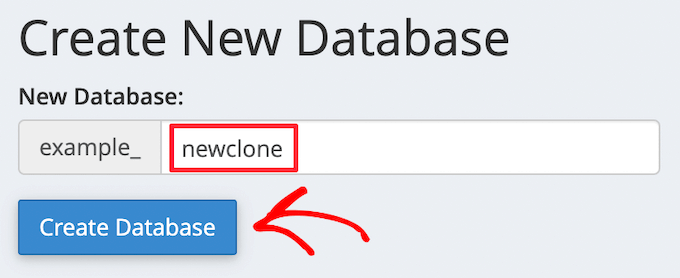
This brings you to a screen where you can type in a name for your database.
Then, click the ‘Create Database’ button.
Next, you need to add a new user to the MySQL database.
Simply scroll to the ‘MySQL Users’ section. Then, type in a username and password for the new user, and click the ‘Create a user’ button.
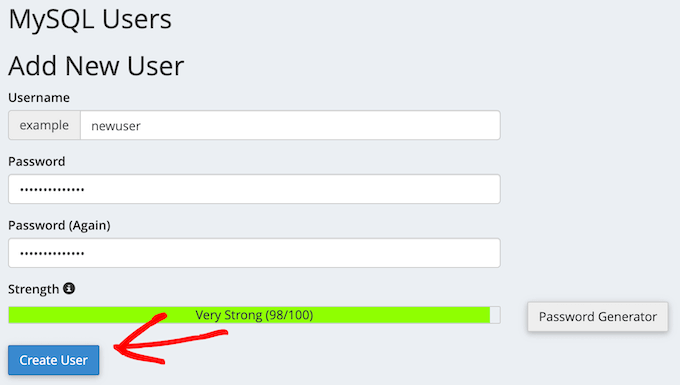
Once you have done that, the next step is adding the user to your database.
Simply scroll to the ‘Add User to a Database’ section and open the ‘User’ dropdown. Here, select the database user you created in the previous step.
After that, open the ‘Database’ dropdown and select the database you created earlier.
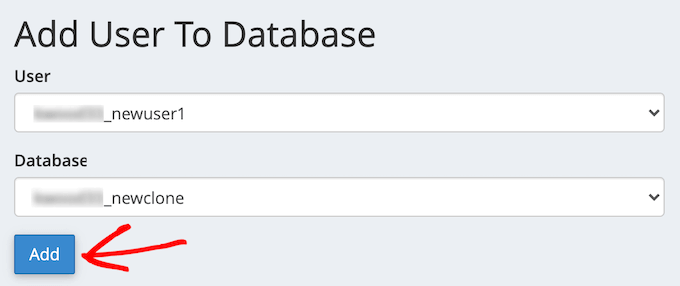
Make sure you take note of the database name, username, and password, as you will need this information in the next step.
With that done, click the ‘Add’ button.
If you are using a localhost installation using XAMPP or other tools, simply visit ‘http://localhost/phpmyadmin/’ or ‘http://localhost:8080/phpmyadmin/’ in your web browser to launch phpMyAdmin.
After that, click on the ‘Menu’ tab, and then select the ‘Database’ option.
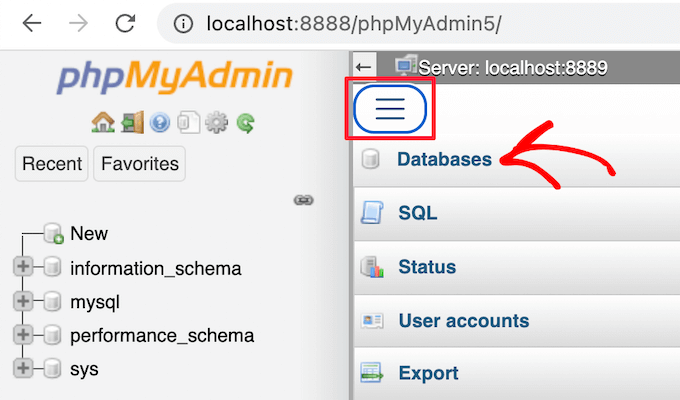
Next, you need to enter a new name for the database.
Then, just click the ‘Create’ button.

You will be using the database name in the next step. For most localhost installations, your host will be localhost, and the username will be root, with a blank password.
Step 5: Run the WordPress Website Importer Script
Now all your files are in place, it’s time to run the Duplicator installer script. This script unpacks your archive file in a few clicks.
First, type your website URL into the web browser and add installer.php to the end of it. This will look something like ‘https://example.com/installer.php.’ Make sure you replace ‘example.com’ with your own domain name or your site’s localhost address.
Next, the Duplicator installer script will appear on the screen. First, you need to enter your WordPress database information.
This is the database information that you copied above.
Once done, click ‘Validate.’
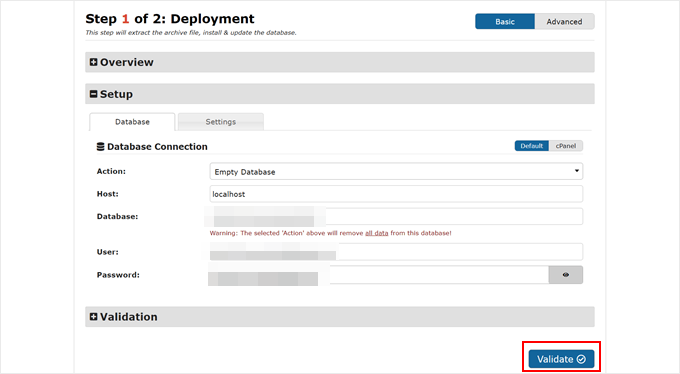
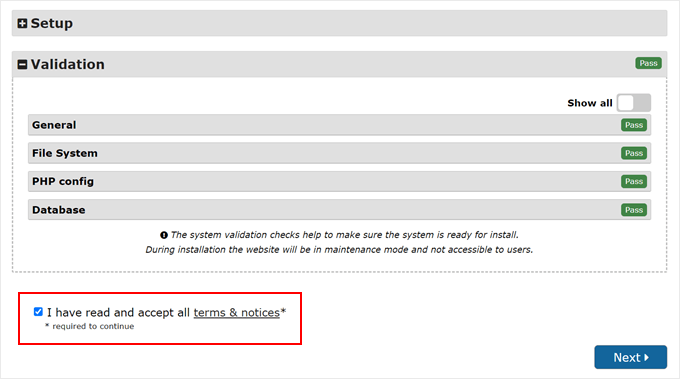
If there are no errors, then check the terms and notices checkbox at the bottom.
After that, click ‘Next’ to continue.
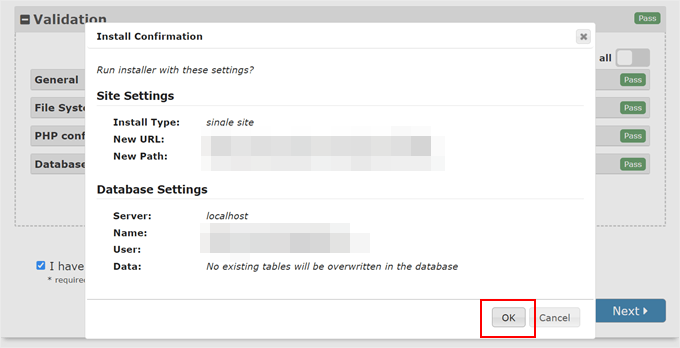
Next, a popup will appear to confirm the installation.
Go ahead and click on the ‘OK’ button.
If the installation is successful, then you can immediately log in to your new WordPress site.
To do this, make sure to check the ‘Auto delete installer files after login to secure site (recommended!)’ and click on the ‘Admin Login’ button.
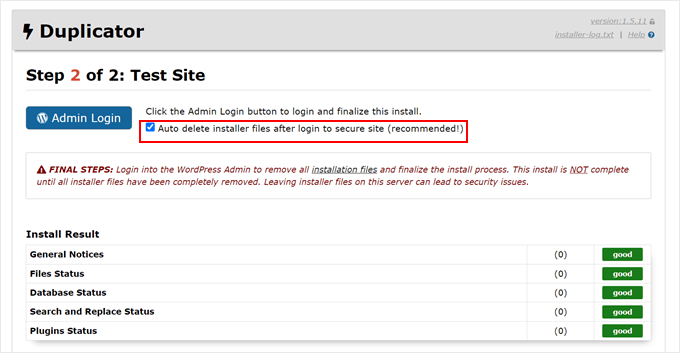
Checking off that box will automatically remove the installer files to get rid of potential security issues and finalize the installation.
Step 6: Test Your Cloned Website and Delete Temporary Files
You can now go ahead and test your cloned website.
We recommend testing both the WordPress admin area and your website’s public front end to make sure all your data is there, and the website is working as expected.
If you get any WordPress errors, then check out our beginner’s guide to troubleshooting WordPress errors.
You will also need to check if your installer files still exist. For good measure, we recommend going to Duplicator » Tools and then click on the ‘Remove Installation Files’ button.
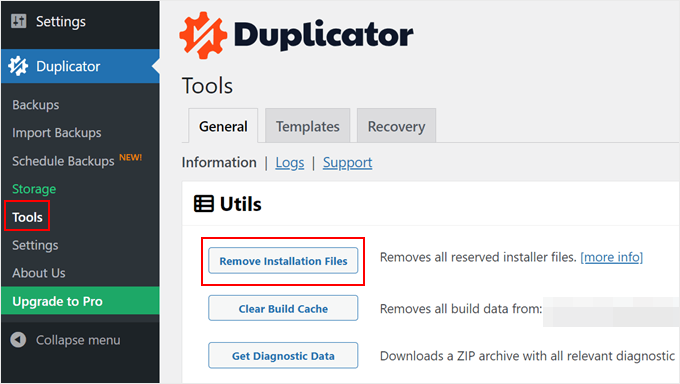
That’s it, you have successfully cloned a WordPress site.
I’ve Cloned My WordPress Website, What’s Next?
If you have successfully cloned your WordPress website, here are some things you may want to do next:
- Check if you have migrated your website properly using this ultimate migration checklist.
- Check your cloned website’s permalink settings.
- Install must-have WordPress plugins to grow your website.
- Disable blog features if you’re planning to run a non-blog site.
- Refer to this website launch checklist before publishing your website.
- Preview your website to see if everything is working.
- Enable WordPress debug mode to resolve potential errors quickly.
- Learn how to free disk space and reduce inode usage to keep your web server healthy.
- Run a website speed test to see if your site performance needs improvement.
We hope this article helped you learn how to easily clone your WordPress site. You may also want to see our guide on how to manage multiple WordPress sites from one dashboard and our expert picks of the best WordPress activity log and tracking plugins.
If you liked this article, then please subscribe to our YouTube Channel for WordPress video tutorials. You can also find us on Twitter and Facebook.


Dario
Thank you for the detailed turorial. Saved alot of work , bless you
WPBeginner Support
Glad our tutorial was able to help
Admin
Felicia Sandler
I have a wordpress site that is currently on a dedicated server with a different URL that points toward the domain we wish to use. If I clone the site to move it to a hosting service, is it possible to do that with a new IP address as well? I welcome any support. Thanks.
WPBeginner Support
If you move to a new hosting provider the IP would normally change by default without any extra steps needed.
Admin
Jiří Vaněk
The Duplicator is an absolutely fantastic plugin that I personally enjoy using for duplicating websites from development environment to server. The only issue I’ve encountered with it is that it creates a .htaccess file in the backup folder, where not all directives may be allowed. Fortunately, this behavior can be resolved in the settings, and .htaccess can be disabled. Otherwise, the plugin always works great and without any problems. Additionally, with a guide like yours, anyone can handle it really well. And as a bonus, it works quite well even in the free version.
Dennis Muthomi
This step-by-step guide was extremely helpful! I followed the tutorial to clone my existing WordPress site to a new server with a different host. Everything went smoothly except I ran into an SSL issue initially on the cloned site. However, after contacting my new host’s support team, they were able to resolve the SSL problem quickly. Thanks so much for providing such a clear and valuable walkthrough
WPBeginner Support
Glad our guide could help you
Admin
Dan
Hi, I have done this however upon completing the Install and clicking the admin button, it takes me back to the original domain page prior to a WordPress Install. I’ve double checked the process and I don’t think I’ve missed any steps?
It just appears that everything was wiped (just an original WP install) but the duplicate file hasn’t been installed?
WPBeginner Support
Your domain is pointing to your original host. You can either change your hosts file to see the cloned site or point your domain to the new host location. For moving your site to a new domain, we would recommend taking a look at our article below:
https://www.wpbeginner.com/wp-tutorials/how-to-properly-move-wordpress-to-a-new-domain-without-losing-seo/
Admin
Martin Page
I have followed your instructions and uploaded the 2 files to an otherwise empty file but when i go to the site/installer.php I get a 404 page.
My FileZilla screen loos exactly like your example.
Any suggestions?
Thanks
WPBeginner Support
You would want to visit the duplicator plugin’s FAQ page and they cover the different troubleshooting steps for that error.
Admin
Rene Young
Thanks. I did that and I have successfully completed creating the clone. I have a question about the step to install the database in the new location (Step 2 of 4 – Install Database): The screen shot shows a choice between “Basic” and “cPanel” but you don’t discuss this.
WPBeginner Support
In this tutorial, we went with Basic
Admin
Rene Young
I could not complete Step 2. I do get warnings in Duplicator, under Paths:
“If the root WordPress path is not writable by PHP on some systems this can cause issues.
If Duplicator does not have enough permissions then you will need to manually create the paths above.”
WPBeginner Support
You would want to either follow our guide below for updating your file permissions:
https://www.wpbeginner.com/beginners-guide/how-to-fix-file-and-folder-permissions-error-in-wordpress/
Or you can reach out to your hosting provider for assistance with the folder permissions.
Admin
Sue
I’m trying to clone a demo site I’m making for people to use as a template. Using Duplicator I’ve created the package, gone into File Manager of CPanel and navigated to the root directory for the subdomain I’m testing it on, and uploaded the zip file and installer file. There is nothing else in the folder.
When I follow the instructions and go to the website address with installer.php added to the end, I do not get the Duplicator import info. I get a Page Not Found….though it does have the header, footer and top menu of the site I’m cloning. What did I do wrong?
WPBeginner Support
If you are using the same domain then you are likely still looking at the old site and not the new one, if you reach out to your hosting provider, they can normally assist with setting up a temporary domain that you can use.
Admin
Tarık Hacıalioğulları
Thank you very much, this saved me so much time. It worked very good!!!
WPBeginner Support
You’re welcome
Admin
saad
Everything s clear thank you but what about login and password to WordPress dashboard can we duplicate ?
WPBeginner Support
It copies your users table so it would transfer your user and password over for you.
Admin
Kara
I’m having a bit of trouble with step 4. With my Hostgator account I don’t have access to my server panel but when I try to add the file via an FTP client, I’m under able to find the folder containing the installer.php. Am I missing something? Could the file name be different or could someone tell me where exactly to put the zip file?
WPBeginner Support
You would want to reach out to your hosting provider and they would be able to assist
Admin
ed
HI there, what if i have paid plugins and themes specific for 1 wordpress site
Will it still work ? Thanks alot, your tutorial so far is the easiest to follow
WPBeginner Support
You would want to reach out to the support for those tools for how they handle that.
Admin
Emma
What do you do when there is a size check notice? Limit is 500mb and my site is 1.32gb uncompressed. Not sure how to compress. It is recommending a 2 part install manually from c panel which is sadly beyond my tech abilities.
WPBeginner Support
You would want to reach out to your hosting provider’s support and they should be able to assist
Admin
Dominique
uploaded zip and installer script to root and i am getting this message when i enter domain.com/installer.php
403 Forbidden
Request forbidden by administrative rules.
What next?
WPBeginner Support
There are a few different options you can try, for a starting point, you would want to take a look at our article below:
https://www.wpbeginner.com/wp-tutorials/how-to-fix-the-403-forbidden-error-in-wordpress/
Admin
Loz Bigrave
Great article, worked like a charm.
WPBeginner Support
Thank you, glad our article was helpful
Admin
Derek
I’ve successfully copied across to a new URL and the cloned website seems to be working. However, when I go into wordpress it’s a reduced version with quite a few tabs missing such as: users/plugins/settings to name a few. How can I get a full version of wordpress the same as the site I copied from?
WPBeginner Support
You may want to ensure you are logged in as an admin user on your cloned site as the most likely reason for that issue.
Admin
Adi
How do you change the name of the website, the url and also the database when installing the cloned site using Duplicator?
WPBeginner Support
To do that, you would want to take a look at our article here:
https://www.wpbeginner.com/wp-tutorials/how-to-properly-move-wordpress-to-a-new-domain-without-losing-seo/
Admin
diana
Hi, I have a question , can a clone my site without erased the other one , i mean the original website ?
WPBeginner Support
Yes, cloning your site does not remove the original
Admin
Todd Murray
This is a great post. Just one clarification before I run the import…on STEP 4, these are the instructions:
No matter where you are copying the files, you need to make sure that the folder is completely empty and has no other files or folders inside it except installer.php file and your backup zip file.
If I already have a theme and started building a site before finding this article, do I need to delete everything from the destination? “folder completely empty” refers to which folder?
Thanks!
Todd
WPBeginner Support
If you want to duplicate a site from elsewhere then you would need to remove what is currently there for your site.
Admin
Christie Bellah
Been using this article for years. Thanks so much!
WPBeginner Support
You’re welcome, glad our guide has been so helpful
Admin
Alexandre
You were right, I didn’t put in the root folder :/
So I tried again, but in the end, I got an error 404 result.
I’ve fixed the wp_config (name, user, pw & host) and made the changes to the htaccess (copied the NEW .htaccess).
All files are deleted, besides the now unzipped folder which contain all the files. *what about the __MACOSX folder? I tried with and without, but get the same result.
Even after this, in Step 4, I still get the 2 warnings in the General Notices:
wp-config not found
wp-config.php not found.
I found the wp-config.php, but seem like I don’t have the wp-config. Are they the same?
Anything else missing?
Thank you
WPBeginner Support
The macosx you don’t need, the wp-config files should be the same. For moving from the subfolder if the original site is still available you would likely want to go through the steps in: https://www.wpbeginner.com/wp-tutorials/how-to-get-rid-of-wordpress-from-your-wordpress-site-url/
Admin
Alexandre
I end up on a “Index of” page showing the file in my sub folder. Anyone know why?
Thanks
WPBeginner Support
You likely installed your WordPress site in the subfolder rather than the root folder for your site.
Admin
Alexandre
Sorry, forgot to say. If I type in the full path on my web browser, I have a loading time, but end up on a white page.
Thanks
WPBeginner Support
If you are getting that white screen you may want to try the recommendations in our article here: https://www.wpbeginner.com/wp-tutorials/how-to-fix-the-wordpress-white-screen-of-death/
JanysF
Does anyone know why the Packages option under Duplicator » Packages isn’t showing for me? I only see under Duplicator: Tools, Settings, and Go Pro.
WPBeginner Support
You may want to try reinstalling the plugin and if that doesn’t work you would want to reach out to the plugin’s support and let them know about that not appearing properly
Admin
ouiouiphoto
Cloning works well with duplicator but having a clone site online seems not to be liked by jetpack
During my tests Jetpack have put himselt in failure on the original site even if jetpack was not active one the cloned site telling me the original was a copy of the clone
If google find your clone you have also some possible issues
WPBeginner Support
While there is a problem with simply cloning a site without any new content, the primary goal would normally be to use this when transferring your site from one location to another and then removing the old site or using the copied site as a template and adding new content to your new site.
Admin
Bidmead
For some inexplicable reason, when I save this useful page to Pocket, what actually arrives there is the old 11 May 2015 version, which discusses a completely different method based on a plugin called BackupBuddy which costs $52 for the 1-site version.
—
Chris
WPBeginner Support
We’ll certainly take a look if it is something on our end. You may want to check with Pocket if there is a cache that needs to be cleared on their end as well
Admin
Chris Bidmead
I’ve been in touch with Pocket. They suggest it might be a problem with their Parser, which checks the content and determines the best way to display it. They’ve managed to reproduce the bug and are investigating.
—
Chris
Gary Andrews
I wand to upgrade my production site to WP 5 and change themes. I thought it might be a good idea to clone my site on my local windows machine under Desktop Server.
I’ve been trying for 2 days to clone my site.
Let me just add that your tuto is perfectly straightforward as long as things go well. It doesn’t go into what might not work correctly.
Firstly Duplicator package creation times out (despite having filtered out the big files). Of course my hosting company doesn’t support Duplicator because it tries to change the time limit, can’t really blame the host company.
I also tried the Duparchive option which doesn’t time out and generates a .daf archive instead of a .zip.
On the Desktop Server local side I tried to run installer.php from my browser but got messages saying I needed to enable ziparchive and/or shell exec. I contacted Desktop Server support about that and have had no answer.
I thought I’d try to extract the data from the daf archive manually but the software that is needed to do this no longer seems to be available.
I imagine that the Duplicator Pro version would work better but I don’t have the budget (association website).
Oh woe is me, looks like I’ll have to do it all by hand.
WPBeginner Support
From the sound of it you sadly may need to manually import/export the data, the other option would be if you have a backup of your site that you could restore to your local installation.
Admin
Adam
Awesome article!!!
Followed your steps and it worked perfectly.
I did make one error though, I extracted the zip file and uploaded the files in ftp which did create errors. Much easier to simply upload the zip instead.
Thanks heaps!
WPBeginner Support
You would likely need to extract the zip once it is on your hosting provider but glad you found a solution for your error
Admin
Donna Lutheran
I copy sites all the time.
The plugins actually look more complicated than doing it manually.
Just download your files, back up your database, ftp to the new server, restore your database to your new database, edit the wp-config file to point to the new database, edit the url in your database to point to the new url.
I also download velvet blue to correct any url problems.
I had a site not pass our security scan that used the plugin. Also, the database back up was stored in the root of your site.
James Cook
I used a much simpler way. My WP installation is with Godaddy…so logged in the cPanel of the site I wanted to cloned…went to subdomains and created the domain for the site destination…then I went to applications and the top of cPanel and clicked the little check box next the primary site I wanted to clone…then hit the clone button…and voila…and exact copy of our site was created in less than 10 minutes…
Indusekar S K
Is there any plugin or other software that could clone a wordpress website to another wordpress on the live?
Mark C
The price for this is riduculous. Even the cheapest option is $80 PER YEAR! What an absolute rippoff!
Better off just going to Control Panel, zipping up your files and download them … then go to PHPMyAdmin and downloading a copy of your database. Then upload your zipped files to the new location…edit the config file, then import the database.
If that’s too hard for website retards … just install the free version of “Duplicate” (similar to Backup Buddy … but FREE).
Carlos A. B. S.
You’re right man, no need to spend a dime on such a a simple task…
Felisha
Either of you have a step by step guide? I am trying to copy my site to a subdomain to target a different city from the main site.
The only thing I understand so far is that I have to:
1. create a subdomain
2. create a new database
3. copy the public html folder of the main site over to the subdomain pubic html folder
After that, every tutorial I’ve seen on the internet gets too confusing
Jerri
What are you talking about? Duplicator is free. I mean, there’s a pro version, but I use the free version all the time to duplicate websites.
The only thing these instructions didn’t add is that you need to first create a new database and add a user to it on the new site before running the installer.
But it’s all easy and free.
Lipa
thx a lot !!! ;]
Mack
Can i copy someone’s site page to my site??
Allan Seabrook
Hi,
I really appreciate all the posts you share with us! Please keep them coming!
My question regarding this post is…
This technique using BackupBuddy works flawlessly.
However, I now have a problem:
When I type in the URL of my original site (where I took the backup), I get directed to the site I cloned from that backup. It’s as if my original site now has a redirect to the cloned site.
What on earth have I broken?
Any advice would be much appreciated!
Thanks,
Allan
Stephen
Check your DNS record. That would be one of the only ways this would happen.
Jonathan
Thanks! Worked perfect!
Mamun sarkar
Hi,
I would like to know how to clone any wordpress website have no hosting access information as well. I mean, suppose a buyer order your wpbeginner like website. Then, How to do it sir. Do you have any tutorials plz.
Hanna
not possible anymore to use backup buddy unless you want to pay. Is their a different method?
Nelson
Duplicator is perfect.
sandeep
i want to copy the theme of running website to another website…
Moses
Hi Sandeep,
Did you get solution to this. I also want to copy a theme to another website(subdomain)
Chris
I’ve used another service to clone WordPress sites and have discovered a problem with residual tables, and I was curious whether this was an issue with BackupBuddy as well.
In the scenario I recently encountered, I create WP Site A with table prefix wp1_.
Then I have to create a new environment to clone to, so I install WordPress at WP Site B with table prefix wp2_.
Now I use my [unnamed] tool to clone site A to site B, which appears good on the admin and public side but when I look in the database I have both wp1_ and wp2_ sets of tables, and all of the GUIDs in the functioning tables for the new cloned site have WP Site A’s URL, not WP Site B’s as I would have expected.
These have to be cleaned up manually. So I wonder, does BackupBuddy do the same thing? Is this to be expected?
WPBeginner Support
BackupBuddy’s sales/support team can probably answer this better.
Admin
Andrew Lopez
I’d be curious to know how to manually perform this task without a plugin or is a plugin recommended for backing up and migrating over to a new website?
Dave Navarro
BackupBuddy fails on large WordPress installs. I can’t get it to back up our site which between database all files is over 400GB in size.
I had to manually download all of the files, then re-upload them to the new site and use importbuddy with just the database. Even that fails if the raw database is too large (failed around 200MB in size).
Nitin
wonderful technique but there is use of another plugin
Gf
I recently moved a small simple blog with all-in-one wordpress migration and it worked great. But when I attempted a larger site on wp4.1 it failed. I think I would like back up buddy but the price is staggering. It would be my biggest wordpress expense, almost twice as much as my hosting!
Jean
I love using BackupBuddy for backups and migrations.
All you need is access to install the plugin and your set to move.
Great article!
johnraf
I used to have similar problems too, but after using
“long path tool” You can use to solve this problem.
yaser
How about if we want to clone a website that we have no backend access? Is there an easy way?
fletch
Do you have ftp access? Do you have access to the database? You would need those two things to backup a website if you don’t have access to wp-admin.