Last week, one of our blog readers couldn’t access their newly migrated website, while everyone else could see it perfectly. The solution? A simple DNS cache clear. It’s amazing how often this quick fix solves loading problems that seem much more complicated.
If you’ve ever wondered why your browser shows outdated content or won’t connect to websites properly, your DNS cache might need a refresh. It’s like telling your computer to update its contact list of website addresses.
After helping countless users through this process, we’ve created this straightforward guide to show you exactly how to clear your DNS cache on Mac, Windows, and Chrome. We’ll walk you through each step so you can get back to browsing without any hiccups.
Here is a quick overview of what we will cover in this guide:
What Is a DNS Cache?
A DNS cache is like an address book saved on your computer. It contains the DNS (Domain Name Server) information of each website you visit.
DNS is a technology that tells your computer the IP address associated with a domain name. To learn more, see our guide on how domain names work.
Saving the DNS information in a local DNS cache helps your browser quickly find a website.
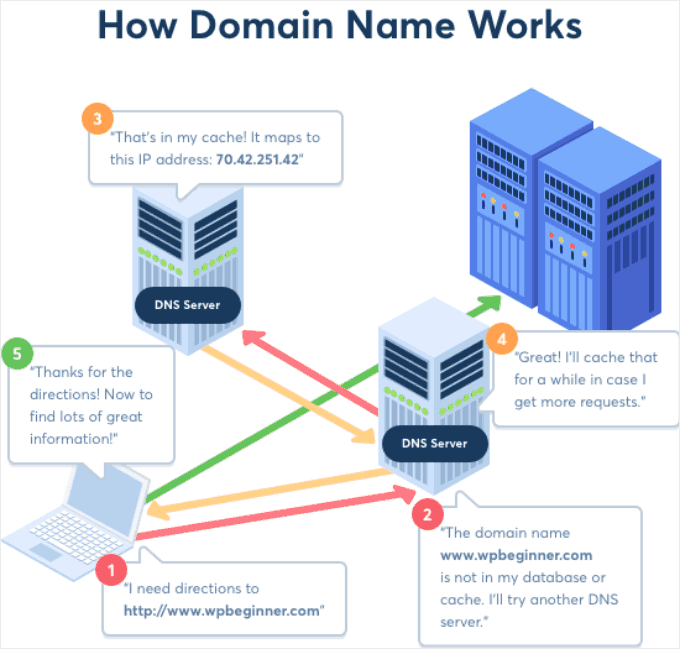
Once you enter a website address in your browser, it will look for DNS information in the local cache first. If it finds the directions, then it uses the DNS cache to visit the website.
On the other hand, if the information is not in the local DNS cache, then the browser will get it from other DNS servers across the internet.
This ensures that every time you visit any website, your browser takes the shortest route to get the DNS information it needs to locate the website on the internet.
However, this may sometimes cause trouble.
For example, when you are moving a WordPress site to a new domain name or moving WordPress to a new host, the DNS information may not get updated quickly on your computer, and you might end up visiting the old website or seeing a not found error.
It will eventually get updated, but why wait when you can clear the DNS cache right away?
Let’s take a look at how to clear the DNS cache across various platforms.
How to Clear the DNS Cache in Windows
Here’s how to clear the DNS cache on a Windows computer.
First, you need to click on the ‘Start’ button and select the CMD (Command Prompt) tool.
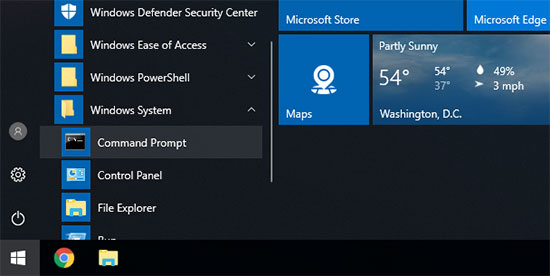
This will launch a command prompt window. Inside it, you need to enter the following text:
ipconfig /flushdns
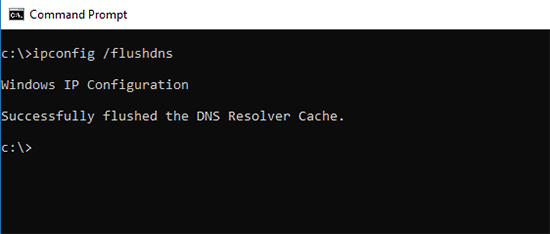
Simply press the ‘Enter’ key to execute the command, and Windows will flush the DNS cache.
That’s all. You can now resume visiting your website to fetch the updated DNS information.
How to Clear the DNS Cache on macOS
If you are on a Mac computer, then you can follow the steps below to clear your DNS cache.
First, you need to launch the Terminal app. You can find it in the Launchpad under the ‘Other’ folder. You can also launch it by opening Finder and going to the Applications » Utilities folder.
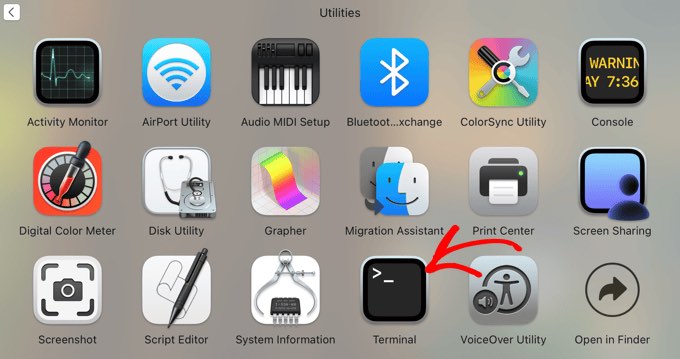
This will launch the terminal window, where you need to enter the following command:
sudo killall -HUP mDNSResponder
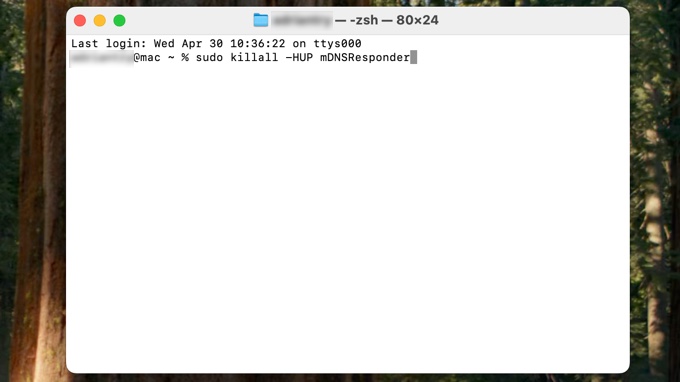
You will be asked to enter your macOS account password. It is the same password you use to log in to your computer.
After that, your computer will flush the DNS cache. You can now visit the website to get the latest DNS information.
How to Clear the DNS Cache in Chrome
Google Chrome also keeps a DNS cache of its own, and it is separate from the DNS cache stored by your operating system.
If you use Google Chrome as your main browser, then you will need to clear Chrome’s DNS cache as well.
First, you need to enter the following address in your browser’s address bar and press the ‘Enter’ key on your keyboard:
chrome://net-internals/#dns
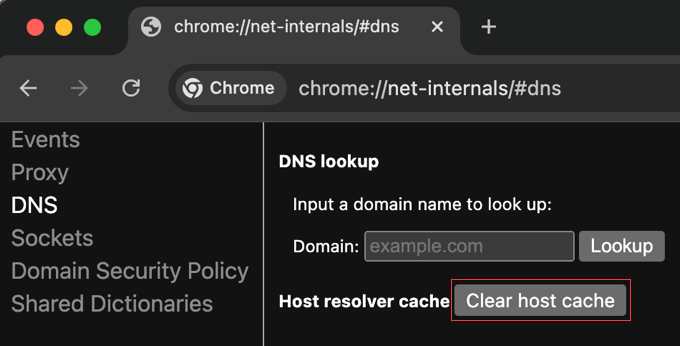
This will load Chrome’s net internal settings page.
From here, you need to click on the ‘Clear host cache’ button, and Chrome will clear up its DNS cache.
How to Check for DNS Updates
When you are moving your WordPress website to a host or transferring your domain registration to a new domain registrar, you will have to change your DNS settings and point them to the new location.
Once you apply these changes to your domain settings, it will take a while for those changes to propagate across the internet. This could take anywhere between a few hours to a couple of days.
During this time, your domain will sometimes point to the old location, and sometimes it will point to the new location. This depends on your geographic location and which DNS servers your browser asks for directions.
You can check how these DNS changes are propagated around the world using online tools like DNS Checker.
Simply enter your domain name, and it will fetch DNS from different geographic locations spread around the world.
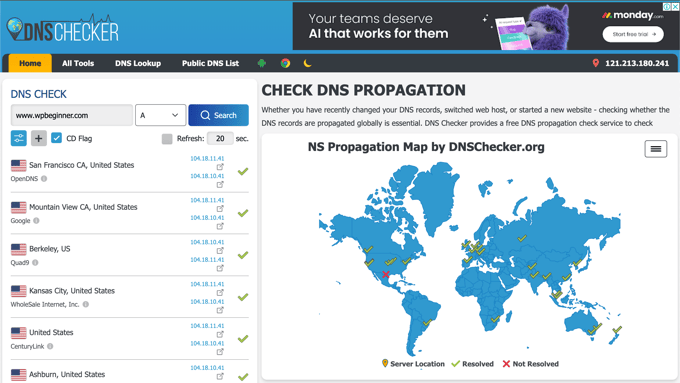
If all locations indicate the same IP address with a green checkmark, then this means the DNS changes you made are now updated all over the internet.
What’s the Difference Between the DNS Cache and Browser Cache?
Now, keep in mind that the DNS cache is different from the browser cache.
Your browser saves a lot of website data in a temporary cache to quickly load pages on repeat visits. This contains the actual contents of the websites you visit, while the DNS cache contains the IP addresses where they are located.
If you are having trouble viewing a page that you updated but can’t see your changes, then you will want to clear the browser cache.
We have a step-by-step guide on how to clear the browser cache on all major browsers.
Expert Guides on Caches in WordPress
We hope this article helped you learn how to easily clear your DNS cache on different devices. You may also want to see some articles on other types of cache in WordPress:
- Glossary: Cache
- Glossary: Page Cache
- How to Easily Fix Leverage Browser Caching Warning in WordPress
- Best WordPress Caching Plugins to Speed Up Your Website
- How to Install and Setup W3 Total Cache for Beginners
- How to Install and Setup WP Super Cache for Beginners
- How to Clear Your Cache in WordPress (Step by Step)
- How to Clear Your Browser Cache in All Major Browsers (Fast Way)
If you liked this article, then please subscribe to our YouTube Channel for WordPress video tutorials. You can also find us on Twitter and Facebook.


Dennis Muthomi
I’m glad that you have clearly compared the DNS cache versus the browser cache. I often find the two confusing
thanks.
Jiří Vaněk
We recently dealt with one of our customers that after changing the DNS records for the domain, he still saw the original website and we saw the new one. We couldn’t figure out what the problem was because we didn’t think it could be this cache (we cleared all other caches before). Only when we cleared the DNS cache using these commands under Windows, the pages were displayed correctly in the browser’s anonymous mode. Subsequently, they also worked in classic mode. So clearing the DNS cache saved us quite a bit of headache and looking for the problem elsewhere.
THANKGOD JONATHAN
So browser cache and DNS cache are two different things. I was really foolling myself and didn’t think about it. All I does is to clear my browser cache and thought it’s all. Thank you for the article.
WPBeginner Support
Glad we could clear up the confusion
Admin
Moinuddin Waheed
I have been in trouble for this mistake many times that is getting confused DNS cache with browser cache and vice versa.
I updated the website and was not seeing the update on my browser.
Then I cleared the browser cache and it worked well.
having said that if we clear the DNS cache with command line , what time it takes to save new domain as cache to load the website faster?
is it recommended to flush the DNS cache regularly?
Jiří Vaněk
Storing a new domain in the cache is a matter of first loading after clearing the cache. The domain is loaded and the DNS cache saves it. There is nothing more to it. As for some regular cache clearing, it’s not really necessary. Personally, I have never needed to delete the DNS cache, except in cases where, for example, the DNS records on the domain were changed. I also did not know this at first and looked for the error elsewhere. However, in my opinion, you do not need regular deletion, unless you are solving a problem where the DNS cache could play a role.
WPBeginner Support
It will try to bring in the new content directly and unless there is another caching that causes a problem, you should see the correct site.
You should not need to normally flush your DNS cache.
Admin
Moinuddin Waheed
Thanks wpbeginner for clearing confusion regarding clearing the DNS cache.
I was confusing it with the browser cache and thought that the new updates will be shown only when we clear the browser cache.
it means we can flush the DNS as and when we think we should.
David
The articles I have read here in wpbeginner are exceptionally simple (without feeling simplified), clear, informative and most helpful. Thank you!
WPBeginner Support
You’re welcome! Glad you found our guides helpful!
Admin