Creating content for your WordPress blog takes time and effort, but getting that content in front of your Instagram audience can feel like an entirely separate job.
Instagram is one of the best places to connect with your audience in a visual, engaging way. But keeping your feed updated shouldn’t mean adding more to your already full plate.
The good news? You don’t have to do it all manually.
Many bloggers and website owners are turning to automation tools that sync WordPress with Instagram. This makes it way easier to keep social presence active without the extra work.
In this guide, we’ll share the most reliable way to automatically publish your WordPress content to Instagram, based on hands-on testing. This will help you save time, grow your audience, and stay focused on what really matters: creating great content. 💡
Why Automatically Publish From WordPress to Instagram?
If you’re looking to save time and keep your audience engaged, automating your Instagram posts is a smart move.
As one of the largest social media websites in the world, many WordPress website owners use Instagram to connect with potential new readers, website visitors, and customers.
Once you have some followers on Instagram, you can use this social networking site to promote your WordPress blog. Every time you publish a blog post, it’s a good idea to let your Instagram followers know about your new content.
To make your blog post stand out on Instagram, you’ll need to add an eye-catching image and an interesting caption. While Instagram doesn’t allow clickable links in captions, you can link to your blog from your Instagram bio so your followers can easily find your latest posts.
You can also add a link in the bio page, which lets you showcase more than a link to your Instagram bio.
Since running an engaging Instagram account takes time and effort, you can save some of that time by automating the process of publishing to Instagram.
That being said, let’s see how you can automatically post to Instagram whenever you publish a new WordPress blog post.
Automatically Publish from WordPress to Instagram with Uncanny Automator
Uncanny Automator is the best WordPress automation plugin that helps you create automated workflows without having to write code.
It connects with more than 185+ plugins and third-party apps, so you can build smart automation workflows that save you time.
For example, you can integrate Slack with WordPress, create a workflow that automatically posts to Facebook from WordPress, and much more.
Want to learn more about the tool? See our detailed Uncanny Automator review.

In this guide, we’ll be using the free Uncanny Automator version. It comes with over 350 automation triggers and actions, including those for Instagram. It’s perfect if you’re on a tight budget and just getting started.
If you want to build more powerful and advanced workflows, though, then you’ll need Uncanny Automator Pro. It includes over 1000 triggers and actions.
The first thing you need to do is install and activate the Uncanny Automator plugin. For more details, see our step-by-step guide on how to install a WordPress plugin.
Upon activation, go to Automator » Settings. Then, simply click on ‘Connect your site.’

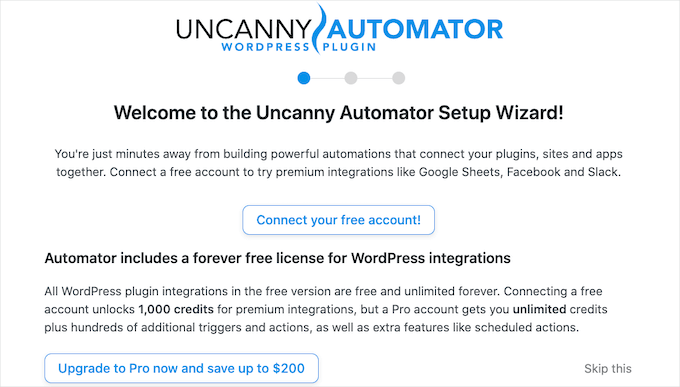
Uncanny Automator will now ask whether you want to upgrade to get more credits, triggers, and actions. If you do want to upgrade, then click on the ‘Upgrade to Pro now…’ button and follow the instructions to buy Uncanny Automator Pro.
If you want to automatically publish from WordPress to Instagram using the free version of Uncanny Automator, then simply click on ‘Connect your free account.’ You can always upgrade to Uncanny Automator Pro at a later date.
Uncanny Automator will now show a popup where you can create an account by typing in your name, email address, and the password that you want to use. After typing in this information, click on ‘Sign Up.’
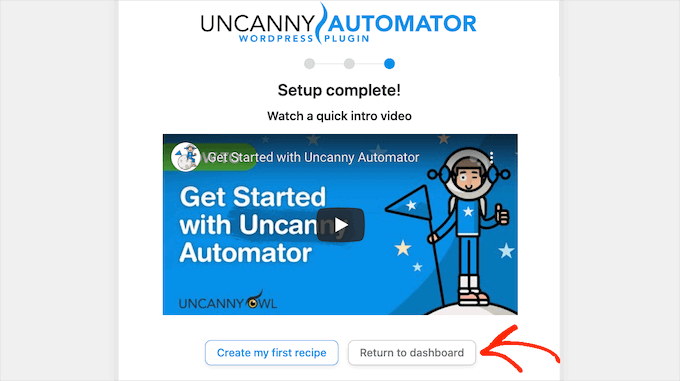
After a few moments, Uncanny Automator will show a message confirming that you’ve set up the plugin.
Next, you need to click on ‘Return to dashboard.’
Before you can start automatically publishing from WordPress to Instagram, you’ll need to connect your Instagram account to Uncanny Automator.
💡 Note: To post automatically, you’ll need an Instagram Business account that’s connected to a Facebook page for your business. Don’t already have an Instagram Business account? The good news is that it’s free. Here’s Instagram’s guide on how to convert a standard account into an Instagram Business account.
To connect Uncanny Automator to your Instagram account, go to Automator » Settings. Then, click on the ‘Premium integrations’ tab.

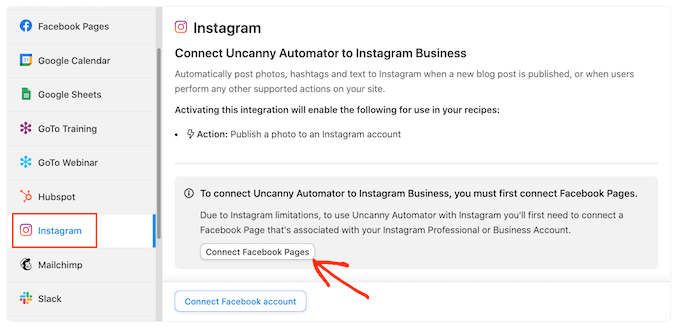
In the left-hand menu, go ahead and click on ‘Instagram.’
Since Instagram is owned by Facebook’s parent company, you’ll need to connect to the Facebook page that’s linked to your Instagram Business account.
To get started, click on the ‘Connect Facebook Pages’ button.
Uncanny Automator will now guide you through the process of connecting to your Facebook page. Once you’ve done that, Uncanny Automator will ask you to select the Instagram account that you want to use.
After choosing an account, you’ll need to select the actions that Uncanny Automator can take and the information it can access on Instagram. Since we want to automatically publish from WordPress to Instagram, you’ll need to enable the first two options:
- Access your profile and posts from the Instagram account connected to your Page.
- Upload media and create posts for the Instagram account connected to your Page.
After that, go ahead and click on the ‘Done’ button.

Once you’ve done that, Uncanny Automator will take you back to the WordPress dashboard.
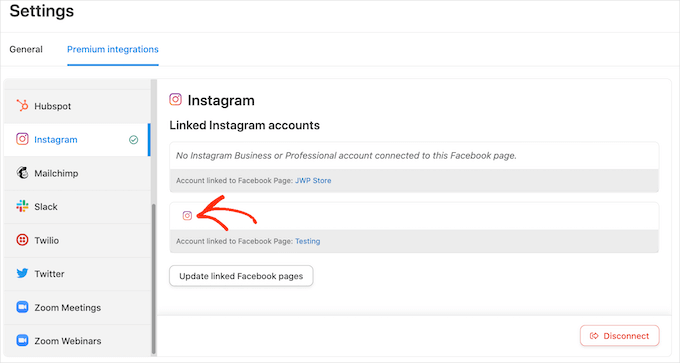
You should now see that Uncanny Automator is connected to your Instagram account.
The next step is creating a workflow that will automatically publish from WordPress to Instagram. Uncanny Automator calls these workflows ‘recipes,’ and they’re made up of actions and triggers.
To build a recipe, go to Automator » Add New.
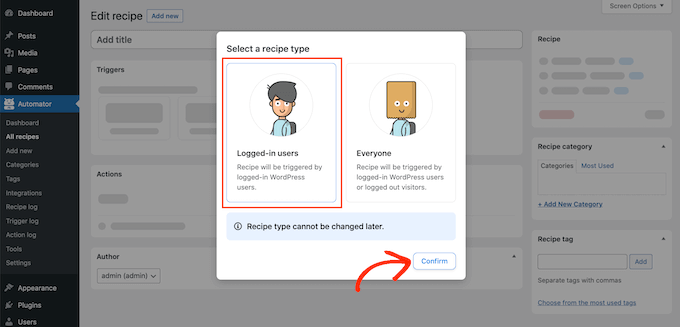
On this screen, you’ll be asked whether you want to create a ‘Logged-in’ recipe or an ‘Everyone’ recipe.
Blog posts can only be published by a user who has a WordPress account. With that in mind, click on ‘Logged-in users.’ Then, just click on the ‘Confirm’ button.
You can now start to build your Uncanny Automator recipe.
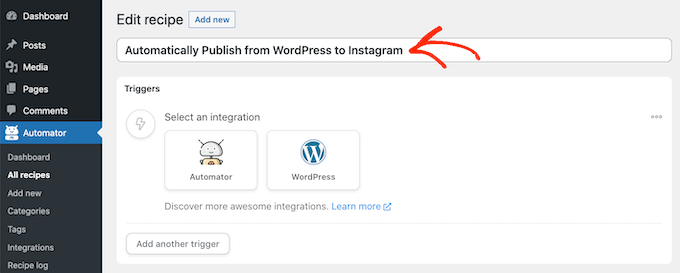
First, you’ll need to add a title by typing into the field that shows ‘Add Title’ by default.
We’ll call the recipe ‘Automatically Publish from WordPress to Instagram,’ but you can use anything.
Next, you need to define the condition that will trigger the action. For our recipe, the trigger is someone publishing a new blog post.
To add a trigger, simply click on the WordPress button in the Triggers section.
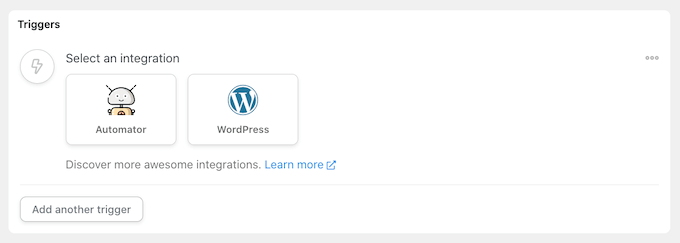
You’ll now see a list of all the Uncanny Automator triggers.
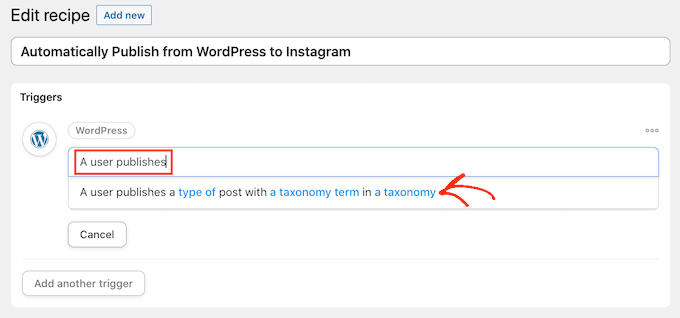
In the ‘Search for triggers’ field, start typing the following: ‘A user publishes a type of post with a taxonomy term in a taxonomy‘.
When the right trigger appears, click on it to add it to your Uncanny Automator recipe.
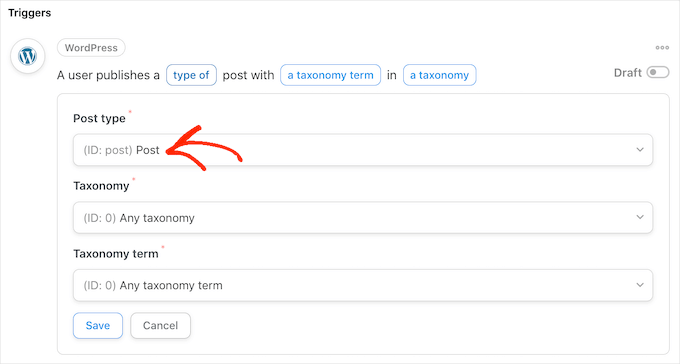
Next, you’ll need to decide the type of content that will trigger the recipe. Simply click on the Post Type dropdown and then choose between post, page, media, or any post type.
Since we want to post to Instagram every time someone publishes a new blog, you’ll typically want to click on ‘Post.’
At this point, you can tell Uncanny Automator to run this recipe only for posts that have a certain category or tag. For example, you may only want to automatically post when a blog has the ‘announcement’ tag.
This gives you more granular control over the content that gets published to your Instagram account, while still getting the time-saving benefits of an automated workflow.
To limit this recipe to a specific tag or category, open the ‘Taxonomy’ dropdown. Here, you can click on either ‘Category’ or ‘Tag’

Once you’ve done that, click on the ‘Taxonomy term’ dropdown.
You can now click on any of the categories and tags to add them to your recipe.
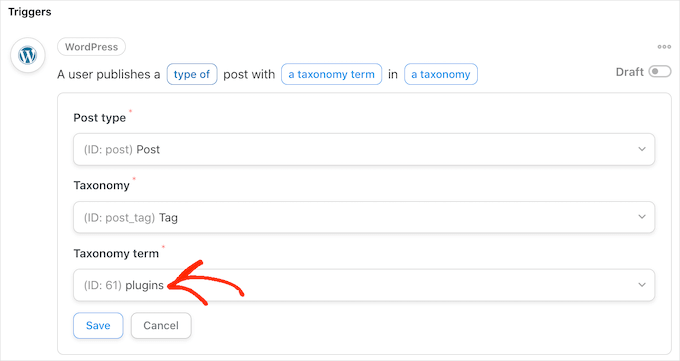
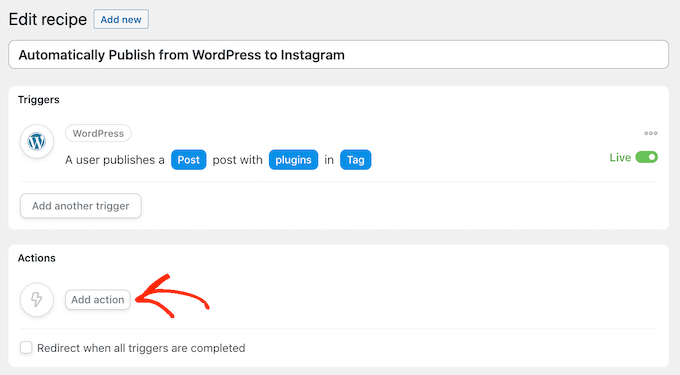
When you’re happy with the information you’ve entered, click on ‘Save’ to save your changes. Uncanny Automator will now show a summary of the action that will trigger your recipe.
The next step is choosing the action that will happen every time you publish a new WordPress post. Start by clicking on the ‘Add action’ button.
Uncanny Automator will now show all the WordPress plugins and apps that you can use for the recipe.
You simply need to find ‘Instagram,’ and give it a click.

Once you’ve done that, click on the ‘Search for actions’ field. In this field, start typing in ‘Publish a photo to an Instagram Business account.’
When the right action appears, click to add it to your recipe.
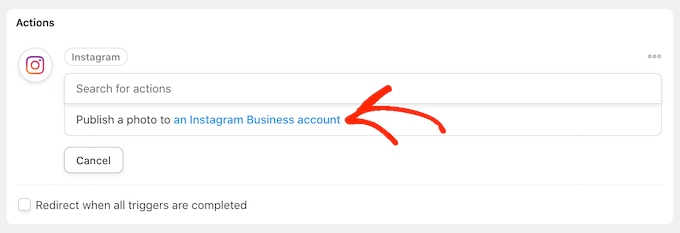
You’ll now see a new set of controls.
To start, we need to specify the image that Uncanny Automator will post to Instagram every time you publish a new WordPress post.
Sometimes, you may want to use the same image for every post. For example, you might have used image editing software to create a special image advertising your website.
To use the same image every time, either type or copy/paste the image’s URL into the ‘Image URL or Media library ID’ field.
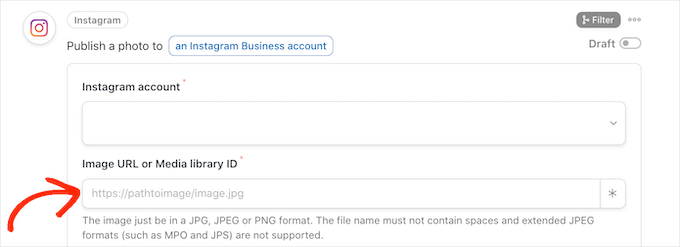
To get an image’s URL, simply find the image in your WordPress media library.
You can then copy the value in the ‘File URL’ field, as you can see in the following image.

Another option is to use a different image for every WordPress post, so you’re not posting the same image to Instagram over and over again.
Every time you publish a blog, Uncanny Automator can post the blog’s featured image to Instagram. If you need help adding featured images to your posts, you can see our guide on how to add featured images or post thumbnails in WordPress.
To post the blog’s featured image to Instagram, click on the asterisk button next to the ‘Image URL or Media library ID’ field.

Then, simply click on the ‘Search token’ field and start typing ‘post featured image URL.’
When the right token shows up, give it a click to add it to your recipe. Now, Uncanny Automator will get the post’s featured image and post it to Instagram automatically.
The next step is typing in the caption that Uncanny Automator will add to the Instagram post.
One method is to simply type text into the ‘Caption’ box, such as ‘We just published a new post. Read all about it on our blog!’ Uncanny Automator will then use this caption for every single Instagram post.

Another option is to add tokens to the caption. Similar to dynamic text, Uncanny Automator will replace the token with a unique value that it gets from the blog post, such as the post’s title or URL.
This allows you to create more engaging and interesting captions, instead of posting the same caption over and over again.
To see all the different tokens that you can use, go ahead and click on the asterisk button.
In the dropdown menu, find ‘A user publishes…’ and then click on the arrow next to it.
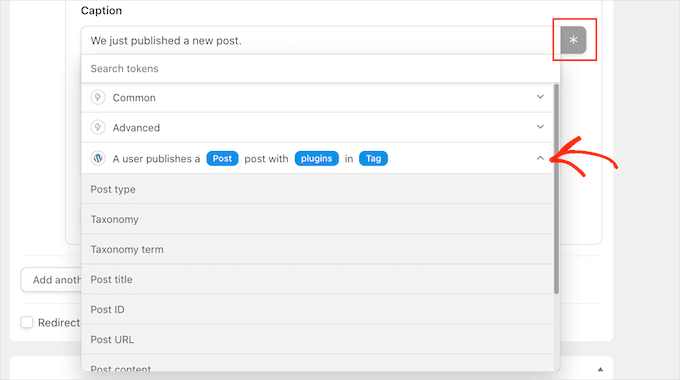
Now, find the token that you want to add to your caption, and click on it.
To create more interesting and helpful captions, you may want to use a mix of plain text and tokens, as you can see in the following image.
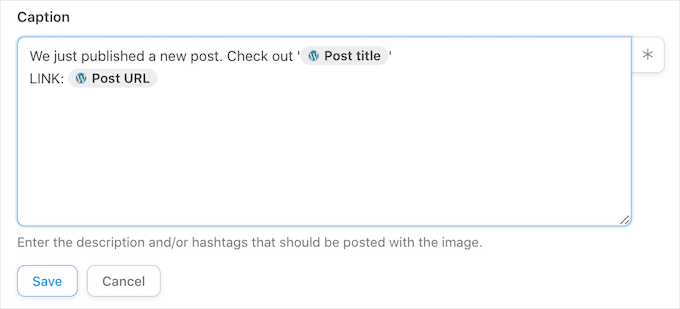
When you’re happy with your recipe, click on the ‘Save’ button.
The final step is activating the recipe so that it will start automatically publishing from WordPress to Instagram.
To publish your automated workflow, find the ‘Recipe’ section on the right side of the screen. Then, simply click on the slider to turn it from ‘Draft’ to ‘Live.’

Now, every time someone publishes a new blog on your WordPress website, Uncanny Automator will make a new Instagram post automatically.
Bonus Tip: How to Get More Out of Your Instagram Feed
Automatically publishing your blog posts to Instagram is a great way to keep your Instagram content fresh and updated.
To get more attention for their Instagram accounts, often professional bloggers and online store owners will embed their Instagram feed on their websites.
This helps you add social proof, keep visitors longer on your site, increase engagement, and even boost sales.
The easiest way to embed Instagram feeds on WordPress is by using Smash Balloon Instagram Feed. It is the best Instagram plugin for WordPress and allows you to add Instagram content to your website automatically.
There’s a free version of the Instagram plugin that’s used by over 1 million websites.
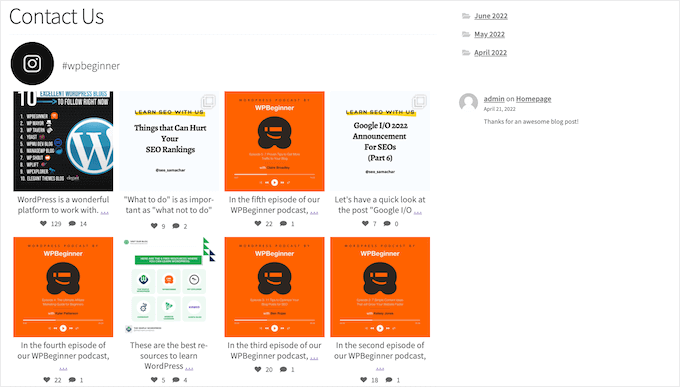
You can use Smash Balloon to customize exactly how your Instagram feed will look on your website and the content it shows.
You can even sort feeds based on Instagram hashtags, show likes and comments, create a custom Instagram photo feed in WordPress, and more using its simple editor.
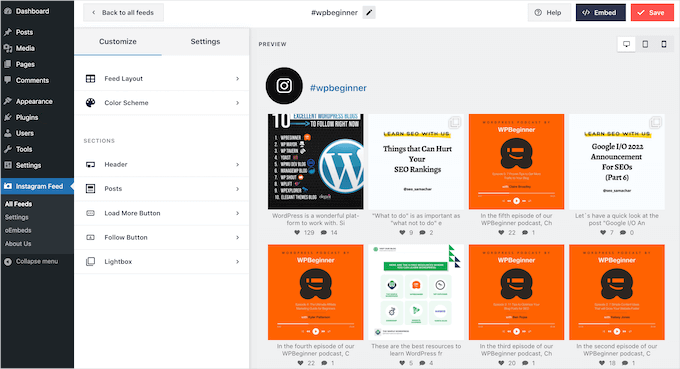
After creating your feed, you can add it to any page, post, or widget-ready area simply by using the Instagram Feed block.
For more details, see our guide on how to easily embed Instagram in WordPress.
FAQs: How to Automatically Publish from WordPress to Instagram
Still have questions about connecting your WordPress site to Instagram? Below are some common FAQs to help you make the most of your automation setup.
Do I need an Instagram Business account for this to work?
Yes, the method described in this guide requires a free Instagram Business account. Instagram’s platform rules state that only Business accounts can connect to third-party tools for automated posting. Your Business account must also be linked to a Facebook Page.
Can I automatically post videos from WordPress to Instagram?
The automations we covered focus on publishing photos, such as your featured image. While posting videos automatically is more complex due to Instagram’s API limitations, some advanced setups with tools like Uncanny Automator might allow it.
However, for reliability, we recommend focusing on image automation.
How can I display my new Instagram posts back on my WordPress site?
That’s a great way to boost engagement and social proof. The easiest option is to use the Smash Balloon Instagram Feed plugin. It lets you embed a live, customizable feed of your Instagram content anywhere on your WordPress site.
More Social Media Guides to Grow Your WordPress Website
We hope this article helped you learn how to automatically publish from WordPress to Instagram. If you find this helpful, you might want to see our other guides on:
- How to Display Instagram Photos in WordPress Sidebar Widget
- How to Add the Facebook Like Button in WordPress
- How to Embed Facebook Albums in WordPress
- How to Create a Viral TikTok Giveaway in WordPress
- Most Wanted Twitter Hacks and Plugins for WordPress
- How to Add Your Social Media Feeds to WordPress
- How to Add Social Share Buttons in WordPress
- How to Display Social Media Followers Count in WordPress
- Best Social Media Plugins for WordPress
- The Complete Social Media Cheat Sheet for WordPress
If you liked this article, then please subscribe to our YouTube Channel for WordPress video tutorials. You can also find us on Twitter and Facebook.


Have a question or suggestion? Please leave a comment to start the discussion.