Are you struggling to keep your blog updated with fresh content while managing everything else on your site?
Allowing users to submit posts is a fantastic way to grow your content library and build an active community without writing every single word yourself.
At WPBeginner, we have managed multi-author sites for more than 16 years and tested countless submission workflows. We know the best methods to accept user content while keeping your site secure and organized.
In this article, we will show you how to allow users to submit posts to your WordPress site using three easy methods.

Why Allow Users to Submit Posts on Your WordPress Site?
User-generated content is very useful in attracting new website visitors and growing your business.
You can allow users to submit guest posts, add images to your gallery, or create new business listings in your business directory.
This way, you’ll get more content for your WordPress blog and cover different topics in your niche. It also helps increase your readership and gain different perspectives on important topics.
With user-generated content, you can even create a community and give them a platform to share their views and ideas. Moreover, adding high-quality content to your WordPress website can also improve your search engine rankings.
Having said that, let’s look at the three ways to allow users to submit posts on your WordPress site without writing any code. You can use the links below to pick a method of your choice:
- Method 1: Front-end WordPress Post Submissions With WPForms
- Method 2: Accept User-Generated Content with User Submitted Posts Plugin
- Method 3: Allowing Users to Register and Submit Posts in WordPress
- Bonus: Style Your User Post Submission Form With WPForms
- Video Tutorial
- Frequently Asked Questions About User-Submitted Posts
- Additional Resources
Method 1: Front-end WordPress Post Submissions With WPForms
If you want your users to submit posts from the front end of your WordPress website without visiting the admin area, then this method is for you.
You will need WPForms, which, in our opinion, is the best WordPress contact form plugin on the market. It makes it super easy to create forms using a drag-and-drop builder.
In fact, we use WPForms on the WPBeginner site for all our contact form needs. Plus, we have tested and evaluated it thoroughly in lots of other contexts. We have found that it offers about 2000 premade templates and complete spam protection.
Plus, it even provides easy integration with payment gateways. This can be helpful if you plan to charge users for post submissions. To learn more about the plugin, see our complete WPForms review.
To get started, you need to install and activate the WPForms plugin. For detailed instructions, see our step-by-step guide on how to install a WordPress plugin.
Note: WPForms also has a free version. However, you’ll need the pro plan of the plugin to unlock the Post Submissions addon.
Upon activation, visit the WPForms » Settings page from the WordPress admin sidebar to enter your license key.
You can get this information from your account on the WPForms website. Once you’ve entered the key, click the ‘Verify Key’ button.
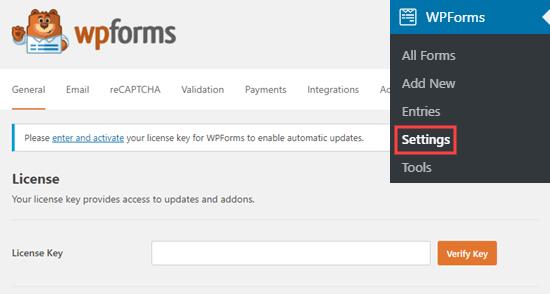
After verification, head over to the WPForms » Addons page from the WordPress dashboard.
From here, scroll down to ‘Post submissions addon’ and click on the ‘Install Addon’ button.
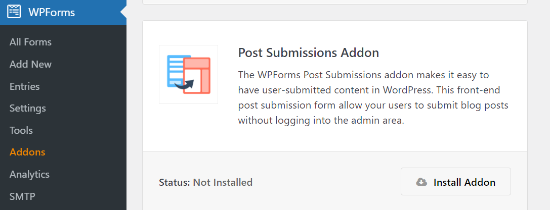
WPForms will now install and activate the Post Submissions addon for you. You will see the Status as active when it’s installed.
Now, you are ready to create a post-submission form on your website.
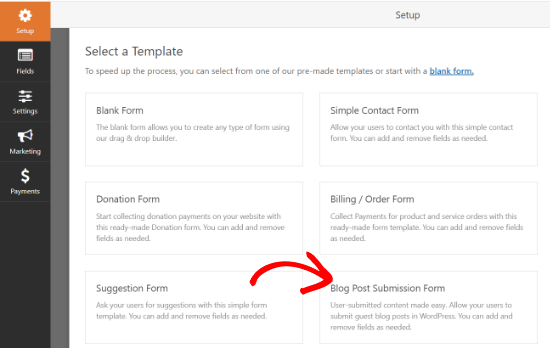
To start, simply go to the WPForms » Add New page from the admin area. This will take you to the ‘Select a Template’ page, where you need to provide a name for your form.
After that, simply choose the ‘Blog Post Submission Form’ template from the list.
WPForms will now launch the template in its form builder. Here, you will notice a form preview in the right corner of the screen and field options in the left column.
You can now easily add new fields from the panel on your left, remove existing fields, and rearrange their order using the drag-and-drop builder.
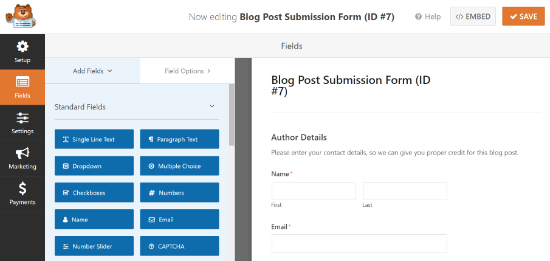
WPForms lets your users select post categories, add featured images, post excerpts, and even add custom fields.
You can also edit form fields by clicking on them. This will give you options to rename a field, change its format, add a description, edit its size, enable conditional logic, and more.
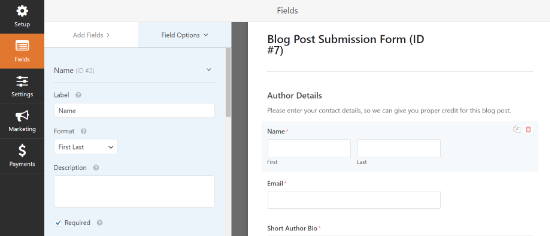
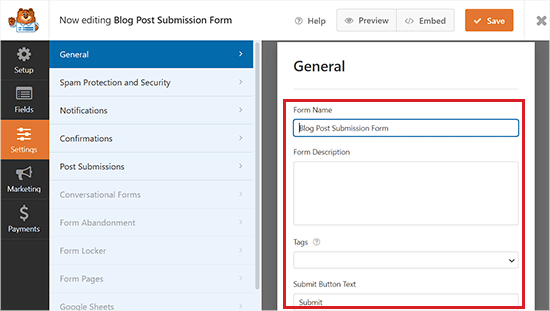
Once you are satisfied with the form, click on the ‘Settings’ tab in the left menu.
Now, from the ‘General’ settings tab, you can rename your form, add a description, edit the text of the submit button, enable dynamic fields, enable AJAX form submission, and more.
You can also toggle on the ‘Disable storing entry information in WordPress’ switch. This stops form entries from cluttering your database, but don’t worry, the actual blog post will still be created and saved in your WordPress Posts section.
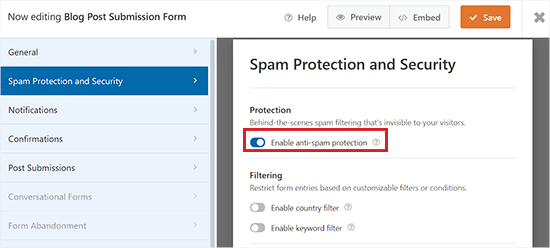
After that, switch to the ‘Spam Protection and Security’ tab from the left column.
By default, WPForms will enable the option of anti-spam protection. This is because it helps prevent people from submitting spam blog posts.
However, you can disable this option by toggling the ‘Enable anti-spam protection’ switch to inactive. Keep in mind that we do not recommend disabling spam protection in your forms.
You can also integrate your form with popular spam protection services like Akismet, reCAPTCHA, and Cloudflare Turnstile to further secure your form entries.
For detailed instructions, please see our tutorial on how to block contact form spam in WordPress.
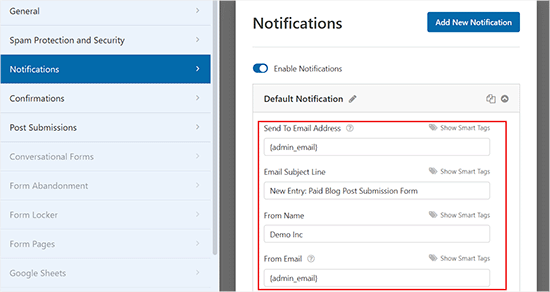
Next, you can go to the ‘Notifications’ tab and edit the email on which you’ll receive a notification when someone submits a form.
WPForms will use your admin email as default.
However, you can change that to any other email, and if you’d like to receive notifications on multiple emails, then simply separate them using a comma.
For more details, please see our tutorial on how to send confirmation emails after WordPress form submission.
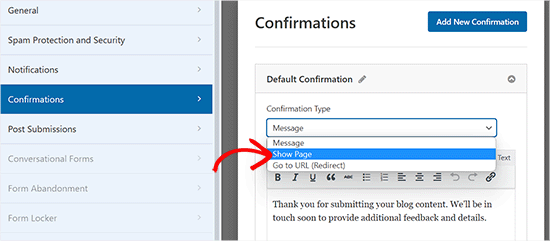
After that, go to the ‘Confirmations’ tab to set up a message your users will see when they submit a form.
You can show a message, display a page, or redirect users to a specific URL using the ‘Confirmation Type’ dropdown menu.
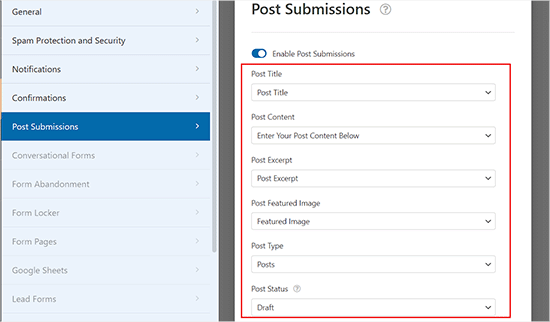
Next, switch to the ‘Post Submissions’ tab. On this screen, you must match the fields from your form to the corresponding post fields in WordPress.
For example, make sure the ‘Post Title’ dropdown is set to your form’s ‘Post Title’ field, and map ‘Featured Image’ to your file upload field.
By default, user-submitted posts will be saved as ‘Drafts’ pending review. However, you can also change the post type and allow users to submit content to your custom post types.
After that, don’t forget to click on the ‘Save’ button in the top right corner of the screen to save your form.
Now, you can click the close button (x) to exit the form builder and add the form to your website.
Add the Blog Post Submission Form to Your Website
First, you need to open up an existing or new page/post where you want to add the blog post submission form.
Once you’re there, click the ‘Add Block’ (+) button at the top left corner of the screen to open the block menu.
From here, locate and add the WPForms block to the page/post.
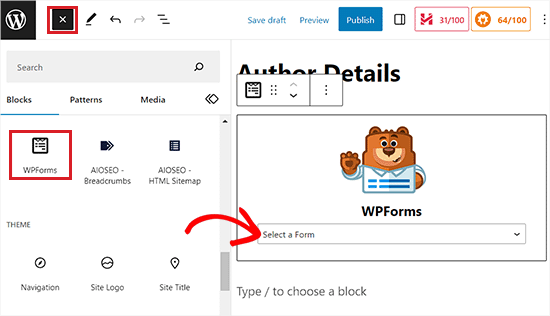
Next, you can select your post submission form from the dropdown in the WPForms block.
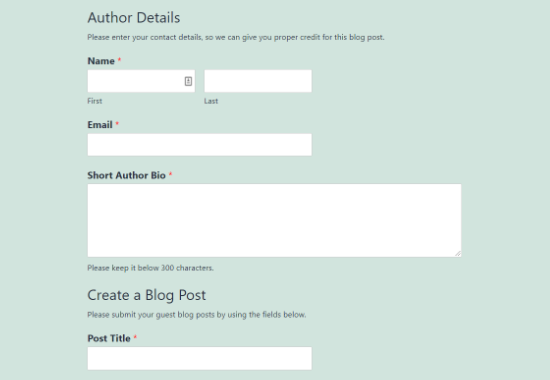
Now, save or publish your page, and then visit your website to see the post submission form in action.
Method 2: Accept User-Generated Content with User Submitted Posts Plugin
If you are looking for a free way to add a blog submission form to your website, then this method is for you.
First, you need to install and activate the User Submitted Posts plugin. For more details, see our beginner’s guide on how to install a WordPress plugin.
Upon activation, head over to the Settings » User Submitted Posts page from the WordPress admin area and expand the ‘Plugin Settings’ tab.
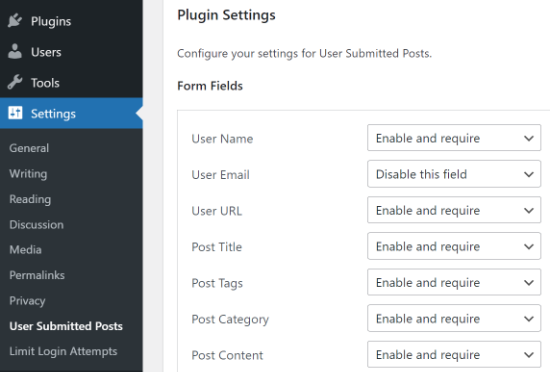
From here, you can select the fields you want to display on the post-submission form and hide any field you don’t want users to see.
You can also choose a default author for all user-submitted content. However, we recommend that you create a new guest user on your WordPress site and assign all user-submitted posts to that user.
You can also allow users to upload images and set a limit on the number of images and maximum image size. You can even set a user-uploaded image as the featured image.
After reviewing all plugin settings, click on the ‘Save Settings’ button to store your changes.
You are now ready to add the user-submitted posts form to your website.
Add the User-Submitted Posts Form to Your Website
First, open up an existing or new page where you want to add the user-submitted posts form in the block editor.
Once you’re there, click the ‘Add Block’ (+) button in the top left corner and then add the Shortcode block to the page.
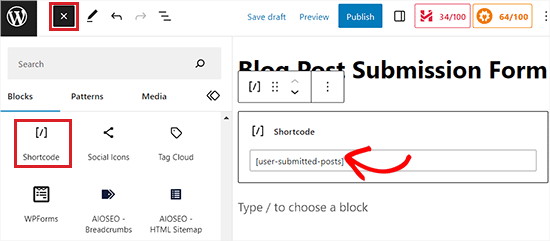
After that, add the following shortcode into the block:
[user-submitted-posts]
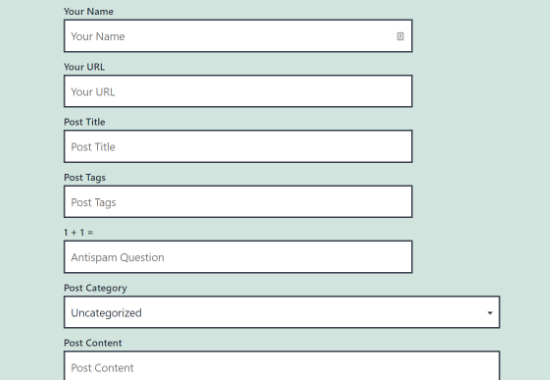
You can now save or publish your page and visit it to see your user-submitted posts form in action.
Method 3: Allowing Users to Register and Submit Posts in WordPress
WordPress comes with built-in user roles and capabilities that allow you to run a multi-author WordPress site.
You can allow users to register on your site and create content using the WordPress admin interface with limited capabilities.
First, you need to enable user registration on your WordPress site.
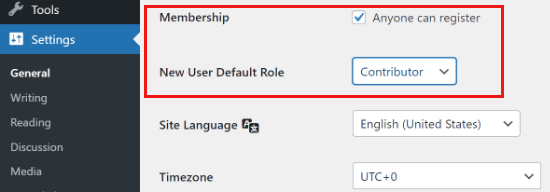
To do this, visit the Settings » General page from the admin sidebar and check the ‘Anyone can register’ option next to the Membership label.
After that, choose ‘Contributor’ or ‘Author’ as the default user role. We recommend choosing Contributor because these users cannot publish posts without your approval. If you choose Author, they can publish content directly, skipping your review.
Finally, don’t forget to click on the ‘Save Changes’ button to store your changes.
Users can now register on your WordPress site by visiting the WordPress login and registration pages. You can even create a custom user registration form in WordPress.
Once registered, users will be able to log in to your WordPress site and submit posts as authors.
Problems with this method:
Many beginners find this method a bit difficult for different reasons.
For example, if you are using two-step authentication on your WordPress site, then your users may find it difficult to log in.
Many websites password-protect the WordPress admin directory. Allowing users to register and use the WordPress admin area means you will have to share that password with them.
Registered users with author roles can see what other posts you have on your website.
Moreover, giving backend access is not completely secure. Malicious users could potentially upload harmful files or fill your website with spam content if you aren’t careful.
To prevent this from happening, you may want to see our ultimate WordPress security guide.
If these issues bother you, you can use methods #1 or #2 to allow users to submit WordPress posts without logging in to the admin area.
Bonus: Style Your User Post Submission Form With WPForms
With WPForms, you can also style your form so that it can attract more users and encourage them to submit posts or images on your website.
You can even customize the form according to your brand design to improve user experience and build trust among your audience.
To style your post submission form, you should first visit the WPForms » Settings page. Ensure that the ‘Use Modern Markup’ option is checked (this is usually enabled by default on new installations).
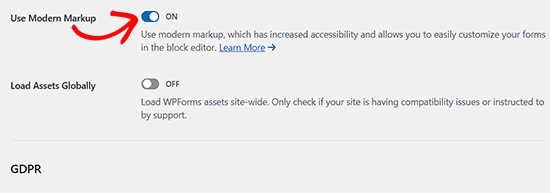
After that, click the ‘Save Settings’ button to store your changes.
Next, visit the post or page where you have added your post submission form and open the block panel on the right side of the screen.
Here, you will see different options to change the field styles, sizes, and colors for your form. You can also change the background color of the form fields from the right.
Once you are done, don’t forget to click the ‘Update’ or ‘Publish’ button to store your settings.
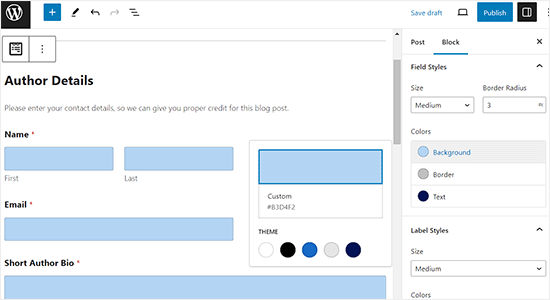
For more detailed instructions, you can see our tutorial on how to customize and style your WordPress forms.
Video Tutorial
If you’d rather learn by watching, then check out our video tutorial:
Frequently Asked Questions About User-Submitted Posts
At WPBeginner, we often hear questions from readers who want to accept guest posts or user content. Here are the answers to some of the most common questions.
1. Do I have to approve posts before they appear on my site?
Yes, absolutely. By default, both WPForms and the User Submitted Posts plugin save new entries as ‘Pending Review’ or ‘Draft’. This gives you full control. You can read, edit, and approve the content before it goes live on your website.
2. Can users upload images with their articles?
Yes. You can add a file upload field to your submission form. This allows users to attach a featured image or other photos. You can even set limits on file size and file type to save server space.
3. Do users need to register or log in to submit a post?
No, they do not. If you use Method 1 (WPForms) or Method 2 (User Submitted Posts), anyone can submit content without creating an account. This is often safer because you don’t have to give strangers access to your WordPress admin area.
4. Can I charge users a fee to submit a post?
Yes, you can. If you are building a niche directory or a job board, you might want to charge for listings. WPForms integrates with payment gateways like Stripe and PayPal, so you can accept payments directly through your submission form.
5. Is allowing user submissions safe for my website?
It is generally safe if you use a frontend form. This keeps users away from your site’s backend settings. We also recommend using spam protection tools like Akismet or Cloudflare Turnstile to block bot submissions.
Additional Resources
We hope this article helped you learn how to allow users to submit posts to your WordPress site. You may also want to see these additional resources:
- How to Block Contact Form Spam in WordPress
- How to Allow Users to Upload Images in WordPress
- Beginner’s Guide to WordPress User Roles and Permissions
- Ultimate Guide to Creating a WordPress Membership Site
- How to Improve Your Editorial Workflow in Multi-Author WordPress Blogs
If you liked this article, then please subscribe to our YouTube Channel for WordPress video tutorials. You can also find us on Twitter and Facebook.


Ronen
thanks mate, that was very very helpful guide…
WPBeginner Support
You’re welcome, glad our guide was helpful!
Admin
Sarah
hi,
Thank you for taking the time to make the tutorial.
One question …
Running an affiliate site, we use a defined layout for posts.
Is it possible for submitted posts to use such a pre-defined template?
This would save a ton of time not having to reformat submission
Many Thanks
WPBeginner Support
It would depend on how your specific layout is designed for if that would be an option or not.
Admin
Kazim
Does user can edit his/her post after submission??
chibuzo
please how can i get other users comment and reply to another post made by another user in my website using the plugin.
WPBeginner Support
If the post is live on your site it should allow your users the same comment settings as other posts on your site.
Admin
Dr. Abhijit Gupta
Hello,
I am looking for a WP plugin that will actually help visitors to submit their post or article to be published on my website. This could be product launch or some information anyone would want to share on my website. But these contents will be published to relevant category upon admin verification and it will look like regular post. Will this plugin help?
WPBeginner Support
To do what you’re wanting, you would follow this guide and instead of adding the form to a page, you would add the WPForms widget to where you want the form in your widgets area
Admin
neha jain
thanks for this useful post
WPBeginner Support
You’re welcome
Admin
Nitin Kapoor
Please Help!
Wordpress plugin : – Want customer to submit review by clicking the button “Submit Review” and want to showcase random 10 reviews on my Home Page.
It it has stars rating that will be big plus.
WPBeginner Support
Hi Nitin,
Please see our guide on how to create reviews site in WordPress.
Admin
Manu
Hello,
I would like to allow users to submit posts from backend but limit the number. Do you know if they are a solution in order to limit it (for example with paid memberships pro) ?
Thanks in advance,
Manu
Olajide olabisi
Thanks so much for this wonderful post.
But please can u recommend a theme/plugins that will allow users to upload an image and choose the category the image falls in and how they can also add location .. please help