You may not be aware that WordPress has an accessibility mode for inserting widgets. This lets you add widgets to your sidebar by clicking links instead.
You can explore the widget interface with greater ease, using keyboard navigation and avoiding the need for drag-and-drop actions. This feature is particularly helpful for users with visual impairments or other accessibility needs.
In this article, we will show you how to easily enable accessibility mode and add WordPress widgets without using drag and drop.
Why Enable Widget Accessibility Mode in WordPress?
A drag-and-drop interface is used to add widgets in both the block-based widgets editor introduced in WordPress 5.8 and the classic widget editor that was offered in earlier versions of WordPress.
However, some users find it difficult to add different widgets to their WordPress website using drag and drop.
The classic widget editor offered an accessibility mode that allowed you to add widgets simply by clicking links without the need for drag-and-drop. If you are using WordPress 5.8 or later, you can still enable that same mode by using a plugin.
That being said, let’s see how to easily enable widget accessibility mode on your WordPress site, step by step.
How to Enable Widget Accessibility Mode in WordPress
First, you need to install and activate the Classic Widgets plugin. For more details, see our beginners’ guide on how to restore classic widgets in WordPress.
Upon activation, head over to the Appearance » Widgets screen in your WordPress admin area. Here, you will notice that you now have the classic widgets interface.
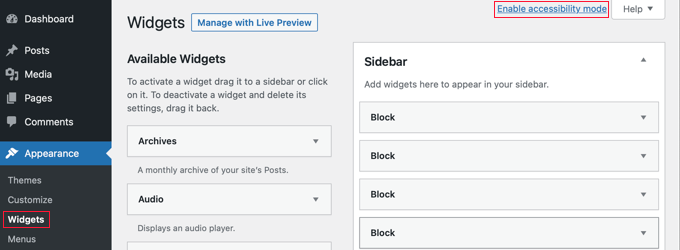
Now, simply click the ‘Enable accessibility mode’ link at the top right corner of the screen.
Activating the accessibility mode will reload the Widgets screen with a new interface. This new interface will now allow you to add available widgets using the ‘Add’ link next to the widget title.

When you do that, the widget will open on a single page where you can configure its settings. You can start by giving the widget a title and then choosing any other options you wish to enable.
In the bottom half of the page, you can choose the sidebar or widget area where you want to add your new widget.
Next to it, you will also see a position dropdown, which allows you to choose the position of this widget in your selected sidebar.
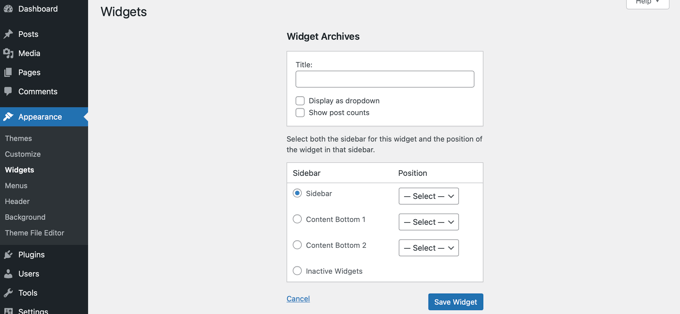
For example, to place the widget at the top of the sidebar, you will need to select ‘Sidebar’ from the list on the left and then choose ‘Position 1’ from the drop-down menu on the right.
Once you are satisfied, press the ‘Save Widget’ button to be redirected back to the widget screen.
Accessibility mode will also enable ‘Edit’ buttons next to active widgets, like this:
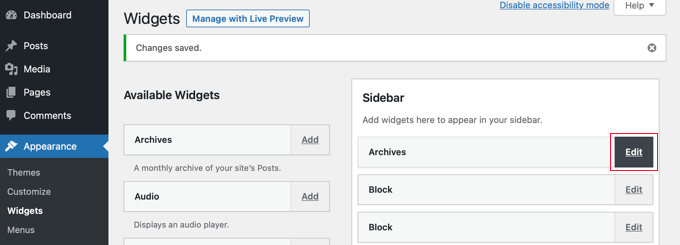
Clicking on the ‘Edit’ button will take you to the same screen as when you added a widget.
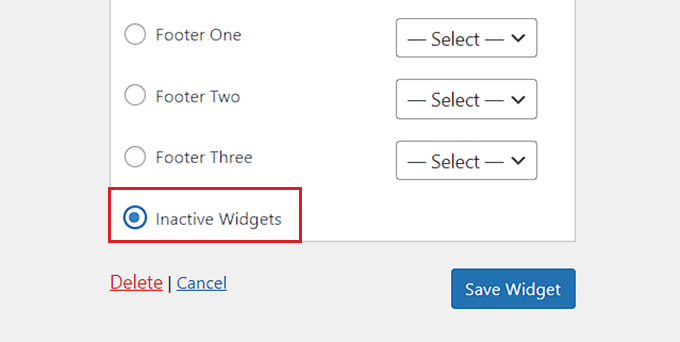
Here, you can edit your widget settings and even delete the widget by selecting the ‘Inactive Widgets’ option at the bottom of the page.
Once you’ve done that, don’t forget to click the ‘Save Widget’ button to deactivate the widget.
Bonus: Remove Inactive Widgets in WordPress
Once you have added the accessibility mode for widgets, it is also important to remove the inactive widgets on your WordPress blog.
When you switch your WordPress theme, some of your active widgets are placed in the inactive widgets section. This is because there is no matching widget area in your new theme.
These widgets can then clutter your site, making it a good idea to remove your inactive widgets. To do this, visit the Appearance » Widgets page from the WordPress dashboard and scroll down to the ‘Inactive Widgets’ area.
Here, you can click the ‘Clear Inactive Widgets’ button to remove them permanently.

However, if you are not using the classic widgets, then you can see our tutorial on how to remove inactive widgets in WordPress.
We hope this tutorial helped you learn how to add WordPress widgets in accessibility mode. You may also want to learn how to show or hide widgets on specific WordPress pages or check out our expert picks for the best Gutenberg-friendly WordPress themes to make your site aesthetically pleasing.
If you liked this article, then please subscribe to our YouTube Channel for WordPress video tutorials. You can also find us on Twitter and Facebook.


Sheena
Hi, I enabled this feature. However I cannot see any add/edit buttons, I also cannot revert this option/or see the disable option. I am now stuck as to how to edit/amend my widgets. Please help
WPBeginner Support
Hi Sheena,
You can disable it by clicking on the screen options button at the top right corner of the screen and then click on ‘Disable accessibility mode’ link.
Admin
juber
i do not working that option so how can i disable accessibility mode.Please help me i am very Tired to this……..
Neal Umphred
Thanks! That is SOOO much simpler . . .
Joseph
This option seems to be eliminated in the newer versions of Wordpress. Do you know how I can get it bak?
WPBeginner Support
We tested with the latest version of WordPress, and the accessibility option is still there.
Admin
WPBeginner Staff
Glad to be of help
Dale Reardon
Thankyou ever so much for this article. I am blind and was always getting my wife to do the widgets for me.
Didn’t know this existed.
Dale.