At WPBeginner, we’ve helped many store owners grow their online businesses. One thing we always recommend is setting up Google Shopping, because it’s one of the most effective ways to get your products in front of high-intent buyers.
When someone searches for products like yours, your items can appear right at the top of Google’s results.
The best part about connecting WordPress with Google Shopping is that once you’re set up, your products will show up in Google’s shopping results automatically.
This means potential customers can find your products right when they’re ready to buy.
In this article, we will walk you through connecting your WordPress store to Google Shopping.

Why Should You Add WordPress Products to Google Shopping
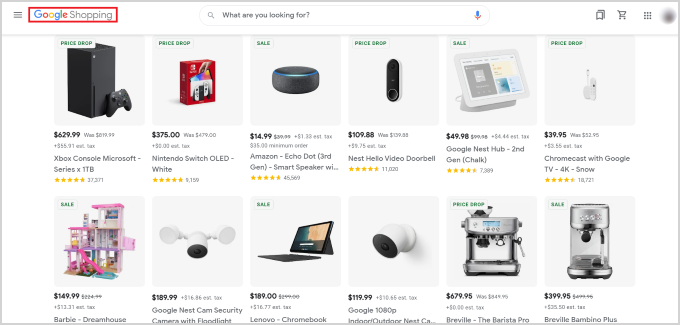
In recent changes to Google Search, more shopping results are now shown directly on the search page. This gives stores more exposure and can drive direct traffic with buying intent to your website.
Over recent years, we’ve seen how platforms like Google Shopping can act as powerful marketplaces, similar to Amazon and Etsy.
They allow users to search, view, and compare products from different online stores that have paid to advertise their products.
If you’re running a WooCommerce store, then adding your products to Google Shopping can make a significant difference in growing your business. We’ve seen how it can open up new revenue streams.
By listing your products, you’ll gain visibility among all users browsing Google Shopping. This has helped many of our users increase traffic to their WordPress websites, generate more revenue, and attract a larger customer base.
With that in mind, let’s walk through how you can add WordPress products to Google Shopping.
How to Add WordPress Products in Google Shopping
Step 1: Creating a Google Merchant Account
To add your products to Google Shopping, you have to start by creating an account in the Google Merchant Center. This is where your product information will be stored for viewing by Google Shopping.
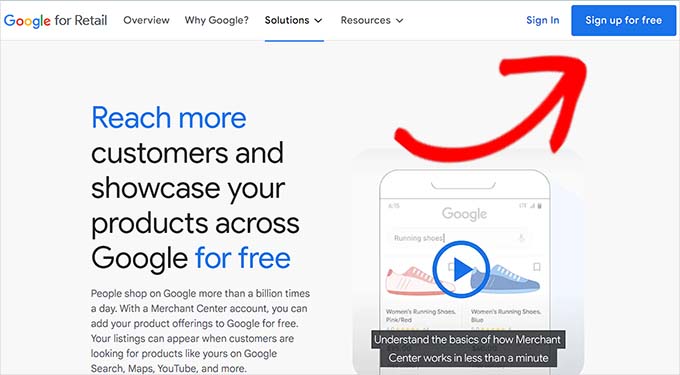
First, go to the Google Merchant Center page and click the ‘Sign up for free’ button.
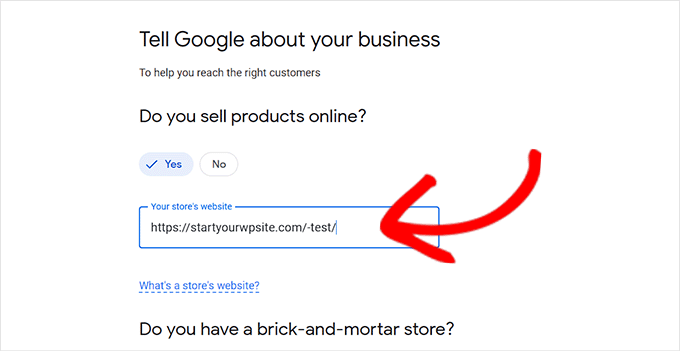
After that, Google will ask you about your online business.
Just check the answers that apply to you, and then provide your website’s URL.
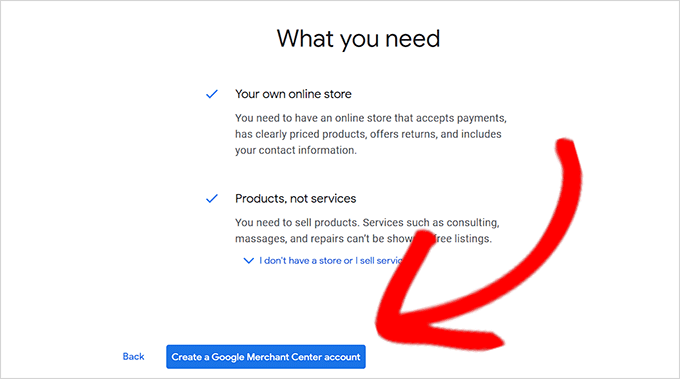
After you’ve provided the details, you’ll be redirected to another page.
Here, you simply have to click the ‘Create a Google Merchant Account’ button at the bottom of the page.
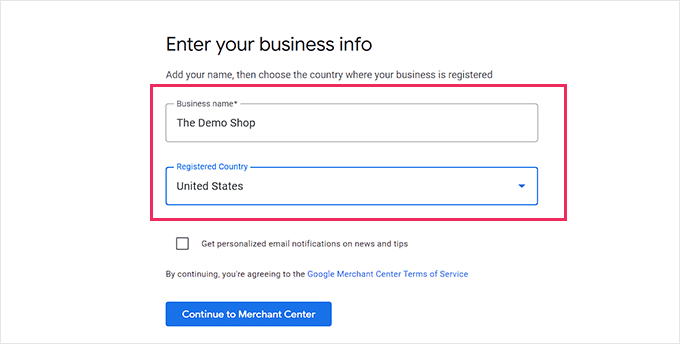
Now, you will be asked to provide your business details. You can start by writing your business name.
Next, select the country where your business is based from the dropdown menu below the ‘Registered Country’ option.
After that, click the ‘Continue to Merchant Center’ button.
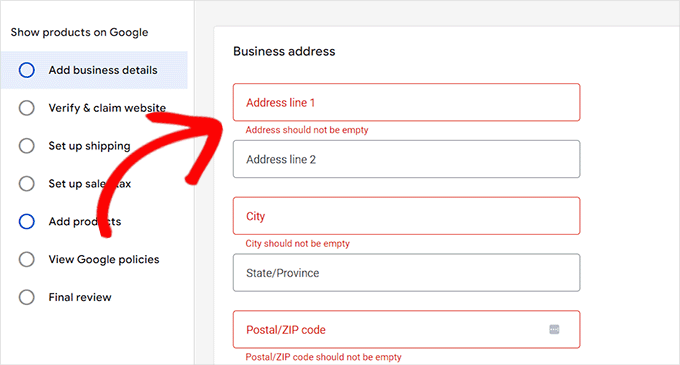
You’ve successfully created your Google Merchant Account. Now, all you have to do is provide your business info and shipping details.
Once you’ve filled in those details, simply click the ‘Save’ button at the bottom to store your settings.
Step 2: Linking Your Google AdWords Account
Now, you’ll have to link your Google AdWords account to your Google Merchant Center account so that you can show your products via Google Shopping.
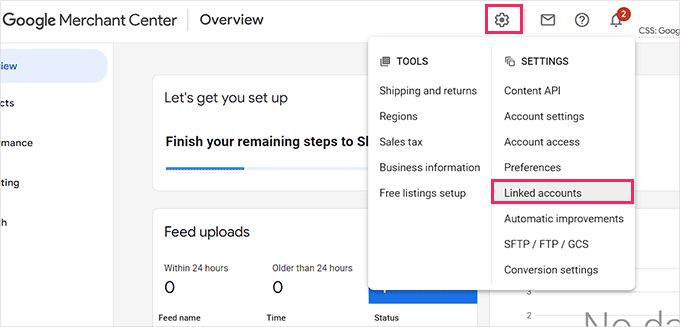
To link your account, simply go to the Google Merchant Center dashboard and click the gear icon at the top of the page.
Clicking it will open up a ‘Tools and Settings’ prompt. Here, you simply have to choose the ‘Linked accounts’ option.
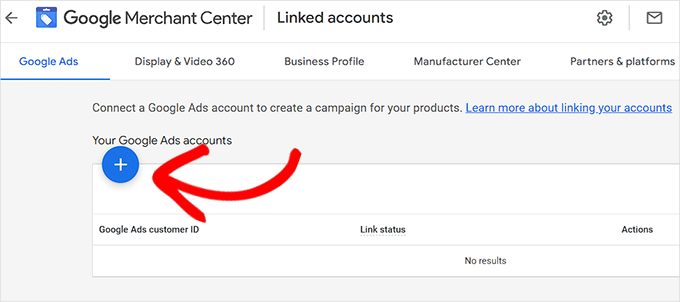
This will take you to the ‘Linked accounts’ page.
Now, you simply have to click the ‘+’ button to create your Google Ads account.
This will open up a ‘Create Your Google Ads Account’ prompt.
Simply choose your preferred time zone and currency and then click the ‘Create’ button.
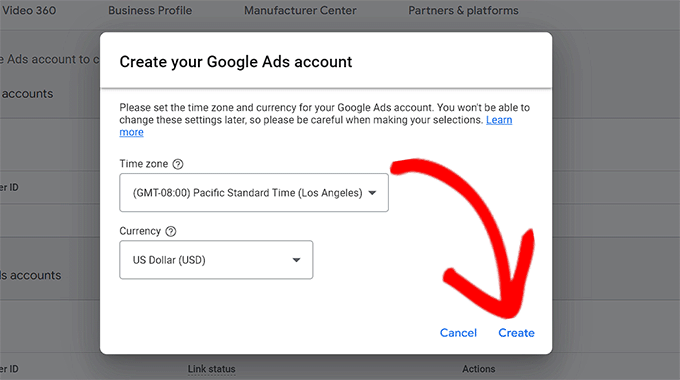
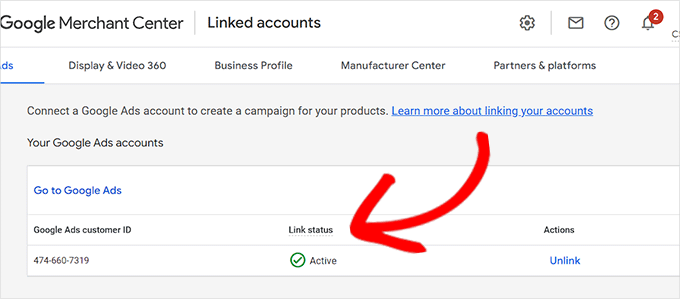
You have now successfully created your Google Ads account.
This is how it will look once your account has been created.
Step 3: Adding WordPress Products to Google Shopping
To add your WordPress products to Google Shopping, we will be using the AdTribes plugin to create a WooCommerce products feed that you can submit to Google Shopping.
Why we recommend AdTribes:
- Easy Integration: Quickly sync your WooCommerce products with Google Shopping.
- Customizable Feeds: Easily customize product feeds to fit your store’s needs.
- Automated Updates: Keeps your product data up-to-date automatically.
- Affordable Solution: Offers great features without breaking the bank.
First, you need to install and activate the free AdTribes plugin. For more instructions, check our guide on how to install a WordPress plugin.
Note: There’s also a premium version of AdTribes with advanced features such as more products approved by Google, additional fields like brand and GTIN, Facebook pixel feature, and more.
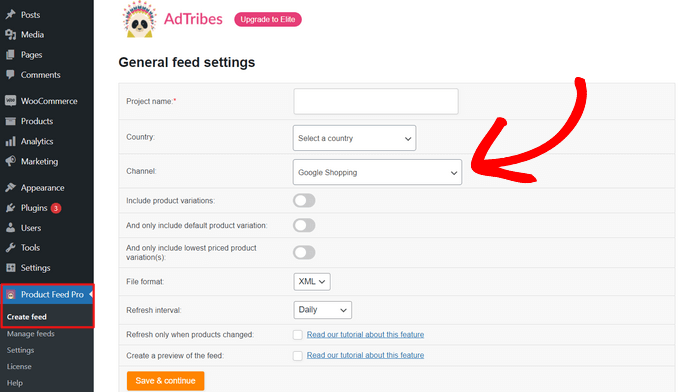
Upon activation, head over to the Product Feed Pro » Create feed page from the WordPress admin sidebar.
From here, simply fill in your business details and choose ‘Google Shopping’ from the dropdown menu next to the ‘Channel’ field.
Then, click the ‘Save & continue’ button at the bottom.
Next, you’ll be taken to the ‘Field mapping’ page. This is where you’ll have to match Google Shopping’s attributes to your WooCommerce attributes.
Luckily, the plugin does most of the work for you by default. So, when you reach the Field mapping page, many of Google Shopping’s attributes like the product ID, product description, product link, pricing, image, and more, will already have matching values.
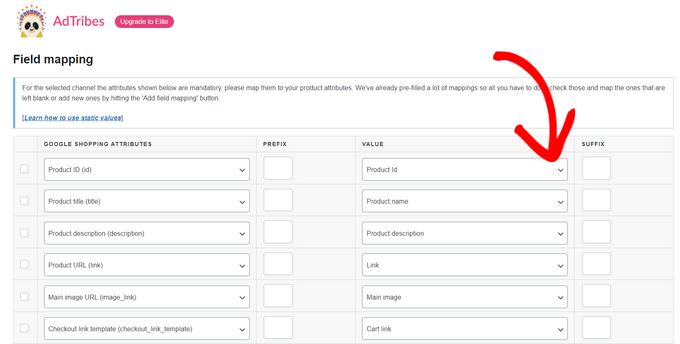
You can add extra fields by clicking the ‘+ Add field mapping’ button. This adds an empty field to the list, and you can choose a new attribute and matching value from each dropdown menu. You also have the option to add a custom field.
Select and fill in as many attributes as possible for more visibility in Google Shopping and click the ‘Save’ button.

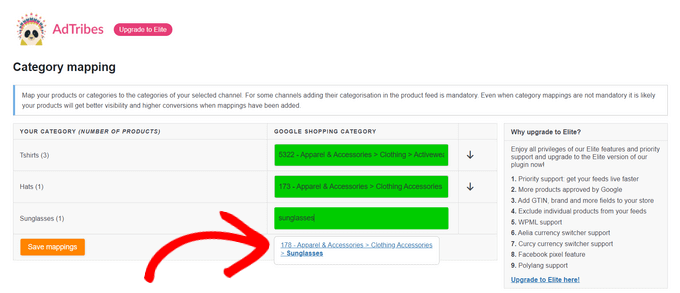
Next, you’ll be taken to the ‘Category mapping’ page. Here, you need to select your product categories.
Simply type your product categories in the corresponding ‘Google Shopping Category’ fields and select the most appropriate category from the suggestions that appear.
When you’re done, click the ‘Save mappings’ button to continue.
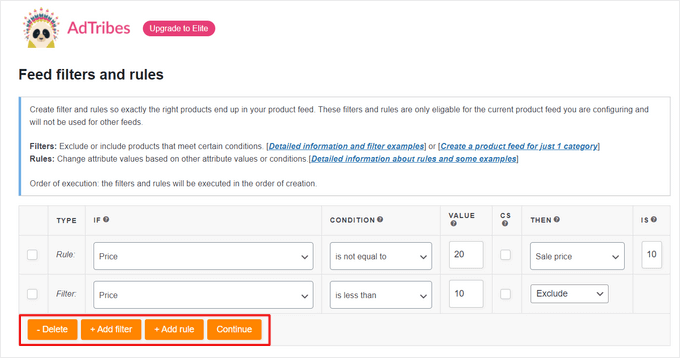
Afterward, you’ll be directed to the ‘Feed filters and rules’ page. From here, you can control exactly what you want your feed to display.
For example, you can add a filter to exclude products that are less than $10. Or, you can add a rule to change a specific products’ details, like ‘if a product’s price is $20, then change its sale price to $10’, for instance.
Then, click the ‘Continue’ button.
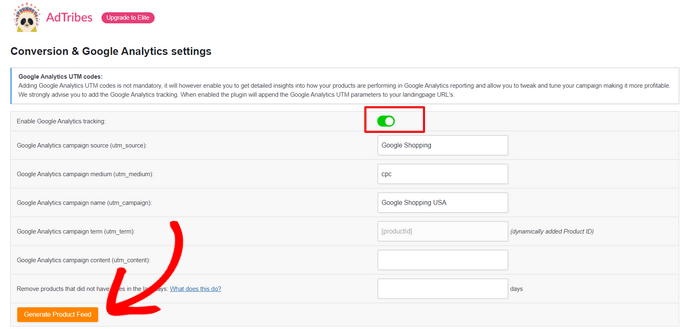
Next, you can enable Google Analytics tracking by toggling the switch at the top of the ‘Conversion & Google Analytics settings’ page. This will add Google Analytics UTM parameters to your product URLs.
Lastly, click the ‘Generate Product Feed’ button at the bottom.
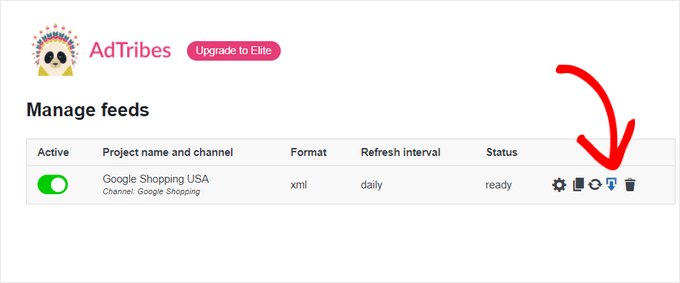
After you’ve created your Google Shopping feed, you’ll be redirected to the ‘Manage feeds’ page in AdTribes.
Here, you will be able to view your Google Shopping Feed. Now, you have to simply click the ‘Download’ button beside it.
Once you’ve downloaded your feed as an XML file, go back to the ‘Google Merchant Center’ dashboard and click the Products » Feeds option from the sidebar.
This will open up the ‘Primary Feeds’ page, where you have to click the ‘+’ button to add a new feed.
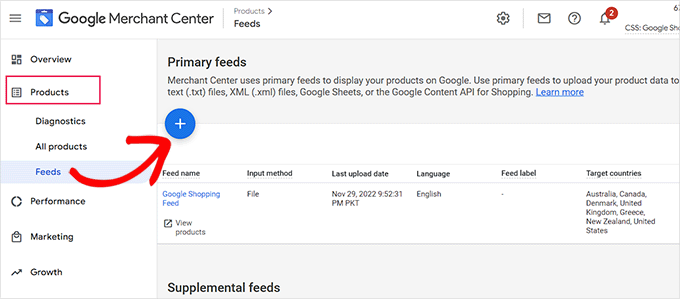
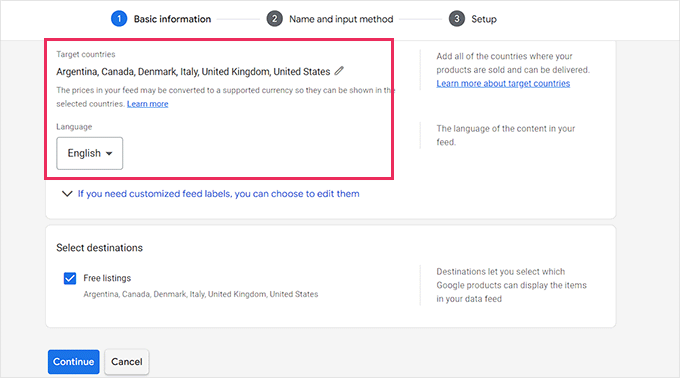
This will take you to the ‘New Primary Feed’ page where you can start by filling in basic details. First, start by adding all your target countries.
Next, select your preferred language and then click the ‘Continue’ button.
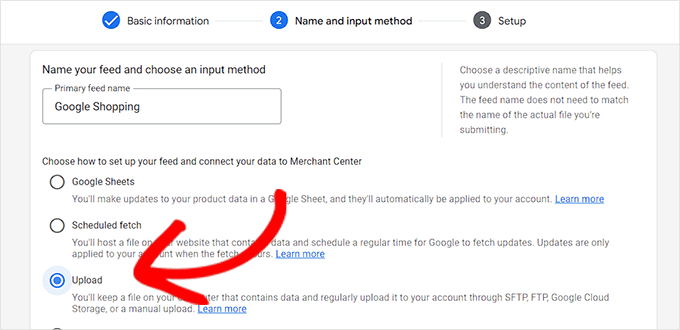
Then, you have to choose a name for your feed and select a method to connect your data to the Merchant center.
For this tutorial, we will be uploading the feed XML from WordPress.
After that, just click on the ‘Continue’ button.
Now that you’re on the ‘Setup’ page, simply type the name for your Google Shopping Feed.
Next, just upload the Feed file you got from WordPress and click the ‘Create Feed’ button.
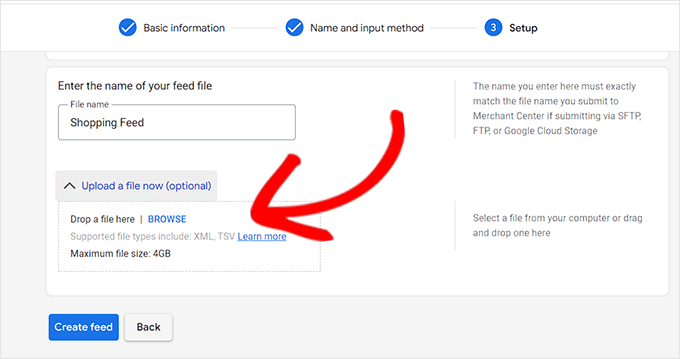
You have now successfully added your WordPress products to Google Shopping.
Bonus: How to Add Google Merchant Center Schema in WordPress
To improve your product search visibility in Google Shopping and increase conversion rates, you should add a Google Merchant schema in WordPress.
Schema markup is HTML code that provides search engines with more details about your products.
A GMC listing schema will make your search snippets more prominent and will allow your products to be featured as popular products for the relevant search terms.
The easiest way to add a Google Merchant Center listing schema to WordPress is to use All in One SEO for WordPress.
It is the best SEO plugin for WordPress that is used by over 3 million websites. We use AIOSEO on all our websites. See our case study on why we switched to AIOSEO.
Why we recommend All in One SEO:
- Optimized Product Pages: This helps you easily optimize product titles and descriptions for better search rankings.
- Schema Support: Adds rich snippets for products, reviews, and pricing to improve visibility in search results.
- XML Sitemaps: Automatically generates sitemaps to ensure all your products are indexed by search engines.
- WooCommerce Integration: Seamlessly integrates with WooCommerce, making it simple to manage SEO settings for your entire store.
To learn more, see our complete AIl in One SEO review.
First, you need to install and activate the All in One SEO for WordPress. For more instructions, please see our guide on how to install a WordPress plugin.
Upon activation, a setup wizard will open up. Simply go ahead and click the ‘Get Started’ button.

After that, you need to follow the setup wizard’s onscreen instructions to configure the plugin. If you need help, please see our guide on how to properly set up AIOSEO in WordPress.
After the AIOSEO plugin is set up, you need to visit the Products » All Products page from the admin sidebar.
From here, simply click the ‘Edit’ link below a product to open the ‘Edit Product’ page.
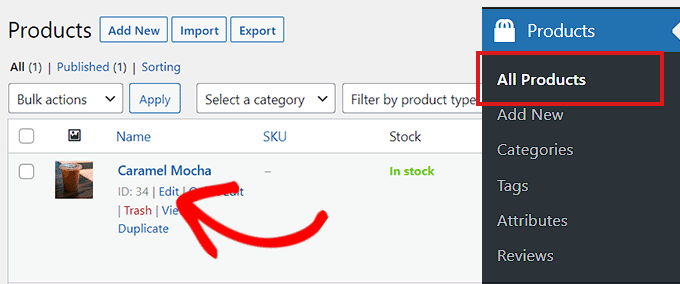
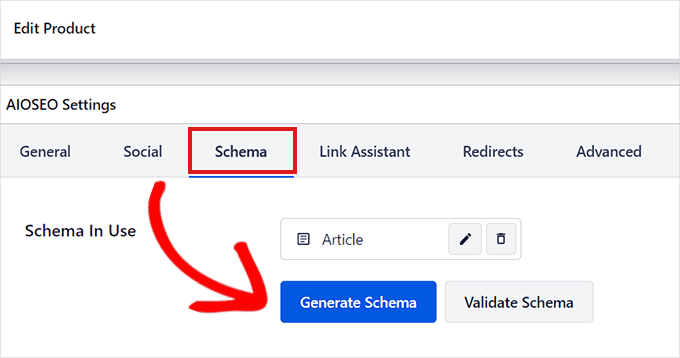
Once there, scroll down to the ‘AIOSEO Settings’ section and click on the ‘Schema’ tab.
Now, you need to ensure the schema type is set to ‘Product’ by default.
If that is not the case, simply click the ‘Generate Schema’ button.
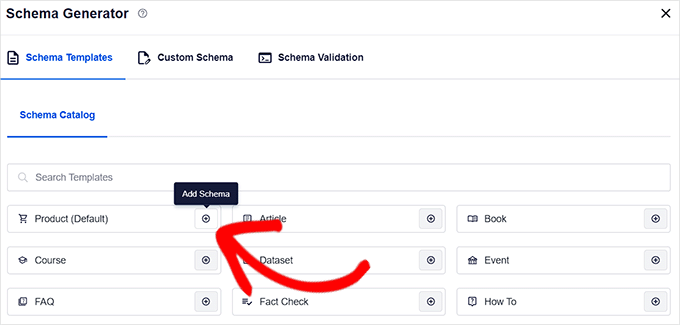
It will open up the Schema Catalog, listing all available schema templates.
From here, click the ‘Add Schema’ (+) button beside the Product option to set it as your primary schema.
Note: You may see the ‘Article’ schema already applied. If so, you can remove it as you add the new one because, in Google’s eyes, this particular page isn’t an article or blog post.
Next, you will need to fill in the product information to add the GMC listing schema.
For that, you need to click the ‘Edit Schema’ button next to the ‘Schema in Use’ option.

This will open up the ‘Edit Product’ modal, where you will need to fill in the product details.
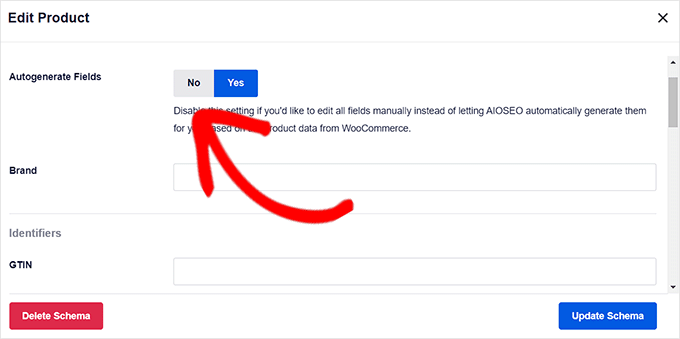
If you’re using WooCommerce, AIOSEO will automatically pull most of the product data from your product information.
However, if you want to fill in the information manually, you need to simply toggle the ‘Autogenerate Fields’ switch to ‘No.’
You will need to add the product attributes, including the name, description, image, ISBN, price, material, color, shipping details, and more.
We recommend that you provide all the details so that the schema markup can make your product snippets more engaging.
Once you’re done, simply click the ‘Update Schema’ or ‘Add Schema’ button to store your settings.
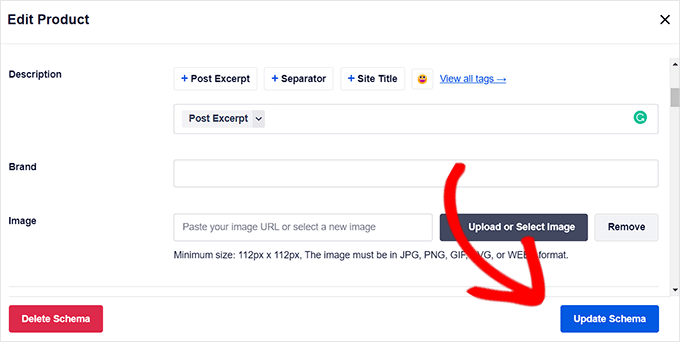
You have successfully added the Google Merchant Center listing schema to WordPress. Your products can now be featured on the platform, hopefully earning you more sales.
Bonus Resources for Online Stores
The following are some additional useful resources that will help you manage and grow your online store:
- Best WordPress Coupon Code Plugins for Your Online Store
- eCommerce Price Model — How to Easily Price a Product
- Best WordPress Store Locator Plugins to Boost Local SEO
- eCommerce Website Maintenance Tips – How to Maintain Your Store
- How to Show Product Recommendations in WordPress (Easy Ways)
- eCommerce Security Tips: How to Secure Your WordPress Store
We hope you learned how to add WordPress products to Google Shopping. You may also want to check out our best WooCommerce reporting and analytics plugins and our article on how to speed up your eCommerce website.
If you liked this article, then please subscribe to our YouTube Channel for WordPress video tutorials. You can also find us on Twitter and Facebook.


Dennis Muthomi
I’m especially excited about the AIOSEO schema markup section because I’ve seen it work wonders on several ecommerce sites I manage.
one thing I would add is to keep an eye on your Google Search Console for any schema markup errors. It’s super important to fix these quickly! I’ve been doing regular schema validation checks and staying on top of product feeds. The results? Pretty amazing actually – we’ve seen up to 30% better product approval rates and visibility in Google Shopping.