Adding subscriptions to your WooCommerce store can unlock consistent revenue streams. It allows you to offer memberships and create exclusive premium content for your customers.
This setup can enhance customer loyalty and provide a steady income.
We’ve seen many businesses find subscriptions to be a game-changer for retaining customers. Plus, at WPBeginner we run a no-fee membership program for our own video site, so we know a thing or two about subscriptions.
In this guide, we’ll show you the simple steps for how to add subscriptions to WooCommerce.
Why Add Subscriptions to WooCommerce?
There are many benefits to adding WooCommerce subscriptions to your WordPress site.
First, it helps to automate the billing process and saves you a lot of time. You don’t have to manually invoice your customers every single month.
By adding subscription payments to your eCommerce business, you’ll have more consistent cash flow, fewer payment errors, and fewer payment delays.
It also gives you more flexibility in the type of WooCommerce site you can create. Some of the most popular eCommerce brands in recent years have used a subscription model for their business.
For example, Dollar Shave Club applies recurring physical product subscriptions. Then, members-only meal services, like Hello Fresh, are gaining traction. There are also curated subscription box services like Stitch Fix.
With that in mind, we’ll show you how to add subscriptions to WooCommerce. We’ll cover multiple ways to add subscriptions to WooCommerce, and you can choose the one that works best for your business:
Ready? Let’s get started.
Method 1. Add WooCommerce Subscriptions (Paid Option)
This method is easier and recommended for most WooCommerce store owners.
For this, we’ll be using the official WooCommerce Subscriptions extension.
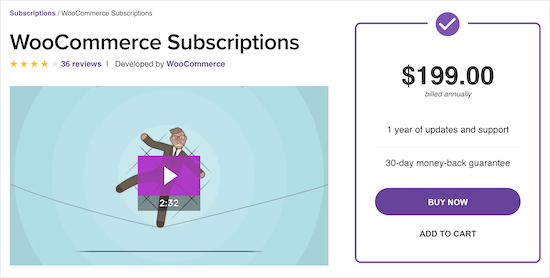
This extension, built by the WooCommerce team, allows you to create and manage subscription products and recurring payments.
You’ll be able to do things like create subscriptions for digital and physical products, create monthly subscription boxes, yearly software packages, and more.
Also, it offers 25 payment gateway integrations, including popular choices like PayPal and Stripe. This means your customers will have a smooth checkout experience.
Then, customers can choose a manual subscription renewal method if they have unsubscribed and want to rejoin your plan. It supports automatic rebelling on failed subscription payments as well, so you never lose revenue.
The easiest way to get started with WooCommerce Subscriptions is to sign up for Bluehost WooCommerce hosting.
Bluehost has agreed to offer our readers an exclusive discount that includes the free $199 WooCommerce subscription extension.
Aside from free WooCommerce subscriptions, this Bluehost plan also comes with close to $1000 worth of premium extensions for free, including Online Bookings & Appointments, Jetpack Premium, and more.
This is why they’re among the top WooCommerce hosting providers on our list.
Once you sign up for hosting, both WooCommerce and the WooCommerce Subscriptions extension will be automatically installed.
After that, you can easily add subscriptions to any WooCommerce products to your online store.
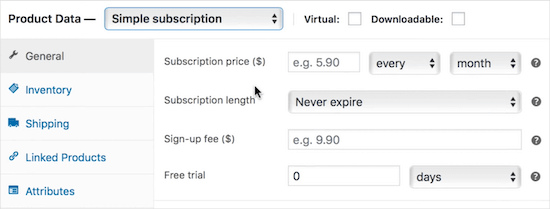
You’ll have an option in your WooCommerce product editing page to set your subscription settings.
For more help with WooCommerce, you can see our ultimate WooCommerce tutorial.
Method 2. Add WooCommerce Subscriptions (with a Free Plugin)
This method is for store owners on a budget who want to add subscriptions to WooCommerce.
To do this, we’ll use the YITH WooCommerce Subscription plugin. This free plugin lets you simply add subscriptions for simple, digital, or downloadable products. If you need even more features, you can upgrade to the Pro version for $199 per year.
YITH is a WooCommerce-centered developer, and you can find almost any feature you want for WooCommerce in one of their plugins. For more details, you can check out their whole library here.
To add subscriptions to the plugin, you’ll need to install and activate it. If you need help, you can refer to our step-by-step guide on how to install a WordPress plugin.
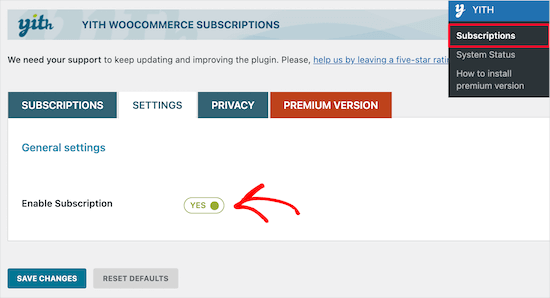
After the plugin is installed and activated, your WordPress dashboard will have a new menu item called ‘YITH’.
Let’s navigate to YITH » Subscriptions. From here, you’ll want to switch to the ‘Settings’ tab and make sure the ‘Enable Subscription’ box is set to ‘Yes.’
Next, you’ll want to open a product you want to turn into a subscription by navigating to Products » All Products.
Then, go ahead and select your subscription product.
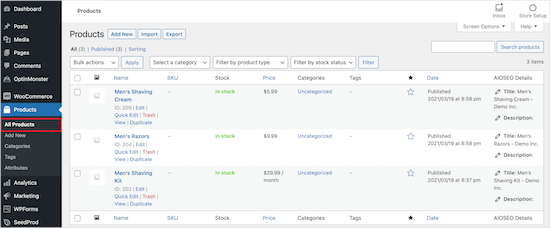
Under ‘Product data,’ you’ll need to check the ‘Subscription’ box.
This will add a new option where you can set the subscription price and maximum length of the subscription.
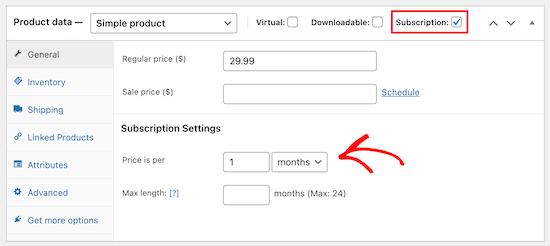
Once you’ve added your subscription settings, let’s make sure you save your product by clicking the ‘Update’ button.
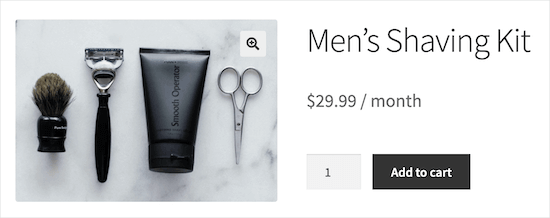
Now, when your visitors purchase a product, they’ll have the subscription payment option.
Note: If you want to add different subscription plans at various price points, you can use YITH WooCommerce Membership. This allows you to set tiered pricing, where the higher plan offers more premium benefits than the basic membership levels.
Method 3. Add WooCommerce Subscriptions for Memberships and Courses
Are you creating a membership site or selling online courses and want to set up subscription payments for your visitors?
This is where MemberPress comes in.
With this best WordPress membership plugin on the market, you can sell subscriptions, online courses, premium content, and digital downloads.
To learn more, you can see our detailed MemberPress review.
But first, you’ll first need to create your membership website. For more detailed instructions, please see our step-by-step guide on creating a WordPress membership site.
After that, you can add recurring subscription memberships with MemberPress. To do this, you can refer to our simple, step-by-step guide on how to accept recurring payments in WordPress.
Once you’ve set up subscription memberships, you can assign your WooCommerce products to your memberships.
This allows you to hide specific products and make users sign up for a membership to view your products or make a purchase.
To do this, navigate to MemberPress » Rules and click ‘Add New.’
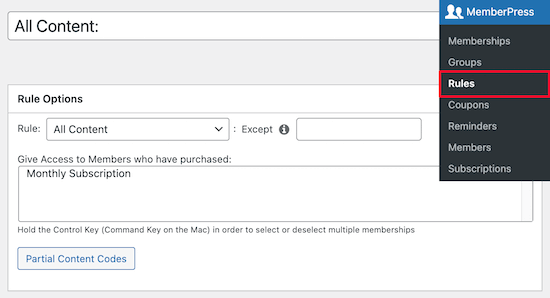
Next, under the ‘Rule Options’ setting, you can select ‘All Products’ from the dropdown list.
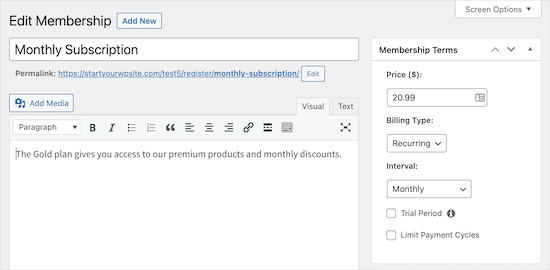
Then, simply select the membership level you want to give access to the products. In this case, we’re only giving our ‘Monthly Subscription’ members access to the products in our store.
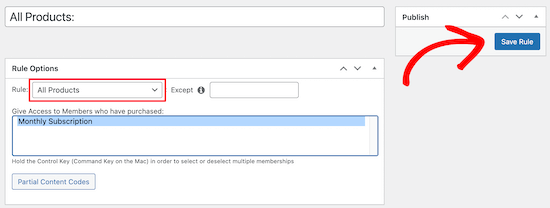
Once you’ve made these changes, make sure to save them by clicking ‘Save Rule.’
You can also use MemberPress as a complete LMS plugin to create courses, which you can set up for recurring subscriptions. MemberPress is also the best WordPress LMS plugin in the market.
You can use the simple drag-and-drop builder to create online courses with an immersive learning experience. With their course addon, you can drip-feed content to subscribers and add engagement triggers to keep them active.
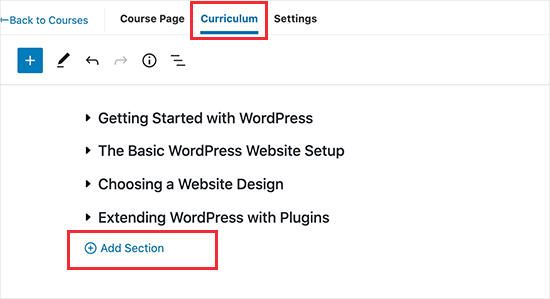
The ‘Courses’ feature of MemberPress works seamlessly with any WordPress theme.
Their classroom mode feature is our favorite because it offers a distraction-free learning experience.
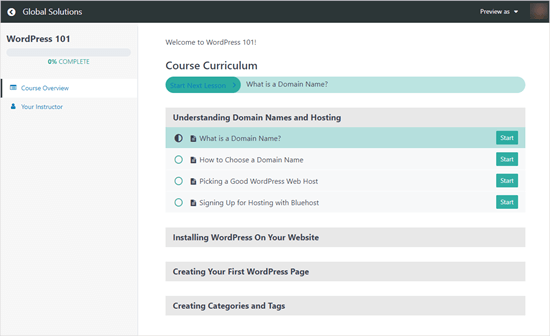
Once your customers sign up for a membership level in MemberPress, they’ll be automatically enrolled in your courses. You can even bundle your courses together for a discount and sell course access to those as a recurring subscription, too.
Bonus Tip: Want to Create a Members-Only WooCommerce Store Instead?
If this guide isn’t what you’re looking for and you want to create a members-only WooCommerce store instead, don’t fret. We have a guide on that for you.
But first, what exactly is a members-only WooCommerce store?
A members-only WooCommerce store requires users to become members to view and buy products. The store can be fully private or offer exclusive products.
Some common reasons for this setup are selling wholesale goods, limiting sales to paying members, offering special shipping discounts, providing different products for each membership level, and giving loyal customers access to popular items.
Then, membership can be based on a paid subscription or a simple sign-up process.

For more on this topic, you can read our guide on how to create a members-only WooCommerce store.
We hope this article helped you add subscriptions to WooCommerce. You may also want to see our list of the best WooCommerce plugins for your store and our ultimate guide on WooCommerce SEO.
If you liked this article, then please subscribe to our YouTube Channel for WordPress video tutorials. You can also find us on Twitter and Facebook.


Echo
#2 YITH you never mentioned a payment gateway for any of the subscriptions, if I missed it I apologize, I’m using Stripe. How is Stripe going to know this is a subscription if I’m using YITH?
WPBeginner Support
You would want to add their stripe integration and then you would be able to charge using Stripe.
Admin