If you post sponsored content, it’s important to follow regulations by clearly labeling those posts. One easy way to do this is by adding a ‘Sponsored Post’ prefix to your titles.
While we don’t do sponsored posts on WPBeginner, we have a similar feature.
We believe it’s important to disclose that our content is reader-supported. So, if you read our blog posts, you’ll see this disclosure at the end of each post. This helps us maintain transparency.
Manually adding this snippet can be tedious, which is why we automate the process.
In this article, we will show you how to automatically add a “Sponsored Post” prefix to your post titles in WordPress.

Why Add Sponsored Post Prefix to Your Posts?
Once your WordPress blog starts to attract more traffic, you may start thinking about how to monetize it.
You can use WordPress and blogging to make money online by doing what you love.
One way to do that is through sponsorships. This is where a company pays you to represent their product, talk about it, and promote it to your readers. The sponsorship may be for a single post or an ongoing relationship.
When publishing sponsored posts, it’s crucial to know about the laws in your area about disclosure.
For example, in the United States, a blogger who publishes a sponsored post must comply with the FTC’s Endorsement Guides. This includes disclosing whenever a post is sponsored.
One way to do that is to add a prefix to the title of every sponsored post.

We’ll show you how to do exactly that in this guide. It’s easier than you may think. You can do it through the block editor and then adding a custom code snippet. This may seem intimidating to beginners, but we’ll walk you through every step using the free WPCode plugin.
With that in mind, here’s a quick look at 3 methods you can use to add a ‘Sponsored Post’ prefix to your post titles in WordPress:
Ready? Let’s get started!
Method 1: How to Add a Sponsored Post Custom Field to Your Post
You can start by opening one of your existing sponsored posts or creating a new one. The custom fields panel is normally located below the content editor. However, if you’ve never used custom fields before, then it will be hidden.
The way to display the custom fields meta box depends on whether you are using the block editor or the classic editor.
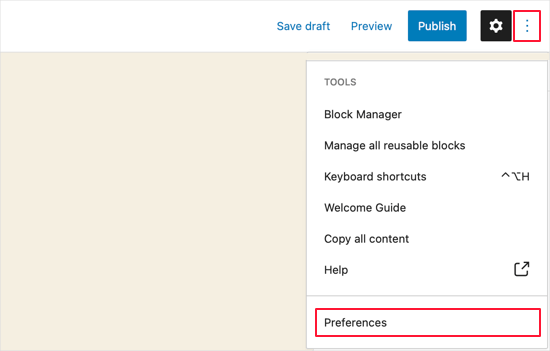
If you use the block editor, then you need to click on the three-dot menu at the top-right corner of the screen and select ‘Preferences’ from the menu.
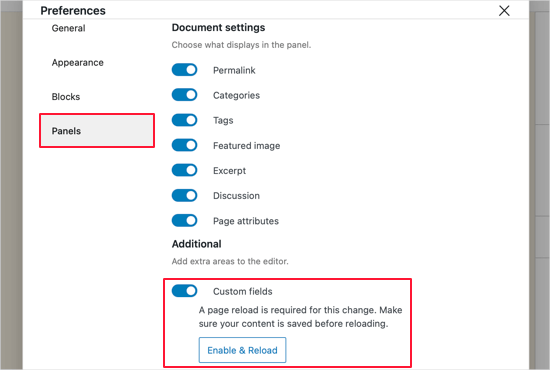
This will bring up a Preferences popup where you need to go to the ‘Panels’ section and then turn on the ‘Custom fields’ switch.
After that, you’ll want to click on the ‘Enable & Reload’ button to reload the post editor.
If you are still using the old WordPress classic editor, then you can click the ‘Screen Options’ button at the top right corner of your screen.
This will open a menu where you need to check the box next to the ‘Custom Fields’ options.

The post editor will then reload.
When you scroll below the content editor you’ll be able to see the custom fields panel.
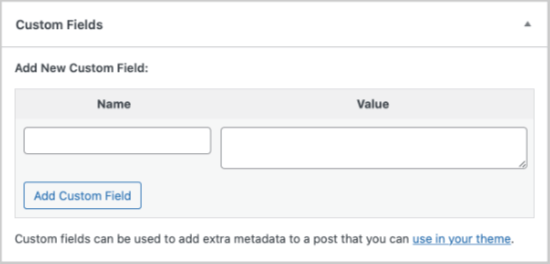
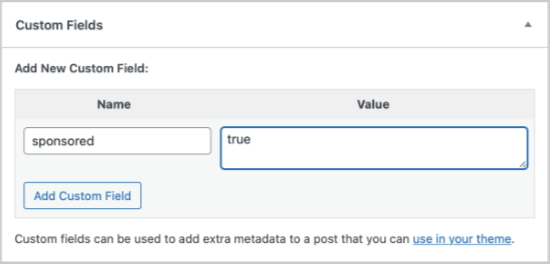
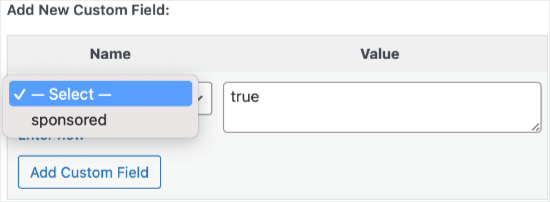
To add a new custom field, just type ‘sponsored’ in the ‘Name’ text box.
In the next field, be sure that the ‘Value’ is ‘true.’
Next, you need to save your post and scroll down to the custom fields meta box. You will notice that the custom field meta box is now showing a drop-down menu.
Next time you write a sponsored post, all you need to do is select ‘sponsored’ from the drop-down menu and enter ‘true’ in the ‘Value’ field.
Method 2: How to Add the Sponsored Post Prefix With a Code Snippet
After adding the sponsored custom field to your post, you need to add the code that will display the sponsored post title prefix.
To do that, you need to add a code snippet to your website.
Normally, this is done through your theme’s functions.php file.
However, we don’t recommend editing your theme’s functions.php directly because the smallest error can break your site. Plus, if you update your WordPress theme, all of your customizations will be removed.
Instead, we recommend using WPCode, the easiest and safest way to add code to your WordPress site without having to edit your theme’s functions.php file.

To get started, you need to install and activate the free WPCode plugin. For step-by-step instructions, you can see our guide on how to install a WordPress plugin.
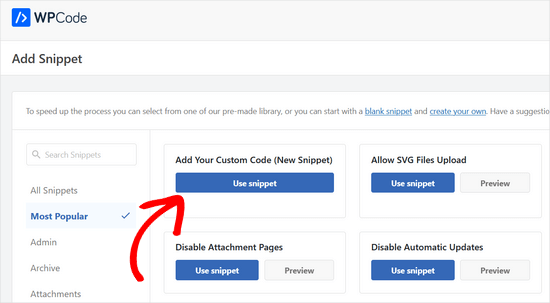
Once the plugin is activated, let’s head to Code Snippets » +Add Snippet from your WordPress admin dashboard. Then, you’ll want to hover over the ‘Add Your Custom Code (New Snippet)’ option and click the ‘Use snippet’ button.
After that, simply copy and paste the code snippet into the code box.
add_filter( 'the_title', 'wpb_sponsored' );
function wpb_sponsored( $title ) {
   global $post;
   $sponsored_text = '<span class="sponsored_text"> Sponsored Post</span> ';
   $sponsored = get_post_meta($post->ID, 'sponsored', true);
   if( $sponsored == 'true' && in_the_loop() ){
       return $sponsored_text.$title;
   }
   return $title;
}
Don’t forget to choose the ‘PHP Snippet’ option from the ‘Code Type’ drop-down list on the right side of the screen.
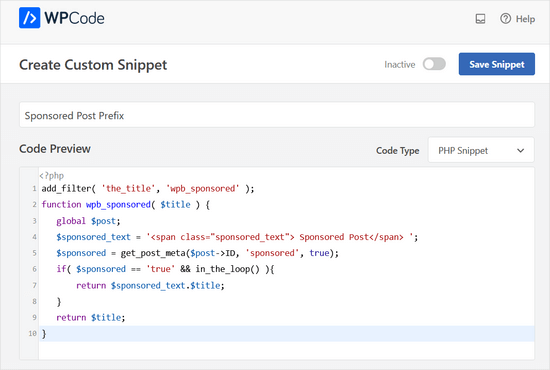
Then, you’ll need to click the ‘Inactive’ toggle to change it to ‘Active’ and the ‘Save Snippet’ button.
Now, WordPress will start displaying the prefix. You can try visiting the post you edited earlier, and you will see ‘Sponsored Post’ prefixed to the post title.

With a bit more work, you can improve the appearance of the prefix.
If you study the code snippet, then you will notice that we have wrapped the sponsored post text around a CSS class we named ‘sponsored_text‘. You can use this CSS class to highlight the text inside the post title.
Here is a little CSS that you can add to your theme:
.sponsored_text {
background: #eeffee;
font-size:small;
text-transform: uppercase;
padding:5px;
}
If you’re new to CSS, then be sure to check out our guide on how to easily add custom CSS to your WordPress site.

The code makes the background of the text green and uppercase and makes the font size small. It also adds a little padding around the highlight. Feel free to modify the CSS to meet your needs.
Method 3: How to Add a Sponsored Post Suffix With a Code Snippet
You might want to add the words ‘Sponsored Post’ to the end of your post’s title instead of the beginning.
You can achieve that by using this code snippet instead:
add_filter( 'the_title', 'wpb_sponsored' );
function wpb_sponsored( $title ) {
   global $post;
   $sponsored_text = '<span class="sponsored_text"> Sponsored Post</span> ';
   $sponsored = get_post_meta($post->ID, 'sponsored', true);
   if( $sponsored == 'true' && in_the_loop() ){
       return $title.$sponsored_text;
   }
   return $title;
}
Here’s what it looks like on WPCode’s ‘Code Preview:’
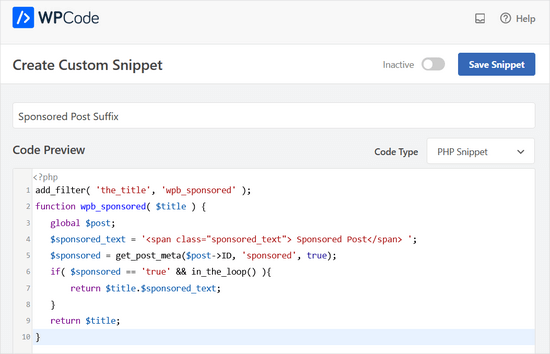
When you study the code, you’ll notice that there are just 2 changes.
We added a single letter space before the sponsored text so that it wouldn’t touch the actual post title, and then we switched the order to display $title first.
That’s it!
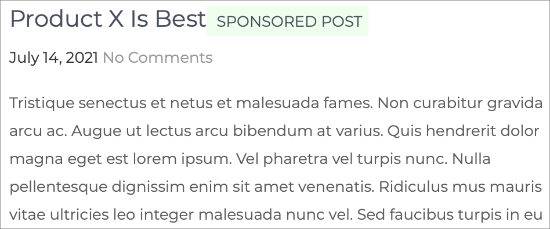
Here’s what it might look like on the live blog post:
Bonus Tip: How to Write an Affiliate Product Review
If you already use sponsored posts to make money blogging, you may be looking for other ways to monetize your site.
Affiliate marketing can be a great way to earn passive income. By writing engaging product reviews, you can build trust with your audience and encourage them to make purchases.
Here are some tips to help your affiliate product reviews stand out:
- Use Facts and Share Your Experience: Start with product details like specifications and then share your personal experience to add a genuine touch.
- Search for Customer Reviews: Look at feedback from other users to gain insights and learn about common issues. This helps you provide a well-rounded review.
- Create Transparency: Always include an affiliate disclosure at the top or bottom of your post. Be honest about the product’s pros and cons to set realistic expectations.
- Identify Needs and Provide Solutions: Know your audience’s challenges and recommend products that can help them. This makes your reviews more relevant.
- Use High-Quality Images: Include clear images to showcase the product. Just make sure to optimize your images so they don’t slow down your site.
- Focus on SEO: Optimize your reviews with relevant keywords, especially in the first 150 words. This will help your content rank higher in search results.
- Create Attractive Affiliate Links: Use a plugin like ThirstyAffiliates to shorten and customize your affiliate links, making them look cleaner and more trustworthy.
For more details, you can check out our article on how to write an affiliate product review.
We hope this article helped you learn how to add a sponsored post prefix to post titles in WordPress. Next, you might also like to learn how to insert ads within your post content or our expert picks of the best WordPress ad management plugins and solutions.
If you liked this article, then please subscribe to our YouTube Channel for WordPress video tutorials. You can also find us on Twitter and Facebook.


kenn
how can i created sponsored products not post. i want my sellers to be able to create sponsored products
WPBeginner Support
You would want to check with the support for your ecommerce plugin for if it has a sponsored product option
Admin
vo thang
I’ve done it,that’s Ok.But,Title post is appear in home page without sponsored text.
How can I make it appear in Home page ?
Thank you so much.
Angela Scott
Is there a way to add an image in place of the text, please?
Soibibo
Hi, I’m new to WordPress and talking about pasting codes to function.php file almost made me loose my site. please where exactly can I post this code on the function.php folder? I have zero knowledge of codes.
WPBeginner Support
Please take a look at our guide on pasting snippets from web into WordPress.
Admin
Ranish Malhan
Hi,
I have created a custom meta feild for my custom post type which is a check box.
So can u please tell how to display posts by checking whether that checkbox is checked or not?
WPBeginner Staff
Yes.
VIAINA
Hi, does “sponsored post” is also shown in the RSS feed?
Thanks.
clreed87
Thanks for the great tip! Will filtering on the_title() also be reflected in the RSS feeds for sponsored posts or just on the blog posts on the site?
Caroline
Great article. Works like a charm. But I cannot seem to make the custom field be saved so I can pick it from the dropdown box for a next post.
Any idea what I’m doing wrong?