Building a WooCommerce store can feel like trying to decorate an empty house – it’s hard to visualize how everything will come together without actual products to work with.
You might find yourself wondering how your theme will handle product galleries, whether your layout works with different product types, or how your store will actually look to customers.
The good news is that WooCommerce includes a complete set of sample products designed specifically for this purpose.
These aren’t just placeholder items – they’re professionally crafted products with high-quality images, detailed descriptions, and realistic pricing that help you see your store’s true potential.
We’ll show you how to add this sample data to your WooCommerce store in a few simple steps.
Once imported, you’ll have a fully functional demo store that makes it easy to test themes, fine-tune your design, and get a feel for how your customers will experience your shop.
What Is WooCommerce Sample Data?
Sample data in WooCommerce is a set of pre-made products that you can add to your online store for testing. It’s more than just simple placeholders.
The sample data includes a wide variety of product types, such as simple products, variable products like a hoodie with different colors and sizes, grouped products, and even virtual or downloadable items.
This allows you to see how your store handles different product layouts and features. Sample data can help you with:
- Testing: Making sure your online store’s design and features work well.
- Learning: Understanding how WooCommerce handles products, tags, categories, and other data.
- Designing: Seeing how things on your product pages, including images and descriptions, will look on your site.
- Tweaking: Letting you resolve potential problems with your WooCommerce theme and trying out essential WooCommerce plugins before going live.
Overall, sample data lets you set up and improve your store without the stress of using your real product listings. As a result, it enables you to offer a better customer experience when you go live with real products.
With that in mind, we will show you how to add sample data in WooCommerce. Here’s a quick overview of all the steps we will cover:
- How to Add WooCommerce Product Sample Data
- How to Create Sample Orders in WooCommerce
- How to Remove the Sample Data in WooCommerce
- Frequently Answered Question About Adding Sample Data in WooCommerce
Ready? Let’s get started.
☝ Important Note: To follow this tutorial, you will need to have a fully functional WooCommerce store. If you haven’t set yours up yet (or you are still in the process), check out our ultimate WooCommerce guide for beginners.
How to Add WooCommerce Product Sample Data
First, you can navigate to WooCommerce » Home in your WordPress admin area and click on the ‘Add your products’ step.
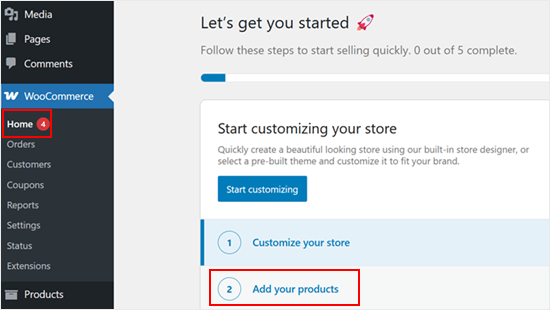
You will then see a step-by-step wizard to add your products.
From here, you can click on the ‘View more product types’ link.
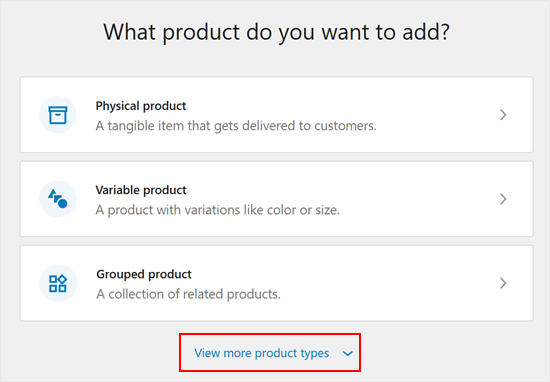
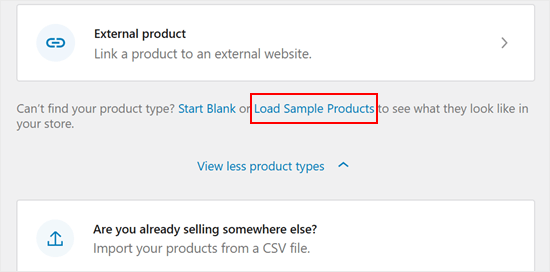
After that, you will see two extra options.
You just need to click on the ‘Load Sample Products’ button to start.
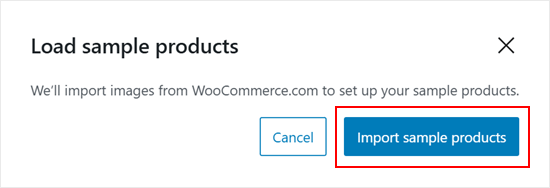
A new popup will now appear.
Go ahead and click on the ‘Import sample products’ button.
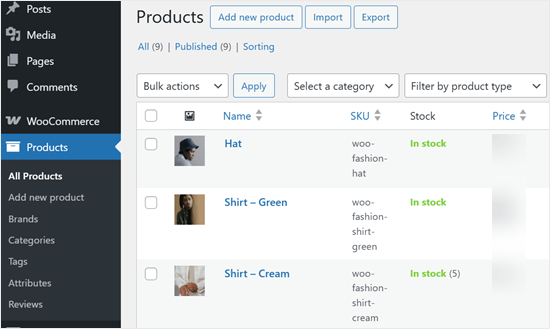
The sample WooCommerce products will then show up just like regular products.
Here, you can edit them just like any other WooCommerce product, preview them with your WooCommerce theme, and try out different WordPress plugins.
How to Create Sample Orders in WooCommerce
WooCommerce doesn’t come with a sample order generator. The easiest way to create dummy orders in WooCommerce is to simply go through the checkout process yourself. This lets you optimize your customer journey and boost conversions.
The good news is that it’s easy to do this without spending any money and changing your products’ prices.
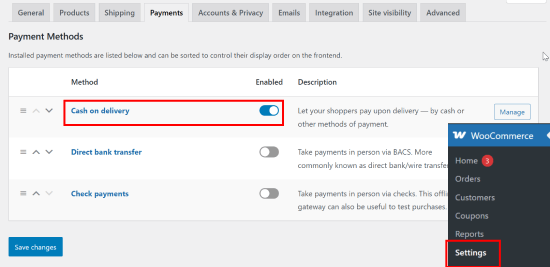
Simply go to the WooCommerce » Settings » Payments page in your WordPress admin and enable the toggle for the ‘Cash on delivery’ payment option.
Don’t forget to click the ‘Save Changes’ button.
Next, you’ll need to go to your store and complete the full checkout process to order some of the dummy products.
You should then see your orders on the WooCommerce » Orders page.
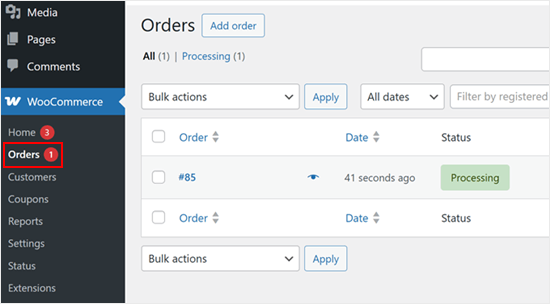
You can create as many sample orders as you want.
For more tips about optimizing customer journeys, then feel free to check out our actionable tips on the best ways to increase WooCommerce sales.
How to Remove the Sample Data in WooCommerce
After you’ve finished using your sample data, you can delete the dummy products and orders.
🚨Important: Be very careful during this step to make sure you only select the sample products and orders. If you have real products or customer orders in your store, we highly recommend making a complete WordPress backup before you begin.
This way, you can easily restore your site if you make a mistake.
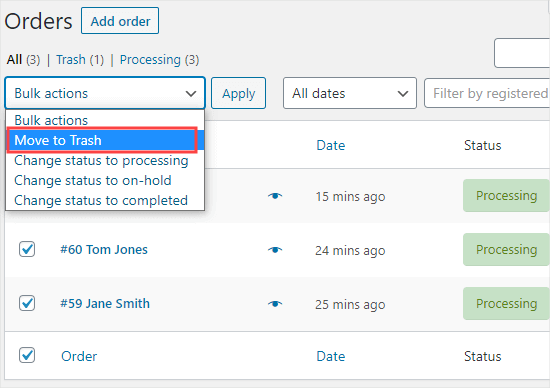
To delete orders, you can head over to WooCommerce » Orders in your WordPress admin. Here, simply select all the orders and use the ‘Bulk actions’ menu to move them all to the trash.
The next step is to select ‘Move to trash’ from the dropdown menu and click the ‘Apply’ button.
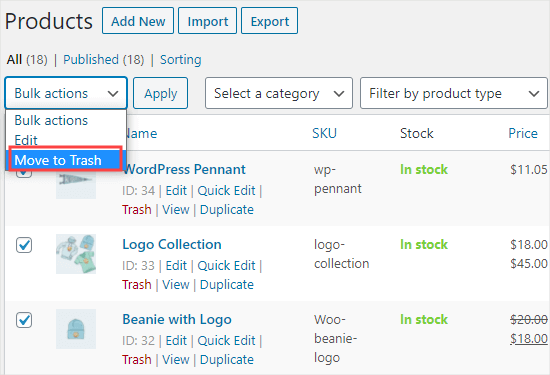
To delete products, you can go to Products » All Products.
Again, simply select all the products and use the ‘Bulk actions’ menu. Then, you’ll want to select ‘Move to trash’ and then click the ‘Apply’ button.
Frequently Answered Question About Adding Sample Data in WooCommerce
In this section, we’ve answered some of the most frequently asked questions about adding sample data in WooCommerce.
How do I import dummy data in WooCommerce?
The easiest way to import the dummy product data is by using the WooCommerce setup wizard, as we showed in the tutorial above.
For new stores, WooCommerce offers a ‘Load Sample Products’ button right on the dashboard, which is the simplest way to get started.
How do I create a CSV file for WooCommerce?
You can create a CSV file for WooCommerce with a spreadsheet program like Google Sheets or Microsoft Excel.
The most important part is that the first row of your spreadsheet must have the correct column headers that WooCommerce recognizes, like name, sku, or regular_price.
When you’re finished adding your products, save the file in CSV format. We recommend checking the official WooCommerce documentation for a full list of all available column headers.
How do I add custom data to a WooCommerce product?
The best way to add custom data like color, size, or material to a product is by using Product Attributes.
When you are editing a product, just scroll down to the ‘Product data’ section and click on the ‘Attributes’ tab. From there, you can create and assign any custom data you need.
Video Tutorial
We hope this article helped you learn how to add sample data in WooCommerce. Now that your store is ready, we recommend that you check out our article on how to set up WooCommerce conversion tracking and our ultimate guide to WooCommerce SEO.
If you liked this article, then please subscribe to our YouTube Channel for WordPress video tutorials. You can also find us on Twitter and Facebook.


Pasquale Mellone
I am in the middle of launching an e-commerce website and I want aware of the sample data feature. Very slick! Thanks for sharing!
WPBeginner Support
You’re welcome!
Admin