Getting your content spacing just right is important for readability and visual appeal.
After years of helping WordPress users perfect their designs, we’ve identified the most effective ways to control block spacing.
Whether you are dealing with too much space between blocks or need to add more white space, WordPress provides several options to achieve the perfect layout.
Best of all, you can make these adjustments without touching any code.
In this guide, we will share 4 proven methods for adjusting the space between WordPress blocks. These techniques will help you create more polished, professional-looking content that keeps your readers engaged.
Why Add or Remove Blank Space Between WordPress Blocks?
WordPress makes creating custom pages and posts easy with the built-in WordPress block editor.
However, you may notice that when you add certain blocks, there’s too much or too little spacing. By adding or removing blank space between your WordPress blocks, you can create custom page layouts exactly as you’d like.
By adjusting the space between blocks, you can group related content together or separate different sections. This helps guide your visitors’ attention and makes it clear which elements are connected.
What’s more, proper spacing helps break up content, making it easier for visitors to read and understand your information.
All in all, having more control over your final WordPress website design can lead to a better user experience.
That being said, let’s take a look at how to add or remove blank space between WordPress blocks on your website. Simply use the quick links below to jump straight to the method you want to use:
- Method 1: Adding Blank Space Between WordPress Blocks With Block Editor
- Method 2: Adding or Removing Blank Space Between WordPress Blocks by Adding Custom CSS
- Method 3: Adding or Removing Blank Space Between WordPress Blocks With CSS Hero
- Method 4: Adding or Removing Blank Space Between WordPress Blocks With SeedProd
- Video Tutorial
Method 1: Adding Blank Space Between WordPress Blocks With Block Editor
The easiest way to add blank space between your blocks is by using the Gutenberg block editor. There’s a built-in spacing block that lets you add blank space with a couple of clicks.
To use this, open up the post or page you want to edit and click the ‘Plus’ add block button.
Then, search for ‘Spacer’ and select the block.

This will automatically insert a spacer into the page.
You can make it bigger or smaller by dragging the block up or down.

Once you are finished, just click the ‘Update’ button to save your changes.
If you are using a block theme, then you can also use the Full Site Editor to adjust the block spacing in your theme templates.
Check out our beginner’s guide to WordPress Full Site Editing for more information.
Apart from inserting Spacer blocks, you can also increase the margin of your blocks to put more space between them and other blocks. You can explore these options in the Block settings sidebar.
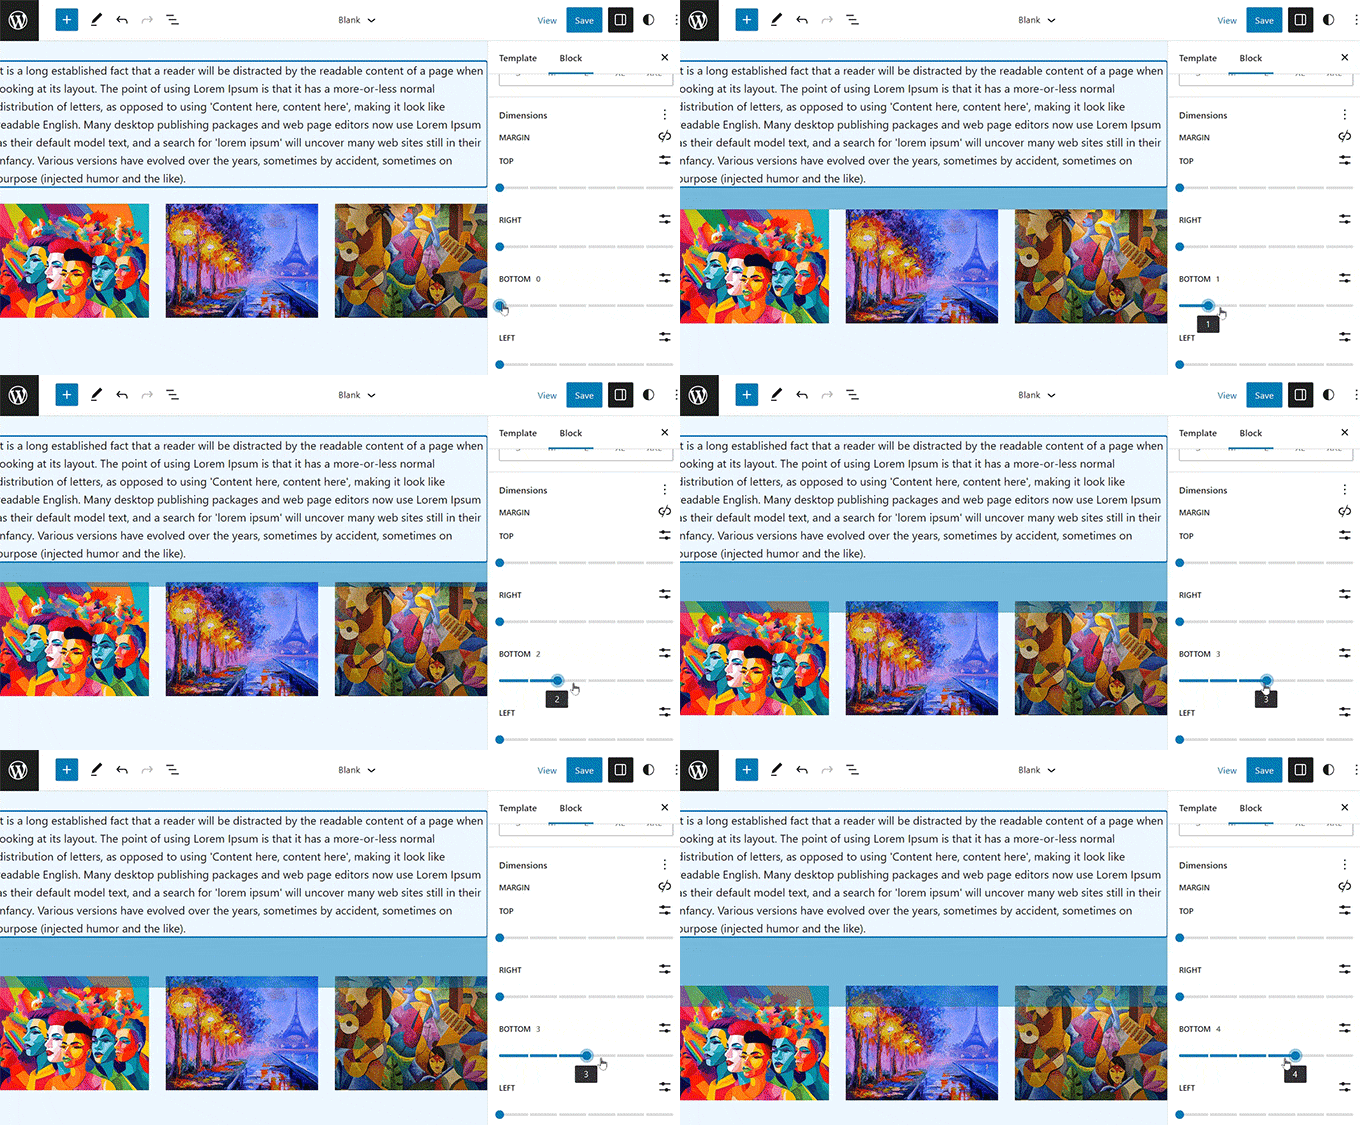
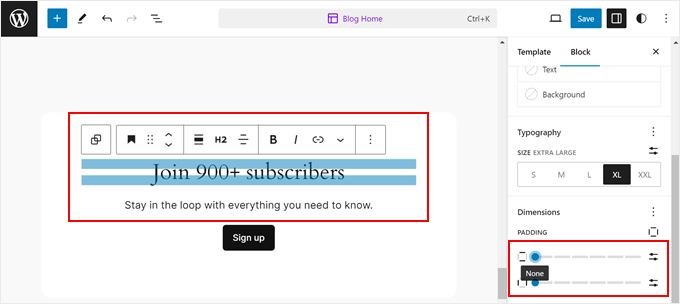
You can also adjust the block’s padding. The smaller the padding, the less space there is between the blocks, and some blocks have added padding by default. So you can think of it as a way to remove some spacing between blocks.
For more details, you can see our guide on padding vs. margin in WordPress.
You may also want to check out these guides for more ways to make the most of the block editor:
- How to Properly Use the More Block in WordPress
- How to Add a Line Break in WordPress (New Line Spacing)
- How to Select and Use Nested Blocks in WordPress
- How to Add Multi-Column Content in WordPress Posts (No HTML Required)
Method 2: Adding or Removing Blank Space Between WordPress Blocks by Adding Custom CSS
Another way to both add and remove blank space between your blocks is by adding custom CSS code to your theme.
If you haven’t done this before, then we recommend you take a look at our guide on how to easily add custom CSS to your WordPress site before you begin.
Next, open up the page or post you want to edit and then click on the block where you want to add or remove the blank space.
Then, click the ‘Block’ menu item in the right-hand options panel.

After that, scroll down to the ‘Advanced’ dropdown and click it. This brings up a set of additional options for that block.
Then, in the ‘Additional CSS classes’ box, just add the following code:
.add-remove-bottom-space
This snippet creates a new CSS class specifically for that block.

After that, click the ‘Update’ button to save your changes.
Next, navigate to Appearance » Customize to bring up the WordPress theme customizer.

Then, scroll down and click the ‘Additional CSS’ menu option.
This brings up a field where you can add CSS code.

Next, paste the following code snippet into the box:
.add-remove-bottom-space {
 margin-bottom: 0;
}
This code snippet sets the bottom margin to zero and will remove the blank space from the block.
If you want to add space to the bottom, then simply change the ‘0’ to something like’ 20px’.

Once you’ve made your changes, make sure to click the ‘Publish’ button to make your changes live.
If you’re using a block theme, you can read our guide on how to fix the missing theme customizer in WordPress to learn where to add the CSS code.
Saving Custom CSS Code Using a Plugin
By adding custom CSS to the WordPress theme customizer, it will only save for the theme you are currently using. If you change the WordPress theme, then you’ll need to copy over the CSS code to your new theme.
If you want your custom CSS to apply no matter what theme you are using, then you’ll need to use a plugin.
WPCode is the best code snippets plugin that allows you to add PHP, CSS, and more to your WordPress website without breaking anything.
We use WPCode ourselves, and we’ve found it to be the easiest and safest way to add custom code. To learn more, see our detailed WPCode review.
The first thing you need to do is install and activate the free WPCode plugin. For more details, see our guide on how to install a WordPress plugin.
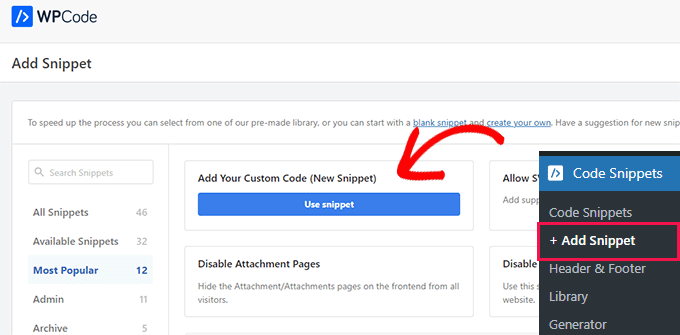
Upon activation, you need to go to Code Snippets » + Add Snippet from the WordPress admin dashboard.
Here, hover over the ‘Add Your Custom Code (New Snippet)’ option in the code snippets library and click the ‘Use snippet’ button.
You need to enter a name for your code snippet and then paste your custom CSS into the ‘Code Preview’ box.
Make sure to pick ‘CSS Snippet’ from the ‘Code Type’ dropdown.
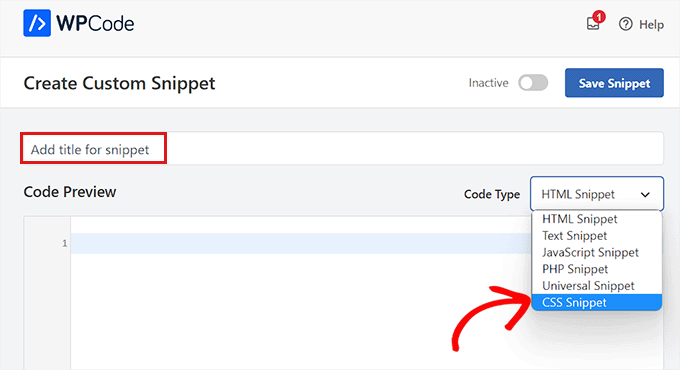
Then, just make sure to click the slider at the top to make your snippet ‘Activate’ and hit ‘Save Snippet’ to execute it on your WordPress website.
For more details, you can see our guide on how to easily add custom CSS to your WordPress site.
Alternatively, you can use the Simple Custom CSS plugin. Upon activation, simply go to Appearance » Custom CSS and add your custom CSS code.

When you are finished, just click the ‘Update Custom CSS’ button to save your changes.
Method 3: Adding or Removing Blank Space Between WordPress Blocks With CSS Hero
Another beginner-friendly way to add or remove blank space between WordPress blocks is by using a WordPress custom CSS plugin. This lets you make visual changes to your WordPress blog without editing any CSS code.
We recommend using the CSS Hero plugin. It lets you edit almost every CSS style on your WordPress site without writing a single line of code.
Great Deal: WPBeginner readers can get a 40% discount by using our CSS Hero coupon code.
The first thing you need to do is install and activate the plugin. For more details, see our beginner’s guide on how to install a WordPress plugin.
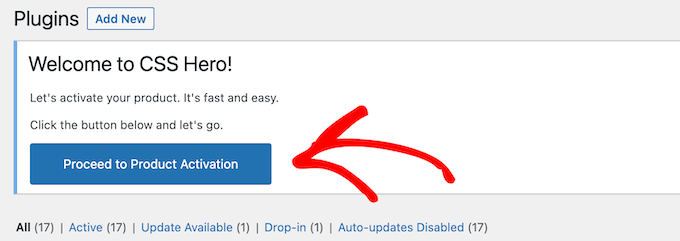
Upon activation, you need to click the ‘Proceed to Product Activation’ button to activate the plugin. You’ll find the button directly above your list of installed plugins.
This brings you to a screen where you need to enter your username and password. Then, follow the on-screen instructions, and you’ll be redirected back to your dashboard once your account is verified.
Next, you need to open up the page or post you want to edit, then click the ‘CSS Hero’ button at the top of your WordPress admin toolbar.

This will open up the same page with CSS Hero running on top of it. The plugin uses a visual editor, so you’ll be able to make your changes in real time.
When you click on any element on your page, it will bring up a toolbar on the left side of the page for you to make customizations.

To remove or add blank space between your blocks, simply click the ‘Spacings’ option and then scroll down to the ‘Margin-Bottom’ section.
Here you can move the slider up or down to add or remove blank space.

Any changes you make will automatically show up on your page.
Once you’re done making changes, you need to click the ‘Save’ button to make your changes live.
Method 4: Adding or Removing Blank Space Between WordPress Blocks With SeedProd
SeedProd is the best drag-and-drop page builder, used by over 1 million websites.
We’ve actually used SeedProd on lots of projects ourselves, and a few of our partner brands created their entire websites using the tool. For details, see our complete SeedProd review.

The plugin has a library of 300+ templates to create custom 404 pages, sales pages, landing pages, and much more.
You can even use it to create a custom WordPress theme without writing any code.
With the drag-and-drop builder, you have full control over the design of your site, and you can easily remove or add spacing to any website element.
To learn more, see our guide on how to create a custom page in WordPress.
As you’re customizing your page, you can add space anywhere by using the Spacer block.
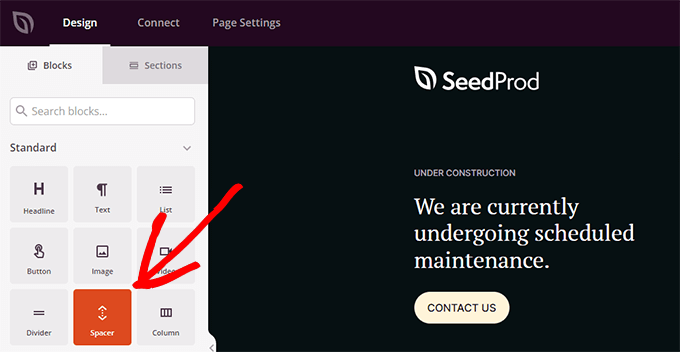
Simply drag and drop it anywhere on the page where you want to add more space between blocks.
Then, you can use the slider to adjust its height.
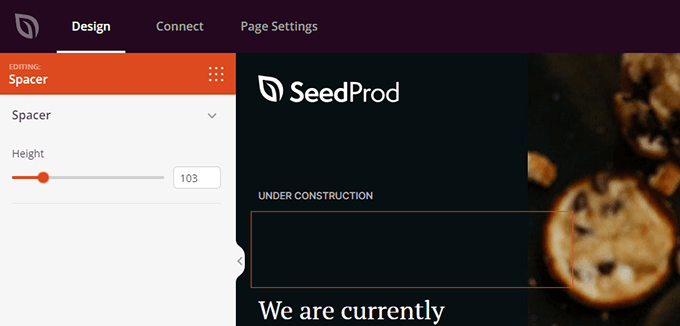
You can also control the spacing between any block. To do that, simply click on any block that you want to add or remove space from.
This brings up the options panel on the left. Then, click on the ‘Advanced’ tab.
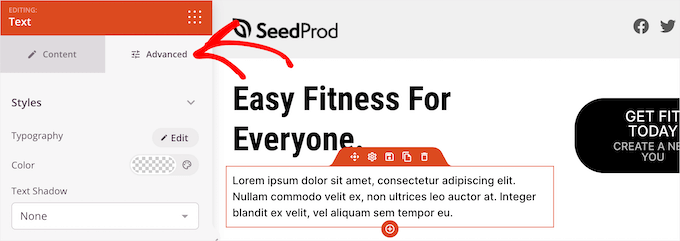
Next, scroll down to the ‘Spacing’ dropdown and click it.
This brings up a menu where you can control the ‘Margin’. Simply enter a number into the bottom margin box to add space or delete the number to remove any existing blank space.

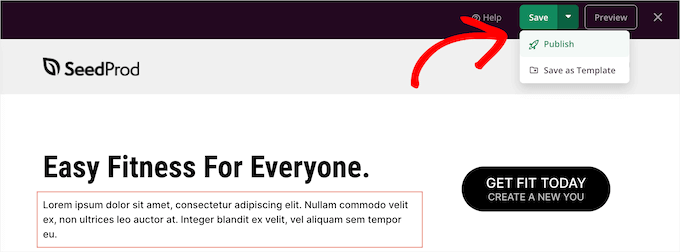
Once you have finished making changes, click the ‘Save’ button.
Then, select the ‘Publish’ dropdown to make your changes live.
Video Tutorial
If you don’t prefer written instructions, then just watch our video tutorial.
We hope this article helped you learn how to add or remove blank space between WordPress blocks. You may also want to see our guide WordPress post revisions and our expert picks of the best Gutenberg block plugins.
If you liked this article, then please subscribe to our YouTube Channel for WordPress video tutorials. You can also find us on Twitter and Facebook.


Kircho Svircho
I am looking for a way to mass manage all the default space between blocks in wordpress. The default space between paragraphs is too small and I want to know how to “rootly” change the settings and make it broader. No margins, no dimension settings emerge in my theme.
I want to ask you how to make a space between paragraphs like yours, without inserting spacers between each block, every time. It takes me 10mins per page to do this and its annoying
WPBeginner Support
To have the effect across the entire site, you would want to use CSS and target the paragraphs or use the plugins to simplify the process
Admin
Jennifer Gould
I tried to use this CSS to remove space between paragraph blocks, however nothing is working. I have even copied and pasted the CSS from your page directly, and it’s still not working. Does this method work as well when applying to paragraph blocks instead of image blocks?
WPBeginner Support
It should still work with other blocks, if our recommendations are not helping then your specific theme may have styling that is overriding other styles. If you check with the support for your specific theme they should be able to assist!
Admin